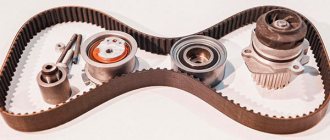
The parts that are responsible for opening and closing the engine valve are installed along with the drive belt. The belt is often subject to wear and tear and is quickly used up. change the VAZ 2109 timing belt yourself, without turning to specialists for help. In this article we have collected complete information. You will soon see that replacing the VAZ 2109 timing belt is simple and does not require special skills. Enjoy reading.
The engine GMZ controls the valves and cylinders. This set of parts begins to work using a belt. According to the standards, replacement of the timing belt and shaft belt in the VAZ 2109 and VAZ 21099 is carried out every 40-50 thousand km. Experts say: “If you have time to replace the belt, the driver will reduce the likelihood of cracks and breakage.”
Many car owners turn to specialists for help. But, as practice shows, it is quite possible to replace the belt on a VAZ 2109 yourself. Replacing the VAZ timing belt will not take you much time. Just follow the instructions.
Preparing to replace the belt
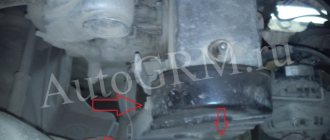
Replacing the crankshaft belt requires some preliminary work. To do this, lift the hood and remove a small section of the air duct pipe, loosening the fastening elements with a wrench. Then the protective front part of the belt guard . Before doing this, you need to loosen the three mounting screws. You can use a regular open-end wrench.
The front right wheel is removed in advance to gain access to the crankshaft. In the car, put the switch in the fourth position and ask an assistant to hold the brake pedal. Now install the 19mm socket on the long wrench. After the screw is unscrewed, you can put the gear in neutral and release the brake pedal.
When to change timing belt
As practice shows, the frequency of replacing a belt on a VAZ 2109 should be every 80 thousand km. But, most vehicle owners prefer not to bring the belt to the specified value, and change the timing belt after 45,000-50,000 km. The reason for replacement may be related to the operation of the equipment in different temperature conditions, as well as the unstable behavior of parts.
To avoid breakdowns, it is recommended to assess the condition of the belt. This assessment is carried out annually or every 8-15 thousand kilometers. To complete the inspection, it is important to remove the plastic front drive unit.
The belt should be replaced in the following cases:
- when scratches are detected;
- tears appeared on the belt or it began to delaminate;
- Oil began to appear on the belt (it is necessary to identify and eliminate the sources of engine oil spills).
Tools and materials
Before you start replacing parts, you should do a lot of preparation. First things first, prepare your tools and materials:
- a set of wrenches or sockets (sizes 8, 10, 17 and 19 mm);
- a screwdriver with a thick tip;
- rotary wrench for tension roller (industrial or handmade);
- tool for replacing spark plugs;
- marker for making marks on parts;
- cloth for cleaning the lid;
- new belt;
- video clip.
If you don't have a wrench, you can install the roller using two suitable pins and pliers. The pins are inserted into the holes and rotated with pliers.
Belt selection
When purchasing a timing belt for a VAZ 21099, it is important to focus on the manufacturer. According to customer reviews, products from Gates and Contitech factories have an ideal balance between quality and value. Many experts recommend installing a Gates tension pulley. The part has high build quality and can last for many years.
https://youtu.be/https://youtu.be/Z_pJOrI3-Hk
_
Preparatory work
Replacing the timing belt requires some prep work to get to it. To do this, lift the hood and remove the air filter pipe by unscrewing the fastenings of the retaining clamp with a wrench. Next, the belt protective cover is removed, for which you need to unscrew the three bolts that hold it in place. This is done with a regular open-end wrench. In the opened space, the timing belt will be visible, which needs to be replaced.
The front right wheel and the protection under it are first removed to get to the crankshaft pulley, which drives the gas distribution mechanism via a belt. In the cab, put the lever in the fourth gear position and ask the assistant to press the brake pedal. We install the head 19 on a long wrench so that it is convenient to get to the crankshaft pulley, which we unscrew, which will require some effort. After the bolt is broken, you can put the gear in neutral and not hold the brake pedal.
Removing the old timing belt
To remove the old belt, do the following:
- Unscrew the spark plugs. This will make it easier for you to remove the old belt.
- Rotate the shaft by the pulley bolt and mark the material. Experts advise turning the shaft several times to make sure that you are doing everything correctly. Accuracy will allow you to set the phases correctly.
- Mark with a marker the general position of the belt on all gears. This mark can be placed on the belt and other parts.
- Unscrew the nut connecting the tensioner pulley with a 17 mm wrench.
- Release the belt tension by turning the roller with a wrench or the pin with pliers.
- Carefully remove the old belt from the engine.
- Take the old part and compare it with the one you bought.
- Remove the tension roller. Many experts recommend changing not only the belt, but also the assembly along with it. In this case, it does not matter what state the node is in.
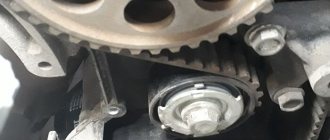
Timing marks VAZ 2109
In order for the engine to start after replacing the belt, it is necessary to install marks on the flywheel . What to do if you find a roller malfunction? In this case, it is better to replace it with another one as soon as possible. Despite the fact that it is wiser to do this in any case, so that there are no problems with the presence of a belt. If you can’t do this, try this: the nut that holds the roller is lowered using a 17mm wrench. We find a mark on the primary camshaft sprocket and connect it to the mark at the top.
How to set timing marks on a VAZ 2109? To connect the marks , remove the screw holding the camshaft sprocket, attach the marks to the crankshaft belt, and then secure it again.
Now you need to align the marks on the VAZ . To do this, locate the small elongated recess and point on the gear drive shaft. We put a drive wheel on the material for transmission. Afterwards, rotate your hands until the wheel hits all the VAZ 2108 timing marks . This is not difficult to do. The arm strength is enough to turn the pulley.
Occasionally the marks on the drive rod are not visible. After attaching the marks to the camshaft, make sure that all marks on the flywheel and housing are aligned. To do this, you must first remove the plug, after which the timing marks 2108 will become visible. If the VAZ timing marks do not match, then after replacing the crankshaft belt the engine will not rotate. Even if it starts, it will work unstable and chaotically. Therefore, try to approach this stage as responsibly as possible. Setting the marks is important for successful repair and subsequent operation of the machine.
Video
The procedure for replacing a camshaft belt and a worn pump is presented in a video from the Nik Nikolsson channel.
Aligning the timing marks is a very important step when performing many repair or adjustment work on the VAZ 2109. For example, this procedure is required when adjusting the clearances in the valve drive. This is quite simple to do, but it is worth devoting a separate article to this material in order to show everything more clearly and in detail.
To carry out this work, we will need a few simple tools:
- 10mm wrench or ratchet socket
- thin flat screwdriver
- jack
So, the first step is to lift the right front part of the car with a jack so that the front wheel is suspended. The photo below shows an example on Kalina, but there is no difference between the engines, so you shouldn’t pay attention to it:
Next, you need to open the hood of the car and remove the casing, under which there is a drive star for the VAZ 2109 gas distribution mechanism. It is usually secured with a pair of bolts from the end:
Next, remove the protective casing, moving it slightly to the side, as is more clearly shown in the picture below:
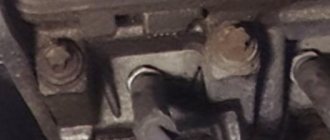
Now you need to put the gearshift lever in the 4th speed position and rotate the front wheel by hand, while looking at the camshaft pulley. It is necessary that the mark on the gear coincides with the protrusion on the cover:
That's not all. Now, using a thin screwdriver, we pry up the protective plug, which is located in the gearbox housing, next to the engine joint, and in this window, the mark on the flywheel should also coincide with the mark on the housing:
If your marks do not match, then you need to adjust them to set them clearly. To do this, we first ensure that the mark on the flywheel matches. If at this moment the marks on the camshaft do not coincide, then it is necessary to remove the timing belt from the sprocket and rotate it until the marks align. Throw the belt back on and then you can do all the work that is necessary.
Replacing a belt with an injection engine
The timing belt is installed only on one engine of the “nine” type - the cylinder volume is 2 liters. Using the fuel injection system did not adjust the camshaft drive chain. The procedure for replacing a part with an injection engine is very similar to the replacement process for a carburetor car engine.
The difference lies in several factors. You will need to do the following:
- Remove the crankshaft position sensor located next to the pulley from the engine. During disassembly, remove the plug from the socket, and then loosen the sensor mounting bolt. Then remove the sensor from the hole.
- To loosen the nut, unscrew the M13 nut located on the generator.
There are also some differences when reassembling:
- The drive wheel for transmission must be set as level as possible. To do this, it is necessary to install the upper mark of the first cylinder on the flywheel and metal housing.
- In this case, the nameplate of the gear must exactly match the gap on the nameplate. The installed drive wheel must be in front of the sensor.
- Pay attention to the gap. The gap between the parts should be no more than one millimeter.
- Once assembly is complete, start and test the engine.
Replacing the roller
Replacing rollers or other drive belt parts is very easy to do. The work does not require the use of special tools. Follow the step by step instructions:
- Remove the terminal from the battery to disconnect the vehicle from power.
- To prevent accidental rotation of the crankshaft, use installation tools.
- We unscrew the bolt that changes the tension, loosen and remove the belt.
- Remove the part (if there is a fastener, unscrew it).
- Replace damaged parts and fold the mechanism in reverse order.
Installing a new timing belt
The crucial moment has arrived. If the camshaft and crankshaft markings match, a new timing belt must be installed. If there are markings or writing on the belt, they should be in a clockwise direction, and if they are attached to a belt, the hand should be oriented as well. Before doing this, remove the old belt. If it is intact, check it. If you see that it is cracked, it is dangerous to carry out replacement work.
The belt is first installed on the crankshaft gear and then, with a little force, installed on the camshaft sprocket. When installing, wind the drive sprocket and tighten the roller with a saw.
Checking the timing belt tension is done by adjusting the tension roller.
But, there is an easier way to install a new belt. To install a new belt, follow these steps:
- Install the new tensioner in the desired position.
- Move the belt through the gears. If it is necessary to change the position, this can be done by turning the drive shaft clockwise.
- Rotate the roller until the belt is properly tensioned.
- Tighten the roller.
Why does the belt break?
Make sure that the belt is installed straight. Due to distortions, the belt is prematurely damaged and breaks. One of the reasons may be bearing failure. If a breakdown is detected, the bearings must be replaced, as there is a risk of coolant leakage and belt breakage.
How to tighten the timing belt of a VAZ 2109
To tighten the belt securely, turn the tension roller using a wrench. When the belt is installed correctly, the branch should rotate ninety degrees.
If you overtighten the belt, you will find overload on the bearings and other parts. Too much pressure is harmful to the belt, which may break during physical activity.
What you need to know
There are a number of signs indicating that it is time to change the timing belt on VAZ cars:
- black exhaust gases;
- uncharacteristic engine vibration during operation;
- difficult starting of the power plant;
- the appearance of noise in the motor.
If you replace a part, you must also change the roller. The pump requires mandatory diagnostics, as it rarely lasts more than 90,000 kilometers. These procedures can be classified as scheduled repairs.
If the belt breaks, the pump or pulley jams, then restoration work becomes unscheduled. To reduce the risk of such troubles, it is recommended to change the belt and its components more often - once every 35,000-40,000 kilometers.
How to set the timing belt on a VAZ 2109 video
After this, the protective timing belt is installed, for which it must be installed on the seat and the three bolts must be tightened again. Reinstall the air intake and secure it with the clamp. The metal and plastic guards are installed in place, the wheels are removed, and the vehicle is lifted off the jack. Then you can start the engine. It will start without problems, and its operation should be stable, without differences or insignificant sounds. This is only possible if all symbols match and the seat belt is tightened with sufficient force.
Experience shows that replacing VAZ 21099 and 2109 timing belts can be done independently, without the need for professional personnel at a service station, especially if it is a planned replacement and the belt is intact before replacement. You don't need any special tools, you just need a socket set with a door and keys, and a regular flathead screwdriver can do the job on its own.
If you are a beginner, replacing a VAZ timing belt can be a daunting task. We suggest watching a short video that explains in detail how to install the timing belt on a VAZ 2109.
How long does it take to replace the belt in VAZ 2108 and - 09 models?
When replacing the timing belt, try to follow the manufacturer's recommendations, but also remember that wear occurs on the gears. As a rule, replacement is carried out after 35 or 40 thousand kilometers. Some experts even recommend replacing earlier, due to the quality of the parts. But personally, I think the best option is to replace this belt after 25 or 30 thousand km, because the consumption at such a mileage cannot be called high.
- Try to clean the engine itself of oil, dirt and dust (in general, such cleaning is good for the engine).
- Then remove the protection cover that hides the belt itself in the drive.