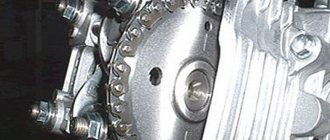
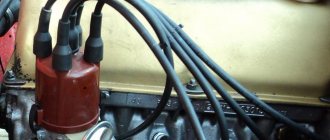
The VAZ 21126 power unit was designed for the Lada Priora; it became the base unit for this car. On the Priora, this engine has 16 valves in the cylinder head, which makes it possible to increase its fuel efficiency and power. The mechanism is driven by a toothed belt. This made it possible to reduce noise and weight of the power unit, and simplified engine maintenance. For trouble-free operation of the engine, it is necessary to change the timing belt in a timely manner. For its correct installation, there are marks on the rear casing, camshaft pulleys, and flywheel.
Timing marks on Priora
The VAZ 21126 power unit was designed for the Lada Priora; it became the base unit for this car. On the Priora, this engine has 16 valves in the cylinder head, which makes it possible to increase its fuel efficiency and power. The mechanism is driven by a toothed belt. This made it possible to reduce noise and weight of the power unit, and simplified engine maintenance. For trouble-free operation of the engine, it is necessary to change the timing belt in a timely manner. For its correct installation, there are marks on the rear casing, camshaft pulleys, and flywheel.
How to train a Lada Priora key
Remote control keys serve vehicle owners to quickly control the locking and unlocking of the car lock. Also, in cars of the Lada Priora modification, the keys help control the super-locking of doors, turning on and off the alarm system that responds to touch and vibration. Other useful functions of the remote control include controlling the trunk lid lock and raising and lowering the windows. In addition, it can be used as an electronic code key for the APS-6 immobilizer, which is a standard anti-theft device on the Lada Priora, as well as modifications of Kalina and Grant.
The delivery set includes two unprogrammed keys, as well as a “master key”, which is designed to “train” the entire system.
Structurally, the remote control key is mounted on the blade of the key designed to turn on the ignition of the car. Via wireless communication it provides control of the following nodes:
- signals are sent via the radio channel to the electrical package control unit and the door module on the driver's side;
- via a transponder channel, communication is carried out with the immobilizer control unit APS-6 or APS-6.1 and the electrical package controller.
Initially, the key is unprogrammed, and for its further operation it is necessary to carry out certain manipulations. First of all, it should be “trained”, using a coded, so-called red immobilizer key, after which it can be used by the car owner.
It must be remembered that two independent remote control keys can be used simultaneously with one security system.
Why are tags needed?
The operation of a four-stroke internal combustion engine occurs in a strictly defined order of movement of the pistons, opening and closing of valves. If this order is violated, the engine will not work, and in some cases it may fail. In the process of fine-tuning the power unit, the manufacturer selected the optimal phases for opening and closing the valves. At the right moment they are activated by the camshaft cams. To correctly set the valve timing when assembling the engine or replacing the timing belt, marks are provided.
Lada 2112 2007, 89 l. With. - with your own hands
Cars for sale
Lada 2112, 2007
Lada 2112, 2008
Lada 2112, 2008
Lada 2112, 2007
Comments 48
I don’t know what they write about here regarding belt tensioning on 2112; on PRIOR everything is tightened bit by bit through the tension roller. The right branch of the belt must already be laid through the guide roller: - through two camshaft pulleys, a crankshaft toothed pulley, through the pump and have sufficient tension. In this case, the marks on the camshaft pulleys and the crankshaft toothed pulley must be fixed to the corresponding counter marks. In this position, holding the belt with your hand on the left side of the branch, on the side of the tension roller, so that it does not weaken and does not jump over the teeth, no matter where and in what place (and this is possible even for one tooth), we place or slip the tension roller under the belt , insert its bolt and tighten everything with such a turn of the roller by hand that the belt does not loosen and does not jump over the teeth.
Next, spin the engine several times, or maybe it’s better, by the wheel with 4-5 gear engaged, and make sure that all the marks on all the pulleys match perfectly. How to recognize the mark on the gear ring of the generator drive pulley on the crankshaft, I have already written below and given a drawing. With the wheel removed and the stand hanging up with the steering wheel turned, this crown and the DPKV are clearly visible, or almost well, through the mirror.
Then, after cranking the engine several times by hand, carefully, slowly - and what the hell is not joking, the marks didn’t match when parked and the valves were bent with the starter, yikes, then you begin to tighten the roller to working condition.
At the moment when, when cranking the engine, the right branch self-tensions when viewed from the side of the pulleys - and the left one weakens, this is where you need to tighten the roller - like how everyone around writes and rips off each other. On a Priora, the tension of the roller may be weak or weak, the belt will jump, or the roller may be pressed against the belt so that it and other damn spare parts will become sick.
Don't be afraid to start the engine to see how your video lives when the engine is running. Nothing will happen to either the belt or the roller when adjusting in a tightened state. The main thing is that the belt does not dangle too much, otherwise it will either fly off or fly like plywood over the toothed pulleys and damn it, bend the valves. If the tension roller is dead, overtightened, the belt may hum a little from the tightening, which in turn will affect the PUMP because it will not last long from a strongly overtightened belt (of course it will not immediately fall apart) - then we begin manipulations to tension the roller . The ROLLER on a Priora should be alive when the engine is running. It should vibrate inconspicuously on the tension spring and this is clearly noticeable, and when you press the gas sharply it jumps, pushing up well with the belt and this can be seen even by a blind mole.
Camshaft marks
The VAZ 21126 engine has 16 valves, so for their operation two camshafts are installed in the cylinder head. One of them is responsible for the operation of the intake valves, the second is the exhaust valves. The camshafts are driven by pulleys through a toothed belt. Each shaft has its own pulley, which cannot be replaced with each other. The pulley on the right side of the motor (when viewed from the radiator side) has an insert for a phase sensor. The manufacturer applies marks to each pulley for proper assembly of the timing drive.
They are located on the crown of the pulley in the form of a protrusion in its lower part. These marks are called movable marks because they rotate with the camshafts. Correct installation of the pulley on the camshaft is ensured by a key. Only correctly installed Priora timing marks will ensure efficient use of its engine. The marks on the pulleys can have different shapes, depending on the manufacturer of the part. It is necessary to carefully wipe the outer part of the pulley with a rag, after which you can see the protrusion or recess as a mark.
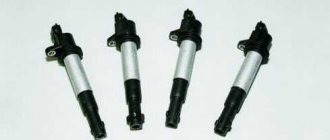
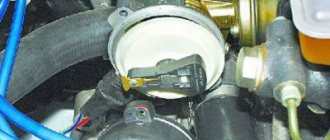
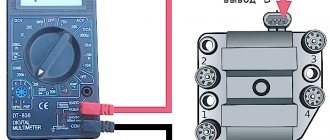
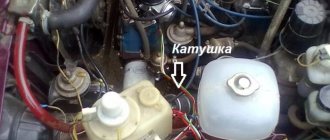
Types and differences of VAZ ignition coils
A car's gasoline engine operates by burning fuel. To ensure ignition, an electric spark is required, which is formed between the electrodes of the glow plug. They have a small gap that the spark must overcome. This is feasible when high voltage (tens of thousands of volts) is applied to the spark plug.
The vehicle's on-board system is not designed for such loads, and the equipment that supplies electricity is not capable of producing such values.
To solve this problem, a coil is introduced into the car's ignition system, creating a high voltage. A component of the vehicle's ignition system converts low voltage to high voltage (depending on the characteristics of the part from 6-12 V to 35,000 V). The tasks performed by the coil are determined by the structural features of the element. It consists of primary and secondary windings, which are housed in an insulated housing.
Attention! If malfunctions occur, it is recommended to check all engine components: from the valves and cylinder block to the ignition coil or module
Crankshaft marks
Installing the camshafts correctly in the desired position does not mean that this is enough to start the engine. Lada Priora has 16 valves, so if you do not synchronize the operation of all engine mechanisms, several of them will be damaged. To prevent this from happening, they must open or close at strictly defined times. The timing mechanism parts are driven from the crankshaft. The crankshaft has a gear at the output, the rotation of which is transmitted through a toothed belt to the remaining parts of the timing mechanism.
This gear is fixed on the crankshaft with a key; it will be impossible to install it in any other position. To correctly match the position of the pistons and valves relative to each other, there is an installation mark on it. It is located on the outside of the pulley in the upper part of the crown. Usually it is found opposite the tooth in the form of a slot, notch, or conical hole. Sometimes this requires wiping the working area of the pulley with a rag. The generator set drive pulley, which is removed from the crankshaft, may interfere with visibility.
Belt faults
Like any other car with a timing belt drive, the Priora belt may have the following malfunctions:
Cracking and delamination of the timing belt working surface is a consequence of:
- long-term operation;
- frequent temperature changes;
- contact with oil or coolant;
- malfunction of the water pump (pump);
- malfunction of the tension or support rollers.
These same factors, as well as improper tension adjustment, can cause belt deformation and breakage.
Marks on the motor housing
It will be simply impossible to install all the moving marks without additional landmarks, so they are applied to the motor housing during the manufacture of engine parts. The cylinder head has two camshafts, respectively, two pulleys. For the correct orientation of their installation, there is a notch on the rear cover of the timing belt for each pulley individually. They are two cutouts in the housing, which covers the working area of the belt drive.
It is important to install both camshaft pulleys accurately, otherwise major problems with the engine may occur. There is another landmark on the cylinder block in its lower part. This is a notch for correct orientation of the crankshaft. The pulley on this shaft operates in a recess in the oil pump housing. It is as if half-enclosed by a metal skirt. It has a slot as a timing mark for the crankshaft pulley.
Ignition control
Electronic ignition control
How to set the ignition angle? On systems with electronic ignition control systems, this can be done using computer diagnostics that connect to the Electronic Control Unit (ECU) or the “brains” of the car. And there you can see how the engine operates in real time - what signals are received from the sensors, what engine speed, fuel consumption, injection timing, ignition timing and other input and output data.
Basically, you don’t need to change anything during operation unless you change the firmware. That is, if the machine somehow began to work incorrectly, then most likely there could be several reasons:
- An incorrect signal is received from the sensors; in this case, you can replace the supposed faulty sensor with a replacement one that is known to be working, and see if the result changes.
- The voltage in the network is incorrect and, accordingly, the sensors give the wrong signal. The input signal to the sensor is 5V, if this indicator is different, the ECU will receive incorrect input data and the engine will not be able to operate normally.
- The ECU is faulty. Quite often it happens that after going through everything possible, it turns out that your brains have flown. But don’t worry, they are inexpensive at VAZ.
Therefore, as such, the ignition is not set on injection machines, it is already built into the system, but it is worth checking whether the marks are set correctly.
Adjusting the ignition marks on the VAZ-2110 injector
When the engine is running, there are some phases that must work synchronously, the camshaft must coincide with the crankshaft, and the timing of fuel injection and ignition must correlate with them. Let's look at all this using the example of the VAZ-2110.
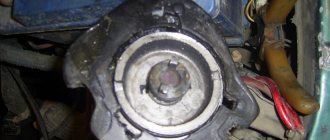
Marks on the flywheel
To reduce inertial masses and make it possible to start the engine with a starter, a flywheel is installed at the rear end of the crankshaft. It can only be locked in one position, so there is also an installation mark on the flywheel. Finding it is not so easy and inconvenient. The protective housing of the clutch mechanism has a rectangular cutout, which is closed with a rubber plug. It can be easily removed with pliers; putting it back will be a little more difficult. In the hole that appears after removing the rubber plug, a conical cutout on the body will be visible.
Now, rotating in any available way, the engine crankshaft is combined with this cutout, a notch on the flywheel in the form of a slot. This is usually done to set the piston of the first cylinder to top dead center. If the notches on the flywheel and its housing coincide, check whether the other reference points of the engine mechanisms match. If this does not happen, you need to turn the crankshaft one more revolution. It is worth remembering the fact that to complete a full revolution of the camshafts, the crankshaft rotates twice.
How to check if labels match
Most often, checking the alignment of the timing marks of the timing drive mechanism is performed when replacing the timing belt. Their position can only be checked when the protective plastic housing of the timing drive and the generator set pulley are removed. You can turn the crankshaft using the front wheel. To do this, lift the front of the car on the right side with a car jack. Next, you need to engage fifth gear, after which the assistant must rotate the raised wheel clockwise with his hands. This is done until the marks on the crankshaft and camshafts match.
Weak link: pump, roller, belt
The reasons for repairing the timing unit are most often broken bearings of the tensioner roller and pump, as well as the timing belt. The pump also has to be changed if the seal of the structure is lost, causing loss of coolant. To replace it, you will have to remove the camshaft pulleys and the rear protective cover of the casing. Remove the generator roller tensioner fasteners (3 bolts), unscrew the 6 bolts (10mm) securing the casing, two of which are located under the camshaft pulleys. After removing the casing, unscrew the 3 bolts securing the pump.
The marks on the pulleys must match
Setting the Gas Distribution phases according to the marks on the prior
Welcome! Gas Distribution Phases - almost before starting any work that is related to the timing mechanism, they require setting the Gas Distribution phases according to the marks, we will explain why this needs to be done, for example, let’s take the removal of the timing belt from the car, when let’s say you removed it, you can break phases if you hit the camshaft pulley (This most often happens), thus if the belt is re-attached to all the pulleys, then the phases will already be disrupted and the engine will not be able to work synchronously, in addition to all this, 16 valve engines usually bend the valves due to disturbed phases gas distribution, so you generally need to be more careful with these engines, but if you set everything to the marks before removing the same timing belt, then after installing it everything will remain the same and even if you accidentally touch the camshaft pulley, thereby shifting the phases a little, then you can immediately return everything to its place, because you will immediately see where the mark has shifted and you can easily align it again.
Note! To install the phases, you will need to stock up on: Socket wrenches, and also necessarily a hexagonal “5” one, because some of the bolts that secure the upper cover of the timing mechanism come with hexagonal heads, and you will also need a TORX T30 type wrench, which can be found in a car store and various like a screwdriver!
When do you need to set the Gas Distribution phases by tags? Before removing the timing belt, you must do this, and it is removed when carrying out almost any work that is related to the timing mechanism itself, that is, if you want to remove the tension roller, for example, which belongs to the mechanism, then the belt will have to be removed if you want to change the camshaft pulleys, again, the belt will have to be removed, etc., in addition, the phases are set according to the marks if they have been knocked down, if the work related to the timing belt is poorly carried out (it was installed incorrectly), usually incorrectly set phases do the following things to the engine: It starts very poorly starts and when starting, the speed jumps and the engine may even stall, but if you have a 16 valve car that bends the valves, then due to incorrectly set phases, as soon as you start it, the valves will immediately bend, the pistons will be damaged and the cylinder walls will be scratched, therefore, be careful with the phases and after replacing the same belt, always check whether you have set them correctly or not.
How to change it yourself?
Before changing the timing belt yourself, you need to study the diagram of the gas distribution mechanism, stock up on the necessary tools, and also imagine the order of work in the form of a sequence of actions.
Before replacing, study the timing diagram
There are differences between modifications of the VAZ 2112, but the basic algorithm is approximately the same for all modifications. This algorithm can also be used on VAZ cars of other modifications, for example, 2110. It is necessary to have a good manual that explains the progress of work step by step. And if you have at least a little experience in car maintenance and minor repairs, we can calmly carry out timing belt maintenance ourselves and change the necessary parts.
Tools and materials
The set of basic tools is small:
- socket heads for 10, 15 and 17;
- spanner or open-end wrench 17;
- large flat screwdriver;
- key for the tensioner pulley (if power steering is installed on the car).
The materials required are a new timing belt.
Step-by-step instruction
- The work begins by removing the negative terminal of the battery.
- Using a 10mm socket, unscrew the six bolts and remove the gas distribution mechanism cover.
- The crankshaft sensor chip is disconnected.
- The crankshaft sensor mount is unscrewed. Then you need to remove the sensor.
- The sensor hole must be aligned with the part of the pulley where there are no teeth. This is done so that the crankshaft sensor can detect TDC (top dead center). In addition, the area without teeth is used to block the pulley. After alignment, you need to put a 12mm hexagon in the hole of the sensor and fix the pulley.
- When the pulley is blocked, the generator nut is unscrewed.
- The belt tension roller bolt is loosened. After this, the belt is removed. Often during this operation the tension and support rollers and the pump are also changed.
- Installing a new timing belt. There are two ways to correctly install this part. First: put on the belt with the tension roller removed. The tension is adjusted after installing the roller. Second: install the belt by turning the exhaust camshaft pulley using a 17mm wrench.
- Next, you need to tighten the timing belt using the adjusting bolt. It rotates using a 10 key. Rotation clockwise increases the tension, counter-clockwise weakens it.
How to set the Gas Distribution phases by marks on a VAZ 2170-VAZ 2172?
1) To begin installation, you will need to remove all the covers that obstruct and prevent access to the timing mechanism; to remove the first cover, you will need to hang the right front wheel with a jack and then remove it from the car (How to remove a wheel, read the article: “Replacing a wheel on a car”), and when it is removed, use a screwdriver to unscrew one single screw that secures the mudguard to the fender liner (It is indicated by a red arrow) and two special screws for which only a TORX T30 wrench will fit (They are indicated by blue arrows) and once everything is unscrewed, remove the mudguard from the car as shown in the second photo.
2) Now open the hood of the car by pulling the opening handle located in the passenger compartment and as soon as it is open, look for the timing cover on the side of the engine and then remove it by unscrewing with a 5-point hex key all the hex head bolts that secure it.
3) Next, you will have to insert everything according to the marks, this is not difficult to do, especially if the Gas Distribution phases are not knocked down, in general, crawl again under the place where you removed the wheel and the mudguard and there will be a generator pulley and a bolt that secures it (The bolt is indicated red arrow), it’s difficult to turn it, but it’s still possible, and by the way, don’t forget to turn on the neutral gear and if the bolt turns hard, then remove the spark plugs (For information on how to remove the spark plugs, read the article: “Replacing spark plugs on a car”), but you don’t have to remove it (Do everything at your own discretion), but in this case it will be difficult to turn the bolt and by the way, turn the bolt clockwise until all the marks match, which are indicated in the paragraph below (In paragraph 4, be sure to read it).
Note! In addition to rotating the bolt, there are two more ways, they are simpler, but in this case you will have to put the wheel on, do it as follows, engage fourth gear and roll the car until the same marks coincide (This is the second method, the first was indicated in paragraph 3), or the third method, hang out any of the front wheels, also engage fourth gear and spin the wheel by hand until the same marks coincide, which method you will use, think for yourself, so by the way, the last two are the simplest if you don’t have a pneumatic key, of course which He will do all the work for you, and all you have to do is press a button!
4) Well, about the marks, let’s say, there are four of them in total on 16 valve cars and four more on other elements (Cases) where the marks should look, now we will explain in more detail, firstly, let’s start with the camshafts, when you turn the pulley mounting bolt or hang the wheel and turn it, make sure that the marks that are present on the camshafts (Marks A) coincide with the marks on the covers (Marks B), in addition, if these marks coincide, the flywheel mark must also coincide (There is a risk , see photo 3) with a triangular cutout and by the way, in order to see this mark on the flywheel, you will need to remove the rubber plug as shown in photo 2 and finally, find the last mark, to do this, remove the generator pulley from the car (How to remove it, read in article: “Replacing the timing belt on a VAZ”, read point 3) and before your eyes there will be a crankshaft pulley, on which the applied mark should coincide with the mark on the oil pump housing (see photo 4), if all these marks coincide, then that’s it good and you don’t need to adjust anything, or if you did the work to remove the timing belt, for example, then after setting the marks you can start working, but there is one But! If the marks do not match, this indicates that the phases are broken and require urgent adjustment (it is strictly forbidden to start the car in this case, so that the valves and pistons do not meet), the adjustment is not difficult, the timing belt is removed (you can see how to do this in the article, the link to which is given a little higher, and it is called: “Replacing the timing belt on a VAZ”) and then the necessary pulleys are scrolled until the marks match, after everything is set, the timing belt is installed in its place.
Checking and adjusting the tension of the timing belt.
If you want your belt to last long and trouble-free, it is important to maintain its tension in the correct position. To do this, periodically test the tension. Pay special attention to the first tension of the new belt. If the belt is loose, the lateral load on the teeth increases, which greatly accelerates their wear. In some cases, if the belt is very loose, there is a high probability of the belt teeth moving relative to the pulleys. This can lead, at best, to engine instability and loss of power. In the worst case, it will lead to expensive repairs. To check the tension, perform the following steps:
1. Unscrew the 5 bolts securing the protective timing cover and move the cover to the side.
2. Press the timing belt exactly in the center between the camshaft pulleys with a force of 100 Newtons (10 kgf). The belt deflection from the horizontal position should be no more than 7 millimeters. Modern tension rollers are also provided with a tension control mechanism. To check the quality of the tension, make sure that mark A on the outer part of the roller coincides with protrusion B.3. To adjust the tension, slightly unscrew the roller mounting bolt and, by rotating the roller, achieve complete alignment of the marks described above (see figure)
4. Secure the tension by tightening the roller mounting bolt.
5. Reassemble all remaining parts in the opposite order of removal.
How to set the ignition on a Priora 16 valves
Checking/adjusting the ignition timing
The ignition timing angle is the angle through which the crankshaft rotates between the moments of ignition of the mixture in each successive cylinder. The measurement is made relative to the TDC end of the compression stroke of the corresponding piston, the result is expressed in angles before or after TDC
Ideally, the air-fuel mixture in the combustion chamber of the cylinder should be ignited at the moment the piston passes the TDC position of the end of the compression stroke. In this case, the explosively growing pressure in the cylinder will push the piston down, thereby causing rotation of the engine crankshaft. Due to the fact that sparking between the spark plug electrodes/ignition of the mixture takes some time (fractions of a second), ignition should be done a little before the piston reaches the TDC position, otherwise the maximum pressure pushing the piston will not be achieved, which will lead to a decrease in the torque developed by the engine.
If you set the ignition timing to 10° before TDC, then the ignition of the air-fuel mixture in each cylinder will occur at the moment when the corresponding piston takes the corresponding position (10° before TDC of the end of its compression stroke). The above remains true only when the engine is running at idle speed. Maximum engine efficiency/fuel consumption savings can be achieved if the combustion process of the mixture in the cylinders is completed within 23° after TDC of the corresponding piston.
As engine speed increases, the pistons begin to move faster, and the spark plugs must ignite the air-fuel mixture so that its combustion occurs even slightly earlier than the moment when the corresponding piston reaches the TDC position. If the ignition is set too early, the increasing pressure in the cylinder will prevent the piston from moving upward, which leads to a characteristic knock, colloquially referred to as detonation. Ignition too late, as mentioned above, leads to a noticeable decrease in engine efficiency.
There are special alignment marks on the crankshaft pulley rim and timing cover. In this case, the mark on the pulley corresponds to the TDC position of the end of the compression stroke of the piston of the first cylinder, to the spark plug wire of which a strobe should be connected when checking/adjusting the ignition timing setting (make sure that the electrical wiring for connecting the strobe does not touch the blades of the cooling system fan!). In this case, the lamp flashes will occur synchronously with the moments of spark formation between the electrodes of a given spark plug. By directing the strobe beam to the pulley rim, you can easily determine the position of the piston of the first cylinder at the moment the mixture begins to ignite - the mark on the pulley rim will “freeze” opposite the corresponding division of the scale attached to the timing cover. When adjusting the ignition timing, it is necessary to achieve compliance with the regulatory requirements for a given vehicle model (see below).
The timing belt occupies an important place in the operation of the entire car. Without it, engine operation is impossible, since it ensures synchronization of the movement of the engine shafts: the crankshaft and two camshafts.
A belt inspection is carried out every 40-50 thousand kilometers. Replacing a belt is not an easy task, since if you incorrectly set the timing marks on the timing belt, your Priora will be in repair for a long time.
Negligence and ignoring this procedure will cause valve deformation. And this is an expensive repair. Therefore, prepare thoroughly for replacing the belt: you need a special tool and a partner. The replacement process consists of several stages.
Replacing spark plugs - step-by-step instructions.
Good day to all. Almost every car enthusiast has at least once replaced spark plugs or glow plugs on their own. We described replacing glow plugs here. Spark plugs are the most important element in the operation of any car. Their purpose is to ignite the fuel-air mixture in the combustion chamber.
The spark plug is the final element on which the entire car ignition system operates. Spark plugs are consumables and require periodic replacement during operation. This article will provide information on how to do this yourself and avoid mistakes.
When to change spark plugs
To understand the specific timing of replacing spark plugs, you need to refer to the technical regulations of the car on which this operation must be performed. This is done due to the fact that depending on the make and year of manufacture of the car, the requirements vary.
What's wrong with the weather and how does it affect spark plugs? You ask. Very simple. Partial dust, sand, dirt, water from the road gets onto the engine. In the process of replacing spark plugs, we observe sand in the wells, oil that flows from under the gasket (Ford), and even water (from above from under the plastic where the wipers are). It's different on different cars. Since the engines are located differently.
How to change spark plugs
Everyone knows this very well, but still many neglect the requirements for replacing spark plugs. Perhaps the rush prevents everything from being done efficiently. Or they do not represent the full responsibility of the matter.
Spark plugs are changed when the engine is cool. It must be taken into account that spark plugs operate at high temperatures, so if you do not cool the car after driving, there is a risk of burns.
In addition, since the cylinder head is aluminum and the spark plugs are steel, they have different expansion coefficients when heated, and a plug that is unscrewed from a hot engine can bite.
The spark plugs really bite and they break off or come out of the cylinder head together with the threads. When unscrewing long spark plugs, they turn 1.2 turns and get snagged. Short candles most often envelop the candle thread.
Preparing to replace spark plugs
Before removing the coils (or wires) and the spark plug itself, it is necessary to thoroughly blow off the working surface so that the dust and sand that accumulate on it do not get inside the cylinder and damage the cylinder mirror and elements of the piston group. This must be done with a professional, powerful compressor.
If there is no compressor, but you need to unscrew the spark plugs, then find one (for example, a tire shop, there is always compressed air there). I do not consider the case when replacement is required in an open field.
If you unscrew the spark plugs without cleaning and blowing out the spark plug well, sand will fall into the cylinder. In engines that are tilted, when starting, the piston will rub sand against the cylinder wall as an abrasive. It will be a bully.
Some will say that this is nonsense. But such cases do occur. The human factor is present everywhere.
How to tighten spark plugs correctly
Go ahead. Let's imagine that you have completed all the preparatory operations and the spark plugs have come out. Great. You are well done. Now you need to screw in the new spark plugs.
First of all, you need to carefully inspect all the new spark plugs one by one. There should be no chips on the ceramic insulator, the threads should be clean, good, and there should be no other externally visible damage.
- Carefully place the spark plug (without throwing it towards the spark plug well, so as not to damage the insulator) into the well.
- Fit the spark plug by hand. In case of biting, go through the thread in the head with a tap (if possible). Be careful not to drop the tap into the cylinder.
- Tighten the spark plug to the required torque using a torque wrench.
If you put a load on the spark plug that exceeds the recommended norm, the sealing ring will be overtightened, overheating will occur and there will be a possibility of destruction of the spark plug, which may simply break.
It is also possible to strip the threads of the cylinder head, which will require an expensive and complex repair. Thus, tightening the candles is an extremely important point and doing it “by eye” is highly not recommended, even though this rule may be neglected even in some services.
Thank you all for your attention. I hope that this information will be useful to all those who are interested in it. subscribe to the channel
Stay up to date with all events in auto repair
subscribe to the channel
. Stay up to date with all developments in auto repair.
Source
Step 1: Belt removal
First, unscrew the screws holding the shield that protects the entire mechanism from dirt. After removing the shield, it is necessary to remove the cover protecting the timing drive, located at the bottom front. To do this, you need to unscrew two screws. Then remove the belt from the generator drive. Here comes a very important moment.
It is necessary to install all shafts in the correct position. On the camshaft pulleys and the rear drive cover in the 16-valve version of the Priora car, the timing marks must match. This is done using the crankshaft. It must be turned to the desired position.
In a Priora car, the timing marks should not only be in relation to the camshafts, but also in relation to the crankshaft. To do this, remove the rubber plug in the upper part of the clutch housing and see if the marks match.
If on the flywheel it is located opposite the recess of the upper cover of the clutch housing, then everything is adjusted correctly. Often, when unscrewing a bolt, the valve timing is disrupted. To prevent this, the flywheel should be locked.
To do this, you will need a regular screwdriver of a suitable size. It must be inserted into the clutch housing between the teeth. It will be more convenient to use the help of a partner for this task. Next we proceed to the final stage.
1. Unscrew and remove the bolt for securing the pulley
3. Loosen the bolt securing the belt tension roller with a 15mm head
Tuning and replacement of the center console on Lada Priora and Kalina
Modern versions of cars are supplied to the market with a restyled version of the tidy. Here, a relatively old generation, navigation and a liquid crystal display appeared. Installing an updated shield requires the following steps.
Selecting the required version
There are only two types of updated designs with and without a CAN bus. The nuance is that the versions are completely identical in appearance. In order to find out which variety is suitable, you need to check the production date of the car. Machines manufactured before 06, 2012 are not equipped with this technology. The article numbers for the new devices with navigation are as follows:
- 2170-3801010-50 without CAN;
- 2170-3801010-60 with CAN.
Also in the kit you need to purchase a navigation antenna and a steering column switch of the appropriate design.
Installation nuances
For Lada Kalina versions, all devices are not equipped with a CAN module. Also the old generation of Priora. Here the installation is carried out without modifications or nuances - just snap out the old panel, remove the terminals, and mount the new set on the stock fasteners. Next, you need to install a navigation antenna on the roof and connect it to the appropriate connector. The second case is when an old panel with a CAN unit, but without navigation, is replaced with an analogue one. Here it is necessary to rearrange the contact connectors of the standard wiring from positions 10-11 to sockets No. 28-29. In case of incorrect operation of the devices, the replaced wires are swapped with each other. After the repair is completed, the counters should reset to zero.
Step 3: Putting on the timing belt
Before installing the timing belt on the Priora, the marks are checked to ensure they match. If they match, then install the belt from bottom to top.
In order to ensure that the marks do not move at the very last moment, it is better to put the timing belt on the 14th part of the pulley: Priora, the marks in the engine of which will move at least a little, go to a repair station with the first supply of the mixture to the cylinders. The next step is to tension the timing belt. The entire tensioning process looks like this:
1. Insert the special key into the grooves located in the tension roller.
2. Using a special wrench, turn the tension roller counterclockwise to tighten the belt.
3. Twist until the groove on the outer part of the roller coincides with the rectangular protrusion on the inner sleeve.
4. Tighten the tension roller bolt. Next we turn the crankshaft. Two turns will be enough.
We check whether the marks on the shafts are aligned. If the marks do not match, the timing belt on the Priora will fail at the first start, which will lead to deformation of the valves. We also pay attention to whether the groove on the roller matches the protrusion.
Diagnostic procedure
Checking the drive should only be performed on a cooled engine and consists of the following manipulations:
- Using a hex wrench, unscrew the cover fasteners (there are 5 in total) and remove the protection.
- Inspect the motor and determine whether the belt needs to be replaced. To do this, you need to turn on the 5th speed, lift the right front wheel and make several revolutions clockwise. There should be no cuts, cracks or peeling on the belt. If there are any defects, the drive must be replaced.
- Inspect the condition of the tension roller - it should also not be damaged.
- Check if the belt tension is as required. To do this, you need to press it between the camshaft gears. The deflection should be approximately 5-7 mm, if more or less, adjust the tension.
- Check the timing marks on the Priora.
Set the timing marks correctly - otherwise you will bend the valves!
The VAZ-21124 engine has a special feature: no matter how its pulleys are turned, it does not bend its valves. With the 21120 engine (16 v 1.5 l) such jokes will not work! If the pulley positions are not too far off, try putting on the belt and turning the mechanism to the “TDC 1 and 4” position. From now on, always use the following instructions:
- The crankshaft is set to the required position by checking the mark on the generator drive pulley (photo 1) or on the crankshaft pulley (photo 2);
Alternator drive pulley and crankshaft pulley
Exhaust and intake shaft pulley
In theory, on the VAZ-2112, marking is carried out the same way, no matter what engine we are talking about. Here are photos for engine 21120.
What it looks like in reality and in the instructions
Take the time to find the inspection window on the gearbox housing. There is another mark under the plug.
The last step is optional. And they do it so as not to redo all the work “from scratch.”
- The number of belt teeth between the “upper pulley” marks is exactly 16;
- The mark on the crankshaft pulley sometimes breaks off - use the control method “1” (photo 1) or “3” (lower photo).
Updates for VAZ-21124
On a 1.6 engine, all actions are performed in the same way as described above. There is one exception - the generator drive pulley is aligned according to the mark on the casing (see photo).
Generator drive pulley, motor 21124
However, if this mark is not there, use the proven method: 20 teeth are counted from the DPKV body. Instead of the 21st there should be a “pass”.
The timing pulleys can be rotated as you like - the pistons will not touch the valves in any case. Compare what the pistons of two different engines look like and it will become clear what we are talking about.
For those who don't understand anything
The number of teeth on the crankshaft pulley is 21, on the camshaft pulleys – 42. When the crankshaft rotates 360 degrees, the camshafts rotate 180. In general, a complete engine cycle consists of two crankshaft revolutions (720 degrees).
In theory, you can use an alternative configuration method. Let the camshaft pulley marks point straight down. Then the mark on the crankshaft pulley should face up (TDC 1 and 4).
If there is no fixing device, you can make it yourself. Even a puller for suspension springs will do (see photo).
see also
Comments 28
I recently changed the timing belt, everything was fine, I put a mark on the flywheel, a friend stuck a screwdriver into the crown so that the flywheel would not move, and I put on a belt, adjusted the pulleys along the way according to the marks, started it and everything sounded. By the way, without fixing the flywheel, I first lost the mark when setting the camshafts.
how much mileage do you have? I’m also worried about something. On the last Priora, the pump jammed, well, according to the valves, but on this one I don’t want to allow that to happen) now it’s 30 thousand. Now I’m wondering whether it’s worth changing now or driving a little more)
mileage 85500), it’s just that the previous owner only changed the belt at 60 thousand, but it’s better to change everything together - the belt, rollers and pump)
I also want the belt, rollers and pump all together) but at what mileage? ))
I think that up to 50-60 thousand it is pointless to carry out this work, unless of course there are no complaints about the operation of the pump and timing belt in general
I also want the belt, rollers and pump all together) but at what mileage? ))
I changed it every 50 thousand.
Thanks to all! everything was set up as in the pictures - the engine just whispers)
It is better to match the mark on the pulley than on the flywheel. Because it's more accurate
I always look at the mark on the flywheel. It is not necessary to unscrew the spark plugs: jack up the front right wheel, engage 4th gear, turn it, compare the marks on the camshafts, look through the window in the box, if there is no mark, then turn the camshafts one more revolution, look at the mark, if all the norms are set, then you will see the mark. If not, then look) The mark on the flywheel indicates more accurately. Everything is clearly visible through the window, but putting the rubber plug back is a pain.
I always look at the mark on the flywheel. It is not necessary to unscrew the spark plugs: jack up the front right wheel, engage 4th gear, turn it, compare the marks on the camshafts, look through the window in the box, if there is no mark, then turn the camshafts one more revolution, look at the mark, if all the norms are set, then you will see the mark. If not, then look) The mark on the flywheel indicates more accurately. Everything is clearly visible through the window, but putting the rubber plug back is a pain.
You shouldn’t put too much trust in the mark on the flywheel, because from the factory the flywheel can be rotated 180 degrees, as was the case for me, when replacing it, I set the marks on the flywheel and did not check the mark on the wheel, it turned out that the flywheel was rotated 180 degrees, as a result, an impact on all 16 there was no bend in the valves, but the prints remained on the pistons and valves; to calm my soul, I replaced the valves with new ones since the engine spins above 8000 and if the valve breaks at such speeds, the consequences will not be very good.
The basis of the operation of the gas distribution mechanism
When the mixture is compressed, a spark enters the working cylinder and the mixture explodes, pushing the piston. He pushes the connecting rod, the connecting rod pushes the crankshaft. Everything is known. The valves, by timely opening and closing, ensure tightness in the cylinder at the right moment and free inlet and outlet in other cycles. The camshaft controls these devices by pressing the valve mechanism with its cams. The Priora engine has 16 valves. They are controlled by two camshafts. And the camshafts are driven by the crankshaft via a timing belt.
To ensure that the valve timing matches and the drive is installed correctly, special marks are applied.
Timing timing marking points
They are applied by the manufacturer in several places and are divided into movable and stationary:
- On the body of the Priora engine
- On camshaft gears.
- On the crankshaft gear.
- On the engine flywheel.
Now in more detail about these tags.
On the engine body of a VAZ 2170
Here the mating marks are installed in three places. They are immovable:
- On the lip of the oil pump housing.
- On the flywheel housing.
- Marks on the plastic protection of the Priora timing belt
The first two types of marks are intended for mating the crankshaft.
That is, the risks on the gear and on the flywheel must coincide with them. The crankshaft drive gear is located in the oil pressure pump housing. This is a slot in the metal skirt that half-encircles the gear from above. It is clearly visible in normal lighting. Sometimes it can be “bombarded” with oil and dust. Then you need to wipe this place with a rag, and everything will be visible.
There is a special arrow installed on the flywheel housing, in the viewing window in the starter area. It must be taken into account that the top dead center is determined only by the average of the three marks.
Marks on the timing case
In fact, they are not located on the motor block, but the plastic casing is very firmly attached to it. Therefore, these notches are referred to as marks on the motor. These are triangular indentations in the upper section of the casing. They are perfectly visible and easy to use. Access to them opens immediately as soon as the outer part of the casing is removed.
Which rollers are better for the drive mechanism?
Gates rollers were installed on the Priora from the factory. Reviews say that this is not the best option, since the quality of the material in them leaves much to be desired, and the service life is barely long enough to replace the belt. Plastic, after all, is plastic. Therefore, when replacing a belt, you should still play it safe and install better quality belts and rollers. The Marel KIT Magnum is a pretty good kit, it includes two metal casters and a quality Contitech belt. They are even visually different, although they cost about 4 thousand. In a word, there are no special questions regarding the VAZ belt, but it is better to install the rollers from a third-party manufacturer and certainly metal ones.
Source