In accordance with the Traffic Rules, operating a car with external lighting devices that do not operate in the prescribed mode or do not meet the design requirements of the vehicle is strictly prohibited, since it contradicts the safety of drivers and pedestrians. Regular monitoring of the condition of light bulbs and their timely replacement will help you avoid fines, reduce costs and preserve your health.
Below is a table of lamps used in Lada Vesta and Lada Xray, as well as recommended manufacturers. We hope that this will help you understand the abundance of light bulbs offered on the auto parts market and make the right choice.
Vesta standard set of fog lights
It is important to understand that if you install it yourself, you instantly lose the manufacturer’s warranty. You can install PTF at a dealer, but the price for this service ranges from 30 to 60 thousand rubles.
What do you get for this money? Fog lights 261500097R with original bulbs have a power of 19W and shine rather dimly. Therefore, the price is about 3000 rubles. for a set of 2 pcs. fully justifies itself.
However, the headlights are far from the most expensive thing in the kit. The most money will have to be paid for the instrument panel wiring harness (about 20-25 thousand) and for the installation service itself at the dealer.
Lamp H8 and H11
Let's compare these two popular car bulbs. Some prefer H8 lamps, some prefer H11 lamps. To find out whether these lamps are interchangeable, you should study and compare their characteristics.
Let's take a closer look at the halogen lamps h8 and h11
- H8 is installed in fog lights and low beam headlights.
- H11 can be installed in both foglights and low beam headlights, which means they are universal.
Both models can be compatible with gas-discharge analogues. Thanks to this, you can create the maximum level of lighting.
The differences in appearance and structure are that the base of the H11 lamp is 2 mm longer than that of the H8. According to experts, you can install the 11th brand instead of the 8th and this will not affect the quality of lighting in any way.
Halogen light bulbs have a long lifespan, easily operating up to 2000 hours. Also, such lamps illuminate the space very well, compared to lamps of other operating principles.
Design features H8, H11
A halogen lamp is one that contains a buffer gas inside. Their operating principle allows for maximum illumination and minimal energy consumption.
The principle of operation of halogen lamps is that oxygen and halogen with the evaporating atoms of the tungsten helix enter into a chemical reaction, creating a powerful stream of light.
The main element of installation of certain lamps is the base. The socket not only holds the lamp in the socket of the socket, but also facilitates the transmission of electric current from the conductive parts to the filament system.
Also, the lamp base creates a seal on the bulb. We are considering lamp models with the abbreviations H8 and H11, but there are also such designations in the code of automobile lamps:
Features of an incandescent light bulb
- T. The letter T indicates that this lamp base is small.
- R - this designation gives information about the diameters, that is, the diameter of the base is 15 mm, and the diameter of the glass bulb is 19 mm.
- P - if such a designation, then this means that the diameter of the base is also 15 mm, and the diameter of the bulb is not more than 26.5 mm.
- W - means that the lamp has a glass base.
- H - indicates that this is a halogen lamp.
- Y - if there is such a letter, then the color of the cylinder is orange.
Replacing lamps in standard PTF on Lada Vesta
Durability is not about the standard Vesta PTFs, and often the cause of a breakdown is a blown fuse or the light bulb itself.
Let's figure out how to replace the standard PTF bulbs on a Lada Vesta:
- Turn the front wheel so that it faces outside the arch and access to the hatch is open;
- Remove the hatch;
- Unscrew the lamp while holding the socket;
- Disconnect the block with wires from the light bulb;
- Connect a new lamp and repeat all the above steps in reverse order.
Try not to touch the new lamp bulb with your hands. If this does happen, wipe it with an alcohol-soaked cloth.
DSC_9678 (Copy)
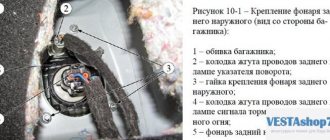
The turn signal lamp is located higher than the brake and side light lamps.
Shown with trunk trim retracted. The turn signal lamp is located higher than the brake and side light lamps. Shown with trunk trim retracted.
If you need to replace one of the lamps, just open the valve in the upholstery, secured with a Velcro fastener.
Choosing PTF for Vesta
If you still decide to save money and install fog lights yourself, you should start by choosing reliable and high-quality headlights.
There really are a lot of options, but good manufacturers put a hefty price tag on their products. And yet it is lower than installing PTF at the dealer.
Before purchasing, be sure to check with specialists about the compatibility of the headlights with your car. This need not be done if the article numbers match the original PTF.
Which headlights to choose - xenon, LED, halogen - is everyone’s business. We recommend giving preference to foreign brands:
- Osram;
- Wesem;
- Hella;
- MTF Light, etc.
When purchasing, be sure to check the integrity of the packaging and the headlights themselves.
Please note that if you have a “luxury” package, then you should think not about re-equipping the entire system, but about replacing diodes and lenses: this will be much cheaper.
High beam
- Korean MTF Light Magnesium H1 / 100W. Time to failure over 550 hours, light white color, two-layer coating. Luminous flux 1700 lm. (hereinafter referred to as the joint venture);
- MTF Light Palladium H1/55W. Manufacturer: Korea, bluish tint, brightness decreases after 400 hours of operation. SP 1700 lm.;
- Osram H1 Cool Blue 4000K: xenon color, German quality, operating time over 500 hours. SP 1700 lm.;
- Osram H1 Night Breaker: the light cone is 35 - 40 meters longer than its analogues. The light is bright white, operating time over 500 hours. SP 1700 lm.;
- Philips H1 Crystal Vision: temperature 4300 K, xenon color. SP 1700 lm.;
- Philips H1 Night Guide Double Life: new for 2022, uses tri-color lighting technology, bright white, cool, warm colors. Preventing glare from oncoming traffic. SP 1700 lm.
Related link:
Characteristics and dimensions of Lada Vesta car seats
Installation of fog lights on Vesta
Difficulties in installation are due to the fact that the Vesta electronics system is fundamentally different from previous Lada models, like the Priora or Granta.
Also take into account the fact that the signal to turn on the headlights comes from the steering column lever to the EMM unit, and only then to the headlights themselves.
The headlights-on indicator operates from the CAN bus signal. This is provided in a “luxury” configuration, and installing a similar system will be expensive.
To reduce the cost and ease of installation, we recommend avoiding significant interventions in the electronics. It is enough to get by with installation using a separate circuit and turning it on using a button rather than a lever.
Equipment:
- Fog lights;
- Power button;
- Relay 4-pin;
- Fuse 16A;
- 5-6 meters of wiring;
- 2 brackets for fastening;
- Facing panels for Lada Vesta 2 pcs.
This entire kit costs an average of 5-6 thousand rubles - it all depends on the selected headlights.
conclusions
This article discussed the simplest, but most expensive method of installing anti-fog equipment.
In practice, especially if your Lada Vesta is no longer under warranty, everything can be done at much lower cost using plastic corrugation, simpler wiring, a 16-amp fuse, and a 4-pin relay. In general, the installation sequence will not differ.
By choosing the most suitable method, you can equip your car with enough light for comfortable driving in the dark, when visibility is very limited.
Connecting electronics
- Route the wiring coming from the right PTF inside the box.
- The wiring into the car interior is routed through the standard hole, which is located near the pedals, and is fed into the button. The gasket must be placed over the steering shaft.
- The biggest disadvantage of installing foglights yourself is the indicator not working, however, there is a solution to this problem. In order to connect the light on indicator on the instrument panel, you need to remove the glove compartment and find the TsBKE there - the central unit of body electronics. In the “S1 Black” connector you need to find the 5th pin in the bottom row on the left and add a +12V wire there. After this, the indicator should light up when the PTF is turned on.
- We take power for the relay through the battery using a fuse.
- We connect “plus” from the side light fuse, marked F6 or F7. You can also use a cigarette lighter for this.
- The relay can be installed both under the hood and inside the cabin - there is no difference.
- Now all that remains is to hide all the wires and check the functionality of the installed headlights.
It is also possible to connect using a standard switch located under the steering wheel in the “Comfort” and “Standard” configurations. To do this, you will need a pulse relay, and all connections are made directly in the interior mounting block.
The main advantage of this method is that installation does not require disassembling the steering shaft housing below and the center console, and wiring can be used to a minimum. In addition, in this case it will be possible to turn on the PTF simultaneously with the dimensions and high beam.
DSC_9672 (Copy)
To replace the brake signal lamp and side light, stick your hand in, feel for the larger socket and, turning it counterclockwise, remove it from the hole in the upholstery.
To replace the brake signal lamp and side light, stick your hand in, feel for the larger socket and, turning it counterclockwise, remove it from the hole in the upholstery.
Further, for clarity, replacing lamps is shown with the trunk upholstery removed.
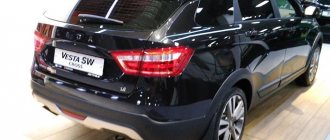
Rear lighting layout
External lights are those located on the fenders of the car, internal ones are those located on the trunk lid. You can see in more detail in the diagram below, all the component numbers in the table.
| № | detail number | the name of detail |
| 1 | 8450006963 | rear left lamp |
| 2 | 8450006965 | rear inner left lamp |
| 3 | 8450006962 | rear right lamp |
| 4 | 8450006964 | rear inner right lamp |
| 5 | 21910375701001 | rear fog lamp |
| 6 | 7703077469 | clamp |
| 7 | 7703033168 | hex nut with flange m5x0.8 |
| 8 | 7703077469 | clamp |
| 9 | 7703033168 | hex nut with flange m5x0.8 |
| 10 | 7703017138 | Large pan head screw |
