Using two 17mm wrenches, unscrew the nuts of the two bolts securing the bracket on the right side member of the body.
The lower bolt can be removed immediately, and the upper bolt can be removed along with the bracket.
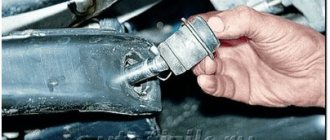
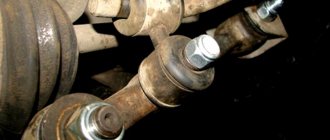
We take out the cotter pin and use two 19mm wrenches to unscrew the upper nut from the axis of the pendulum arm.
We remove the axle with the lever from the bracket.
The bracket contains two plastic bushings (sliding bearings). At both ends of the axle there are two flats on which lock washers are installed. Rubber seals are placed on the bracket shoulders and the outer part of the bushings, which are held in place by lock washers. The plastic bushings should fit tightly in the bracket, and the lever axis should not have radial play in the bushings. When the bushings are worn out, replace them with new ones. When assembling, add Litol-24 or Fiol lubricant to the pendulum arm bracket. After tightening the upper nut, we check the turning torque of the lever axis in the bracket. The lever should rotate when a load is applied to its free end within the range of 1–2 kgf. Install the pendulum arm bracket in the reverse order of removal.
PENDULUM, WHAT'S INSIDE, WHICH PENDULUM IS BETTER, TIPS. replacing the pendulum of a vaz 2106
Steering rods VAZ, Diagnostics, tips. REPLACING THE PENDULUM OF A VAZ CLASSIC. Replacing the pendulum on a classic
How to adjust the steering gear
Adjustment of the steering gear may be necessary if the steering wheel becomes very difficult to turn or a slight sticking is clearly felt when turning the steering wheel. Adjustment is carried out using a 19-mm open-end wrench and a flat-head screwdriver. In addition, for precise adjustments you will definitely need the help of a partner.
- The car is installed on smooth asphalt. The steering wheels are installed straight.
- The hood is opened, the steering gear is cleaned of dirt with a piece of rags. There is an adjusting screw with a lock nut on the crankcase cover of the gearbox. This screw is covered with a plastic cap, which will need to be pryed off with a screwdriver and removed.
Adjusting the steering column play
The need for adjustment arises after repair of the unit or when large play appears when turning the steering wheel. If the mechanism has a large free play, the wheels lag somewhat behind the movement of the steering wheel. To make the adjustment you will need:
- flat screwdriver;
- 19 mm wrench.
We align the steering wheel in the center, and then perform the following actions:
- Using a 19 mm wrench, unscrew the nut located on top of the steering gearbox.
Video: adjusting the steering column play on a “classic”
Replacing silent blocks on the lower arm of a VAZ-2107
Now the replacement process itself. Let's start with the lower arm of the VAZ-2107:
- For ease of work, we place the car in a viewing hole and immobilize it using a handbrake and wheel chocks installed under the rear wheels;
- We do not remove the wheel on the side where the replacement is being made, but it will have to be jacked up;
- We install wooden stands under the ball joint of the lower arm. After this we lower the jack. The height of the stands should be such that the wheel hangs out. Thus, we unload the lower lever;
- We unscrew the nuts securing the lever to the axle, having previously treated them with WD-40;
- You can press out silent blocks on this lever without any tools. Let's look at how to remove the front hinge (which is located closer to the front of the car). Before starting the process, you should generously treat the silent block with WD-40, making sure that the product gets inside between the axle and the inner race of the element.
- We take a pry bar, which will be used as a power lever, and rest it on the rear bolt securing the axle to the body (which is closer to the rear hinge). Using a pry bar, we move the lower arm back, while the silent block will rest against the car body. Using a pry bar to create force, we strike the side surface of the lever with a hammer. Since the hinge rests on the body, and the lever moves towards the rear of the car, the force created, including impact, leads to the silent block being pushed out of its seat. We do this until the hinge comes out of the socket as much as possible. Then we remove it by prying it with the same pry bar or a reinforced screwdriver.
- Before planting the new element, generously lubricate the seat and the silent block itself with soapy water;
- After removing the old rubber element, the seat will lower slightly relative to the axis, so before doing this you should lift it, centering the position of the hole;
- For pressing, you will need a piece of pipe whose walls will rest against the side of the holder (it will act as an extension). We put the silent block on the axle, having first moved the lever back as much as possible with a pry bar. We put a piece of pipe on the hinge and hit the attachment with a hammer until the side rests against the body of the lever.
In this simple way we press out and press in the front silent block. The rear hinge changes in a similar way, but there are several nuances.
First, you need to put on a washer and screw on the fastening nut from the side of the front hinge, having previously lubricated the threads and the axle itself with nigrol (the next time you replace it, it will be easier to unscrew the nut, and the possibility of the silent block sticking will be eliminated), so that during the process of pressing out the rear element, the lever rests against it.
Secondly, good access will be hampered by the steering end, which must be removed.
To do this, we use either a ball joint remover, or we remove it from the seat by creating tension with a pry bar and striking the socket body with a hammer.
How to identify a faulty pendulum
The easiest way to determine if the lever is faulty is to listen for knocking noises while driving on rough roads. You shouldn’t deliberately drive into a hole or run over a bump, so you can pull over to the side of the road and experiment
But this is not the only way to determine the malfunction of such an important part as the pendulum
The second way to determine whether the VAZ 2107 pendulum arm is faulty is the presence of large play in the steering wheel. This can be determined quite simply by turning the steering wheel in one direction and the other. But the most common case of pendulum failure is the presence of load when turning the steering wheel. But these factors do not always indicate that the pendulum lever is the culprit. Malfunctions with such symptoms may include loosening of the bolts or overtightening of the adjusting nut. Therefore, before you start replacing the device, you should definitely make sure that it is broken. This can be done after dismantling it. The first sign of a part malfunction is the presence of defects on its component elements, so to determine the failure you will need to disassemble the mechanism.
Location of the pendulum on the VAZ 2107
This product is located on a VAZ 2107 car from below the engine compartment. You can see the pendulum when you open the hood and look at the bottom of the car on the passenger side. It is most convenient to dismantle or examine the device from below from an inspection hole or on an overpass.
A bipod extends from the pendulum, which controls the rotation of the front wheels of the VAZ 2107. The photo below shows a view of the pendulum arm on the VAZ 2107.
Removal and repair of the pendulum
To carry out the work, you will need to stock up on a standard set of tools and a steering rod puller, and then begin the work process:
After removing the product, it is replaced or repaired. Installation of a new pendulum arm is carried out in the reverse order of removal. It is advisable to replace the pendulum arm only if it cannot be repaired. In frequent cases, the product can be repaired, which many motorists do on their own.
Repair of the mechanism is carried out using the following procedures:
The product is assembled in the reverse order of removal, but initially all parts should be lubricated with Litol-24
This completes the replacement of such an important device on the VAZ 2107. After assembly, you should check the steering wheel play
Currently, pendulum arms with rolling bearings are also sold on the market. There are different reviews about the reliability of this option. Everyone is inclined to believe that the pendulum on bearings facilitates the rotation of the steering wheel and lasts several times longer than the factory one, but it is not repairable. In the end, the choice is yours.
Source
Failure of the steering mechanism
When the gearbox finally fails, the ability to drive the vehicle is completely or significantly lost. How to timely determine the “quick end” of the steering mechanism of a VAZ 2106 car, so as not to encounter this at the most inopportune moment? There are several “warning lights” that indicate that the mechanism in question needs replacement.
| Problem | Causes and consequences |
| 1. Extraneous squeaks are heard when turning the steering wheel | This may indicate that a foreign substance of an abrasive type has entered the gearbox, or an internal breakage of the worm or gear. Possible jamming of the unit, loss of control over vehicle control functions |
| 2. Significant play in the steering wheel | In most cases, play is caused by loosening the adjustment bolt and is eliminated by tightening it. If such a measure does not produce results, therefore, the gearbox of the VAZ 2106 car must be replaced |
| 3. Oil leak | This may mean either a rupture of the sealing gasket or a crack or hole in the housing. This is fraught with high oil consumption, insufficient lubrication of the steering mechanism and acceleration of its inevitable failure. |
| 4. Difficulty turning the steering wheel | The reason is insufficient lubrication, displacement of the engagement angle of the worm and gears, partial jamming of moving parts and mechanisms. It is fraught with increased driver fatigue during a long trip, complete jamming of the unit, loss of control over vehicle control functions |
| 5. Knocks and vibrations in the gearbox, which are felt through the steering wheel | The reasons may be: a loose adjustment bolt, failure of sealing couplings and gaskets, or wear and tear of mechanisms moving in mesh. Possible jamming of the unit, loss of control over vehicle control functions |
Replacing a vehicle gearbox is not a particularly difficult task, but this does not mean that it does not require careful preliminary preparation. First of all, you need to decide on the tools that will be used for the removal: which ones are available and which ones need to be prepared or purchased.
In order to replace the steering mechanism on a VAZ 2106 car, you need to acquire a set of wrenches, pliers, pliers, and a device for pressing out the pins of ball joints. Without the latter, the replacement process will become quite noticeably more complicated, which may affect the quality of the work performed. Therefore, you should not save at the expense of your own safety and comfort.
Because due to poor installation of the control mechanisms of the VAZ 2106 car, they can fail at the most inopportune moment, which will expose the lives of the driver, passengers and other road users to unreasonable danger. Next, it is necessary to carry out a superficial inspection of the gearbox housing for damage and assess the external condition.
It is located in the engine compartment, under the main brake cylinder of the car. In case of significant contamination, it is advisable to clean it from dust, dirt and oil stains. This will increase the speed and convenience of replacement work.
Replacing the swing arm
If repair is not possible, you can install a new swingarm and secure it. The procedure is the reverse of removing the pendulum from the car body.
Replacing the pendulum on a VAZ 2107 is a fairly simple process. You can make it yourself.
The first signal that needs to be taken into account and the pendulum replaced is a bent bipod of the pendulum arm. It is possible to carry out repairs to replace the pendulum without an overpass. Initially, it is necessary to dismantle the main filter housing so that it does not interfere. Next, you need to unscrew the castle nuts of the tie rods, as well as the ball pin nut. After this, it is necessary to press out the ball pins of both steering rods. To do this, a long steel rod is used, which is struck with a hammer.
Where is the swing arm located?
It is located under the bottom of the car, you can see it by opening the hood of the car and looking at the very bottom of the engine compartment, and the easiest way to look at it is from the bottom of the car, to do this, climb under the car and find the lever there that comes from the pendulum itself, and for clarity, this lever is indicated by an arrow.
Pendulum VAZ 2107: replacement, repair
Rear-wheel drive vehicles have a pendulum arm. In VAZ 2104 and VAZ 2107 cars, this is an important part of the steering linkage. It functions as a support on the right side and guarantees the desired steering angle ratio.
Functions and purpose
The steering gearbox is installed on the driver's side, and the steering pendulum mechanism is connected to the bipod on the passenger's side. They are connected to each other by a steering rod and serve as support points. The driver controls them by acting on the steering rod. The pendulum body is made of cast iron or aluminum and has the shape of a cylinder with holes for attaching it to the spar or to the frame. In the center, an axle is inserted through a hole, which is threaded through the body and makes the handle more movable, and also serves as a support for the steering rod. The other end of the bipod moves like a pendulum and therefore has this name.
Types of pendulums for VAZ 2104–2107
In the manufacture of pendulum levers, bushings are used, and the bearings on which the lever axis rests. They are designed to provide longer service life for moving parts. Manufacturers believe that bushings are more durable because, unlike fragile bearings, they are not subject to influences other than abrasion. However, both materials are subject to wear. If the elements are worn out, the driver will feel more tension in the steering wheel than usual, and it becomes difficult to control the car due to increased play. When hitting a hole or bump, extraneous knocks begin to be heard from the side of the pendulum, and the steering wheel travel increases. And if the mechanism itself is damaged, the bolts are loosened, or the adjusting nut is overtightened, then the wheel will rotate more tightly.
The designers tried to make the pendulum airtight and isolated the internal cavity of the body with two rubber rings, but usually after traveling 45–90 thousand km it has to be completely changed. When a car drives onto country roads, all the dirt is pulled inside.
Rolling bearings solve this problem; they are little subject to wear from contamination and do not require additional lubrication. But, unfortunately, not all manufacturers supply high-quality products to the market.
Selection of pendulum lever.
When choosing bushings or bearings, you need to rely, first of all, on the quality characteristics of the product. So, bushings can be made of polyurethane and will last longer. The pendulum handle on bearings moves more easily and freely, therefore it does not put stress on the steering wheel and is considered by many drivers to be more durable, but in fact, it all depends on the quality. If you buy a good product, you will not have to repair or replace it often.
Replacement of the pendulum lever of VAZ 2107, VAZ 2104.
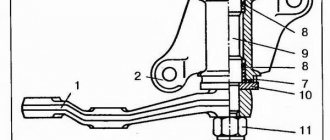
Pendulum design for VAZ 2104 - VAZ 2107 1 - bipod; 2 — bracket body; 3 — washer; 4 — adjusting nut; 5 - cotter pin; 6 — upper washer; 7 - seal; 8 — bushing; 9 – axis; 10 — lower washer; 11 - lock nut.
Many owners of VAZ 2104 - VAZ2107 cars buy, make repairs and change the pendulum themselves.
To do this you need:
- prepare tools, use the repair kit for the VAZ 2107 – VAZ 2104 pendulum;
- remove the front right wheel;
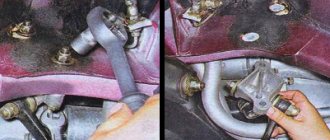
- unscrew the nuts securing the bracket on the right side member;
- the most time-consuming part is pressing out the ball pins of both steering rods. It is better to use special ones for these purposes. puller for tie rod ends. But you can also go a cheaper way: to do this, you can take a steel rod and rest it on the ball pin, the nut is not completely unscrewed, and start hitting it with sharp blows of a hammer.
This must be done carefully so as not to strip the threads or flatten the castle nut, so it is better to screw on another nut.
- remove by unscrewing two nuts, while on the other side you need to put on an adjustable wrench that will keep the bolt from turning;
- unscrew the top nut;
- remove the axle from the bracket. During assembly, add lubricant to the pendulum arm bracket.
- The bushings should fit tightly in the bracket, and the axle should have no radial play. When the bushings are worn out, replace them with new ones.
- check the turning torque of the axle - by tightening or loosening the nut, observe while turning the bipod. When turning, the bipod should “walk” easily and without effort. The lighter this force, the less it will be transmitted to the steering wheel.
Designs on bearings cope better with this task.
- check the play on both sides;
- tighten the top nut;
- install the bracket in place.
Repairing the pendulum on a VAZ 2104 - VAZ2107 car is not difficult and will not take much time, but to be sure of the result, it is better to contact a professional.
korchim.ru
Knock in the front suspension on small bumps: causes and possible breakdowns. Car repair
Car enthusiasts, and especially beginners, are afraid of any extraneous sounds when the car is working or moving. Often, when driving, an incomprehensible knocking sound from the front suspension may appear on small bumps at different speeds. Inexperienced motorists immediately go to a service station to solve problems, but specialists in most cases, after diagnosing the chassis, find nothing. But the knock remains, and something needs to be done about it. There is no need to rush to buy new parts for the chassis. It may well be that the reason for this knocking is a mere trifle, a trifle. Let's try to understand this issue, because the price of the front suspension is quite serious (repairs cost up to 500-1000 dollars), so it is so important to find the reason yourself.
Common reasons
Sounds may occur due to a defect in the suspension system arms.
How to check silent blocks?
A flat mount will be required for diagnosis. This will allow you to determine how badly these parts are worn. Using the mount, the lever will move in the longitudinal and transverse directions. If there is play or damage, then the front suspension silent blocks are to blame for the knocking.
Sometimes the levers can be collapsible. Then you can replace it with a silent block. To do this, the lever is dismantled, and then, using a special mandrel, the part is squeezed out. It is advisable to lubricate the new silent block before installation. The seating surface must also be cleaned. After installation, the knocking should stop.
Steering
Even for experienced service engineers from numerous car repair shops, finding the cause of extraneous knocking noises is a serious problem. Many people immediately recommend replacing the shock absorber strut. Here it is, new, on the car, and the strange knocking noise in the front suspension on small bumps has not gone away. The car owner goes to another service center, but there they offer him to replace the support bearing, but even after that the knocking noise does not disappear.
When diagnosing the front suspension, experienced car owners begin checking with the steering system.
The main causes of vibration in the steering wheel
Among the popular reasons that cause a slight knock in the front suspension on small bumps is a large gap between the steering rack and gear. This is the result of wear and tear. To make an accurate diagnosis, it is recommended to pull the steering rods up and down. At the same time, carefully observe the movement of the rod. If she doesn't move, then she's fine. If the rod dangles, then most likely the bushings are worn out.
If the rack turns, then the accurate diagnosis is a large gap in the engagement. But this problem can be easily eliminated by tightening this very rail. Also, when pulling the steering rod, you may notice broken or overly worn bushings securing the steering rods to the steering rack.
Upper rack support
This can also cause knocking in the front suspension over small bumps. On car forums, the topic dedicated to this knock is very popular. The reasons are different for everyone. In attempts to combat this annoying sound, car owners go through the entire suspension, but often the knock remains.
One possible cause is the upper strut support. It consists of a rubber part as a damper and a bearing. If this rubber element has lost its elasticity, then this is the cause of this extraneous knock that all drivers struggle with. In order to find out for sure whether this is so, measure the gap between the limiter and the support. In most cars this is easy to do, but in some models this unit may be closed. If measurements show that the gap is more than 10 mm, then the support must be urgently replaced. However, this gap is not always uniform. When measuring, it is recommended to focus on the average figure. It is worth checking this support carefully: on many cars this sound appears only on one side.
Reason for knocking
Why is it knocking? Here, at first glance, metal parts cannot collide. However, the hydraulic shock absorber system does not absorb sharp but short movements of the rod very well. This function is performed by rubber supports, which must have the required level of elasticity. If the supports are too extended, then they will inevitably lose their energy capacity. They handle impacts worse and deliver them to the car body with an indignant thud.
Worn support bearing
These sounds appear in the same way as with an inelastic damper, but they are sharper and much louder. In order to make an accurate diagnosis in this case, it is necessary to remove the stand. It is recommended to take into account one rather interesting feature that is inherent in such breakdowns: bearing wear is always uneven. So, maximum wear is where it is constantly located when the car is driving straight. If after turning the steering wheel the knocking noise disappears for a while, then it is definitely a support bearing.
There is also another diagnostic method. It is quite old, but effective. You will need an assistant again. The second person should rock the machine up and down. At this time, the driver should feel the shock absorber rod with his hand. The knock will be transmitted to this rod.
Another possible reason is that the nut on the upper support is loosely tightened, sometimes this happens.
Spherical bearing
On car forums, in topics dedicated to this knock, a variety of reasons for knocking in the front suspension are discussed. Ball joints are one popular reason. One can say even more - this is a classic among all possible sources of extraneous knocks.
But there is one peculiarity here. On front-wheel drive cars, knocking noises from ball joints are very rare. It is more typical for classic VAZ models.
Thus, a worn joint can cause sharp vibrations when crossing small irregularities in the road. It is quite easy to diagnose this malfunction - pull the front wheel in a transverse direction. Naturally, it is advisable to lift the car for this. Beginners may confuse play in the ball joint with wheel bearing movements. In this case, the assistant must hold the brake before pulling the wheel, this will eliminate the hub play.
Sometimes an extraneous knock can be caused by a real trifle - check the rubber boots. Hinges cannot last long if the protective cover is torn.
Rack
Very often, knocking in the front suspension on small bumps is attributed to this particular unit. In reality, the stand is the source of knocking in very, very rare cases. But it’s worth checking, because this is a very important unit.
A heavily worn, very weak strut, even if it has not yet leaked, can cause shocks. When the car moves and the wheels fall into a hole, the rebound force of this strut is not enough, and it is not able to prevent the spring from straightening. The stand shoots the wheel down. When the wheel either touches the hole or hangs in the air, it stretches to its maximum. There will be a blow in both the first and second cases.
Rack diagnostic methods
There are a lot of methods. The classic one is to swing the body down, and it should smoothly rise to its normal position and stop. If everything is so, then the rack is working.
It happens, although quite rarely, that the strut makes extraneous sounds due to its internal problems, for example, the nut that holds the piston has become unscrewed. However, this does not cause knocking. When driving, the car sways and controllability decreases. In this case, replace the strut and repair the suspension.
Various shock absorber breakdowns are the consequences of its improper use. The oil in these systems must have a special specific viscosity, which also depends on the air temperature. Having warmed up the engine, the driver immediately takes off, but the oil in the rack has not warmed up. If it’s frosty outside, then the viscosity in the stand is too high. In this case, thin and very fragile parts fail.
Thick oil may also not be related to the weather. Sometimes excessively thick liquid is poured into shock absorbers. This is done to increase the resistance force and so that the oil does not “run away”. But as a result, stability and controllability deteriorate, because hard does not mean good.
Unpopular reasons for knocking
It would be a good idea to check the anti-roll bar bracket. This part consists of bushings based on metal and rubber, which are turned in different directions and connected by a thin isthmus. Most often it is he who breaks down. On rough roads, on small bumps and on turns, you can hear a knocking sound.
For a correct diagnosis, you need to pull the end of the stabilizer with one hand. This will work better if the wheels are turned to the right.
It happens that the motor mounts wear out. The engine moves actively at increasing speeds and on uneven surfaces. At certain moments, he reaches the body with the generator and oil pan. The result is a knock. This source of knocking is rarely guessed at. Many people change the suspension, but replacing the front suspension does nothing in this case.
Anything can knock in cars. For example, washer barrels. If it is poorly secured in place, the race will knock. There are also many other mysterious culprits behind such sounds.
Brakes as a source of knocking
Sometimes sounds coming from the suspension are actually coming from the brakes. It happens that a car enthusiast has checked everything and replaced everything that can be replaced. The front suspension layout has already been learned by heart, but the knocking was still there.
To make a diagnosis, you need to move. If the knocking noise disappears when braking, and when the pedal is released, it resumes again, then the brake pads are to blame. The same problems can occur after installing new pads.
If the car is knocking, do not rush to repair the chassis. Perhaps the extraneous sound is caused by a completely different reason. In this case, only a complete diagnosis can help. It may be enough to replace the front suspension silent blocks and the sound will disappear forever.
How to check silent blocks
The problem with wear of silent blocks for classics is the inability to set the correct camber and toe angles. The reason is that the rubber part of the assembly is destroyed, the position of the lever becomes incorrect, it tilts to the side. Even if there is slight damage to the rubber part, the silent blocks must be replaced immediately. Moreover, it is desirable for everyone - the efficiency will be much higher, from this the front suspension arms of the VAZ-2106 will begin to move normally relative to the body.
Before starting work aimed at diagnosing the condition of silent blocks, you need to prepare the car. To do this, install stops under the rear wheels, jack up the part to be repaired and remove the wheel. The ideal option is to carry out diagnostics on a pit or lift. The essence of the whole procedure is to measure the displacement of the outer and inner washers. For the first, it should be in the range of 3-7.5 mm (lower suspension arm) and 1.5-5 mm (upper arm). For the inner washer - 2.5 mm on all suspension arms. It is possible that the radial displacement will be large if the silent block is installed incorrectly in the lever. On VAZ-2106 cars, the front suspension works largely thanks to securely pressed silent blocks.
Video on installing a Sparco steering wheel on the “four”
As you can see, removing the steering wheel is not difficult. Even an inexperienced car enthusiast will cope with the task within half an hour, no more. Problems may arise when installing a steering wheel that does not fit the design of the car and the adapter. In such cases, you need to take an individual approach to find the right solution.
Sources
- https://avtovx.ru/rulevoe-upravlenie/rulevaya-kolonka-vaz-2106-140/
- https://ladaautos.ru/vaz-2109/samostoyatelnaya-zamena-rulevoj-rejki-vaz-2109.html
- https://vazweb.ru/desyatka/upravlenie/kak-pomenyat-rul-na-klassicheskih-modelyah-vaz-2101-2107.html
Steering problems
The steering mechanism, like any other vehicle component, wears out and requires repair over time. To simplify the troubleshooting, there are certain signs that allow you to find out the nature of the breakdown and fix it in a short time.
Oil leak
On a classic, the problem of a “wet” steering gear is quite common. There can be many reasons for this:
- oil seal wear;
- leakage from under the gasket;
- loosening of the fasteners that secure the mechanism cover;
- Corrosion of the input shaft.
If the oil seal and gaskets can be replaced and the bolts tightened, then if the shaft is damaged, the part will have to be ground.
Tight steering wheel
Sometimes it happens that to turn the steering wheel it is necessary to apply noticeably more effort than usual. Several reasons can lead to this malfunction:
- incorrect wheel alignment;
- failure of one of the elements in the steering mechanism;
- the gap between the worm and the roller is broken;
- The pendulum axis fasteners are too tight.
Steering play
One of the reasons for free play in the steering mechanism is wear on the shaft crosspieces. In addition to them, play appears in the gearbox itself. If the unit has a high mileage, then it is advisable to disassemble it, inspect the condition of all the elements, replace parts with high wear, and then carry out adjustments.
Knock and vibration
If you feel feedback on the steering wheel while driving, there can be many reasons for this phenomenon. Driving a vehicle in such a technical condition leads to rapid fatigue and reduces the level of safety. Therefore, the steering mechanism needs diagnostics.
Table: causes of vibrations and knocking on the steering wheel and ways to eliminate them
| Cause of steering failure | Troubleshooting method |
| Increased clearance in front wheel hub bearings | Adjust the front wheel hub clearance |
| Loosening the tie rod ball pin nuts | Tighten the tie rod ball stud nuts |
| Increased clearance between the pendulum arm axis and the bushings | Replace the swingarm bushings or bracket assembly |
| The adjusting nut of the pendulum arm axis is loose | Adjust the tightness of the swingarm nut |
| The clearance in the engagement of the roller with the worm or in the worm bearings is broken | Adjust the gap |
| Increased clearance in steering rod ball joints | Replace tie rod ends or tie rods |
| Loosening the bolts securing the steering gear housing or the pendulum arm bracket | Tighten the bolt nuts |
| Loosening the swing arm nuts | Tighten the nuts |
Repair of VAZ 2106 steering gear: design, malfunctions and their elimination
The vehicle's steering must always be in good condition. The safety of driving a vehicle directly depends on its functioning. At the slightest sign of malfunction, diagnostics are necessary, and then repair or replacement of the unit, which you can do yourself.
Steering mechanism VAZ 2106
The “six” uses a worm-type steering mechanism with a gear ratio of 16.4. It consists of the following nodes:
- steering wheel;
- steering shaft;
- worm-gear;
- steering rods.
Steering column VAZ 2106
The main purpose of the steering column is to transmit rotational motion from the steering wheel to the front wheels. All “classics” use structurally identical components. The mechanism is attached to the left side member with three bolts. There is a bolt on the top cover with which the gap between the roller and the worm is adjusted. The need to set the gap arises when a large backlash appears in the mechanism. The gearbox and steering wheel are connected to each other through an intermediate shaft, which is mounted on splines that prevent it from turning.
Steering column device
The steering gear housing has a worm shaft mounted on two bearings that do not have an inner race. Instead of an inner ring, special grooves are used at the ends of the worm. The required clearance in the bearings is set using spacers, which are located under the bottom cover. The exit of the worm shaft from the housing is sealed with a cuff. On the side of the spline connection on the shaft there is a recess for a bolt connecting the gearbox shaft to the shaft from the steering wheel. The worm is engaged with a special roller located on the axis and rotating with the help of a bearing. The bipod shaft at the exit from the body is also sealed with a cuff. A bipod is mounted on it in a certain position.
On the sixth model Zhiguli, the steering mechanism works in the following order:
- The driver turns the steering wheel.
- The force is transmitted through the shaft to the worm element, which reduces the number of revolutions.
- When the worm rotates, a double-ridge roller moves.
- A lever is installed on the bipod shaft, through which the steering rods are activated.
- The steering linkage acts on the steering knuckles, which turn the front wheels in the desired direction and at the required angle.
Steering column problems
The appearance of problems in the steering mechanism can be judged by characteristic signs:
- creak;
- backlash;
- grease leaks.
If any of the listed defects appear, repairs should not be delayed.
Creaks in the column
The appearance of squeaks can be caused by the following reasons:
- Excessive play in the hub bearings. To fix the problem, it is necessary to adjust the gap or replace the bearings;
- The tie rod pins have become loose. The way out of the situation is to tighten the nuts;
- large play between the pendulum and bushings. The malfunction is eliminated by replacing the bushings;
- wear of the worm shaft bearings can manifest itself in the form of squeaks when turning the wheels. To solve the problem, adjust the clearance in the bearings or replace them;
- The fastening of the swing arms has become loose. The way out of the situation is to tighten the nuts when setting the wheels straight.
Oil leak
Leakage of lubricant from the steering column on a “classic” is a fairly common occurrence. This is due to the following:
- damage (wear) of the oil seal on the shaft of the bipod or worm. The problem is solved by replacing the cuffs;
- loosening the bolts securing the crankcase cover. To eliminate leaks, tighten the bolts diagonally, which ensures the tightness of the connection;
- damage to the seal under the crankcase cover. The cover will need to be removed and the gasket replaced.
Stiff steering wheel rotation
There may be several reasons why the steering wheel turns slowly:
- Incorrect alignment of the front wheels. To fix the problem, you will have to visit a service station and carry out adjustment work;
- deformation of any part in the steering. Steering rods are usually subject to deformation, which is due to their low location and mechanical stress, for example, when hitting an obstacle. Curved rods must be replaced;
- Incorrect clearance between roller and worm. The required gap is set with a special bolt;
- tightly tighten the nut on the pendulum. The way out of the situation is to slightly loosen the fasteners.
Steering column repair
Repairing a gearbox, like any other unit, requires preparing tools and following step-by-step instructions.
Dismantling
Tools you will need:
- 17 and 30 mm head;
- long and powerful knob;
- mount;
- hammer;
- ratchet handle;
- regular open-end wrench 17.
The procedure for removing a node consists of the following steps:
- We unscrew the bolt securing the shaft and steering column.
How to disassemble
The mechanism is disassembled for the purpose of troubleshooting parts and subsequent repairs. Tools you will need:
- large socket head 30 mm;
- 14 mm wrench or socket;
- puller for gearbox bipods;
- flat screwdriver;
- hammer;
- vice.
The procedure consists of the following steps:
- We use a wrench to unscrew the nut that secures the bipod to the shaft, and then clamp the gearbox in a vice.
Unit repair
To troubleshoot parts, they are washed in diesel fuel or kerosene. After this, check the condition of the worm shaft and roller. They must not have any damage. The rotation of the ball bearings of the assembly must be free and without jamming. The structural elements of the bearings must be in good condition, i.e., be free of signs of wear, potholes and other defects. The presence of cracks in the gearbox housing is unacceptable. If parts with wear are identified, they are replaced with serviceable elements. The cuffs are changed during any repair work on the column.
Assembly
Before assembly, gear oil is applied to the internal elements, and the process itself consists of the following actions:
- Lightly hit the adapter with a hammer to press the inner ball bearing ring into the mechanism housing.
Video: disassembling and assembling the VAZ steering mechanism
Steering column oil
To reduce friction between parts inside the assembly, lubricant is poured into the crankcase. In Zhiguli, for the product in question, oil of class GL5 or GL4 is used with a viscosity class of SAE80-W90. However, some car owners use TAD-17 instead of modern lubricants. Oil in a volume of 0.2 liters is poured into the steering column.
Change of oil
On the VAZ 2106, as on other “classics”, it is recommended to change the lubricant in the steering mechanism once every 20-40 thousand km. Replacing more frequently is just a waste of time and money. If it is noticed that the oil has become very dark and the steering wheel has become heavier when turning, then the lubricant must be replaced as soon as possible. Tools for work you will need:
- open-end wrench 8 mm;
- 2 large-volume medical syringes;
- small diameter tube or hose;
- a suitable container for draining used oil.
The work comes down to the following steps:
- We unscrew the plug on the gearbox.
- We put a tube on the syringe and use it to suck out the old grease, pouring it into a container.
When adding oil, it is recommended to shake the steering wheel to release air from the crankcase.
Video: replacing the lubricant in the Zhiguli steering column
Level check
Experienced classic car owners claim that oil leaks from the gearbox even when installing a new mechanism, so periodically checking the level will not be superfluous. To determine the lubricant level, you will need to perform the following steps:
- Wipe the surface of the assembly with a rag.
- Unscrew the filler plug.
Adjusting the steering column play
The need for adjustment arises after repair of the unit or when large play appears when turning the steering wheel. If the mechanism has a large free play, the wheels lag somewhat behind the movement of the steering wheel. To make the adjustment you will need:
- flat screwdriver;
- 19 mm wrench.
We align the steering wheel in the center, and then perform the following actions:
- Using a 19 mm wrench, unscrew the nut located on top of the steering gearbox.
Video: adjusting the steering column play on a “classic”
Pendulum VAZ 2106
A pendulum arm or simply a pendulum is a part that connects the steering rods and the steering gearbox. The product is located under the hood symmetrically to the steering gear and is mounted on the right side member.
Replacing the pendulum
Like other parts of the car, the swingarm is subject to wear and tear and sometimes requires repair or replacement. The following characteristic signs indicate that problems have arisen:
- when driving on uneven roads, knocking noises are heard;
- large play in the steering wheel.
When the pendulum breaks down, sometimes you have to exert a lot of force to rotate the steering wheel.
It should be taken into account that the listed symptoms can appear not only when there is a problem with the pendulum arm, but also when the assembly is loosely tightened or the adjusting nut is overtightened.
How to remove
For dismantling you will need:
- a set of open-end or ring wrenches;
- ball pin remover.
We perform the procedure in the following sequence:
- Remove the right front wheel.
- We unscrew the fastening of the rod fingers to the pendulum lever.
Pendulum repair
Repair of the unit comes down to replacing bushings or bearings (depending on the design).
Replacing bushings
Repairs are carried out using the following tools:
- 19 mm wrench;
- vice;
- new bushings;
- lubricant "Litol-24".
The repair sequence is as follows:
- We clamp the pendulum in a vice. We take out the cotter pin and unscrew the fasteners.
Troubleshooting and assembly
After disassembling the pendulum, we check the condition of all parts. There should be no defects on the axle and lever (traces of wear, deformation). With high mileage of the car, bushings are subject to wear. Therefore, they have to be replaced with new ones. There should be no cracks or other damage on the bracket. The pendulum is assembled in the reverse order, with Litol-24 applied to the pendulum axis and the hole under it. The adjusting nut should be tightened so that the bipod rotates when a force of 1-2 kg is applied to its end. A dynamometer is used to determine the force.
Video: replacing the pendulum arm bushings on a “classic”
Replacing bearings
With high mileage of the car, the bearings in the pendulum begin to bite and jam, which requires their replacement. The tools you will need are the same as in the previous case, only instead of bushings you need bearings. Repair consists of the following steps:
- We clamp the part in a vice and unscrew the adjusting nut, but not completely.
When assembling the pendulum, the bearings are pressed so that rotation is free, but without play.
Video: repair of a pendulum on VAZ 2101–07 bearings
You can repair the steering gearbox on a VAZ Six with a garage tool kit consisting of a hammer, keys and screwdrivers. The work does not require special knowledge and skills. After reading the step-by-step instructions, even a car enthusiast without experience can perform the repair. The main thing is to be careful when inspecting the parts and assembling the mechanism.
5.1.13 Replacing rubber-metal joints of levers on a car / VAZ 2107
Determine the need to replace rubber-metal hinges based on the signs indicated above in the subsection “Determining the condition of front suspension parts.” You can replace the hinges either directly on the car or on levers removed from the car (described in the subsection “Checking technical condition and repair”).
Replacing rubber-metal joints of the lower arms
is done in the following order. Place the car on an inspection pit or lift and hang the front of the car on the side where the replacement will be made. Remove the wheel. After unscrewing the nut, press out the tie rod ball joint pin using puller A.47052 and move the free end of the side rod back. Remove the nuts securing the lower control arm to the axle and remove the washers from both ends of the axle.
| Rice. 5–24. Scheme for pressing out the lower arm hinge using device 02.7823.9500: 1 - screw; 2 - nut; 3 - glass; 4 - lower lever; 5 - hinge; 6 — axis of the lower arm |
Install glass 3 (Fig. 5–24) of fixture 02.7823.9500 on the shelf of lever 4 and screw screw 1 onto the end of axle 6. Holding screw 1 with a wrench and rotating nut 2, move the eye of the lever from the outer ring of the hinge. Remove the device and the pressed-out hinge 5 from the lever axis. Using a crowbar or a mounting spatula, using a crowbar or a spatula to bring the lever eye into a position concentric with the lever axis, insert the new hinge into the hole in the lever eye and slide it onto the axle.
| Rice. 5–25. Scheme for pressing the lower arm hinge using device 02.7823.9501: 1 - nut; 2 - ring; 3 - hinge; 4 - lower lever; 5 — emphasis; 6 — axis of the lower arm |
Place ring 2 (Fig. 5–25) of fixture 02.7823.9501 onto the end of the axle and insert stop 5 between shelf 4 and the nearest nut securing the axle to the cross member of the front suspension. Rotating nut 1 and holding stop 5, press new hinge 3 into the eye of the lever. Remove the device, install the washer and nut securing the lever to the axle. Do not tighten the nut. The other rubber-to-metal joints of the lower suspension arms are replaced in the same way. After replacing the joints, connect the steering rod to the steering knuckle arm, tighten and cotter the steering rod ball pin nut, install and secure the wheel.
| Rice. 5–19. Pressing out the hinges of the upper arm: 1 - device A.47046; 2 - hinge |
| Rice. 5–20. Pressing in the hinges of the upper arm: 1 - device A.47046; 2 - hinge; 3 - cap used together with device A.47046 |
Replacement of rubber-metal hinges of the upper suspension arms
perform using fixture A.47046 in the same way as on the removed levers (see Fig. 5–19 and 5–20), in the following order. Place the car on a viewing ditch or lift. Raise the front of the car with a jack on the side where the replacement will be made. Remove the wheel. Unscrew the nut of the upper lever axle and, having removed the axle, turn the lever with the lugs outward.
| Rice. 5–26. Scheme for pressing out the upper arm hinge: 1 - bolt; 2 - nut; 3 — glass of device A.47046; 4 - hinge; 5 - upper lever |
Install glass 3 (Fig. 5–26) of fixture A.47046 with nut 2 and bolt 1 with the head inside the lever on the lever. By rotating nut 2, press out the hinge, remove the device and the hinge.
| Rice. 5–27. Scheme for pressing in the upper arm hinge: 1 - bolt; 2 — ring of device A.47046; 3 - hinge; 4 — upper lever; 5 — glass of device A.47046; 6 - nut |
Insert the new hinge into the lever eye, install fixture A.47046 so that the head of bolt 1 (Fig. 5–27) is directed outward and ring 2 of fixture A.47046 is under the head. Rotating nut 6, press in the hinge and remove the device. The other hinges of the upper arms of the front suspension are replaced in the same way. After replacing the hinges, turn the upper arm with the lugs towards the front strut, slide it onto the strut, insert the upper arm axle, install the washer and axle nut without fully tightening it. Install the wheels, lower the vehicle and tighten the control arm axle nuts. Before tightening the nuts, perform all the operations described earlier (see “Installing the suspension on a vehicle”). After replacement, the rubber-metal joints should be “kneaded” by making a test drive of 15–20 km, and be sure to check and, if necessary, adjust the angles of the front wheels.
How to replace the silent blocks of the lower arm of a VAZ 2107
Replacing the lower arm (VAZ 2107)
How to replace the silent blocks of the lower arms of a VAZ without a puller.
Replacing silent blocks of the upper arm on a classic\\VAZ 2105
Repair and assembly of the front suspension on a VAZ - installing springs, replacing balls, levers and silents
When to change the swingarm
- Basically, after the pendulum arm fails, knocking noises begin to be heard from the lower part where it is located, which will be especially audible when hitting a bump.
- In addition to knocking, the free play of the steering wheel, popularly called play, can also be increased.
- Also, the steering wheel itself may be difficult to turn due to the failure of the pendulum arm.
Note!
All these signs relate to a malfunction of the pendulum, but they can also occur when the pendulum bolts are loose or the adjusting nut is too tight, so before replacing the pendulum arm with a new one, check the tightness of the bolts and either loosen or tighten them as necessary!
How to replace the pendulum arm, also known as the pendulum, on a VAZ 2101-VAZ 2107?
Pendulum VAZ 2106
A pendulum arm or simply a pendulum is a part that connects the steering rods and the steering gearbox. The product is located under the hood symmetrically to the steering gear and is mounted on the right side member.
Replacing the pendulum
Like other parts of the car, the swingarm is subject to wear and tear and sometimes requires repair or replacement. The following characteristic signs indicate that problems have arisen:
- when driving on uneven roads, knocking noises are heard;
- large play in the steering wheel.
When the pendulum breaks down, sometimes you have to exert a lot of force to rotate the steering wheel.
It should be taken into account that the listed symptoms can appear not only when there is a problem with the pendulum arm, but also when the assembly is loosely tightened or the adjusting nut is overtightened.
How to remove
For dismantling you will need:
- a set of open-end or ring wrenches;
- ball pin remover.
We perform the procedure in the following sequence:
- Remove the right front wheel.
- We unscrew the fastening of the rod fingers to the pendulum lever.
Pendulum repair
Repair of the unit comes down to replacing bushings or bearings (depending on the design).
Replacing bushings
Repairs are carried out using the following tools:
- 19 mm wrench;
- vice;
- new bushings;
- lubricant "Litol-24".
The repair sequence is as follows:
- We clamp the pendulum in a vice. We take out the cotter pin and unscrew the fasteners.
Troubleshooting and assembly
After disassembling the pendulum, we check the condition of all parts. There should be no defects on the axle and lever (traces of wear, deformation). With high mileage of the car, bushings are subject to wear. Therefore, they have to be replaced with new ones. There should be no cracks or other damage on the bracket. The pendulum is assembled in the reverse order, with Litol-24 applied to the pendulum axis and the hole under it. The adjusting nut should be tightened so that the bipod rotates when a force of 1-2 kg is applied to its end. A dynamometer is used to determine the force.
Video: replacing the pendulum arm bushings on a “classic”
Replacing bearings
With high mileage of the car, the bearings in the pendulum begin to bite and jam, which requires their replacement. The tools you will need are the same as in the previous case, only instead of bushings you need bearings. Repair consists of the following steps:
- We clamp the part in a vice and unscrew the adjusting nut, but not completely.
When assembling the pendulum, the bearings are pressed so that rotation is free, but without play.
Video: repair of a pendulum on VAZ 2101–07 bearings
You can repair the steering gearbox on a VAZ Six with a garage tool kit consisting of a hammer, keys and screwdrivers. The work does not require special knowledge and skills. After reading the step-by-step instructions, even a car enthusiast without experience can perform the repair. The main thing is to be careful when inspecting the parts and assembling the mechanism.
Welcome! The steering gearbox is an integral part of any car, because only thanks to this thing the forces from turning the steering wheel are transmitted to the wheels. But like any other unit, the steering gear wears out over time, which makes it necessary to replace it. You can find detailed instructions for replacing the steering gearbox below.
Steering VAZ 2107
The steering mechanism of the VAZ “Seven” consists of several units connected together by means of fasteners. These components and their constituent elements, like any other part of the car, wear out over time and become unusable. The purpose, design, repair and maintenance of the VAZ 2107 steering system should be discussed in more detail.
Purpose
The main function assigned to the steering mechanism is to ensure the vehicle moves in the direction specified by the driver. On most passenger cars, the trajectory of movement is carried out by turning the wheels of the front axle. The steering mechanism of the “seven” is quite complex, but at the same time it provides trouble-free control in different situations on the road. The car is equipped with a safety steering column with a driveshaft that folds upon impact. The steering wheel of the mechanism in question has a diameter of 40 cm and to completely turn the wheels you need to make only 3.5 turns, which allows you to perform maneuvers without much difficulty.
What does it consist of?
The front wheel control mechanism on the VAZ 2107 is made of the following basic elements:
- steering wheel;
- shaft;
- gearbox;
- bipod;
- trapezoid;
- pendulum;
- steering knuckles.
Steering shaft
Through the shaft, rotation from the steering wheel is transmitted to the steering column. The shaft is secured with a bracket to the car body. Structurally, the element is made in the form of a cardan with crosspieces and an upper shaft. In the event of a collision, the mechanism folds, thereby ensuring the safety of the driver.
Gearbox
The VAZ 2107 is equipped with a worm steering column, which converts the rotational movement of the steering wheel into the translational movement of the steering rods. The operating principle of the steering mechanism is as follows:
- The driver turns the steering wheel.
- By means of cardan joints, the worm shaft is driven, thereby reducing the number of revolutions of the steering wheel.
- The worm element rotates, moving the double-ridge roller.
- The secondary shaft rotates, on which the bipod is fixed, driving the steering rods.
- The trapezoid moves the steering knuckles, turning the wheels in the desired direction.
Steering linkage
The radius of the vehicle's trajectory when turning depends on the angle of rotation of the wheels. Since the outer wheel has a larger radius than the inner one, in order to avoid the latter slipping and deteriorating traction with the road surface, the front wheels must deviate at different angles.
This is what the steering linkage is used for. During the maneuver, the transverse thrust of the mechanism shifts under the influence of the bipod. Thanks to the pendulum arm, it pushes and pulls the side rods. Since misalignment occurs, the impact on the tie rod ends is different, which leads to the wheels turning at different angles. The tips of the trapezoid with the rods are connected through adjusting couplings, which allow you to change the angles of rotation of the wheels. The parts of the trapezoid are connected to each other by identical ball joints. This design contributes to the normal operation of the unit even when driving on bad roads.
Pendulum arm
The steering pendulum of the “seven” is necessary for synchronous rotation of the wheels of the front axle without lag. Thus, the car is able to corner safely. If malfunctions occur with the pendulum, the vehicle’s performance during maneuvers deteriorates, which can lead to an emergency.
Removing and replacing the steering gear
Activities that are necessary to replace the steering mechanism of a vehicle:
- Removing the steering wheel.
- Disconnecting the steering shaft.
- The middle and left side tie rods are disconnected from the bipod and moved to the sides.
- Next, using two wrenches, unscrew 3 bolts that secure the steering gear to the car body. Before performing this procedure, it is necessary to remove the left fender liner.
- After unscrewing the nuts, you need to remove the bolts. This should be done carefully so as not to lose washers and gaskets, the main purpose of which is to adjust the ratio of the two shafts.
- The gaskets are removed (their locations must be marked, since they will be placed back when installing a new steering gear).
- The gearbox is carefully lowered and should hang on the machine body.
- Afterwards, through the top of the hood, the steering gear is removed.
The removed steering mechanism of the VAZ 2106 car must be completely cleaned of dirt. Work is also being carried out to clean the gearbox mounting area. If necessary, work is carried out to defect a section of the body if traces of corrosion or mechanical damage are detected.
It is unacceptable to ignore any, even insignificant in your opinion, problem with the mounting location of the steering gear, since in the future this may negate the work expended now. It is not recommended to leave damaged and suspicious areas of the body without proper care.
Installation of the steering gear is performed in the reverse order. However, in order for the replacement to take place correctly, during assembly work you must adhere to the following recommendations:
- When screwing in bolts and nuts, do not immediately tighten them.
- After completing the process of installing fasteners, you need to get behind the wheel and turn it to the right, and then to the left a few turns. Thanks to this action, automatic adjustment occurs - all parts and elements are finally adjusted to their seats.
- After performing the manipulations described above, it is necessary to finally tighten all bolted connections and reinstall all additionally removed parts and elements in the reverse order.
When the adjustment is completed, it is recommended to check the amount of lubricating fluid inside the crankcase. If the quantity there is not enough, you need to add oil to the required level.
The vehicle's steering must always be in good condition. The safety of driving a vehicle directly depends on its functioning. At the slightest sign of malfunction, diagnostics are necessary, and then repair or replacement of the unit, which you can do yourself.
Repair of the pendulum arm (Pendulum) on VAZ 2101-VAZ 2107
Welcome! Pendulum lever - over time, like any other part, the pendulum lever, or as it is also called simply “Pendulum”, becomes unusable, and the cost of this lever for some will seem too small, and there will be those people for whom the cost the pendulum arm will seem too large.
Therefore, in order not to spend money and buy it new right away, you can first try to repair it at minimal cost, but with the loss of some time, which, compared to money, will seem like a more acceptable option.
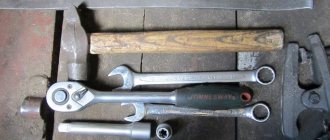
Note! To repair the pendulum, you will need: A set of basic wrenches, a vice, as well as a screwdriver, pliers, and it is also recommended to stock up on a dynamometer, thanks to which you can determine with greater accuracy the action under which the bipod of the lever rotates (More details will be discussed in the article , just below)!
Where is the pendulum arm located? It is located at the very bottom of the car, and this is easy to understand, because as such the pendulum is part of the main part of the car's chassis. (But still, you can see a more detailed location of the pendulum in the article entitled: “Replacing the pendulum arm on a VAZ”)
Why do you need to repair a pendulum arm? In most cases, the pendulum is disassembled, thereby repairing it in order to replace the main bushings in it, due to which a backlash appears in the pendulum, which in turn cannot be removed by tightening the pendulum nuts.
How to repair the pendulum arm, also known as the pendulum, on a VAZ 2101-VAZ 2107?
Disassembly:1) First, remove the swingarm from the car. (For information on how to remove it, see the article linked just above, under the heading: “Where is the pendulum lever?”)
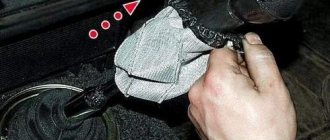
2) Now, without removing anything from it, place the removed pendulum in a vice and then clamp it as shown in the figure. Then, using pliers, remove the cotter pin that will hold the nut from unscrewing (in the photo this cotter pin has already been removed). And after the cotter pin is removed, take a wrench and use it to unscrew the adjusting nut.
Note! After removing the adjusting nut, pay attention to the washer located under it, which you will also have to remove!
3) Next, when the small washer is removed, use your hand or take a screwdriver and then pry up the large washer and then also remove it from the lever axis.
4) Next, again, pry up with a screwdriver, but only this time one of the main bushings (indicated by a blue arrow) and thereby remove it, as well as remove the o-ring that is located under this bushing and which is indicated by a red arrow.
5) Then take your hand and remove the bracket from the axis of the pendulum arm, and after removing the bracket, remove the second O-ring, which is also indicated by the arrow.
Note! Under the sealing ring there is another one of the main bushings, which also needs to be removed by picking it up with a screwdriver!
Checking the parts: 1) After you have disassembled the lever, first check its condition and the condition of its axis on which all the parts that you removed earlier are located.
Note! The lever itself should not have any kind of defects, and in particular it should not be bent. The lever shaft must also be in good condition and must not show any signs of visible wear!
2) Next, also check the condition of all previously removed bushings.
Note! When inspecting the bushings, pay special attention to ensure that there are no wear marks, strong bends, etc. Otherwise, replace the bushings with new ones! 3) And finally, check the bracket that was removed from the lever last, so there should be no signs of deformation or various types of cracks on this bracket
3) And finally, check the bracket that was removed from the lever last, so there should be no signs of deformation or various types of cracks on this bracket.
Assembly: 1) Assembling the pendulum is carried out in the reverse order of disassembly, but only when assembling, keep in mind one important detail; using grease, it is recommended to lubricate the pendulum axis itself, namely in those places where this is indicated by the arrows. It is also recommended to lubricate everything with the same grease, the hole for this same pendulum axis in the bracket as shown in the photo on the right.
Note! And in conclusion, be sure to use a wrench or something else to tighten the pendulum adjusting nut so that the bipod, which is indicated by the arrow, rotates under the influence of a force of “1-2 kg”, which can be determined using the attached dynamometer on the end of the bipod!
Installation of a new pendulum
The new pendulum is installed in the same way as it is removed, only to install you will have to read the article in the reverse order of removal.
Attention!
Before installing a new pendulum on a car, make sure that it has been assembled correctly; to do this, clamp the pendulum in a vice so that its bipod is directed strictly horizontally. In this position, under the weight of its own weight, the bipod will have to stand in one place, not moving anywhere. It will only have to move under the influence of a force of “1-2 kg” applied to the part on which the right tie rod joint will be installed, in other words, to the tip of the bipod as shown in the figure:
Didn't find the information you are looking for? on our forum.
Replacing the lower arm on a VAZ 2101-VAZ 2107
Welcome! The lower arm - it is located in the front suspension and a ball joint is screwed to it, and the front spring itself is also on it; replacing this arm is not quite easy, it may take you more than one day to replace it (If you are doing the work for the first time) but still, the good news is that this lever is not very expensive and if yours becomes unusable (a crack will appear on it, for example), then it will need to be replaced in the near future with a new one and we do not recommend that you use the car at all (If the lever has a crack appears) until it is replaced.
Note! To change the lower arm, you only need: All the keys that you have in your arsenal, as well as a wheel wrench and a jack, since the wheel will have to be removed on the side on which you will change the arm!
Where is the lower control arm located? In the front suspension of the classic, there are many levers, but some of the largest and most important (Without them the car would not move at all) are the lower and upper lever, the upper lever is at the top and is not subject to special deformation (Only if the car is not lowered and only if You didn’t drive it into a hole at high speed), the lower arms are most often subject to deformation, because they are located at the very bottom, and if you drive the car into a sharp hole (into a hatch, for example), then after the collision the wheel will fall to the bottom and all the weight the front part on the lever will shift, in connection with this your lever will bend or even crack, so you need to monitor them periodically and, if possible, after a strong collision with a bump, check the levers for condition, for clarity, the lower lever (namely the one on the left parts placed) is shown in the photo below.
When should the lower control arm be replaced? It is changed only in case of severe deformation, if the lever is slightly bent, then you can still ride on it (Of course it’s better to change it, but in fact you can do the camber and continue driving), but if it is cracked, then this lower lever must be replaced, if the lower arm is severely deformed, the wheels lose camber and because of this the car begins to pull to the side; in addition, the tire tread wears out faster due to the broken camber, so if there is severe deformation (Even if it is not cracked), try to replace the lower arm with a new one.