Oil pump VAZ 2112
If your VAZ 2112 car does not have operating oil pressure. When the engine is idling or under load. Which is reflected by a red light that does not go out on the instrument panel with an image of an oil can. Perhaps you need to replace the oil pump of a VAZ 2112. You have two options - either go to a service station, leave the car for repair for at least half a day, and pay a decent amount for the work. The second option is to make the replacement yourself.
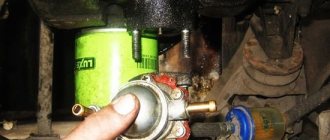
Tip: If the red light does not go out, indicating a lack of pressure in the system, do not rush to change the pump. First, check the wiring of the oil pressure sensor. Then make sure that the sensor itself is working properly: unscrew it and see if it is dry or lubricated. If the sensor is dry, the oil pump is malfunctioning, otherwise replace the sensor.
Purpose
The purpose of the oil pump is to circulate oil through all engine components to lubricate them evenly and increase their service life. It is driven by an internal combustion engine (internal combustion engine) and is structurally divided into two different types, based on the principle of coupling with the crankshaft. In our case, it connects directly to the crankshaft, that is, it rotates with it. This is the operating scheme of the unit for front-wheel drive VAZ cars. Cars with all-wheel drive, as well as classics, have a more complex system installed. There, the drive contains additional links: an intermediate shaft, a timing chain (gas distribution mechanism), and toothed gears, through which torque is transmitted from the crankshaft to this device.
Common faults
So:
- Most often, the pump of the VAZ 2112 and other VAZ models with front-wheel drive leaks through the seal, which has to be changed.
- The oil receiver also often fails, especially if you use low-quality oil, or missed replacing it in a timely manner, or the oil does not meet specifications (too thick).
- Too liquid simply will not be pumped and the pressure sensor will immediately light up.
- In this case, the oil receiver mesh becomes clogged, the circulation of oil through the engine becomes difficult, causes oil starvation, and as a result, the service life of the engine is significantly reduced.
- This includes a malfunction of the pressure reducing (bypass) valve: either it is stuck in the open position, and then the oil pressure drops. Either it does not bypass, and then the oil will squeeze out through the oil seal
What oil to fill and at what frequency?
The manufacturer recommends changing the engine oil after 10 thousand kilometers, however, it is recommended to shorten this period if possible, and at the same time change the oil filter. You should only buy oil from well-known companies and, when choosing it, beware of counterfeits. The ideal option is to pour oil recommended by the manufacturer and not be fooled by cheapness or high cost (expensive does not mean high quality).
Recommendations for choosing spare parts
So:
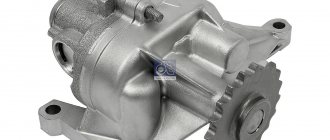
- The oil pump usually does not cause car owners much trouble, since it has a service life of at least 120 thousand kilometers. However, no one is immune from breakdowns
- If suddenly you still need to replace the oil pump on a VAZ 2112, it is better to take original spare parts and not save
- Among the well-known suppliers of parts for VAZ cars, the official one is the Tolyatti Automobile Assemblies Plant (TZA for short).
- It also produces oil pumps for the VAZ 2112
- This is one of four varieties of such units in the VAZ line, which fits all front-wheel drive fuel-injected cars
Helpful advice: To avoid serious consequences for the car and major engine repairs, it is important to monitor the indicators on the dashboard. If the oil pressure lamp flashes at idle speed, and replacing it does not solve the problem, the lamp lights up again - this means there is a breakdown
When the warning light suddenly comes on and the performance of your car’s engine is alarming, it is recommended to turn off the ignition and call a tow truck to a repair station. This will save money on subsequent engine repairs (continuing to drive the car under its own power in such a situation, you risk serious damage to the engine).
- Typically, removing the oil pump on any car occurs when disassembling the engine.
- Only if necessary, this work is carried out on the car without removing the engine from it.
- Before starting this procedure, first drive the car into the inspection hole.
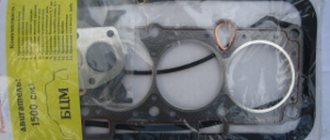
- And immediately purchase everything you need to carry out a full replacement, as shown in Photo No. 2.
Designations in the photo:
- 1 - oil pump
- 2—pan gasket
- 3 - pump gasket
- 4 - sealing ring
- 5 - sensor mounting bracket
Attention: The pumps of the VAZ 2108-1011010 and 2111, 2112-1011010 engines are almost the same, with the exception of point No. 5 - the sensor mounting bracket is different, do not miss this point!
Tip: It is recommended to install only a factory-produced gasket under the pump, since a non-standard gasket may have a thickness that does not meet the specifications and cause problems with the operation of the pump.
Necessary tool
- A set of wrenches (open-end - spanner preferably)
- Socket set and ratchet
- Two strong flathead screwdrivers
- Hexagon set
When to change the oil
This question is quite important and this work should be done according to certain rules. You shouldn’t simply replace it every certain period of time. You just need to do this on time:
- It is recommended to change the oil for the VAZ 2112 after a mileage of about 8,000 or 10,000 km. But this again depends on operating conditions (long idling - winter periods), it is recommended to change the VAZ 2112 oil at lower mileage. A dark color of the oil, as a rule, will signal the need for this procedure; this indicates that combustion products are present in the oil, and accordingly will negatively affect the performance of the oil (washing out combustion products and mechanical wear, heat removal and transfer, lubrication) .
- Changing the oil on a VAZ 2112 must be done after a trip, until the engine has cooled down. If the engine is cold, you need to start it and warm it up to operating temperature. This must be done in order to reduce the viscosity of the oil in order to drain it as completely as possible from the crankcase.
- If you are changing the fluid, after draining the old oil, you must fill in new oil to the lower oil level mark. Start the engine and let it idle for ten minutes. Drain the oil and only then change the oil filter. Now you can safely fill in new oil to the required level. If the minimum level is on the dipstick, there is a risk of insufficient pressure and lubrication, and overheating is also possible. If, on the contrary, the maximum level, then this can result in squeezing out the seals and causing a leak through them.
In order to replace or repair the oil pump on cars of the 10th family, it is necessary to have an inspection hole or overpass. As a last resort, a jack can be used. You also need the following tools:
- Wheel wrench for unscrewing wheel bolts.
- Wrenches in sizes “10”, “13”, “17”.
- Hex socket wrenches size "5" and "8".
- Large slotted screwdriver.
- Tool for tensioning the timing belt roller.
- Clean and dry container to drain the oil.
After you have prepared all the tools, you can begin the repair work.
Common unit breakdowns
- operational wear of the components of the unit: the pump housing or gears fail: during the operating cycle, the gap between the driven and driving gears increases. In normal condition it does not exceed 0.25 mm. Wear leads to the fact that the distance between the parts increases to 0.5 mm: the gears no longer mesh. The described breakdown makes the oil pump unsuitable for routine repairs - it is easier to buy a new part than to install new gears and adjust them;
- leakage: oil begins to leak from under the pump. The reason for this is a leaky oil pump gasket. Replacing the gasket solves the problem;
- Oil receiver clogged: The oil receiver becomes clogged due to a clogged crankcase. In this case, you need to dismantle the oil pan and clean the mechanism.
In most cases, it is necessary to purchase a new oil pump. The price of a new part in online stores is in the range of 1700 - 2500 rubles. The devices are compatible with the first generation Samara.
Signs and causes of oil pump malfunction Lada 2114
There are several markers, the appearance of which will allow you to suspect defects in the pump:
- The corresponding light on the dashboard lights up;
- Oil puddles regularly form under the car;
- Smoke is generated during engine operation.
Causes of unit malfunctions:
- use of motor oil that does not comply with the car manufacturer’s recommendations;
- oil filter clogged;
- permanently low level of lubricating fluid in the crankcase;
- non-working condition of oil level monitoring devices;
- failure of the engine lubrication system valve;
- impurities entering the engine oil (most often coolant is mixed with it).
All the described breakdowns are accompanied by activation of the control lamp, so do not delay repairs; begin service operations after activating the control indicator.
Troubleshooting
Direct connection of the pump to the crankshaft avoids damage associated with its drive. This, however, does not exclude the possibility of other malfunctions.
The main malfunctions of the VAZ 2110–12 oil pump include:
- clogging of the oil receiver mesh;
- damage to the device body;
- wear of gear seats in the housing and cover;
- wear of the drive or driven gear;
- damage to the pressure reducing valve;
- deformation or damage to the valve spring.
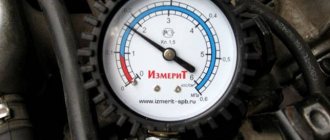
A constantly burning warning light in the form of an oil can indicates a drop in pressure in the lubrication system to a critical level
Signs of oil pump failure may include:
- critical oil pressure warning light on the dashboard;
- engine overheating;
- high-frequency knocking (clattering) at the pump location.
The design of the VAZ 2110–12 engine does not provide for the installation of an oil pressure sensor. Like most modern cars, representatives of the tenth family are equipped only with an emergency (critically low) pressure sensor. When the pressure in the system drops, a warning light in the form of a red oil can lights up on the instrument panel. However, this lamp can also light up in the event of other malfunctions (failure of the sensor, break in its electrical circuit, oil leak, etc.).
Engine overheating also cannot be attributed only to symptoms of a faulty oil pump. It usually occurs due to problems in the cooling system.
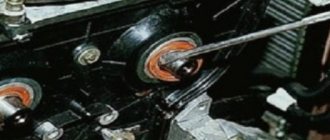
As for the knocking coming from the oil pump, not everything is clear here either. Sometimes, when gears or housing elements wear out, the device may produce a high-frequency knocking sound. As a rule, it is associated with the formation of play between the gears and the housing (cover) and is most clearly audible at idle. However, similar sounds can also be produced by worn bearings (tension or guide rollers, pumps, crankshafts).
The process of replacing the oil pump on a VAZ 2110-12 is quite simple and does not involve the use of any special tools. However, to do this you need to buy a new pump and spend some time. Therefore, before replacing the device, you should make sure that it is the one that is faulty. This can be done using the following algorithm.
Filming
- First you need to disconnect the negative cable from the battery.
- Draining the oil from the engine
- We take out the camshaft drive belt
- We take out the crankshaft toothed pulley, then its key, using two flat-head screwdrivers.
- Then remove the oil sump.
- Unscrew the oil intake mount.
- Using a 10mm socket with a ratchet and an extension, unscrew the six bolts securing the oil pump to the cylinder block.
- Remove the unit from the engine.
Be sure to wash the new oil pump with gasoline to remove grease for preservation. We fill it with oil before installation so that it does not rotate dry when starting. It is also important to turn the drive gear in order to place the pump on the crankshaft: so that the protrusions on the gear coincide with the groove on the crankshaft. Lubricate the seal lip with oil before putting the pump back. Carefully tuck the working edge of the oil seal onto the shaft journal using a wooden stick. Be careful and attentive when tightening the bolts so as not to strip the threads. Proceed in reverse order, install the remaining parts.
As can be seen from the above, this is not such a difficult job. The main thing for her is to approach it correctly and creatively. After all, proper lubrication is the basis for the longevity of a car.
Instructions for verification
So:
- First, check the serviceability of the electrical circuit going from the sensor to the instrument panel. Throw the wire going from the sensor to the engine to ground, the light will go out if the circuit is working properly.
- The second reason could be the oil filter. Such a breakdown is determined by unscrewing the oil pressure sensor. It should be moistened with oil; a dry sensor means that the filter is clogged or its valve is stuck.
- When replacing the filter does not have an effect, open the pan and check the oil receiver itself and the condition of its rubber sealing ring.
- After these checks, one reason remains - a breakdown of the unit itself.
For your information:
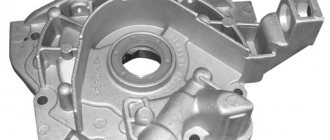
- The engine of the VAZ 2110 model is equipped with a combined lubrication system. On machines of this model there is a gear oil pump, which is located at the front end of the cylinder block.
- Special gears with trochoidal internal gearing reduce mechanical losses during rotation.
- The oil pump itself is equipped with a fully in-line, non-separable filter. With bypass and anti-drainage valves. This device ensures good oil circulation and lubrication through all components of the internal combustion engine (ICE).
- It works by rotating the crankshaft. The connection method to the crankshaft is direct, which is typical for all VAZ cars with front-wheel drive.
- On all-wheel drive and classic models, the system is supplemented with special transmission parts: a timing chain, an intermediate shaft, and a set of gears that transmit torque from the crankshaft.
- The service life of this pump is from 120 thousand km, it works properly when the engine has already undergone a major overhaul. However, during operation, breakdowns are not excluded.
If replacement is still required, it is better for you to choose the VAZ 2110 oil pump from among reliable manufacturers.
Operating procedure
So:
- Disconnect the negative cable from the battery terminal.
- Drain the oil from the engine (through the drain plug in the oil pan).
- We take out the camshaft drive belt.
- Now remove the oil sump.
- On engines with a fuel injection system, disconnect the block with wiring from the sensor that counts crankshaft revolutions.
- Using two screwdrivers, remove the pulley from the crankshaft.
We pull out the pulley with two screwdrivers
- If the key does not fit tightly in the crankshaft groove, take it out so that it does not get lost.
- We unscrew the bolts securing the oil receiver (there are three bolts, there are flat washers under the bolts) and remove the oil receiver.
- We clean the oil receiver mesh from dirt and wash it with white spirit. When the mesh cannot be washed or is damaged, we replace the oil receiver.
- We replace the lost elasticity or torn sealing ring of the oil receiver.
- We unscrew the bolts securing the oil pump to the cylinder block (there are six of them) and remove the pump along with the gasket. Be careful - there are flat washers under the bolts.
Unscrew the bolts securing the pump
- We turn the pump drive gear to ensure correct installation on the crankshaft: the protrusions on the gear should coincide with the flats on the crankshaft.
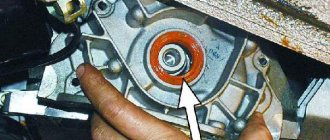
- Before installing the pump in place, lubricate the lip of the oil seal.
- When putting the pump in place, carefully tuck the working edge of its oil seal onto the crankshaft journal using a wooden stick.
- Only after this do we tighten the bolts securing the pump.
- Then install all the parts back in reverse order.
- Adjust the tension of the camshaft drive belt.
For VAZ 2110, replacement of the oil pump is completed. All that remains is to change the engine oil. We also recommend watching a video on replacing the oil pump.
Step-by-step instructions for repairing and inspecting oil pump parts:
1. For a detailed inspection, it is necessary to remove the oil pump.
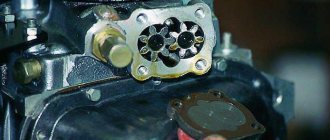
2. First, you need to unscrew the bolt (1) and remove the crankshaft position sensor (2), which is only available on engines with a fuel injection mechanism.
3. When disassembling the pump, you need to unscrew the six bolts and remove the pump cover.
4. Using two screwdrivers, you need to lift the pump housing so that the pins on the housing can come out of the holes located in the cover of the VAZ 2110 oil pump. Now remove the housing itself by disconnecting it from the cover.
5. We take the gears out of the cover: first the driving one, and then the driven one.
6. Now you need to unscrew the pressure reducing valve plug. An O-ring must be installed under this plug. Inspect the ring - if it is too compressed, it needs to be replaced.
7. Having unscrewed the plug, we take out the spring of the pressure reducing valve.
8. Now we take out the valve itself, gently tapping the body on a clean wooden stand. If the valve does not come out, it must be removed using a thin pointed object, preferably also wooden, so as not to damage the surface.
9. Now you need to carefully inspect the aluminum cover for visible signs of wear, mechanical damage, deep scratches in the contact areas of the gears. If found, the cover must be replaced with a new one.
11. The size of the maximum permissible diameter of the driven gear socket is 75.1 mm, so we measure the diameter, and if it exceeds the permissible one, we will also have to replace the housing.
12. Now you need to measure the width of the body segment in the middle part. If the measured value is less than 3.4 mm, the VAZ 2110 pump housing must be replaced.
13. Check the gears. The thickness of the drive should not be less than 7.42 mm. We measure: if it is less, we replace the gear.
14. The same applies to the slave. If the thickness is less than 7.35 mm, the gear must be replaced.
15. Then we check the axial clearances of the gears. It is necessary to install the drive gear back into the housing, after which we apply a steel ruler to the housing and use a feeler gauge to measure the gap between the gear and the ruler.
16. In the same way, measure the axial clearance between the attached ruler and the driven gear. For the drive and driven gears, the maximum permissible axial clearance is 0.12 mm and 0.15 mm, respectively. In cases where these values are exceeded, the gears must be replaced with new ones.
17. Through calculation, more accurate values of axial clearances can be obtained. To do this, a micrometer is used to measure the thickness of the oil pump housing along the outer surfaces, as well as the thickness in the area of the sockets for the drive and driven gears along milled surfaces in several places. The axial clearance is calculated based on the difference between the arithmetic mean of the socket depth and the measured thickness of the gears.
18. The next stage of repair is to inspect the pressure reducing valve seat to detect rough scratches and other deep mechanical damage on the inner surface. If found, the cover must be replaced.
19. If burrs and deep mechanical scratches are detected on the pressure reducing valve itself, it must also be replaced with a new one.
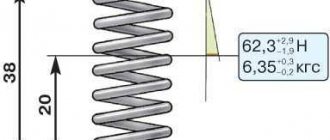
20. We also replace a bent, broken/broken or cracked pressure relief valve spring. The height of the spring in its free state is normally 44.72 mm; the same parameter under a load of 4±0.24 kgf is 31.7 mm. If there is a discrepancy, the spring must be replaced.
21. Assembling the oil pump. We install the driven gear with the chamfers on the teeth towards the housing.
22. Then install the drive gear in the same way - with the chamfers on the teeth facing the body. The gears must be lubricated with engine oil before installation.
23. Now you need to install the cover on the body and tighten the fastening bolts.
24. Before installing the pressure reducing valve into the seat with the bottom down, it must be lubricated with engine oil. Then you need to install the spring and tighten the plug with the aluminum O-ring of the oil receiver tube, also pre-lubricated.
25. It is necessary to pour engine oil into the pump through the oil receiver tube.
26. At the end of the repair and complete assembly of the car’s oil pump, turn the gears several turns so that the working surfaces of the gears are well lubricated.
Engine diagram and structure
Many motorists know the structure of the main power unit, but not everyone remembers it. In order to understand how the process itself occurs, let us recall how the engine works.
Engine diagram
1 - channel in the cylinder block for supplying oil to the oil line of the cylinder head; 2 — channel in the cylinder head; 3 — pipe for exhausting crankcase gases into the air filter housing; 4 - oil filler cap; 5 — exhaust hose pipe; 6 — pipe for removing crankcase gases into the throttle space; 7 - oil line in the cylinder head; 8 - camshaft; 9 — oil supply channel to the camshaft bearing; 10 — oil pressure indicator sensor; 11 — pressure reducing valve; 12 — channel for supplying oil from the filter to the main oil line; 13 - oil pump drive gear; 14 — driven gear of the oil pump; 15 — oil supply channel from the pump to the filter; 16 — anti-drainage valve; 17 — cardboard filter element; 18 — oil sump; 19 — oil receiver; 20 - drain plug; 21 - bypass valve; 22 — oil filter; 23 — oil supply channel from the crankshaft main bearing to the connecting rod; 24 — oil supply channel to the crankshaft main bearing; 25 - main oil line
How does engine lubrication occur (diagram and explanation)
Engine lubricant circulation diagram
So, when the issue of engine design has been considered, we can proceed directly to the consideration of lubrication. The system itself is considered combined.
Using pressure, the following are lubricated: main and connecting rod bearings of the crankshaft, camshaft bearings, cylinder walls (using splashing), pistons and oil scraper rings, the camshaft itself, valves and pushers.
The oil pump is located inside the engine, and only the cover cap is visible from above. The oil pump drive is mechanical, forced.
Schematic representation of oil circulation
Replacing lubricant
In order to change the oil, you will need a tool, 5 liters of oil (about choosing oil here) and an oil filter.
Shel Helix oil recommended for filling into the 10 series Lada engine
So, let's look at the sequence of actions:
We remove the lower engine protection (if there is one, of course). Unscrew the oil pan drain plug.
We wait for the oil to drain. While the liquid is leaking out, it is necessary to replace the filter.
To do this, use a special tool to unscrew the filter element. You need to pour a little oil into the new filter and screw it in place of the old one.
It is worth noting that between the motor and the filter there is a copper o-ring, which also needs to be replaced.
We tighten the drain plug. Unscrew the filler plug.
Using a funnel, we pour new oil into the system until the fluid indicator on the dipstick is between the MIN and MAX indicators.
Tuning
The manufacturer AvtoVAZ provides a minimum of 50 hp for all its engines. s, so the 21124 engine can be modified in several ways:
- tuning of the cylinder block - boring of cylinders to 84 - 88 mm using ShPG of the appropriate sizes;
- tuning of the intake/exhaust tract – 4 throttles and “spider”, respectively;
- modification of the cylinder head - lightweight camshafts and split gear with appropriate tuning by a specialist;
- modernization of valves - replacement of standard equipment with lightweight T-shaped parts.
Separate throttle for each cylinder
Thus, engine 21124 is an improved version of the basic internal combustion engine 2112 with the volume, piston stroke and height of the cylinder block increased to 1.6 liters. The developers have ensured the interchangeability of parts from other engines from the AvtoVAZ manufacturer.
If you have any questions, leave them in the comments below the article. We or our visitors will be happy to answer them
Rotary
The design of this type of unit is a little more complicated. The device consists of two rotors - driven and driven. Both are enclosed in a housing.
If the pump is unregulated, then the oil that is sucked into the device passes through the rotor blades. If the pressure level in the system is higher than the nominal or calculated pressure, then the pressure reducing valve is activated to relieve excess pressure.
Adjustable devices have a special movable stator equipped with a spring. It regulates and ensures constant oil pressure regardless of the engine speed. The stator is designed to control constant pressure by varying the volume of the cavity between the rotors. To do this, the stator is rotated in the required direction.
Removal
Begin:
- First of all, disconnect the “-“ (minus) wire from the battery, as with any other repair.
- Drain the oil (through the plug on the oil pan) from the engine
- We take out the camshaft drive belt
- We take out the crankshaft toothed pulley, then its key, using two flat-head screwdrivers.
- Now remove the oil pan
- Unscrew the oil intake fastener
Unscrew the oil intake fasteners and remove it
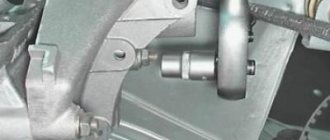
Using a 10mm socket with an extension and a ratchet, unscrew the six bolts securing the oil pump to the cylinder block.
Unscrew the mounting bolts using a ratchet socket
Remove the unit from the engine.
Be sure to wash the new oil pump with gasoline to wash off the preservation lubricant. We fill it with oil before installation so that it does not rotate dry when starting. It is also important to rotate the drive gear to install the pump on the crankshaft: so that the protrusions on the gear coincide with the groove on the crankshaft. Lubricate the edge of the oil seal before putting the pump back. Carefully tuck the working edge of the oil seal onto the shaft journal using a wooden stick. When tightening the bolts, be careful and careful. so as not to strip the thread. Install the remaining parts in reverse order.
Disassembly
So:
We clamp the pump body in a vice, placing soft pads on the jaws and, using a 8-mm hexagon, unscrew the bypass valve plug.
Unscrew the valve plug
- We remove the piston and spring of the bypass valve.
- We check the seat of the bypass valve - the presence of burrs and scratches is unacceptable
- Using a 5mm hexagon, unscrew the six bolts securing the pump housing to its cover.
Unscrew the bolts securing the housing to the cover
- We take out the pump housing.
- We take out its drive gear from the cover.
- Behind it, we remove the driven gear.
- We wash all pump parts with gasoline, diesel fuel or kerosene, wipe the gears dry, and lubricate them with clean oil before installing them back.
- We carefully inspect the body for cracks, chips, and severe burrs, and if found, replace it.
Permissible seat diameter and permissible partition thickness
- The same goes for pump gears; scuffing, chips, and cracks are not acceptable.
- We check the condition of the pressure reducing valve spring; if it is broken, cracked, or very short (compressed and does not match the dimensions), we replace it.
Acceptable dimensions of the pressure reducing valve spring
Assembly
We assemble the pump in the reverse order of disassembly. The driven gear inside the pump is positioned so that its side with chamfers and a mark is attached to the housing.
The mark with which the driven gear is applied to the housing
The same with the drive gear. That's all. The pump assembly is completed, all that remains is to install it in place, as our instructions say. In addition to the instructions, we recommend watching a video on this issue.
Max
The first problem we encountered after purchasing a used VAZ 2112 car was that the timing belt broke and all the valves were bent. The repair cost more than 15 thousand rubles. After buying a car, be sure to go to a car service center, check everything and repair it, otherwise the repair may cost a pretty penny like it did for me. And so the VAZ car is not whimsical in maintenance. I do everything myself and rarely call for service.
your name
Timing and alternator belts are usually changed immediately upon purchase. The same as liquids (antifreeze, brake fluid, oil).
VAZ 2109: oil pump and its malfunctions When you need to replace the oil pump in a VAZ 2104 Replacing the VAZ oil pump yourself Repair and replacement of the VAZ 2110 oil pump
Assembly
Tip: When the pump is removed, we recommend replacing the front crankshaft oil seal located in the cover. We assemble the pump in the reverse order of disassembly. The driven gear inside the pump is positioned so that its side with chamfers and a mark is attached to the housing. The same with the drive gear. That's all. The pump assembly is completed, all that remains is to install it in place, as our instructions say. In addition to the instructions, we recommend watching a video on this issue. If a red indicator lights up on your instrument panel, signaling a lack of oil pressure in the system, then do not rush to run to the store and buy a new oil pump. The video discusses the most basic reasons why oil pressure may drop in a VAZ engine:
Replacing the oil receiver of a VAZ 2112
In this article we will continue assembling VAZ-2112 engine components.
Lubricate the sealing ring of the oil receiver with engine oil
It is advisable to replace the oil receiver O-ring
We install the oil receiver in place and tighten the bolt securing the oil receiver to the oil pump with a torque of 7.0-8.0 Nm (0.7-0.8 kgf m).
We tighten the two bolts securing the oil receiver to the cover of the second main bearing with a torque of 8-10 Nm (0.8-1.0 kgf m)
Cut off the protruding ends of the oil seal holder gaskets.
Lubricate the plane of the cylinder block with grease
Installing the oil pan gasket
If the pan is slightly deformed, it is better to coat the pan gasket with sealant.
We tighten the oil sump mounting bolts with a torque of 5-8 Nm (0.5-0.8 kgf m).
Install the key into the groove of the crankshaft
Installing the crankshaft timing belt
We put the timing belt on the crankshaft pulley
Install the washer on the belt drive pulley
We put on the generator drive pulley and attach the bolt and washer
We tighten the pulley mounting bolt, holding the flywheel on the other side with a torque of 97.9 - 108.8 Nm (9.90 -11.1 kgf.m)
We install the sealing gasket on the water pump and lubricate the gasket with grease.
Install the water pump into the cylinder block so that the factory marking of the pump is directed towards the mating plane of the cylinder block, since the mounting bolts are located asymmetrically.
Tighten the coolant pump mounting bolts to a torque of 7.64–8.01 Nm (0.78–0.82 kgf.m)
After this, install the cylinder head as indicated in the article - “Removing and installing the cylinder head.”
Running in the engine after assembly
The repaired engine is subjected to bench testing (run-in) without load according to the following cycle: 750–800 min -1. 2 minutes
1000 min -1 . 3 min
1500 min -1 . 4 min
2000 min -1 . 5 minutes
After installing it on the stand and starting the engine, check:
– whether there is a leak of coolant or fuel between mating parts and in pipeline connections; – oil pressure and whether there is any oil leakage through the gaskets;
If any unusual knocking or malfunctions are detected, stop the engine, eliminate them, and then continue testing.
If oil leaks through the gasket between the crankcase and the cylinder block, tighten the fastening bolts to the recommended torque.
If the oil leak continues, check the gasket and replace it if necessary.
If oil leaks through the gasket between the cover and the cylinder head, check the gasket and rubber bushings on the studs securing the cylinder head cover.
If necessary, replace the gasket and bushings, following the recommendations outlined in the article “Engine Assembly”.
After engine repair, a certain period of running-in of the working surfaces of new parts is necessary.
This especially applies to those engines on which the pistons, connecting rod and main bearing shells have been replaced, the crankshaft journals have been ground, and the cylinders have been honed.
Therefore, when running in a repaired engine, do not subject it to maximum loads.
Engine break-in should continue with the vehicle at the recommended speeds for the vehicle's break-in period.
Oil pump installation
- 1. Before installing a newly purchased VAZ 2112 or 2110 oil pump, be sure to lubricate its pressure reducing valve and gears. Also, when replacing, use only a new oil seal;
- 2. Install the oil pump, place the timing belt on the tension rollers, and align it according to the marks. Next, the plastic protection is installed.;
- 3. Put on the wheel;
- 4. Install the oil intake on the oil pump VAZ 2112, 2110;
- 5. Thoroughly degrease the crankcase and apply sealant;
- 6. Install a new gasket, then apply sealant again;
- 7. Degrease the block, install the crankcase in its place. The task will be simplified if you first screw a few bolts in different places and then tighten the rest;
- 8. The flywheel protection is installed, followed by the crankcase protection (if available);
- 9. Fill with high-quality oil and start the VAZ 2110, 2112 engine.
Repair of pump VAZ 2112, other models
You can also repair the VAZ 2110 oil pump with your own hands, which consists of disassembling this product, visual inspection to identify worn parts, followed by replacement. But it is the best option only if there are spare parts or another serviceable unit. In all other situations, it would be more practical to purchase a new product for the VAZ 2110, 2112.
Why does engine oil pressure drop?
Replacing the oil pump on a VAZ 2110 yourself
If you noticed a light that came on while driving on a warm engine, there is no point in starting the procedure by measuring the oil level. In any case, the dipstick will show a low content, since the lubricant still remains on the parts
Allow the oil 5-20 minutes to settle into the crankcase. The time interval from the moment the ignition is turned off until the start of measurement depends on the make of the car, air temperature, degree of engine heating, etc.
It is also important that the car is on a level surface
In the meantime, while our oil is draining, examine the surface of the engine for fresh oil stains, and check for visible damage to the oil sump. See how the oil filter feels, whether it is loose or whether its gasket is damaged. Then pull out the dipstick, wipe it dry and put it back, then take it out again. If the oil trace is near or below the minimum MIN mark, add oil to the engine. Check again with the dipstick to see if the level has risen and start the engine.
Checking the oil level in a Toyota car engine
Has the lamp gone out? What a score. The whole problem was the low lubricant content. Therefore, the device signaled to you that the oil pressure in the engine had lost. You were able to lift it, and everything fell into place.
And now briefly about other common reasons for the lack of oil pressure in the engine:
| Problem | Fixing the problem |
| Oil pump malfunction. | We buy a new one, pour a little oil into it before installing it |
| Malfunction of the sensor (measuring device). | We check the wires and the quality of the connections; - Remove the sensor and connect an external pressure gauge instead. If everything is normal, then the sensor itself has failed. It needs to be replaced. |
| Worn bearings in the motor. | We repair the engine. |
| Dirty oil filter, clogged oil channels, oil intake screen, faulty oil intake tube. | We install a new filter, clean the channels - Add engine oil - Remove the oil sump, clean the mesh, change the tube. |
| Problems or clogged pressure relief valve (liquid leaks through seals and other seals). | We disassemble the valve, clean it, and replace it if necessary. |
We recommend: The engine does not develop power: what to do?
DIY pump repair VAZ 2110/2112
The driver does not always have the opportunity to replace a faulty pump. In some cases, it is possible to repair the device by restoring the operating functions of the pump. If the pump has not yet exhausted its service life (50 thousand kilometers), then you can repair it. However, the pump cannot be repaired without using a special repair kit. This is a set of rubber gaskets and parts that most often fail and need to be replaced.
Repair kits for pumps may vary in composition, depending on which spare parts need to be replaced
In addition, you will have to thoroughly prepare for repairs: the place for disassembling and repairing the pump must be clean and level.
How to disassemble a water pump
Once the pump is removed from the machine, it will need to be disassembled. Only after disassembly and thorough cleaning will it be possible to replace the leaked parts of the pump.
To disassemble the pump, it is recommended to follow the following diagram:
- Wipe the product with a dry cloth.
- Unscrew the pump pulley.
- Pull out the thrust ring.
- Use a hammer to knock out the bearings from the shaft.
- Pull the shaft itself out of the housing.
- Unfasten the impeller.
- If something remains from the oil seal, then remove the remaining rubber from the housing.
The procedure for disassembling the water pump is intuitive: until you remove the pulley, it is impossible to get to the shaft and impeller
After this, the cavity of the pump itself must be thoroughly cleaned of dirt and old deposits - you can wash the pump with the same gasoline that is usually filled into the VAZ 2110/2112 tank.