Self-replacement of VAZ 2106 front suspension springs
The reason for the need to replace the front suspension springs may be a violation of the integrity of the springs. This may be the result of mechanical damage or the occurrence of cracks, as well as in case of serious subsidence.
Worth reading:
- Self-replacement of the VAZ 2110 CV joint
- How to replace the steering rack of a VAZ 2115 yourself
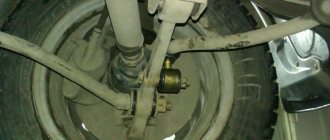
- Using a rope or wire, pull the upper arm higher, thereby providing access to the front suspension spring.
Self-replacement of VAZ 2106 front suspension springs
- Use a pry bar to pry the lower end of the spring and remove it from the lower arm support cup.
Self-replacement of VAZ 2106 front suspension springs
Algorithm for replacing the front springs of a VAZ 2107
Prepare the simplest tool for the job; every car owner who at least sometimes repairs his iron horse should have it.
You will need:
- A set of keys (you should have it in your trunk);
- jack;
- a brush with metal bristles;
- wheel wrench;
- hammer;
- wire hook;
- mount;
- insulating tape.
The sequence for replacing the front springs is as follows:
1. Remove the shock absorber from the desired side and remove the wheel.
2. Next, you need to slightly unscrew the nuts securing the lower arm.
Attention! When performing work under a vehicle, do not forget about safety precautions; place wheel chocks under the wheels and supports under the car body.
Place a lifting device under the lower arm and lighten the suspension (this is necessary to simplify the task of removing the stabilizer).
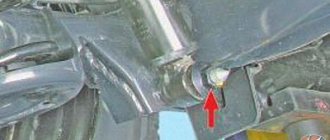
3. Unscrew the pair of nuts that hold the fixing bracket on the stabilizer pad.
4. Now remove the retaining bracket from its place, and then the cushion (stabilizer bushing).
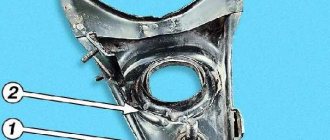
5. Slightly loosen the ball nut that secures the steering knuckle and the lower hinge pin. Be careful. The nut must be unscrewed until it coincides with the end of the pin. Once this happens, lower the jack that is located under the lower control arm slightly.
6. Take a hammer and make several strong (and most importantly, sharp) blows to the outer part of the fist. Thanks to this action, you will achieve the release of the pin from the rotary cam.
7. Pay attention to the lower arm. At the moment when the pin is knocked out, it will be on only one nut, you need to slightly raise the jack under the lower part of the lever. But there is no need to heavily load the suspension.
8. Unscrew the pin nut and lower the lower part of the lever as low as possible. Then, using a mounting tool, move the stabilizer (more precisely, its rod) over the stud. Now remove the jack and let the lever lower.
9. Take and make a hook out of wire and secure the upper lever with it. Please note that in this case there is no need to disconnect the steering knuckle. Try to mount the lever so that it is as high as possible - this will simplify access to the spring.
10. Pry the spring from below and pull it out from the bottom. There is a rubber spacer on the upper part of the support located on the body; remove it. If it is badly cracked, replace it. Now you have an idea of how to remove the front springs on a VAZ 2107.
Also check out
- How to replace the support bearing of a VAZ 2110 without wheel alignment
- Installation of new front struts on Lada Priora cars
- How to replace a VAZ 2110 timing belt and tension roller at home
- Remove the suspension spring, remove the spring gasket from the upper support cup. After this, you can replace the front suspension spring.
Self-replacement of VAZ 2106 front suspension springs
To do this, do the following:
- Use electrical tape to secure the gasket to the spring and install the part in place.
Self-replacement of VAZ 2106 front suspension springs
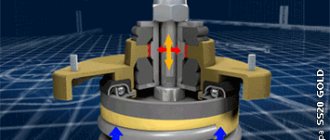
- Place the blade in the hole for the shock absorber, supporting the spring with it, and fix the lower coil. There is a screw surface on the lower arm that indicates the correct position of the spring. Installation should achieve this position
Self-replacement of VAZ 2106 front suspension springs
Self-replacement of VAZ 2106 front suspension springs
- Having installed the lower coil in the correct position, jack up the lever and load the spring. Using a mounting spudger, seat the spring onto the screw surface.
Self-replacement of VAZ 2106 front suspension springs
- Increase the load on the spring, install the stabilizer bar between the two studs that secure the bracket.
Self-replacement of VAZ 2106 front suspension springs
Self-replacement of VAZ 2106 front suspension springs
20
- Reassemble everything in reverse order.
After this, the replacement of the VAZ 2106 suspension springs can be considered complete.
You can check it out:
- Installation of new front struts on Lada Priora cars
↑ Installation of cross member A.70526 to support the engine when removing the front suspension cross member.
Supporting the engine with a cross member A.70526 or a hoist, remove the cross member.
Install suspension components and parts in the reverse order of removal.
Install springs on the front and rear suspensions of the same group (group A is marked with yellow paint, and springs of group B are marked with green). In exceptional cases, it is allowed to install group A springs on the front suspension, and group B springs on the rear suspension.
The front suspension should only have springs with yellow markings on the outer surface of the coils.
Instructions for working with rear springs
Before starting the replacement, you should slip 2 boots under the wheel located diagonally from the one being removed. Replacing the rear springs begins with unscrewing the wheel without removing it; later, you need to place a block under the end of the rear axle beam without lowering the jack. The entire mass of the car will rest on the block and will not compress the spring. Engine number, On a VAZ 2106 car, model and number, engine model, mass. The block should be positioned in such a way as not to interfere with unscrewing the lower shock absorber mount. Further on the annotation.
- Loosen the shock absorber mounting nut, unscrew it and do not remove the long bolt. The shock absorber must be unscrewed so that you can remove the spring later.
- Place ties on the coils of the spring 5 from the reverse sides, do not securely fix them, pressing them by the studs with a wrench.
- Raise the surface of the car body with a jack until you can remove the spring together with the ties.
- You, the rubber spacer sticks to the metal of the body and does not remain in the glass, only the steel ring falls out. I have been thinking for a long time about replacing the front windows of the VAZ 2106 with glass, like the VAZ 2106. Therefore, it is necessary to pry up the rubber using a long flat-head screwdriver so as not to remove it from the socket.
- Loosen the grips of the ties, alternately unscrewing the studs with a wrench. Replacing tie rods on VAZ 2101, 2103, 2105, 2106 as with VAZ collapsible tie rods. Rearranging the ties on the new spring will not tighten it to the approximate size of the old one.
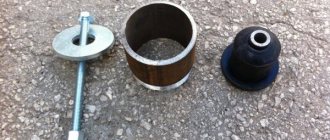
- Place a new rubber spacer with a steel washer on the upper coil of the spring. Its configuration is such that it should coincide with the shape of the upper turn.
Installing new front suspension springs
1. Take a new product and fix a new gasket (spacer) on it, this is where electrical tape comes in handy. Make sure the gasket is positioned correctly. The wide part should touch the spring part, and the narrow part should touch the body.
2. Use a spudger and push it through the special hole at the bottom of the arm. After this, fix the spring with a spatula (for now only on the bottom side).
3. Take a jack and place it under the lower control arm. Now lift the device slightly to load the spring. At this moment, use a spatula to guide the spring so that it takes place on the screw part of the cup.
4. Now continue increasing the load and throw the stabilizer bar over the stud. Check again that the spring is installed correctly.
5. Reinstall everything in reverse order. If the replacement is carried out on an overpass or a special pit, then the nuts securing the lower arm to the axle can only be tightened when the car is loaded.
Replacing the front suspension springs will not cause you any difficulties. The main thing is to adhere to the given algorithm and be careful at each stage.
After completing the work, check that all nuts are tightened well. Have a good trip and of course no breakdowns.
Replacement of the front suspension springs is carried out in the following cases: when the integrity of the springs is compromised, in case of mechanical damage or cracks, as well as in case of significant subsidence.
Properties of suspension springs
When torsion bars on vehicles were replaced with springs, handling improved and suspensions became more convenient to maintain. Springs maintain the vehicle's ground clearance, reducing vibrations and shocks while the vehicle is moving.
To make the ride comfortable, you need to choose the right parts. If the technical characteristics are unsuitable, then the positive properties of the suspension will be reduced to zero. Therefore, it is important to consider the following parameters:
- diameter - its increase affects rigidity;
- number of turns - as the number increases, the rigidity decreases;
- form.
Often, car owners strive to install stiffer parts in the suspension. This helps to increase the sensitivity of the steering wheel to the driver's control, but the grip on the road deteriorates.
Fans of a sporty driving style believe that, on the contrary, it is better to install parts with reduced rigidity. However, this suspension can create problems on country roads.
Let's take a closer look at which springs are best installed on a VAZ.
Springs and shock absorbers for the front and rear suspension of VAZ 2106, 2107, 2101, 2105
Well, spring has come, I decided to do the suspension. First of all, I spent a couple of days surfing the Internet. You need a sports suspension so that the car behaves steadily on the highway at least up to 160 km/h and has the least amount of roll when cornering. At the same time, I want a more or less comfortable ride in the city, over bumps, etc., I also go to the country. There is no need for a big understatement. The money factor is also important...
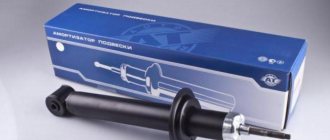
SHOCK ABSORBERS FOR CLASSICS VAZ 2106, 01, 05, 07, 03 – PLAZA SPORT, SINGLE-PIPE, GAS-OIL.
{loadposition user20}
In the picture above there is an ammo of the old and new batch (yellow and orange).
Monotube shock absorbers are better and more reliable than twin-tube shock absorbers. And of course, gas-oil ones! First of all, I spent a couple of days surfing the Internet. The main fluctuations were between KYB and PLAZA. PLAZA won. In the Internet community there is a prejudiced attitude towards these shock absorbers, namely, that when buying them you are playing the lottery. Some drive perfectly for more than 100 thousand, some break down in the first thousand. Having reasoned logically, summarized the information and read the official explanations from PLAZA representatives, I came to the conclusion that the culprit is:
- Fakes. Questionable shock absorbers were purchased at markets, small shops, etc. Often the seller himself is confident in the originality of the shock absorber. To combat counterfeits, PLAZA changed the labeling and color of ammo. Now plaza sports are yellow (formerly orange), and plaza standard are orange (formerly yellow). I just got Plaza Sport front ones from different batches (one orange, one yellow). So take a look at the box before you buy it. And yet, in each box with a shock absorber there is a piece of paper with the serial number of the shock absorber with a stamp.
- Incorrect pumping. Many “tuners” don’t even know that shock absorbers need to be pumped before installation! Such shock absorbers have a high probability of failure in the first thousand. Bleeding shock absorbers before installing them on a car. I’ll briefly describe it: Turn the ammo head down, squeeze it all the way, 3-4 seconds. Hold, turn back, 3-4 seconds. hold, release (let open) and so on 6-7 times. To check whether it is pumped, we press sharply in the working position - if there are no dips, the stroke is uniform, then everything is fine. If there is, we pump it further. After bleeding, the shock absorber should remain in working position. Do not turn!