Brake hoses in the VAZ 2107 are made of rubber, and they need to be changed periodically. Over time, they become brittle, the rubber wears out, and the brake fluid begins to leave the reservoir. If you don’t monitor its level, one day you may end up in a situation where the brakes simply fail, and it’s good if this happens on a deserted street. To avoid this problem, monitoring the condition of rubber parts and brake fluid levels should be carried out regularly, regardless of service life.
Replacing brake pipes in a VAZ is a process that you can easily do yourself in the garage, using the advice of professionals.
Replacing main brake pipes in a classic VAZ 2107 2106 2105, video
We do-it-yourself replacement of main brake pipes in classic Lada cars, such as VAZ 2107 2106 2105 2104. The work will be performed on the “six” we all know.
The replacement is being carried out due to the fact that during a previous body repair, one of the main brake pipes was incorrectly secured, as a result of which it constantly rubbed against the cardan. There are no visible leaks, but you yourself understand that the brakes are the most important thing in a car, so such parts require priority replacement, especially since it is not so expensive. To work, you will need an inspection hole or a lift, for ease of work, a standard set of keys, and, if desired, self-made plugs from rubber hoses so that the brake fluid does not leak out. Video of replacing main brake pipes in the classic VAZ 2107 2106 2105 2104:
After replacement, do not forget to bleed the brake system; for this you will need an assistant.
BRAKE PADS PROBLEMS
The parts of the braking system in question have to be changed not only when they wear out, but also when malfunctions occur that are associated with the use of low-quality consumables or too active driving. The following characteristic signs indicate problems with the pads:
- creaking, grinding and other extraneous sounds when braking;
- car skidding when pressing the brake pedal;
- to operate the pedal you have to exert more or less force than usual;
- beating of the pedal when braking;
- after releasing the pedal, it does not return to its original position;
- the presence of black dust on the rims.
EXTERNAL SOUNDS
Modern brake pads are equipped with special indicators that indicate wear of these car parts. The indicator is a metal strip that is attached below the friction lining. When most of the material is worn out, but the pad is still able to decelerate, a characteristic grinding or whistling sound appears when the brake pedal is applied. If the pads are not equipped with such indicators, the presence of extraneous sounds indicates obvious wear of the elements in the brake mechanism and the need to replace them.
Pad wear can manifest itself in different ways, and one of the signs is extraneous sounds when braking.
SKID
If the car skids to one side when braking, then the likely cause is wear on one of the pads. The car can skid until it turns around, even on a dry surface. In addition to the pads, skidding can occur due to scuffing or deformation of the brake discs.
VIDEO: WHY DOES THE CAR PULL TO THE SIDEWAY WHEN BRAKING
Some time ago I was faced with a situation where the car began to pull to the side when braking. It didn't take long to find the reason for this behavior. After a quick inspection of the car's underside, it was discovered that one of the rear brake wheel cylinders was leaking. This caused brake fluid to get on the working surface of the pad and drum, as a result of which the mechanism was unable to perform its function. The problem was resolved by replacing the cylinder and bleeding the brakes. If you encounter a similar situation, I recommend replacing the entire cylinder rather than installing a repair kit, since the quality of rubber products today leaves much to be desired.
INCREASING OR DECREASING PEDAL FORCE
If the pedal has to be pressed unusually hard or lightly, the problem may be caused by worn or dirty pads. If everything is in order with them, then you should check the integrity of the entire brake system for fluid leaks.
VIBRATION
If there is vibration when you press the brake pedal, then a possible reason is that dirt has gotten between the brake disc and the pads, or a crack or chips have appeared on the latter. As a result, parts are subject to premature wear. However, you should be aware that a similar phenomenon is also possible due to problems with the hub or hydraulic cylinders of the brake system.
THE PEDAL IS DOWN
Sometimes it happens that the brake pedal does not move back after being pressed. This indicates that the pads are “stuck” to the disc. This phenomenon can be observed at sub-zero temperatures when moisture gets on the pads. In addition, air may enter the braking system, which requires inspection and subsequent repair or bleeding of the brakes.
RAID ON DISCS
Plaque on wheel rims is black dust, which indicates wear on the pads. If the dust contains metal particles, then not only the pads are erased, but also the brake disc itself. If such a situation arises, you should not delay inspecting the brake mechanism, as well as replacing failed parts.
The appearance of black deposits on wheels can be caused by active driving or natural wear of the pads.
One day I noticed that the front wheel rims were covered with black dust, and it was not road dust. It is no longer known what brake pads were installed at that time, but after replacing them with factory ones from AvtoVAZ, the situation remained unchanged
Therefore, I came to the conclusion that the appearance of black dust is a normal phenomenon, indicating natural wear of the pads.
How to change front brake hoses on a VAZ 2107
Good afternoon dear friends. The brake system of any car includes brake lines and rubber hoses. The latter have the ability to “crack” during operation, losing their tightness. If there is no tightness in the system, brake fluid leaks out, which means there will be no effective brakes, resulting in an accident or expensive body repairs.
To avoid this, you need to monitor the condition of the brake hoses. If cracks and breaks are observed on their surface, replace them urgently. Today we will learn how to independently change the front brake hoses on a VAZ 2107 , and a specialist will show on video how to do it correctly, reveal all the secrets and nuances of replacing them using the example of a Lada 2106.
When to change hoses
By regularly diagnosing the system, it is easy to understand when it is time to change spare parts:
- The appearance of cracks in the braid.
Cracks in the braid
To see them, just bend it a little. The size of the crack does not matter; even the smallest tear length can quickly lead to serious wear. - The appearance of liquid near the tips.
- Violation of the integrity of the part, the appearance of frayed areas.
Integrity violation - If the brake fluid starts leaving the reservoir too quickly.
- If the car has just been purchased secondhand.
Any of these reasons is a good reason to replace old spare parts with new ones.
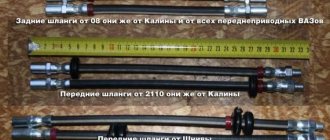
Brake hoses
Video diagnostics of flexible brake pipes
Required Tools
- Special split wrench “8/10” for unscrewing brake pipes
- Open-end wrench "17"
- Socket wrenches for “14” and “10” or heads for the same bolts
- Pliers or round nose pliers
To replace the front brake hoses on a classic, you will need a narrow metal brush to clean the bolted joints from dirt and a rubber cap to “plug” the metal tube. This cap can be taken from the bleeder fitting of the working brake cylinder. We'll talk about how to use it below. I advise you to buy new copper sealing washers in the amount of 4 pieces.
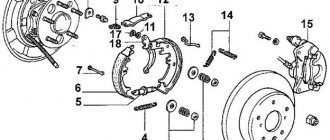
Disassembly and assembly of wheel cylinders
| Rice. 7–16. Wheel cylinder: 1 — pad stop; 2 — protective cap; 3 - cylinder body; 4 - piston; 5 - seal; 6 — support cup; 7 - spring; 8 - crackers; 9 — thrust ring; 10 - thrust screw; 11 - fitting; A - slot on the thrust ring |
| Rice. 7–17. Wheel cylinder parts: 1 - piston assembly; 2 — cylinder body; 3 - thrust screw; 4 - thrust ring; 5 - crackers; 6 - spring; 7 — support cup; 8 - seal; 9 - piston; 10 - protective cap |
Install the piston assembly with the automatic device on a special device so that the protrusions of the device cover the head of the thrust screw 3 (Fig. 7–17). Using a special screwdriver, turning piston 9, unscrew the stop screw 3 from the piston. Remove seal 8 with support cup 7 and crackers 5 from the screw. Separate thrust ring 4 and thrust screw 3.
How to replace the rear brake hose of a VAZ.
Assemble the automatic device for adjusting the gap between the shoes and the drum and the wheel cylinder itself in the reverse order, taking into account the following:
— tighten the piston thrust screws with a torque of 3.9–6.9 N·m (0.4–0.7 kgf·m); Slot A (see Fig. 7–16) on the rings should be directed vertically upward; deviation from the vertical is allowed no more than 30°. This arrangement of the slot ensures more complete removal of air from the wheel brake drive when bleeding the brake;
— to pre-compress the thrust rings, press the pistons into the cylinder body using a special device shaped like a cylinder with a conical internal hole;
— the force of pressing the piston into the cylinder must be at least 343 N (35 kgf); if the force is less than 343 N (35 kgf), replace the thrust ring;
— when pressing the piston into the cylinder, it is necessary to maintain dimensions of 4.5–4.8 mm and 67 mm (maximum) (see Fig. 7–16) for a free fit of the brake drum;
— before installing parts into the cylinder body, lubricate them generously with brake fluid.
After assembly, check the movement of each piston in the cylinder body. They should move easily within 1.25–1.65 mm. Replace the protective caps 2 last.
Repair of VAZ rear brake cylinder. Budget renovation.
Replacement of rear brake cylinder cuffs of VAZ 2102
How to replace cuffs on a rear brake cylinder
Checking wheel cylinder parts
Pads
- Carefully check the pads for damage or deformation.
- Check the elasticity of the tension springs, both upper and lower; if necessary, replace them with new ones.
- The springs must not have residual deformations when stretched with a force of 343 N (35 kgf) for the lower springs and 411 N (42 kgf) for the upper ones.
Check the cleanliness of the linings, if dirt or traces of grease are found, thoroughly clean the linings with a wire brush and rinse with white spirit, in addition, check for any leakage of grease or oil inside the drum; eliminate the faults. Replace the pads with new ones if the thickness of the linings is less than 1.5–2 mm.
LADA Kalina engine cooling system diagram
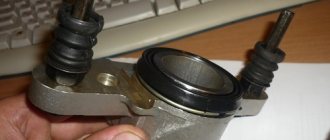
Rice. Rear brake working cylinder: 1 — piston assembly; 2 — fitting for removing air; 3 - cylinder body; 4 - thrust screw; 5 - thrust (split) ring; 6 - crackers; 7 - spring; 8 — support cup; 9 — seal (rubber cuff); 10 - piston; 11.protective cap (“boot”)
On the VAZ-2104, VAZ-2105, VAZ-2106 (since 1986), VAZ-2107 and their modifications, automatic adjustment of the gap in the rear brakes is carried out using split thrust rings 5 (Fig.), pressed into the cylinder.
Therefore, when disassembling, first remove the anthers 11, and then apply light blows with a hammer through a soft metal drift to the piston 10 so that another piston, complete with ring, cuff and other parts 1, comes out from the opposite side.
Then a drift is inserted from the side of the removed piston and the one that was hit first is pressed out. During the operation, the drift should not touch the walls of the cylinder so as not to scratch it. The requirements for cleanliness are the same as when disassembling a VAZ-2101 cylinder (see above).
Then, holding the thrust screw with 4 pliers, using a screwdriver inserted into the slot of the piston 10, we unscrew the parts.
After replacing cuff 9, we assemble the assembly by moistening the parts with fresh brake fluid. The tightening torque of the thrust screw is 0.4-0.7 kgf-M. The pistons are pressed on each side.
When installing in place, ring 5 must be compressed, for which a small clamp is sometimes used.
Remember that the slot on the thrust rings 5 must be directed vertically upward (permissible deviation no more than 30°), otherwise air will not be removed from the cylinder.
After assembling the unit, check the stroke of the pistons. They should move easily by about one and a half millimeters (more precisely 1.4-1.6 mm). If this does not happen, the rear wheels will not release the brakes. Most likely the reason is improper assembly or contamination of parts.
How to unscrew an old brake hose
1. Carefully clean with a metal brush all the bolted connections that we will unscrew: the fastening of the brake hose clamp to the working cylinder, the bolt connecting it to the cylinder, the joint between the hose and the brake pipe and their fixing plate. These places are located in the wheel area and serve as an excellent storage area for road dirt and rust. This must be done so that there are no problems when dismantling all these parts.
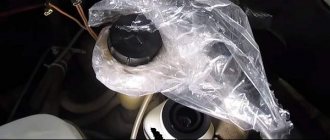
2. Unscrew the cap from the brake fluid reservoir and instead put on a plastic bag and screw the cap onto the clutch reservoir. This is necessary to seal the brake system. Having done this “trick”, you will not lose much “brake fluid” when replacing the front brake hoses on a classic.
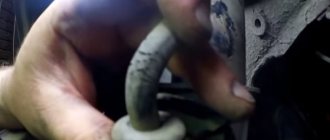
3. Using pliers or round nose pliers, remove the fixing bracket from the junction of the tube and hose. It is needed to prevent spontaneous unscrewing of the fitting.
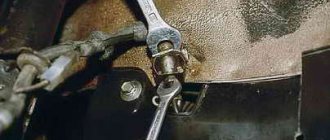
4. Using a special split wrench set to “10”, unscrew the metal tube from the hose fitting, fixing it with the wrench set to “17”.
Important! When unscrewing the tube fitting, make sure that it does not rotate with the fitting. There is a chance to break it. To prevent this, you need to “soak” the contact area with WD-40 and develop it by slightly swinging the key in the direction of opening and closing. If this does not help, then remove the opposite end of the front brake hose, fix the fitting, and use a key to “17” to unscrew the hose.
Having removed the hose from the metal tube, close its fitting with the cap mentioned above. This will prevent loss of brake fluid.
5. To unscrew the brake hose from the working cylinder, you need to use a “10” key to unscrew the bolt securing the hose clamp from the wheel hub. Remove the fixing bracket.
6. Using a spanner wrench or a 14mm socket, unscrew the bolt securing the hose from the brake cylinder.
It is recommended to replace the old copper sealing washers with new ones. You will see them when you remove the fastening bolt from the hose fitting and the working cylinder seat. They seal the joint, so there should be two of them - one on top under the bolt head, the second on the bottom, between the cylinder and the fitting.
Removal is complete; reassembly is done in reverse order. After this, it is recommended to bleed the brake system; how to do this was described in detail in the previous article. We check the connection points for leaks and tighten them if necessary.
Video, replacing the front brake hoses of VAZ 2106, VAZ 2107:
Basic faults
The brake system itself is quite simple, but some of its elements require special attention. Main types of faults:
- The brake fluid leaks, resulting in a drop in pressure in the system. If a preliminary inspection does not find a leak, it is necessary to check the brake master cylinder. We bend the noise-insulating mat located under the brake pedal and inspect for streaks in the area of the rubber seal of the master cylinder. The presence of drips will indicate that the cause has been found and requires disassembling the cylinder and then replacing the cuff. If there is a vacuum booster, the brake master cylinder must be removed and inspected.
- When you release the brake pedal, the car drives sluggishly. Reason: the rear or front pads are jammed. Seized pads are identified by checking the heat of the corresponding wheel. We touch each disk - the hottest one will be jammed. In the case when these are the front wheels, you can, after removing the wheel, move the brake cylinder. If this fails, you will have to replace it with a new one. In the case of rear pads, the brake wheel cylinder will need to be replaced.
- When you press the pedal, braking does not occur, but it does when you press it several times in a row. This may indicate the presence of air in the system. The solution to the problem is to bleed the brakes to remove air.
- Problem with the handbrake. Most often this problem occurs in winter. It manifests itself in the fact that after a long period of parking, when the handbrake is released, the wheels remain locked. The reason is that the parking brake cable is frozen. During its operation, moisture gets there and freezes in winter. If the casing is severely damaged, it will have to be replaced.
Brake master cylinder diagram
Vibration when braking
This is a fairly common malfunction that is associated solely with critical or uneven wear of the discs or drums, and the repair will consist of replacing them.
Car shifts to the side when braking
The malfunction is due to either a failure of the working (wheel) cylinder or wear of the pads. Replacing them (or repairing them) will solve the problem.
The VAZ 2107 brake pedal fails: the main reasons
The brake system must be sealed and free of air. If the pedal begins to fail, then, with a greater degree of probability, we can say that depressurization has occurred, that is, air has entered the system.
Other reasons:
- rust formation on the pedal linkage;
- failure of the vacuum booster;
- unadjusted distance between the cylinder piston and the pedal itself;
- lack of fuel fluid in the system.
It is also important to remember that brake fluid is an aggressive substance that can destroy thin pipes and even lines. That is why it is important to use only high-quality TZ
Low-quality liquid can form cracks through which it then flows out safely. But the flip side of the coin is that when you press the brake pedal, air leaks through these cracks.
Installation nuances
- The fitting of the new hose on the caliper side must be screwed on with a special cut-out downwards. Otherwise, it may rest against the brake pipe of the cylinder and break it.
- If, when dismantling the old front brake hose, the tube fitting was rotated along with the tube, then installation of a new one begins by screwing it to the iron tube. We fix it with a split wrench, and with an open-end wrench we twist the hose and tighten it.
- We tighten all threaded connections carefully so as not to strip the threads. We clearly get into it and try. They should twist without much effort. If you feel that it is difficult to “go”, then separate them and try to get clearly into the thread again.
- You need to tighten everything without any hassle, the threads are small, and the metal is fragile, you can tear it off and then nothing will be able to eliminate the brake fluid leak unless you pull the fittings and bolts.
Rear end
There is nothing complicated here, except that the line is longer and it is connected as follows - the longer part of the tube is connected to the GTZ and screwed to the “sorcerer”. Then the “sorcerer” is connected with a short tube to the brake mechanism on the wheel.
Replacement of the rear brake pipe is carried out as follows. If there is an overpass or hole, then you will not need to remove the wheel. First, apply liquid wrench to all threaded connections, then wait a little. After this, use a Phillips screwdriver or other suitable tool to unscrew the screws securing the tubes to the car body. After this, use a suitable wrench to unscrew the two fittings securing the tube to the brake hose and to the regulator. The element is removed and a new one is installed in its place. If the long line to the “sorcerer” is damaged, then the actions are similar, only unscrew the fitting from the GTZ and from the regulator.
After the replacement, you must remember to add brake fluid to the expansion tank to the required level and be sure to bleed the system, since it has taken in air and the braking process will be ineffective. If the front brake pipes on the left were replaced, then there is no need to bleed another line.
Replacing brake pipes VAZ
The brake system appeared on the first cars. Its presence has become the key to the safety of the driver and passengers. The first brake system did not have a complex mechanism of action and consisted of several mechanical parts that created the necessary friction on the wheel drive for its subsequent stopping.
The second stage in the development of the braking system was the application of the laws of hydraulics. With this method of braking, the interaction between the brake pedal and the working parts of the brake system is carried out using a special fluid called “brake fluid” (or abbreviated as TF). Brake fluid allows you to stop your vehicle more efficiently. In addition, the use of brake fluid softened the pressure on the brake pedal and made driving more comfortable.
For successful circulation of brake fluid from the brake drive system to the working parts, it is carried out through special pipes. Initially, they were made in the form of hoses, but since they were unreliable, they were replaced by another material.
About bleeding the brakes
To carry out the operation in the traditional way, you will need the services of an assistant. Its job is to press and hold the brake pedal repeatedly while you bleed air through the fittings on each wheel. The procedure is repeated until there are no air bubbles left in the transparent tube connected to the fitting.
Before pumping, do not forget to add fluid to the reservoir. Waste material with air bubbles that you have drained from the brake mechanisms cannot be reused.
To bleed the brakes without an assistant, you need to have a mini-compressor for inflating tires and make a fitting - an adapter in the form of an expansion tank plug. The supercharger is connected to the spool and pumps up a pressure of 1 bar, simulating pressing the brake pedal. Your task is to loosen the fittings, release air and add new fluid.
The integrity of the brake hoses must be constantly monitored, especially when the elements are well worn. If you notice a network of small cracks or a tear with protruding textiles, purchase and install a new pipe. Spare parts do not have to be replaced in pairs; hoses can be installed individually.
Source
Design and principle of operation of brake pipes
The car is braked by pressing the brake pedal. The pedal lever acts on a vacuum or any other booster, which creates the necessary pressure on the brake fluid. The liquid compresses and goes into a zone where this pressure is minimal. It enters the brake pipes, through which it is directed to the working parts of the brake system. The fluid puts pressure on the brake pads, causing them to compress. When you release pressure on the brake pedal, the pressure in the booster decreases, and the spring drive of the brake pads unclenches them and sends the fluid back to the booster (the area of least pressure).
The passage of liquid is carried out through tubes made of metal. The tubes extend from the vacuum booster and are laid under the car to the working parts of the brake system. The joints of the tubes are made in the form of threaded connections, which makes it possible to achieve maximum reliability when creating high pressure in the system.
To increase the reliability of the braking system, the pipes are connected diagonally, which allows the brakes to be used if one of the lines fails. So, for example, from the vacuum booster, one tube connects the working part of the brakes of the front left and rear right wheels, and the second tube directs the brake fluid to the front right and rear left wheels. At the junction of all four pipes, a special pressure regulator is installed, which filters out excess pressure from the system so that it does not cause a breakthrough in the lines.
Original and counterfeit spare parts, their differences
The main problem when buying new spare parts is not to buy a fake of dubious quality; to do this, you need to know what distinguishes a quality product from a counterfeit one.
- Manufacturer. A company that produces high-quality parts has the markings cast along with it, and not just painted on the braid.
- All symbols and instructions on the packaging must be translated into Russian.
- Brake pipes from trusted manufacturers are not sold individually; the front ones only come in pairs.
- Quality spare parts are made from high quality materials. To check, you can try stretching the product. A good one will not deform, but one made of unreinforced rubber will stretch.
- A hose of proper quality has a double press-fit circuit; counterfeit parts cannot boast of this.
How to distinguish original from counterfeit
How to repair brake pipes
This process requires the car enthusiast to have extensive locksmith skills and the ability to use special tools. Repairs are carried out in cases where it is not possible to replace the damaged line; it involves saving money on the purchase of a new pipe system and extends the service life of the old one.
To carry out repairs you must:
1. Unscrew the damaged tube from the cylinder or brake caliper.
2. After disconnecting, it is necessary to cut off the damaged area using a pipe cutter.
3. Clamp the tube 50 millimeters from the edge of the cut and chamfer the edge of the tube using a drill.
4. Remove all that remains of the chips and insert a fitting intended for connecting the tube to the brake operating mechanism into the cut area.
5. Insert the end of the tube into the special equipment and flare it. The main line that has undergone repairs must be purged with compressed air. And only after this is it installed with a working mechanism or another pipeline system using an adapter.
As for the length of the tube, this parameter depends on the car model. On some cars, the brake pipes have a reserve that allows you to shorten the pipe and reconnect it to the working mechanism. The metal from which the brake tube is made is flexible, so there should not be any difficulties with its position.
About flushing the brake system
A person’s life depends on the serviceability of a car’s brakes, and therefore diagnostics must be approached responsibly. The brake system requires periodic inspection. In addition, it needs to be washed from time to time, which many people don’t even realize. Most car enthusiasts will not even remember when their car had a complete brake fluid change. Moreover, there are often those who have not changed the fluid in the system at all since purchasing a new car.
Why flush the system?
Brake fluid tends to wear out over time, that is, with continuous use, over time it begins to lose its basic qualities. Brake fluid serves to transmit pressure through the master cylinder to the working cylinders when the pedal is pressed. In addition, it serves as a lubricant for the components and mechanisms of the hydraulic system.
Brake fluid is hygroscopic, meaning it can absorb water. This means that with constant moisture ingress, after several years of operation, the working fluid begins to boil at lower temperatures. This level can drop to the point where it boils even during moderate driving with infrequent use of the brakes.
The brake fluid that has absorbed moisture ceases to properly lubricate, and the pistons in the cylinders begin to heat up, the sealing collars overheat and leak, and when the brake fluid gets on the friction linings, it renders them unusable. The internal cavities of the cylinders are corroded by corrosion. All this is developing very quickly, and soon a complete repair of the brake system will be required, in particular, replacement of working elements. To avoid such unpleasant consequences, you can change the working fluid in a timely manner. It’s easier and cheaper than having to deal with repairs and replacement of components later.
Washing rules
The procedure for replacing the fluid is specified in the user manual. In addition, replacement is necessary when the fluid in the master cylinder reservoir becomes dark. In this case, flushing is required. To do this, you will need to purchase a special tool, although you can use a simpler method, namely, use a new TZ for these purposes.
There are several ways to wash it. You can use the services of a service station, where washing is carried out using special equipment. But the VAZ 2106 is easy to maintain, and you can wash it yourself in a garage. The work takes more time than turning to specialists, but the results are no less effective, and you will also be able to save money. The only thing you will have to fork out for is to buy a high-quality TZ. You need to take it with a reserve, as some will go away along with the old liquid. You will also need the help of a friend.
The procedure is as follows.
After washing, bleeding will be required, so you need to prepare a transparent silicone hose in advance, which can be pulled tightly onto the bleeding fitting on the cylinder. In terms of technology, flushing is very similar to pumping and is performed according to the same scheme. That is, you need to start with the left rear wheel, then move to the right front, the next will be the right rear and the last one to bleed is the left front. All liquid is pumped out of the tank. You can use a syringe or a medical bulb. If there is sediment or plaque on the walls, the tank should be removed and washed, or, in extreme cases, replaced. Next, fresh fuel fluid is poured into the tank. Then everything is the same as when pumping: one person sits in the driver’s seat and presses the pedal, the second unscrews the fitting and drains the brake fluid into a container
To avoid having to do pumping after washing, it is important to press and not release the pedal until the fitting is screwed in completely. Determining when to switch sides is very simple. This will happen when the color of the leaking fuel fluid changes, it becomes light
In this case, you need to carefully monitor the fuel fluid level in the master cylinder tank and periodically add it to the maximum.
Before starting this procedure, it is strongly recommended that you study the detailed instructions and read the repair and maintenance manual for the VAZ 2106. There are also methods of washing using compressed air and a compressor, with complete disassembly of all parts and washing by hand, but the result will be the same in any case.
Replacement of front brake tubes
To replace the front brake hoses, it is necessary to place the car in a pit and prevent any movement. Then:
1. Unscrew the line fitting. Hold the hose with a wrench to prevent it from turning.
2. Unscrew the brake pipe from the car body. Typically, they are covered with rust, so it is necessary to treat them with WD-40.
3. Unscrew the other end of the fitting from the brake cylinder or pressure regulator.
4. Install a new brake pipe and reassemble all components in the reverse order.
After repair work or replacement, it is necessary to fill in the brake fluid and bleed the brakes. Bleeding is mandatory and is needed to squeeze out air bubbles from the car’s brake system.
It is worth noting that in some cars, in order to remove the brake pipes, it is necessary to remove other elements, such as the gas tank. The fact is that the design of many models provides for the passage of brake pipes over these elements and their dismantling is possible only when the latter are removed.
As for the engine compartment, usually everything is quite simple and getting to such elements as the brake pipe is not difficult.
This completes the replacement of the brake pipes. As you guessed, this procedure is not at all complicated and does not require special knowledge and skills from the driver. The only thing that is needed when performing repair work is adherence to a clear sequence of actions and increased responsibility. Because the life and health of passengers and the driver depend on the correct operation of the braking system. Good luck on the roads!
About grooving brake drums
As mentioned above, some defects that arose during the operation of brake drums can be eliminated using the so-called groove. It should be said right away that it is not possible to sharpen a drum yourself in a garage. Because for this, firstly, you need a lathe, and secondly, you need the skill of working on this machine, and a serious skill at that. A novice driver can hardly boast of having a machine in his garage and the corresponding skills. Therefore, he has only one option left: to seek help from a qualified turner.
For high-quality drum turning, you can’t do without a lathe.
So what is a brake drum groove? It usually consists of three stages:
- preparatory stage. The turner removes about half a millimeter of metal from the inner walls of the drum. After this, the machine is turned off, and the drum is carefully inspected for internal defects. The preparatory stage allows you to determine the general level of wear of the drum and the feasibility of further work. Sometimes, after the preparatory stage, it turns out that the groove is useless due to severe wear, and it is easier to replace the drum than to grind it;
- main stage. If, after preliminary processing, it turns out that the drum is not very worn, then the main stage of turning begins, during which the turner smoothes and grinds all small cracks and grooves. During this work, about 0.3 mm of metal will be removed from the inner walls of the drum;
- The final stage. At this stage, the sanded surface is polished using a special paste. This procedure eliminates even the smallest defects that are not visible to the naked eye, and the surface becomes perfectly smooth.
It should be noted here that the groove will help get rid of internal defects on the drum, but it will be useless if the geometry of the drum is broken. For example, the drum was warped due to an impact or due to severe overheating. If the drum is cast iron, then it will have to be changed, since it is extremely difficult to straighten brittle cast iron using metalworking tools. If the drum on the “seven” is light alloy, then you can try to straighten it. And only after that start grooving.
replacing brake pipes on a VAZ 2107 car
Before unscrewing the brake pipe fittings, it is necessary to clean the connections from dirt and apply penetrating lubricant. To unscrew the brake pipe fittings, special wrenches are used that cover the five faces of the fitting and prevent them from being crushed. The operation is illustrated using a brake pipe connecting the brake pressure regulator to the rear brake hose. To perform the work of replacing the brake pipe on a VAZ 2107 car, you will need an assistant, as well as a special 10 mm wrench for brake pipes, a transparent vinyl tube of a suitable diameter, a container for draining brake fluid, fresh brake fluid (see “Operating fluids used on a VAZ car 2107").
Removing the brake pipe from a VAZ 2107 car
1. We prepare the VAZ 2107 car for operations (see “Preparation of the VAZ 2107 car for maintenance and repair”).
2. Using an 8 mm socket wrench, unscrew the screws of the two brackets securing the brake pipe to the underbody of the VAZ 2107 car.
3. Using a special 10 mm wrench, unscrew the connecting fittings securing the brake pipe to the brake pressure regulator (see “Brake pressure regulator of the VAZ 2107 car - check and replacement”) and the tip of the brake hose (see “Rear brake hose of the VAZ 2107 car - replacement” ). 4. Remove the brake pipe.
Installing a tomrose tube on a VAZ 2107 car
1. Install a new brake pipe on a VAZ 2107 car in the reverse order.
2. Fill the brake reservoir with brake fluid and pump the brakes on the VAZ 2107 (see “Hydraulic brakes on the VAZ 2107 - pumping and replacing brake fluid”). 0 0 votes
Article rating
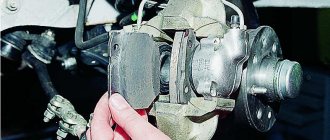
Removing the brake caliper
To remove the caliper you must do the following:
- lift the car on a lift or jack up the wheel on which the brake caliper needs to be removed;
- Using a wrench, remove the bolt securing the brake hose bracket;
- remove the bracket so that it does not interfere with further actions;
Important: under the bracket fastening bolt there is a spring washer, which must not be lost when dismantling the bolt and bracket
- unscrew the bolt securing the brake hose;
- remove the bolt after first removing the two o-rings;
- insert a rubber tube or bolt of a suitable diameter into the hole in the brake hose tip to prevent brake fluid from leaking out;
- Use pliers to remove the cotter pins securing the brake pad pins;
- pull out the pins securing the brake pads and remove them using a bit or a thin, but not sharp, screwdriver;
- remove the retaining springs from the brake pads;
- remove the brake pads;
Advice: if you plan to use the brake pads in the future, they should be marked with a marker so that during reassembly they can be installed in the same place where they were. If this is not done, they will wear out faster and brake worse.
- bend the locking plates of the washers on the caliper mounting bolts;
- unscrew and remove the bolts securing the caliper to the steering knuckle;
- Remove the brake mechanism (caliper) of the VAZ 2107 from the brake disc.
Important: the upper and lower caliper mounting bolts differ in the shape of the head. When installing the unit in place, you must not mix them up.
Rules mandatory for compliance with the installation of a new VUT
When installing a new vacuum mechanism, consider the following rules:
- the VUT rod is connected to the brake pedal after placing the device on the fixing pins;
- to perfect the sealing components, lubricate the space between the brake cylinder and the vacuum device with sealant;
- the VUT rod in the VAZ-2109, which affects the main brake cylinder located on the front side of the frame, can move during transportation or installation. Therefore, to check the condition of the product, press it all the way.