The transparency of the headlight glass must be ideal, since a powerful luminous flux passes through it, which, if there are deviations in the optics of the deflector, can both reduce the driver’s visibility and blind oncoming cars. Cleaning and polishing the outer surface of the headlight, removing dirt from the inside, differ in the method and complexity of implementation, but their importance is the same.
Selection of detergent composition
The aggressive components of most products can damage the surface of the headlight and the reflector. When choosing, it is important to pay attention to the composition, as you can purchase a low-quality product without a degreaser.
Distilled water does not leave streaks on the surface of transparent plastic and reflector, but is not able to wash away stagnant dust or haze from burning lamps.
An excellent detergent is regular toothpaste diluted in purified water. However, such a liquid requires careful rinsing, otherwise the plastic will become covered with a white coating.
How to wash internal headlight parts:
- soap composition;
- dishwashing liquid;
- shower gel.
Cosmetic micellar water to remove makeup will also help to wash the headlight from the inside. When choosing, you should pay attention to the absence of alcohol, which can easily wash off the coating and render the optics unusable.
What you need for work
On modern cars, xenon and bi-xenon are actively used, plus recently LED lights have been installed on cars literally from the factory, without forgetting about traditional halogen lights.
There really are a lot of options. But they are all polluted to the same extent. If you notice that the headlights or lenses are cloudy, you can correct the situation on your own. To do this you should take:
- cleaner;
- regular toothpaste;
- soft microfiber;
- lint-free fabric;
- hair dryer;
- screwdrivers;
- a set of keys;
- electrical tape;
- adhesive mounting tape;
- wire;
- fishing line;
- scissors;
- stationery knife.
At the final stage, the outer part of the headlights can be brought to perfection by using a polishing paste designed specifically for such purposes.
But usually there are no problems with external care of optics. Sometimes it is enough to install a headlight washer and periodically wipe and polish the surface, maintaining its original appearance.
Separately, it is worth emphasizing the first point on our list. Namely, on the detergent.
Not all liquids are suitable for working with automotive optics. Particularly when it comes to cleaning lenses and internal reflectors. There is an opinion that vodka and alcohol cope with this task perfectly. Yes, they are effective. But their problem is that such aggressive alcohol-containing compounds can corrode the applied coating on the reflector, thereby permanently ruining the part. Therefore, it is better to take a solution based on distilled water and regular dishwashing detergent. The effectiveness is slightly lower, but with several repetitions the result will be excellent.
Removing the headlight
To clean the reflector, plastic and auxiliary parts from the inside, you will need to remove the headlights from the car.
To remove the optics, on some models you will need to remove the bumper. To do this you need:
- Turn out the wheels and remove the fender liner clips that are attached to the edge of the bumper.
- Remove the radiator grille.
- Unscrew the screws and remove the clips that hold the bumper.
- Carefully remove the part without damaging the headlight glass or lens.
When dismantling the front bumper, you should pay attention to the corners, which shift when the fasteners are unscrewed and can damage the optics.
Dirt from the inside can only be removed with the headlight removed. After dismantling all unnecessary parts, just unscrew a few bolts and the optics can be easily removed.
The hole for the lamp can be removed directly from the car. To do this you need:
- Remove the protective boot.
- Bend the retaining tendrils and remove the lamp.
- Disconnect the block with wires and place the light element in a box or clean cloth.
When removing the lamp, avoid accidentally touching the bulb with sealant, glue or fingers. Any contamination of the part will significantly reduce the declared service life.
Rubber harness trailer suspension: device, how it works, pros and cons
- remove the headlight housing;
- take out all the light bulbs from there;
- take a wire about 15-20 cm long;
- wrap electrical tape around it to the middle;
- secure a soft, lint-free cloth on top of the electrical tape;
- soak in glass cleaner;
- insert a wire into the hole in the headlight housing;
- carefully begin cleaning the reflector;
- only without sudden and strong movements;
- Dry any remaining moisture with a hairdryer;
- put everything back together.
The process of removing dirt from the inside
Cleaning the inside of a headlight does not take much time, but it does require diligence and skill. Before starting work, you need to remove the lamps, unscrew the ignition unit and prepare the necessary tools. Immediately before the operation to remove dirt from the inside, we prepare cleansing baths.
Cleaning the reflector and plastic from the inside:
- Carefully pour liquid into the reflector through the lamp hole.
- Seal all holes with tape.
- Remove dirt with gentle shaking and circular movements.
- Drain the composition.
- Next, you need to pour a portion of fresh cleaning fluid into the headlights and continue shaking.
- Dust and minor contaminants will be removed from the surface of the reflector after 3-4 passes with water changes.
If plaque remains on the inside of the plastic, then you need to use the following method:
- Take two magnets.
- Tie a fishing line to one of them.
- Wrap the tools in a soft cloth.
- Place the magnet with fishing line into the headlight.
- Place the second tool on the front side of the plastic mask.
Once the magnets are firmly attached, you can begin cleaning the inside of the transparent mask using circular movements. This method helps get rid of more serious contaminants. To improve the effect, add a little cleaning compound inside the headlight.
The next step, after all operations from the inside of the optics, is to thoroughly rinse all parts with distilled water. This is an important and responsible moment in car care. A headlight that is poorly cleaned from the solution will fog up and become covered with a white film on the inside.
After complete rinsing, you need to thoroughly dry the optics. To do this you need to follow the steps:
- Wipe the headlight outside and inside with a clean cloth.
- Turn on the hair dryer and heat the optics evenly.
- If drops of water leak out, wipe them dry with a cloth.
- Check the optics for dryness using gentle shaking.
- If water appears, continue drying with a hairdryer.
- Leave the part alone for a couple of hours.
Installation of the removed parts is carried out in the reverse order.
When performing work, you should follow safety precautions and use gloves.
Large contaminants cannot be washed off without disassembling the modules and peeling off the plastic cover. However, a simple procedure without disassembly will significantly improve the appearance of the car and maintain a dense flow of light.
Deciding on the approach
It would be more logical to remove the glass, wash it properly and put it back in place. The practical side of the issue causes rejection. Removing the front panel and then re-seating it with sealant is quite a task. For comparison: many people prefer to buy a used headlight, wash it inside and polish it, rather than remove the glass and fix any significant defect in the existing optics.
It's easier to wash from the inside, but how? There are two technologies used in this regard:
- Classic. Fare is given a bath - a cleaning solution is poured inside, they wait, drain, wash out the remains and dry for a long time.
- Magnetic. A cloth is placed inside with a magnet wrapped in it. There is also a magnet on the outer surface. One pole attracts the other and the device located inside the product begins to slide along the glass, ensuring proper cleaning.
How to wash the inside of a headlight using the classic method
In its pure form, classic involves non-contact washing of the insides with a cleaning solution. The method is excellent for headlights of budget-class cars, where a minimum of electronics is used for optics. Dismantle the headlight, remove all lamps, lenses and valves of the ventilation system and that’s it - the product is ready for washing.
The cleaning solution is prepared manually. There is no universal recipe; some use glass cleaner, some use dishwashing detergent, and some even prefer household products of a more aggressive class. The safest thing to do is use a glass cleaner, not necessarily a car one.
You should purchase at the rate of one bottle of detergent per headlight. Container volume – 0.8-1 liter. Let us repeat that glass cleaner is not used in its pure form here: you should make a solution - 60% detergent, the remaining 40% tap water.
- Rinse the insides with running water. This is especially important if there is sand or other abrasives in the housing. It must be washed, otherwise when rinsing with a soapy mixture, grains of sand will scratch the inner surface of the glass.
- Place the optics in the container. Use a plastic bowl to avoid damaging the front of the product.
- Pour the cleaning solution inside the headlight so that the liquid completely covers the glass when the part lies face down.
- Leave the headlights in this position for 10-15 minutes so that serious dirt has time to soak off.
- Rinse the insides with a cleaning solution. Pour the poured chemical from one corner to another (along the glass), shaking the headlight periodically.
- Drain the detergent. The most convenient way to do this is through the ventilation holes, which allow you to remove up to 98% of the contents poured inside the product.
- Rinse the insides with running water. Do not save water; not a single trace of detergent should remain.
- Rinse the headlights with distilled water. This will remove drops of tap water that leave marks after drying. The number of repetitions must be at least two.
- Dry. At the first stage, a household hair dryer is usually used to dry hair. Barely warm air is directed into the headlight through the hole for replacing lamps and flows inside for about 20 minutes, with pauses so that the product does not overheat. At the second stage, natural drying is carried out. The parts are placed in the sun, and to speed up the result, a bag of silica gel is placed inside, covering the holes with lids.
How to clean the inside of a headlight without disassembling it? Magnet to the rescue!
The complex design of the optics, oddly enough, is not the main obstacle to cleaning it with Mister Muscle. The main disadvantage of the first method is that no one is immune from damage to the reflector. Under a certain set of circumstances, chrome literally “peels” off the plastic, causing the product to lose its former aperture ratio. The puzzling thing is that this can happen not even through the fault of the detergent: there have been precedents when chrome peeled off from the slightest exposure to ordinary tap water. Therefore, if you have not found experienced confirmation of washing the headlights of a certain car on the vastness of forums and social networks, do not take risks.
Use an alternative. Cleaning headlights from the inside with a magnet requires a minimum of disassembling the product, does not harm the reflector, does not require long-term drying and is relevant for almost any car. The only thing, keep in mind that the magnet inserted inside the headlight must be securely fastened, otherwise complete disassembly of the product will become inevitable. We will now tell you how to do this.
Opel Vectra *MilkyWay-13* › Logbook › Washing headlights from the inside without disassembling and polishing.
As you can see in the previous post, when replacing the radiator, I removed not only the bumper, but also the headlights to wash them. Having read a lot of information on washing headlights from the inside without disassembling them, I perked up, took out all the lamps from the headlight, and then a small bummer awaited me - there were pads, wires and an auto-corrector left in the headlight, which cannot be removed from the headlight indiscriminately. I became depressed. I started smoking nervously and reading the Internet to find at least some information about whether it was possible to fill it all with water and whether everything would work. I spent 2 hours and came across a couple of entries in the on-board car where guys washed their headlights without removing any electrics from the headlight except the lamps. I plucked up the courage to do it!
I needed: Dish detergent - 200 ml. Distilled water - 10 l. Wife's hair dryer - 1 pc. Wife for drying headlights - 1 pc. Time - 1 day.
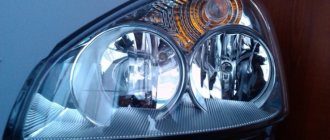
So, we take the headlight, take out all the lamps from it, put it in the bathtub, fill a bottle with 0.5 detergent (about 50 ml), carefully so that a lot of foam does not appear, fill the bottle with water and pour everything from the bottle into the headlight through any hole. Then we take the headlamp with both hands and shake it gently. BE CAREFUL, because if you shake it too hard, you can damage the paint on the lens mask, as unfortunately happened to me. Then, we raise the headlight and with stunned eyes we look at how much dirt is splashing there, like mine:
After this, drain the water through the holes and do it again until the dirt disappears. Two times was enough for me. Then rinse the headlight with ordinary water until all the foam is gone. When all the foam has been washed away, rinse the headlight with distilled water. It took me 5 liters of distillate for each headlight. Distilled water is needed so that there are no streaks left on the inner surface of the headlight when it dries, like with ordinary water. After that, we place them in the sun with the glass side up for a couple of hours, so that the liquid from the headlights flows out to the maximum and the sun dries the insides of the headlights. Then we sit my wife down with a hairdryer to dry the headlights. She sat for about 3 hours. I directed hot air alternately into each hole of the headlight for about 15 minutes, then the headlight cooled down and started again. Then they left the headlights overnight and continued drying in the morning for another 2 hours.
Then it was time to polish the headlight. What you needed: 800/1000/1500/2500 grit sandpaper - two sheets of each.
Runway polish - 1 tube.
Polishing wheel for a vertical drilling machine - 1 piece.
Question
Doctor48 6 565
Doctor48 6 565
- local
- OPC Club
- 6 565
- 16,464 messages
- Lipetsk
- 5D
- DRIVE2
So that this process does not get lost, I decided to separate it into a separate topic. Maybe it will be useful to someone
I decided to change the light bulbs. We got unsuccessful ones, and after six months the light went out.
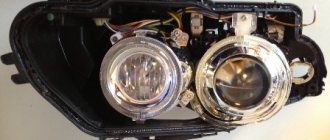
More precisely, there was light, but it looked like 5000K, and not 4300. And 5000K is hard to see on wet asphalt. Having removed the headlights, I thought, maybe the lenses are just dirty? And it was decided to dismantle them. There were no major problems other than assembly. The frame does not simply fit onto the lens. I solved the problem by inserting a wire and pulling it, the frame, to the lens. There are 5 latches
I always take Philips light bulbs, but they still have a difference
The lens is secured with 3 nuts
The frame does not allow you to remove the lens, so you will have to apply a little force
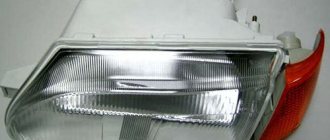
Lens
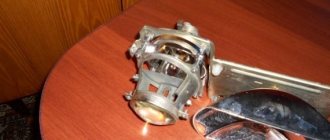
Burnt reflector (on both headlights)
Remove with a piece of aluminum tape
We get
We collect
Differences in light bulbs (bottom number, new on the left)
The light has become an order of magnitude better, all that remains is to resolve the issue with the headlight glass. The report will be
Source
How to wash and clean a headlight inside and out without disassembling it
The transparency of the headlight glass must be ideal, since a powerful luminous flux passes through it, which, if there are deviations in the optics of the deflector, can both reduce the driver’s visibility and blind oncoming cars. Cleaning and polishing the outer surface of the headlight, removing dirt from the inside, differ in the method and complexity of implementation, but their importance is the same.
Methods for cleaning headlights and necessary tools
Cleaning headlights can be chemical or mechanical. In the first case, various substances are used to either dissolve contaminants or significantly reduce their adhesion to the glass surface.
It should always be remembered that if the deflector is glass, then a much wider range of detergents can be used, while caps made of polycarbonate or other plastic can be irreparably clouded by the most unexpected cleaning agent.
When mechanically cleaning, you also need to remember the different hardness of glass and plastic parts:
- The former are much more difficult to scratch unless you use very coarse abrasives.
- The latter cannot withstand even just wiping with a rag, since any fine abrasive and dust will leave a network of scratches that can only be removed by deep polishing.
Tools and consumables you will need:
- detergents depending on the chosen cleaning method;
- technical rags that do not release fibers during use;
- masking tape and electrical tape, which are best checked to see if traces of glue can be easily removed from the surface;
- wire, nylon fishing line and magnets for penetration into hard-to-reach places;
- vegetable oil;
- a set of tools for assembly and disassembly operations;
- industrial adjustable hair dryer for softening sealant;
- toothpaste as a cleaning and polishing agent;
- knives of various configurations and sharpness.
Of course, the main cleaning agent will be plain water.
Cleaning the outside of the headlight
This operation is easier the more often it is performed. You cannot allow the headlight glass to develop until a cloudy yellow coating appears that is firmly attached to the surface, but you can deal with it.
Glass washing
First, you need to wash the headlight as thoroughly as possible from dirt and grease deposits. An ordinary car shampoo, specially designed to be harmless to glass and paintwork, will help.
For greater effectiveness, it is applied to the glass in maximum concentration and left for about half an hour. After which it is washed off with a rag and plenty of water.
The dull outer layer can be refreshed using regular toothpaste, which is generally intended for this, only for teeth. It contains a fine abrasive capable of polishing.
How to clean plaque with toothpaste
The paste is applied to a sponge or napkin, and then rubbed in a circular motion. It works slowly, so the procedure will require diligence and patience.
If you have a small-sized polishing machine or appropriate attachments for the drill, the process can be accelerated, but there is a danger of “digging holes”, making the surface uneven and glare.
The main thing here is not to abuse the speed and pressure on the glass, especially plastic, which easily overheats. Although ordinary glass does not tolerate local overheating, which can cause it to crack.
Periodically, the paste should be washed off and the current result assessed.
Removing sealant, glue or varnish with sunflower oil
It is very difficult to remove substances with good adhesion that accidentally get on glass.
Ordinary vegetable oil can help, the effect of which is to soften, relatively speaking, the sealant, penetrate under its layer and weaken adhesion to the surface.
After which the layer can be easily removed mechanically, with a rag or a soft scraper. The freed area is washed with detergent or degreased with alcohol solutions. For example, included in household glass cleaners.
DIY headlight polishing process
The process of polishing headlights using toothpaste can be divided into several stages:
- Protect metal parts and rubber seals from exposure to abrasive agents;
- Preliminary cleaning of headlights from dust and dirt.
- Apply toothpaste to the surface and rub with a brush, felt or medium-hard towel. You need to do this with vigorous circular movements until the scratches are completely removed. If necessary, add toothpaste or goyim paste. By the way, it is more efficient to polish using an electric drill, which is equipped with special attachments. The speed should be maximum.
- Cleaning the polished surface of glass from dental residues.
The first stage of polishing glass headlights is to prepare the field of activity. To do this, you first need to carefully tape all metal surfaces and rubber seals with tape to prevent them from being damaged during polishing. Then clean the surface from dirt, grease, oils and other things. It is advisable to use a degreaser, soap solution or washing powder.
Technology for polishing headlights using toothpaste
After completing the preparatory work, you can proceed to the main process of polishing glass headlights. This is done in this way: the paste is applied either to the surface of the headlight itself or to a brush (felt or towel).
Polishing is carried out with very vigorous and fast circular movements. It is best to use special tools, such as an electric drill, hammer drill or grinder. To do this, they are equipped with special grinding wheels, onto which goi paste or regular toothpaste is applied; you can use a special polish based on diamond dust
When processing glass headlights, as well as plastic ones, it is important to prevent the surface from overheating. Since this can lead to cracks or the plastic may “float” at high temperatures. To prevent this, you need to control the degree of heating of the glass surface; this is done by hand - the glass should not be very hot. Therefore, you need to take short breaks all the time.
Therefore, you need to take short breaks all the time.
If you have certain skills and use abrasive pastes with different abrasiveness ratings (from 400 to 1000), you can achieve a smooth change in the haze of the glass.
How to clean the inside of a headlight without removing it from the car
When cleaning the inner surface of the deflector, especially reflective surfaces (reflectors), it is better to remove the headlights.
Moreover, on most cars this will not pose any significant difficulties; at most you will have to dismantle the decorative parts of the false radiator or loosen the bumper fastenings.
But if this is undesirable, then you will have to put up with the inconvenience and work on the spot.
Cleaning with magnets
To press the cleaning cloth with the product applied to it, you can use two fairly powerful magnets.
One, with the help of a wire tied around it, is inserted inside the headlight housing, from which the lamp sockets, lenses and additional reflectors have been removed, the second is brought outside.
The magnets attract each other, after which the inner one begins to follow the trajectory of the outer one, wiping the headlight glass. The operation continues until complete cleaning, after which the body is washed and dried.
Technology for removing dirt from the reflector
The reflector (reflector) is located inside the headlight housing. You can clean it using a piece of fairly stiff wire, bent in place and wrapped in a lint-free cloth.
The wire is inserted into the headlight through the holes for the lamps and, due to the bend given to it, allows you to press the napkin to the reflector.
You must act with extreme caution, without applying force or using aggressive substances. Deformation of the reflector is not allowed, as is damage to its reflective layer, which is usually made in the form of a very thin coating.
At the end of work, the reflector must be thoroughly rinsed and dried.
Towbar for Renault Arcana: manufacturers, installation nuances, design choice
- remove all the light bulbs that are there;
- after this, a technological hole is formed in the housing;
- pour a solution of water and dish soap or micellar water into it;
- seal the hole with tape;
- shake the headlight thoroughly;
- open the hole, drain all the water;
- repeat the same steps 2-3 more times until the water coming out is clear;
- after the soap solution, pour in plain clean water;
- Dry the interior surfaces with a hairdryer.
Only when you are sure that the inside of the optics housing is dry, can you return all the dismantled light bulbs to their place.
If you have halogen or xenon, you cannot touch the bulb itself. Otherwise, fingerprints will remain, which will lead to rapid wear of the lamps.
That is, it is better to hold the light bulbs by the base itself. If possible, use medical gloves while working.
But that is not all. The lenses and reflector need to be cleaned.
How to wash the inside of a headlight without disassembling it
To perform this procedure, the headlight will still have to be removed. But the quality of work will be significantly higher than more conservative methods.
But it is not necessary to disassemble it by removing the glass, especially since not all lighting devices provide for this.
Selecting a detergent
The simplest solution may be a solution of ordinary liquid soap. It works smoothly and effectively.
It is possible to use kitchen dishwashing detergents or car shampoos.
It is better not to take risks with the use of alcohol or other solvents; it can damage reflective surfaces.
Work order
You can do it manually or using a compressor.
- The headlight is removed from the car, all removable parts, sockets, bulbs, lenses, reflectors, fittings are removed from it.
- The cleaning composition is poured into the body, and all holes are sealed with adhesive tape.
- Washing is done by vigorous shaking until the liquid becomes noticeably cloudy. The process is repeated several times.
- Residues of detergent are removed by rinsing the body with distilled water; it does not leave streaks or stains.
- The case is dried with a hairdryer at low temperature or compressed air.
- You can increase efficiency by placing a rag with the solution and supplying air from a compressor inside.
Cleaned surfaces should not be touched with unprotected fingers; this may leave fatty deposits, which will certainly appear due to the high operating temperature of powerful headlights.
Methanol for electronics and polycarbonate parts
This product has gained popularity due to its rapid evaporation, after which no traces remain. The advantages of methanol also include safety in relation to the internal components of the headlight.
It is important to remember that care must be taken when working with this toxic and flammable substance.
To begin with, dismantle the headlights, remove the light bulbs, and then pour in 200 ml of the substance. The headlight is turned over and rocked from side to side for several minutes. The liquid is poured out and the procedure is repeated several more times. The remains are dried with a hair dryer.
Cleaning the headlights yourself is not difficult, the main thing is to follow some rules: do not use acetone for plastic, and alcohol for the reflector.
How to wash and clean a headlight inside and out
When using a car for a long time, the headlights become dirty just like any other part. Moreover, pollution can be not only external, remaining, for example, after an off-road trip, but also internal. If dust gets inside the headlight, there is a high probability that its housing is leaking. Perhaps, when installing new lamps, you did not glue the glass firmly enough. And sometimes this happens at the factory. Be that as it may, the optical device requires thorough cleaning from all sides, including the inside. Of course, the easiest way to do this is to completely disassemble the headlight. But if the headlight is initially one-piece, or you are afraid of damaging its insides, use our recommendations to wash and clean it without disassembling it.
Materials and tools
In order to clean your headlights as much as possible from dust, water droplets and dirt, both outside and inside, prepare the following set of tools:
- cleaning agent;
- toothpaste;
- a soft cloth made of microfiber or other fabric that does not leave fibers;
- household hair dryer.
- Screwdriver Set;
- insulating tape;
- adhesive tape;
- hard wire;
- two small magnets;
- fishing line;
- stationery knife and scissors.
It’s worth taking a closer look at the headlight cleaner. Not every liquid is suitable for these purposes, especially when cleaning lenses and reflectors from the inside. There is an opinion that alcohol or vodka removes dirt best. This is true. However, alcohol can corrode the coating on the reflector and ruin the optics forever . Therefore, you should not use heavy artillery. Distilled water with dishwashing detergent will clean the headlight a little more slowly, but no less efficiently. Some people use a regular glass cleaner for these purposes.
Another interesting method is to use cosmetic micellar water to remove makeup. It is sold in all cosmetics stores. You should not choose an expensive option; most importantly, make sure that the composition does not contain alcohol.
To remove dirt, try using makeup remover
We fight yellowness and bluish bloom
Plastic headlight polishing and protection kit includes cleaning abrasive paste, protective spray and microfiber cloth
To quickly eliminate cloudy deposits and yellowness, just pop into an auto chemical store and choose a DIY headlight polishing kit. Various manufacturers have been offering something similar in retail for a long time. For example, the German brand Autosol has in its arsenal a convenient kit called “Set for polishing and protecting plastic headlights.” It includes a cleaning abrasive paste, protective spray and a microfiber cloth.
In the end, everything is done right in the parking lot. First, as mentioned above, the contact surface must be isolated with masking tape from adjacent parts. Headlights that have been cleaned of dust and dirt (an important point, since remaining debris can severely scratch the surface when wiped) should be carefully coated with restoring paste and polished by hand using a napkin.
By applying some effort for 10-15 minutes, you will be able to notice that the picture changes and the body becomes more transparent. At the end of this stage, the plastic is thoroughly washed with a stream of water or cleaned with a napkin so that no abrasive particles remain on the surface.
Ideally, the headlights should regain their original appearance, as if the car had just come out of the showroom. But to consolidate the result, a mild spray is used. This preservative is applied to the cleaned surface, after which, if necessary, it is wiped to a glossy shine with a microfiber cloth.
How to clean the inside of a headlight without disassembling it
Cleaning your headlights will be much easier if you can remove the glass and take them apart piece by piece. Unfortunately, many modern car models are equipped with non-removable lenses. But even they require cleaning from time to time.
headlights need to be cleaned not only from the outside, but also from the inside
Over the years of operation, an impressive layer of dust and dirt accumulates on the optical elements. This negatively affects the quality of lighting: the headlights become dimmer and more diffuse.
Video: why you need to wash your headlights from the inside
Glass cleaning
Even if you don’t want to completely disassemble the headlights, you still have to remove them from the car. This process will be different for different cars: in some cases you need to remove the radiator grille, in others you need to remove the bumper. Most likely, you yourself know how to properly remove headlights from your car, but if not, take a look at the owner’s manual.
- After you remove the headlight, you need to remove all the low and high beam lamps, turn signals, and dimensions from it.
- Pour a small amount of your chosen cleaning agent into the holes.
- Now you need to temporarily seal the holes with adhesive tape and shake it properly. Usually after these manipulations, the liquid acquires a dirty yellow color. This means that you didn’t start cleaning in vain.
- Open the holes and drain the water.
- Repeat steps 2 and 3 until the water runs clear.
- If you poured soapy water into the headlight, rinse it with clean distilled water at the end.
- Use a household hairdryer to dry the inside of the headlight. Do not set the temperature too high to avoid damaging the optics. You must get rid of all the small droplets.
- Make sure the inside of the headlight is completely dry and reinsert the bulbs.
When working with halogen and xenon lamps, do not touch the bulb itself! Due to the high internal temperature, traces of oil from your fingers will remain on it, even if your hands are perfectly clean. This will significantly reduce its service life. Try to hold the lamps only by the base. If this is not possible, wear medical gloves.
To wash away dirt from the inside of the headlight, pour the cleaning solution into the housing and shake it
There is another unusual way to clean glass from the inside. It is not suitable for serious stains, but it can help if you need to quickly remove a small stain.
You will need two small magnets, which you need to wrap in a soft cloth. Lightly moisten the fabric of one of the magnets in the cleaning agent, secure it to the fishing line and place it in the headlight housing through the hole for the lamp. Using the second magnet, control the internal one and clean the glass in the right places. When you are satisfied with the result, simply pull the line and remove the magnet from the housing.
Video: cleaning the headlight from the inside using magnets
Cleaning the reflector
The reflector inside the headlight collects the light from the lamp into a single beam. Constant exposure to a light source may cause it to become cloudy. If you notice that the light has become dimmer and more diffuse, the problem may be caused by the reflector.
To clean this part from the inside without completely disassembling the headlight, use the following method.
- Remove the car headlight.
- Remove the low and high beam lamps.
- Take a strong piece of wire about 15 cm long and wrap it halfway with electrical tape or tape.
- Place a soft, lint-free cloth over the electrical tape.
- Lightly dampen the cloth with glass cleaner.
- Bend the wire so that it can reach the reflector through the lamp hole.
- Use a cloth to gently clean the reflector. Do not make sudden movements or use force! If handled incorrectly, the protective layer on the part may peel off.
- If after finishing work there are still drops of moisture on the reflector, dry them with a regular hairdryer.
- Replace the lamps and install the headlight on the car
using such a device you can clean the reflector through the lamp hole
Never use alcohol to clean the reflector! Under its influence, the reflector will delaminate, and you will have to purchase a new optical system.
Self-recovery methods
To get to the reflector, the headlight removed from the car must be disassembled. The first option involves repeatedly passing the hot air of a hair dryer over the seam. The second option involves leaving the headlight in an oven preheated to 100°C for 20 minutes. After opening, all parts are cleaned of sealant residues, washed without using alcohol-containing liquids and dried.
Using metallic tape
Let's start with how to restore the reflector on a headlight using tape foil. All you need is metallized tape, purchased at a hardware store for about 30 rubles. Its adhesive base copes well with high and low temperatures, and the aluminum film is very wear-resistant.
In order to obtain a smooth surface with a minimum of seams after gluing the tape on the reflector, first, pieces of the most suitable shape are formed from several strips. Then remove the protective film and carefully stick it on. The whole procedure takes about half an hour.
Advantages of the method: durability, low cost, ease of implementation.
Disadvantages: when gluing, irregularities and seams remain, which impair the properties of the reflector.
Using metal foil
Aluminum foil is highly reflective, which allows it to be used in the restoration of headlight reflectors. You will also need some epoxy resin. To maintain a perfectly smooth surface of the foil, the entire pattern is made from plain paper. Then the parts are duplicated from aluminum sheet, a thin layer of resin is applied to the reflector and glued, removing excess resin. Advantages: withstands any temperature changes.
Disadvantages: being between the metal foil and the plastic base, epoxy glue lacks air and takes a very long time to dry. It is almost impossible to remove dried glue. Therefore, such a reflector is not suitable for repeated restoration. With the advent of tape foil, this method is practically not used.
Using chrome paint
Headlight reflector repair using chrome paint is the most popular. No need to cut and glue anything. Paint is sprayed onto the degreased surface of the reflector from a can of white chrome until a uniform, uniform layer is obtained. After painting, the headlight is dried according to the instructions on the can.
Benefits: Provides a smooth surface. You can even spray paint onto metal tape, thus increasing the reflective effect.
Disadvantages: does not tolerate high temperatures. You should try to find heat-resistant chrome paint.
Using mirror film
No less effective is the restoration of the reflector by applying a metallized self-adhesive film of the Oracal brand. Films from the Oracal 351 and Oracal 352 series can withstand temperature changes from -40 to +120°C and, according to the manufacturer, can be used outdoors for two years without deterioration in performance. Since the headlight is a hermetically sealed space, the service life of the self-adhesive film increases.
It is necessary to make templates from paper or ordinary tape that exactly replicate the shape of the reflector. Then cut out the polyester film of a similar shape. Using a hairdryer, glue it onto the prepared surface of the reflector, smoothing it out and preventing the appearance of bubbles. The joints and edges can be additionally treated with chrome paint.
Advantages: reliable manufacturer, excellent reflective effect.
Disadvantages: the price of 1 m2 starts from $5.
As you can see, restoring headlight reflectors is a simple procedure and quite feasible in a garage. Considering the fact that auto repair shops charge an order of magnitude more money for similar work, it always makes sense to try to return the headlight to its previous brightness with your own hands using one of the proposed methods.
Cleaning the outside of the headlight
Many drivers, when washing their car themselves, forget to pay due attention to the headlights. However, their cleanliness is much more important than the cleanliness of a bumper or car door, because safety depends on the quality of lighting.
Video: cleaning headlights from dirt
From yellowness and plaque
Sometimes an unsightly yellow coating forms on the outside of the headlights. It not only spoils the appearance of the car, but also makes the headlights dim.
Regular toothpaste will help remove yellow plaque from the surface of the headlight.
Today on the car cosmetics market there are a large number of products designed to combat this plaque. However, the most effective of them is already in your home - regular toothpaste. After all, if a product can remove plaque from teeth without corroding them, then it will cope with plastic just as well.
Apply a small amount of paste to the headlight and polish it
To clean a headlight with it, apply a small amount of paste to a towel or toothbrush, then buff the yellowed area in a circular motion. When finished, rinse the headlight and evaluate the result. If the plaque is very strong, repeat the procedure.
After polishing with toothpaste, the plaque disappears
Video: how to clean plaque with toothpaste
From sealant, glue or varnish
After carelessly gluing the headlights, a small amount of sealant may remain on the plastic. It does not affect the operation of the device, but spoils the appearance of the car. To remove the sealant, it must first be softened.
But what exactly to soften it with is a big question. The fact is that different compounds are removed using different substances. Unfortunately, you are unlikely to know what type of sealant was used at the factory. In this case, you will have to try all these means one by one.
Very often, the remaining substances can be dissolved using ordinary vinegar. If vinegar doesn't work, try White Spirit. In some cases, treatment with gasoline, alcohol, oil and even very hot water helps.
If none of the products gives the desired effect, warm up the contaminated area with a regular hairdryer. When exposed to heat, the sealant will become a little softer, which means it will come off easier.
In some cases, the headlight can be cleaned using a special silicone sealant remover. You can buy it at almost any store that sells car cosmetics. However, this product is not universal and is suitable, as you might guess, specifically for silicone compounds.
Once you have managed to soften the sealant, take a straight screwdriver and wrap it in a cloth soaked in the softening compound. Clean the desired area centimeter by centimeter. Then wipe the headlight with a clean cloth and enjoy its appearance.
Video: how to remove sealant using sunflower oil
To remove excess glue or varnish from the headlight, use WD-40. It will most likely be able to solve your problem. Nail polish remover without acetone is also suitable for removing glue.
Don't use acetone if your headlights are made of plastic! It will corrode the outer layer, and only polishing the headlights in specialized salons can help you.
With skillful hands you can remove any dirt, even bitumen residues. The main thing is that when cleaning headlights with your own hands, inside and out, follow the basic rules: do not use alcohol for the reflector and acetone for plastic. If you have tried all the remedies and the contamination still remains, try taking the problem to a car repair shop. Experienced specialists will do all the work, and at the same time suggest an effective cleansing method that you can successfully use in the future on your own.
Causes
It is much more important to understand why oil is flowing through the breather in the engine, since this will allow us to establish the cause and eliminate it. On your own, or with the help of specialists, is no longer of fundamental importance.
It is interesting that some reasons may not be directly related to the ventilation system at all.
Among the main causes of oil in the breather are the following:
- Severely worn piston rings and piston rings. This leads to the fact that a large volume of gases enters the crankcase of the power unit, and standard ventilation does not have time to cope with them. As a result, increased pressure in the internal combustion engine and squeezing out oil through the breathing valve.
- The oil separator drain channel has become clogged over time. As a result, the separated oil has no choice but to mix with the gases passing by it.
- Problems with the air filter. Or rather its pollution. When operating, the motor requires a large volume of air. If the filter becomes clogged, the engine senses a lack of air and begins to suck it in from other available sources. This is basically a ventilation system.
- Excessive oil volume in the system. A common mistake made by beginners who change the oil themselves for the first time and fill in more than required. The excess ends up in the ventilation.
- Valve jamming. The breathing valve itself, that is, the breather, may jam. It ceases to perform its functions fully. Hence the oil.
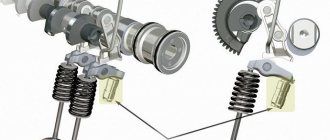
- Worn timing belt or valve burnout. Because of this, gas from the crankcase may end up in the space above the valve. Then it enters the crankcase, the pressure increases, and the oil is squeezed out.
As you can see, you shouldn’t immediately blame the breather for all the troubles.