Disassembling the headlight may be necessary for cleaning, replacing a broken internal element, painting the inside, or installing additional components (for example, angel eyes, LED strips). For most car enthusiasts, the thought of disassembling a headlight can be intimidating. However, this process is not too difficult if you study the information first and do everything correctly. In this article we will figure out how to disassemble the headlight. Most modern headlights have an adhesive connection between the headlight housing and its lens (the transparent part of the headlight). Let's look at ways to disconnect this connection, their advantages and disadvantages, as well as restoring the tightness when putting the headlight back together.
Introduction to the topic
Few car owners know how to disassemble a headlight, but they are willing to sacrifice personal time and money to install xenon lenses, which will have a better effect on driving safety at night.
The lighting devices of most modern cars are equipped with special parts that contain xenon lamps. The powerful light from gas-discharge components performs well not only at night, but also in conditions of snowfall, fog, and rain.
Xenon is considered a sign of an expensive foreign car with a bunch of options and a set of modern systems. However, many manufacturers have started producing components for independent implementation in almost any headlight.
For installation, you need to disassemble the optics; in addition, you will need a set of lenses, gas-discharge lamps, sealant, screwdrivers, a hair dryer, spatulas and a lot of patience.
Why do you need to replace the canopy glass?
Let's figure it out first, why is it necessary to replace the headlight glass of a VAZ 2110 or 2114:
- It's simple - glass separately is cheap and there is no need to buy expensive headlights entirely. The reason why it is needed is some pebble that has fallen on the glass or other foreign object. When the glass of the lamp cracks, the light from the headlights becomes dim.
- In addition, the headlight glass of a VAZ 2114 or VAZ 2110 may fade over time and then again, by the way, there will only be a replacement. Polishing rarely helps in this case, and this process is not so easy.
It’s easier to buy headlight glass and quickly replace it. - It’s easier to buy disassembled flashlights at flea markets. There you can find the glass you need and buy it very cheap. The assembled headlight itself costs about 5,000 rubles each. Why, one might ask, buy an expensive accessory if you can simply replace the glass?
Every motorist sooner or later faces problems with headlights. And he does what is best for him. If the headlight has become unusable, you can replace it as an assembly. To do this, you just need to buy a new model, sealant, film. Then dismantle the old headlight, apply sealant to the new lamp, and then calmly glue it in place. During the process, you need to ensure that no dust or dirt gets between the connections.
Description of automotive optics
Car headlights vary in appearance, size and type. However, the parts meet stringent requirements for certain characteristics. For example, for right-hand traffic, the optics must correctly collect the beam of light, have a clear limitation without flare horizontally and a clearly defined “daw” towards the side of the road. This luminous flux allows you not to dazzle oncoming drivers and illuminate the side of the road on the right.
You can form and direct the light beam:
- headlight reflector;
- lens;
- outer glass.
The reflector is most often used with halogen lamps, but there are exceptions with xenon. The lens is used to form the beam for all types of lamps. It can be halogen, xenon or even LED.
Glass with special guide ribs on the inside can be seen on old foreign cars produced before 1990. The most striking example is considered to be a lantern from an old Zhiguli. For example, on the glass of a VAZ 2107, stripes are clearly visible, which are responsible for collecting the light flux.
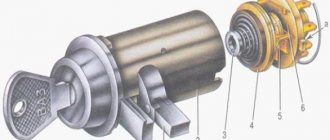
Structurally, any headlight consists of:
- housings;
- glass;
- reflector;
- lamps;
- wires and plugs.
Rating of the best sealants
Let's start looking at the best auto sealants for restoring head optics. Due to the abundance of offers on the market, choosing a good composition for a non-specialist can be difficult, but if you follow our recommendations, most problems can be avoided. We guarantee that our review includes sealants that really deserve it.
Dow Corning 7091
Silicone one-component adhesive is ideal for mating and sealing plastic/glass surfaces. It is also used for gluing glass to metal. The composition has excellent strength and elasticity, in its original state and it is moderately plastic and characterized by resistance to temperature fluctuations. On the market you can find sealant packaged in containers of three different colors, corresponding to a certain volume.
Dow Corning 7091
The polymerization time is short, the composition is non-toxic, odorless. No priming of the treated surface is required. The cost of a small tube with a volume of 0.31 liters. – about 800 rubles. There are more substantial containers for commercial use (20/250 l.). The best sealant for headlights based on silicone filler.
3M PU 590
A well-proven polyurethane sealant from a well-known American manufacturer is characterized by its ability to withstand temperatures of about 100°C. Among other advantages of adhesive-sealant, we note the following:
- versatility – reliable gluing of almost any surface in different combinations;
- polymerization time does not exceed 40 minutes;
- resistance to aggressive liquids;
- absolute moisture resistance, not afraid of direct exposure to ultraviolet radiation.
Packaged in tubes of 300/600 ml. After processing, the seam can be painted along with the surface itself. A 300-gram package costs from 450 rubles.
Donedeal DD6870
Another well-known American manufacturer presents a new transparent adhesive composition based on silicone, which has high strength and guarantees absolute tightness of the connecting seam.
Let us list the main advantages of the sealant:
- high polymerization speed (no more than 145 minutes);
- possibility of use in a wide temperature range (-60°C – +260°C);
- absolute moisture resistance;
- resistant to solvents and other aggressive liquids;
- high elasticity, transparency after hardening.
This automotive “super glue” is familiar to many Russian motorists. It also does not have an unpleasant odor and is considered an excellent tool for gluing and repairing automotive optics. Most often you can find packaging in the form of an 85-gram tube costing from 300 rubles. One bottle is enough to restore two damaged headlights.
Abro WS 904
Quite an unusual product, since it is produced in the form of a tape rolled into a small roll.
Abro WS 904
The adhesive properties of the sealant are excellent, the time for complete polymerization is short, in a word, an excellent sealant for car headlights. It does not stick to your hands when working and holds its shape perfectly after application.
It has no unpleasant odor either before processing or after complete hardening. The method of using the adhesive composition involves preheating it with a hairdryer and applying the tape to a previously degreased surface. After this, you need to press the parts to be glued tightly. One roll costing 500 rubles or more is enough to process four headlights.
Emfimastic RV
High-quality French one-component polyurethane-based adhesive characterized by excellent adhesive properties. It is odorless, complete polymerization time is 30 minutes. The sealant holds its shape perfectly and is characterized by high elasticity.
Available in 300/600 ml tubes, the cost of a 300 gram package starts from 500 rubles. For high-quality application of sealant, a special tool is required - a hand or pneumatic gun. Before application, the surface to be treated must be degreased.
Description of lenses
The lens is the most favorable component for installing a gas discharge lamp. The internal device allows you to accurately collect the light flux and direct it to the right place, providing a clear cut-off line and a clearly defined daw.
Lenses are divided into:
- xenon;
- bi-xenon
The bi-xenon version comes with a special built-in curtain that covers the light flux in low beams and opens completely in high beams. Thus, one lens is sufficient for installation in a headlight with one module. Classic components are responsible only for high or low beam and are not equipped with a curtain.
How to open and disassemble a headlight
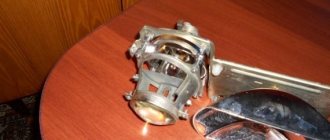
How to restore a headlight reflector
Changing the “right-hand drive” low beam beam by disassembling the headlight... This is what the headlight looked like before preparation - the beam was adjusted with pieces of aluminum tape.
How to find the right places on the reflector? We attach a piece of paper ~1×1cm to a thin stick and begin to move it along the reflector, carefully observing the beam. Quite quickly we find the necessary sectors and temporarily seal them with paper tape. As soon as all the “unnecessary” places are found and the beam becomes satisfactory, remove the tape and use a knife to remove the chrome in these places. There were thoughts not to spoil the reflector but to seal it or paint it with something, for example, gray heat-resistant paint for mufflers - but I decided not to risk it .
What is needed for installation work
To install bi-xenon and classic lenses, you will need to complete the following steps:
- Remove the headlights from the car. This may require a special tool.
- Warm up the light fixtures with a hairdryer, disassemble the module and remove the old sealant.
- Remove the halogen lamp from the reflector and unscrew all fasteners.
- Place the lens into the hole that appears and secure it with the retaining ring on the reverse side.
Installation of lenses in the headlight is carried out in accordance with the side position indicators. Otherwise, the “daw” will be turned the other way around and the beam will shine incorrectly. After installation, you will need to install ignition units in the engine compartment and connect the wires.
How to disassemble a headlight, rules for performing the procedure
Making eyelashes for the headlights
No matter what car the headlight on is broken (on Kalina, on Priora or another vehicle), the rules for disassembling the mentioned device look like this:
- The sealing compound should be heated evenly, relative to the entire perimeter of the lighting fixture. At the same time, the maximum heating temperature of the sealant is 3000 degrees. Otherwise, the device may be damaged.
- Avoid applying significant force when working with a car light. This is due to the comparative fragility of the material from which the device is made.
- When removing the headlight, you must turn off the power supply to the vehicle. Such actions will prevent a short circuit.
At the same time, you should be guided by the information contained in the instructions for the vehicle.
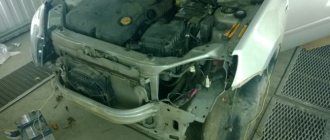
Dismantling and disassembling optics
It is not possible to disassemble the headlight directly in the car, so the optics will have to be removed. Cars use different mounting systems; many models will require the front bumper to be removed.
Typically, the optics are mounted with 1 or 2 bolts on top and several latches on the bottom, under the bumper. To remove the part you need to do the following:
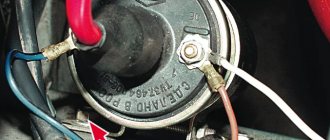
- Open the hood and remove the negative terminal from the battery.
- Unscrew the screws holding the headlights.
- Disassemble the back cover and remove the chips and wires.
- Remove lighting fixtures.
Some manufacturers use a latch system that does not require the use of bolts. It is quite easy to disassemble and remove such a part.
To install lenses, we must disassemble the optics. To do this you need:
- Unscrew all the screws along the contour of the glass on the back side.
- Disassemble the retaining clips and latches.
- Take out all the light bulbs.
- Place the part in a box of suitable size with a small hole for a hair dryer.
- Close the box and heat the headlight for 5–8 minutes.
- The softened sealant will easily come off if you carefully pry the glass with a flat-head screwdriver.
Often the headlight is assembled using a special rubber glue, which is easily softened in a box with a hairdryer. You should carefully remove any remaining compound that will interfere with the assembly of the headlight.
To remove the reflector from the headlight housing, screw in the adjusting screw to the end of the thread and remove the plastic fastener.
Recommendations
Comments 40
Heat it in the oven, and the glue that holds the reflector comes off and can be separated with a little effort, but I can’t tell you the time and temperature.
Break it, and put a new one on the sealant, everything is good!
Give Andrey Chemaev all the ingredients, he will do a full service for your headlights, they will be as good as new.
Someone seemed to boil them and the glass fell out on its own.
Saw SHURA it is Golden.
In order to preserve the glass, I cut the reflector with a grinder, retreating about 1 cm from the edge of the glass, but I didn’t have time to cut halfway - the glass fell out on its own, and so on both headlights.
thanks for the advice, if a hairdryer doesn’t work, I’ll try that
When I was painting the lenses, I peeled back the iron edging of the headlight and then used a utility knife to cut the sealant in a circle. And carefully cut it with a knife
when I started to bend it on the new Russian headlight, the glass began to crack
It turned out strange for me. In general, go for it, the main thing is not to be afraid and not to think about the bad! Try pouring solvent onto the sealant, it may peel off and then come off
when I started to bend it on the new Russian headlight, the glass began to crack
What if you pour solvent inside the headlight and leave it for another hour?!
What if you pour solvent inside the headlight and leave it for another hour?!
won't the reflector eat it?
Will devour. So he needs to remove the current glass from there
oh, that’s right) something I’m not paying attention to)
warm it up evenly with a hairdryer, be sure to wear gloves so that the glass does not crack, be sure to warm it up evenly and slowly, after a good warm-up, try to carefully pick up the glass with a scalpel, if it doesn’t help, apply brake fluid along the contour and leave it for a couple of days, then repeat the operation.
oh, special thanks for the brake, I'll try it
But in general, maybe there are small L-shaped scalpels in nature, or what are some sales devices to get under the edging? Or is it easier to do this “sharpening” yourself? I also can’t imagine how to get there with a knife.
that was also the idea
But in general, maybe there are small L-shaped scalpels in nature, or what are some sales devices to get under the edging? Or is it easier to do this “sharpening” yourself? I also can’t imagine how to get there with a knife.
Similar L-shaped crap is available in kits for removing glued glass (windshields, etc.)
there's a healthy one, I need a miniature one
you can try making an engine/gearbox dipstick by sharpening and bending the end, they are quite rigid and elastic at the same time (which are made from a strip of metal)
ooooh, good idea! collective intelligence is a good thing.
With collective wisdom, if everyone works hard, they can build a new Mars rover in a couple of months, to the envy of NASA)))
With a hammer New glass costs 50 rubles
All the same, in the process of “carefully peeling off” you will crack or break
The result is the same, but with a hammer it’s faster
Excellent advice to a person who bought headlights for the glass)
Well then, on the contrary, cut off the reflector with a grinder)
With a hammer New glass costs 50 rubles
All the same, in the process of “carefully peeling off” you will crack or break
The result is the same, but with a hammer it’s faster
you completely fell from grace, he bought these glasses for 8000 rubles
well, in vain. On Avito nearby, in Elektrostal, there were new headlights for that money for two months, until I was ready to buy them.
If I'm not mistaken, on old cars the windows were glued with BF type glue, and when it hardened, it became like glass. Can use a drill with a cutter to carefully cut along the glue
Using an engraver, cut off the “rolling” and “cut off” the glass with a stationery knife.
Source: www.drive2.com
Lens installation
It is not difficult to place lenses in headlights with your own hands. The main thing is to follow the signs on the upper and lower sides. The body of the lens is placed in the hole where the lamp stood and screwed into a ring on the reverse side. The ring is included in the package. All work is carried out wearing fabric gloves - also part of the kit.
It will take no more than half an hour to install the lenses in the headlights. The most time-consuming part of the process is running the wiring through the back wall of the headlight housing. You can insert the wires using a drilled hole, which must be filled with rubber glue.
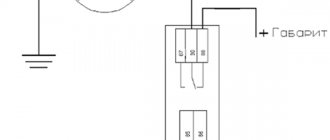
Installing ignition units and adjusting light
Ignition units are installed inside the headlight housing or outside in the engine compartment of the car. If one of the units fails, you will have to disassemble the case again and remove the glass, so it is more convenient to place the electronics behind the bumper or directly under the headlight using double-sided tape.
Xenon devices shine perfectly even in heavy snow and fog, but for correct operation they require professional setup using a special stand. This procedure is offered at each maintenance station and is inexpensive.
Sho-me sealant
The original black automotive headlight sealant is identical in its characteristics to that used in factory headlights. When heated, the adhesive and sealant for headlights changes its fluidity, which allows you to disassemble/assemble the headlight without much effort. Suitable for both partial addition and for assembling a headlight from scratch.
|
| vendor code | Description | Price | Basket |
| — | AM-GER | Automotive sealant original black, length 4.57 meters | 590 rub. |
How to use:
- Clean the headlight from old sealant.
- Using slight stretching and pressing, place the sealant evenly into the channel of the headlight housing.
- Place the headlight in an oven/heating cabinet at a temperature of 95C and heat for about 10-15 minutes.
- Having taken out the headlight, immediately put the glass on and press firmly along the entire perimeter.
- Using clamps and other available means, secure the glass until it cools completely.
- Sometimes it is necessary to repeat the last two steps for a tighter fit of the glass to the headlight.
Sealant SHO-ME
The original SHO-ME butyl headlight sealant is identical in its characteristics to that used in factory headlights. When heated, the adhesive and sealant for headlights changes its fluidity, which allows you to disassemble/assemble the headlight without much effort.
Since ordinary sealant becomes hard after hardening and does not become elastic even when heated in the oven, in the future you will have to work hard to disassemble the headlights again.
To avoid all problems, it is better to use professional butyl sealant for headlights. You will not have problems with fogging and subsequent disassembly of the headlight.
Suitable for both partial addition and for assembling a headlight from scratch.
If you plan to lay the sealant from scratch, for example, if the headlight was originally non-separable, but it is necessary to have such an opportunity in the future, then to do this you need to measure the perimeter of the headlight and divide the resulting number by 1.2-1.3. The diameter of the “sausage” of this sealant is approximately 5-6mm; as a rule, the groove in the headlights for the sealant is smaller, so the sealant needs to be stretched a little to make it more convenient to lay it in the groove.
If you plan to only partially add sealant to the existing one, then one meter will be enough.