A large number of cars heavily pollute the environment, so the requirements for new cars regarding the content of harmful impurities in exhaust gases are becoming more stringent. They are achieved in different ways, but the most effective is the installation of a catalyst in the exhaust system, as well as adjustment to the optimal composition of the combustible mixture in the engine cylinders. The car’s on-board computer receives a signal from the VAZ 2107 lambda probe, and then, at its command, the composition of the combustible mixture changes.
What is an oxygen concentration sensor used for?
In practice, many vehicle owners are not even aware of the existence of this element. Its purpose is to determine the oxygen concentration in the exhaust gases and subsequently transmit this information to the ECU. Based on this, according to the algorithms embedded in the system’s memory, the fuel-air mixture is corrected for its complete combustion in the cylinders of the power unit.
The location of the oxygen sensor is the exhaust manifold. On most models, the lambda is mounted directly in the area of the catalytic converter. Regardless of where the sensor is installed, the correctness of its readings and system performance will not be affected. There are two types of lambda probe:
- Broadband
- Dual channel
Note that the second type is included in the design of older vehicle models that were produced before the 90s. All modern models have a broadband lambda, which accurately records all deviations to ensure the most correct mixture formation. At the same time, a properly functioning sensor of such a system can actually reduce fuel consumption and ensure optimal crankshaft speed of the power unit.
What is a probe
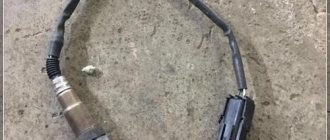
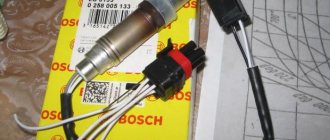
The oxygen sensor VAZ 2107 injector among car enthusiasts is called a lambda probe (λ probe).
On the VAZ “classic” such devices began to be installed after the appearance of an injector on the engine. The lambda probe monitors the presence of oxygen residues in the exhaust gases. This is necessary to reduce the amount of carbon monoxide in the exhaust of a running engine, which is possible after adjusting the composition of the air-fuel mixture in the power supply system of the power unit.
Operating principle of the oxygen sensor
The principle of operation of the oxygen sensor is quite simple. The lambda probe must compare the readings with some ideal results in order to understand how the percentage of oxygen in the mixture changes, so measurements are taken in two places - atmospheric air and combustion products are measured.
This approach allows the sensor to feel the difference if the fuel mixture ratio changes.
The ECU must receive an electrical impulse from the lambda probe. To do this, the sensor must be able to convert measurements into electrical signals. For measurements, special electrodes are used that can react with oxygen.
Lambda uses the principle of galvanic cells - changing the conditions of chemical reactions leads to a change in the voltage between the two electrodes. When the mixture is rich and the oxygen content is below the lower threshold, then the voltage rises. If the mixture is lean, the voltage will drop.
Next, the impulse that occurs at the stage of chemical reactions is sent to the ECU, where the parameters are compared with the fuel maps stored in the memory. As a result, the operation of the power system is adjusted.
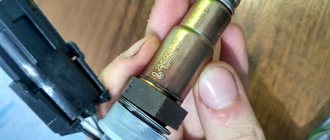
The tip is coated with platinum - it is this layer that reacts with oxygen. One side of this tip is in contact with the exhaust gases, the other side with the air in the atmosphere.
The lambda probe electrodes have one feature. So that the reaction is more efficient and the indicators are accurate, measurements of the oxygen content in the exhaust are carried out under certain temperatures.
In order for the tip to reach the performance characteristics and the required electrical conductivity, the temperature of the environment should be 300-400 degrees.
Some oxygen sensor models are equipped with electric heaters. Thanks to them, the lambda can quickly reach operating temperature conditions. Heating uses energy from the vehicle's on-board network.
Replacing an oxygen sensor is not a planned procedure, but recommendations often boil down to the following:
- heated sensors require replacement every 100 thousand kilometers;
- sensors without heating - replacement every 50-80 thousand kilometers; mileage:
- planar sensors - replacement every 160 thousand kilometers.
The lambda probe is replaced after checking it for damage using any of the methods described above. Repair work to troubleshoot a lambda probe is divided into two stages: preparatory and installation phase.
The preparatory stage involves the availability of the necessary tools, selection and purchase of a replacement part (lambda probe). Next, the protection is dismantled and the nut is processed for fixation with a liquid wrench or WD-40. It is also necessary to prevent the manifold from expanding and reduce the engine temperature to an acceptable level.
Description of the fan switch sensor
Where is the temperature sensor located in the VAZ 2107 injector or carburetor, what is its purpose? To begin with, we recommend that you familiarize yourself with the purpose and possible malfunctions.
Location and purpose
This controller is an integral element of the cooling system of the power unit and actually performs a function similar to a thermostat. When the engine temperature increases to a certain value, the controller activates the ventilation device, which helps cool the engine radiator. A ventilation device is used to remove heat from the radiator by forcing an air flow onto it. The main purpose of the fan sensor is to prevent overheating of the power unit.
As for the installation location, you should look for this device in the engine compartment of the VAZ 2107. Opening the hood, you can immediately see the radiator assembly, where the sensor is installed. Depending on the shape of the radiator device, the controller can be located at the bottom left or right.
Operating principle
The operating principle is as follows:
- On the bottom of the controller there is a special plate that changes, that is, bends if the temperature of the power unit increases.
- During bending, the plate exerts a certain pressure on the piston. The latter begins to move forward, while moving it closes the contacts on the device. We are talking about both moving and fixed contacts.
- If the coolant remains cold and does not heat up, the plate, accordingly, will not bend.
Forced fan activation
In accordance with the technical characteristics of the Semerka cooling system, the fan should not run constantly. But in some cases, the principle of its forced inclusion is still implemented. This occurs as a result of a controller failure - the temperature sensor located in the engine compartment has displayed data on the instrument panel about an overheated power unit, but the fan does not turn on. This may indicate a breakdown of the fan sensor or poor contact with the vehicle's on-board network.
There are two ways to solve the problem:
- When driving on a flat road, you can try to drive without stopping, this will allow the oncoming air to blow on the engine radiator. In this case, it is imperative to monitor the engine temperature, that is, the indicator arrow on the instrument panel. If you need to stop at a traffic light, turn on the heater at full power.
- But it would be better to forcefully activate the fan. To do this, you need to remove two contacts from the sensor and then close them with each other, but before performing these actions you should disconnect the battery. After the circuit is closed, connect the battery - this will cause the device to work without interruption. After stopping the car, the fan will continue to work and will do this until the battery is discharged.
Regulator diagnostics
To perform the test, you will need plain water, a container, a thermometer that can operate at high temperatures, and a regular household oven.
Diagnostics is performed using a multimeter and is carried out as follows:
- First, you need to pour water into the container.
- Dip the part of the sensor opposite the one on which the contacts are located in the liquid.
- Then the tester probes need to be connected to the controller contacts. The multimeter itself must be set to resistance or ringing mode.
- Place the container on the stove and turn on the gas, gradually heating the liquid in it. There should also be a thermometer in the container.
- When the liquid temperature increases to approximately 92 degrees, the contacts on the controller, if it is working, should close. At this moment, the tester may make a characteristic sound. If this does not happen, the device must be replaced. The tester readings must be compared with the normalized ones, which are indicated in the service book (the diagnostic video was made by Dmitry Yakovlev)
In what cases is it better to replace the lambda and is it necessary?
The main signs indicating the need to change the oxygen sensor:
- The Check Engine light is on.
- The car did not pass the emissions test.
- The vehicle jerks when moving;
- Engine power has decreased;
- The car's fuel consumption has increased;
- The vehicle engine may operate in emergency mode.
Properly functioning probes help the stable functioning of the internal combustion engine and the car as a whole. The sensors measure the amount of oxygen in the exhaust gases and transmit information to the electronic control unit, which, based on this data, regulates the composition of the fuel-air mixture. If the probe does not work correctly, with malfunctions, then the car will also perform worse, and one must remember that environmental damage is also caused due to dirty exhausts.
What shortens the life of the catalyst on a VAZ 2114?
In general, the average service life of catalysts is hundreds of thousands of kilometers, and significantly exceeding this period, up to 120 or even 150 thousand, cannot be considered an exception to the rule. However, owners of products from the domestic automotive industry request to replace it with a flame arrester, as a rule, earlier. Why does this happen?
- Mechanical damage. As for the dirt roads of the Russian outback (and sometimes just directions that road services maintain only in the winter), there is no need to explain. Sometimes it is enough to run into a deep hole hidden by a puddle, or a stone thrown from under the wheels gets into the catalyst housing, and replacing this device becomes an inevitable necessity.
- Poor quality fuel. Not only diluted fuel, but also a modified (enriched) fuel mixture can damage honeycombs by burning.
- Bad spark plugs. If, due to them, unburned fuel residues enter the catalyst, it flares up at the temperature of the exhaust gases (600-800 degrees), causing the honeycombs to melt and become clogged.
- Corrosion. Unfortunately, the welded joints on the VAZ 2114 initially have insufficient factory anti-corrosion protection, which is why condensate corrodes the pipes with rust.
Loose fasteners, broken hangers
Here you shouldn’t blame the manufacturer, the VAZ owner just needs to look under the bottom of the car more often and pay attention to signs indicating that it’s time to replace the catalyst with a flame arrester
Checking the serviceability of the lambda probe
To check the functionality of the oxygen sensor, you should visually assess its condition, and also measure the voltage generated by the regulator at different engine speeds.
Visual inspection
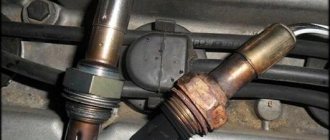
When checking the lambda probe, you should evaluate the integrity of the device body and connecting wires, as well as the condition of the connection connectors.
The presence of traces of soot on the sensor indicates a failure of the lambda probe heater and excessive enrichment of the fuel mixture. This leads to distortion of the readings of the control device.
A shiny coating on the working part of the oxygen regulator means an excess lead content in the fuel used. You should think about changing the gas station, otherwise you will need to replace the catalyst in the near future.
Gray or off-white deposits on the lambda probe housing appear when using the wrong type of engine oil, as well as after incorrect use of various fuel additives.
Checking the sensor with a multimeter
To check the lambda probe, the multimeter must be switched to voltage measurement mode. The negative probe is attached to the engine body, and the positive probe is connected to the signal wire of the oxygen regulator. The check is performed with the engine running and warmed up to operating temperature.
Reversing light
When the engine is operating at 3500 to 3000 rpm (according to the tachometer), a working oxygen sensor should operate every second and generate a voltage of 0.2–1 volts. When simulating changes in the saturation of the fuel-air mixture, the multimeter readings should increase sharply. When closing the throttle valve, the voltage at the sensor should tend to zero.
Note! A change in the composition of the mixture during testing can be simulated by injecting a small amount of gasoline into the intake manifold or removing the hose from the fuel pressure regulator.
If, during all manipulations, the voltage on the sensor is stable at 0.45 volts, the lambda probe is faulty.
The procedure for checking the oxygen regulator using a multimeter is presented in the following video:
Checking the lambda probe with an oscilloscope
An oscilloscope allows you not only to check the serviceability of the regulator, but also to evaluate, based on the amplitude characteristics, the wear of the working regulator, which leads to deterioration in engine performance, but is not detected by the car’s electronic control unit.
The check is performed with the engine warm and idling. A normally operating lambda probe under such conditions shows a sinusoidal voltage diagram with a constant step within 0.1–0.8 volts.
For an oxygen sensor that is on the verge of failure, when checking, the signal amplitude drops to zero. In most cases, this mode of operation of the regulator is determined by the vehicle’s on-board electronics, and the CHECK ENGINE control icon lights up on the dashboard.
However, an oscilloscope helps diagnose lambda probe faults that are not visible to the car's self-diagnosis systems. Such cases include “freezing” of the control signal without the voltage values going beyond the operating range. In fact, the sensor does not function correctly, but the ECU continues to take its readings into account when controlling the injection system.
Checking the sensor using the ELM327 adapter
You can check the functionality of the lambda regulator yourself using the ELM327 USB OBD II universal diagnostic scanner. This adapter is compatible with most modern European, American and Asian cars.
Note! ELM327 is suitable for diagnosing VAZ cars with ECU firmware BOSCH 7.9.7 and ME73, as well as for checking injection GAZ cars.
The device reads readings through the vehicle's diagnostic connector and displays the result on the screen of a laptop or tablet with pre-installed software (for example, the Torque Pro utility).
The visibility of graphical information is similar to that of an oscilloscope, and the convenient user interface does not require special skills in working with diagnostic equipment.
The principle of working with the ELM327 adapter is presented in the following video:
- When do you need to change the rear pads on Largus?
- How to prepare and paint a car at home
- How to change the fuel filter on Kalina
- Which sealant is best for the engine?
Resonator malfunctions and repairs
Resonator malfunctions include:
- pipe beating on protruding parts of the body and other elements;
- burnout of the end part of the tank at the welding site of the body and pipe;
- burnout of the housing or internal perforated channel;
- exhaust gases exit through the mounting joints.
An annoying knock coming from under the car's bottom is usually the result of a loose exhaust pipe beating against the body and other components. The reason for this is the rubber fasteners, which wear out and stretch over time and cannot provide rigid fixation of the exhaust tract when moving. The problem is solved by replacing these fasteners.
Other problems can be resolved in the following ways:
- The burnout on the side of the resonator can be welded. There is no need to remove the pipe to do this. An experienced welder will do the work on site, covering the body with a sheet of asbestos.
- If exhaust gases are observed escaping through the joints of the exhaust system, the mounting clamp or flange should be tightened further. You can also loosen the fastening, fit the parts closer together and re-tighten the clamp.
- If the housing or internal channel burns out, the resonator is usually replaced with a new one. If the fistula is small, you can try to weld it without removing it from the car.
How to replace a faulty oxygen sensor
Vehicle diagnostics confirmed that the oxygen sensor is faulty and needs to be replaced. The driver can perform this operation independently. You should purchase a new spare part, prepare the tools, and the place where the faulty oxygen sensor will be replaced. In addition to the new spare part, the driver will need:
- Inspection hole in a garage, overpass or lift.
- Wheel chocks for vehicle wheels.
- Set of tools.
- Liquid WD40.
- Wire brush.
- Rags.
- Work gloves.
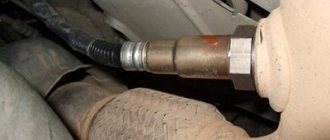
You can find out where the oxygen sensor is located on the VAZ 2107 from the vehicle’s operating instructions. It is installed at the bottom of the car on the exhaust pipe. You should only work with the probe on a cold engine, otherwise you can burn your hands or break the sensor itself. The vehicle is installed at the selected work site and the power unit is allowed to cool. The car is braked with a hand brake; for safety, wheel chocks are installed under the wheels.
Next, the process of replacing a faulty probe will be carried out as follows:
- If the bottom of the engine compartment is covered with protection, it must be removed.
- The installation site of the lambda and the sensor itself are cleaned of contamination with a metal brush. Afterwards, the installation site is treated with WD40 liquid.
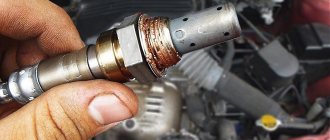
- While the lead is “working,” cut off the clamps securing the probe wires and disconnect the connector.
- The next step is to dismantle the faulty part. The key is set to “22”, but it may be a different size (depending on the type of lambda), and is turned out of the muffler pipe. You will have to apply some force, since the probe “sticks” in the threaded connection. It is best to use a spanner wrench to avoid tearing off the edges.
- Install a new spare part, connect the connector, secure the sensor wires with clamps.
- Replace previously removed parts in their place.
At this point, the process of replacing the faulty part is completed, you can start the engine and check operation in all modes.
How to make a mechanical corrector for the exhaust system?
To implement a mechanical blende for the catalyst with your own hands, it is recommended to use blanks made of heat-resistant steel or bronze. This way the parts will not be deformed due to high temperature. There are two designs, but both options require a lathe or the help of an experienced turner.
First option
It is a sleeve 40-100 mm long. On one side, a standard sensor is screwed in, and on the other, the circulation of gases is limited by a small diameter hole. The essence of the “device” is that the composition of the exhaust mixture is averaged, because the lambda probe is removed from the gas stream itself and, accordingly, catches fewer toxic substances. Due to this, it is possible to deceive the ECU.
A typical drawing with spacer dimensions can be changed in terms of dimensions, it depends on the model and brand of the car. The optimal inlet diameter remains unchanged - 1.5-2 mm. In some cases, the length of the bushing may not allow it to be installed in its original place. As a result, you have to weld the mount elsewhere in the exhaust pipe.
Second option
- Exhaust gases enter the bushing body through a small diameter hole.
- In the volume of the spacer, excess CH and CO are subject to oxidation by oxygen, as a result of which the concentration of harmful substances decreases.
- The ongoing processes change the shape of the sinusoid, and the electronic system believes that the catalytic converter is operating normally.
A do-it-yourself catalyst blende made according to the above diagram has advantages similar to the previous option. Here the standard probe will be raised by 32 mm, although this is less than 40-100 mm.
Features of spacer installation
The installation procedure is not difficult, and begins with placing the car on an overpass or lift. Further actions occur according to the following scheme:
- Disconnect the negative terminal of the battery.
- Unscrew the controller.
- Screw the bushing onto the probe.
- Screw the upgraded unit into place.
- Connect the battery.
After the first start, the Check Engine light should go off. The motor will now operate normally.
How to change an oxygen sensor
The dismantling procedure does not apply to scheduled repair work and is usually performed as necessary; however, experts still make certain recommendations:
- It is better to change planar sensors every 160,000 km;
- with heating - every 100,000 km;
- without heating - every 50,000 - 80,000 km.
Replacement begins by removing the part protection and treating the retaining nut with WD-40 or a similar compound. The engine must not be overheated to avoid manifold expansion. Installation procedure:
- Using a screwdriver, disconnect the connectors of each wire;
- Use a special key with a slot to unscrew and remove the probe (if it does not unscrew, the threads can be lubricated with WD-40, but carefully so that the composition does not get on other parts);
- Install a new sensor, trying to avoid distortions, tighten the fastening;
- Reconnect the connectors and install protection;
- If you are also replacing 2 lambda probes, then do the same with the second device (there may be two or more).
After this, you need to check the functionality of the system. There should be no errors displayed on the dashboard and the engine should run stably
It is also important to ensure that the connection between the new part and the engine controller is correct. To do this, different types of driving are launched, laid down by the car manufacturer.
If no problems appear, then the procedure was completed successfully.
Quite often there are cases when a car mechanic changed the lambda probe on his own, but this did not give the desired result. Therefore, we always recommend contacting professionals at a specialized car service center. Our car service technicians can quickly and efficiently replace the oxygen sensor so that your car always works as it did after it came off the production line. Don’t delay if problems arise, because the principle is known: the earlier a breakdown is detected, the easier and cheaper it is to fix it. If you need to replace a lambda probe in St. Petersburg, call us at the number indicated on the website.
Replacing the VAZ 2107 resonator
Replacing the VAZ 2107 resonator is carried out on an inspection pit, overpass or lift. To complete the work you will need:
- two keys for 13;
- powerful flat screwdriver;
- hammer and wooden handle;
- pliers;
- pipe wrench (gas);
- aerosol lubricant WD-40 or equivalent;
- fabric gloves.
Theoretically, disassembling the exhaust system is not very difficult. However, in reality, the problem of separating sections usually arises, since the joints of the joints are firmly stuck due to heating and the formation of internal carbon deposits.
The resonator is mounted at four points: at two joints (with the exhaust pipe and muffler) and at two rubber hangers, hooked directly to the tank. Its dismantling is carried out in the following order:
- Drive the car into a viewing hole (overpass), set the parking brake and secure it with wheel chocks.
- Apply aerosol lubricant liberally to the joints of the resonator section and wait 15-20 minutes.
- Using 13mm wrenches, loosen the rear and front fastening clamps. Carefully knock the mandrels off the thickened part of the joint onto the pipe.
If you cannot disconnect the pipes in this manner, try bending the end of the outer pipe with the slots by driving a flat-head screwdriver under it. When the gap widens, spray the joint again with spray lubricant. If necessary, you can remove the rear suspension of the main muffler and have an assistant rotate this element while you hold the resonator with a pipe wrench.
The new resonator is installed in the reverse order. Before installation, it is recommended to carefully inspect the main muffler and intake section. If burns are detected on them, appropriate work should be performed.
During the assembly process, it is necessary to ensure that the pipe does not sag and at the same time does not touch the body. In the first case, the resonator may be damaged on a rough road, and in the second, it will hit the body while driving, causing a dull knock in the car's interior. Upon completion of the work, it is necessary to start the engine and, going down into the inspection hole, make sure that the joints do not allow exhaust gases to pass through.
Video: replacing the VAZ 2107 resonator
The VAZ 2107 resonator operates under difficult conditions - the temperature of the gases passing through the section is about 600 °C. If you do not monitor the condition of the rubber fasteners, the pipe will become loose and begin to leak gases. If a fistula appears in the body, the tank should be welded immediately, otherwise the damage will quickly increase. Replacing the VAZ 2107 resonator is quite simple. To do this, you will only need a minimum set of plumbing tools and step-by-step implementation of the instructions of professionals.
We recommend watching:
- Catalyst VAZ 2107 euro 3
- Resonators VAZ 2110 types
- What is the difference between a muffler and a resonator?
- Replacing the muffler VAZ 2107 injector
- What is the difference between a resonator and a muffler?
- Sectional view of the exhaust system resonator
Symptoms of malfunction
The main signs indicating a breakdown of the oxygen sensor are:
- Increased toxicity of exhaust gases;
- Unstable, intermittent acceleration dynamics;
- Short-term activation of the “CHECK ENGINE” lamp with a sharp increase in speed;
- Unstable, constantly changing idle speed;
- Increased fuel consumption;
- Overheating of the catalyst, accompanied by crackling sounds in its area when the engine is turned off;
- Constantly lit “CHECK ENGINE” indicator;
- Unreasonable alarm from the on-board computer about an over-enriched fuel assembly.
It must be borne in mind that all these deviations can be symptoms of other breakdowns.
The service life of a lambda probe is approximately 60-130 thousand km. The reasons for shortening the service life and failure of the device may be:
- Use when installing sensors that are not designed for high temperatures of sealants (silicone);
- Low-quality gasoline (high content of ethyl, lead, heavy metals);
- Oil entering the exhaust system as a result of wear of oil scraper rings or caps;
- Overheating of the sensor as a result of incorrectly set ignition, over-enriched fuel assembly;
- Multiple attempts to start the engine, leading to the penetration of flammable mixtures into the exhaust system;
- Unstable contact, short to ground, broken output wire;
- Violation of the integrity of the sensor structure.
Why do sensor failures occur?
Most often, the oxygen sensor in the VAZ 2107 fails after using low-quality fuel; leaded gasoline is especially harmful to it. Other reasons for probe failure may be:
- Presence of fluid in the exhaust system.
- Severely dirty fuel filter.
- Development of the device resource.
Lambda operates in an environment of hot gases, so the ingress of any liquid into its working area will lead to the appearance of cracks and subsequent failure of the device. The on-board computer will not be able to correctly determine the composition of the working mixture. High gasoline consumption will become noticeable, and interruptions in engine operation will occur. Impurities in the fuel do not burn and end up in the exhaust manifold, then on to the lambda, which leads to distortion of its readings.
It is also important to set the ignition correctly, otherwise overheating will damage the device, and pops in the exhaust system will destroy the oxygen sensor and its ceramics. There are cases when “skilled” mechanics break the sensor.
Causes of premature wear of oxygen sensors
- Systematic use of low-octane fuel with the addition of chemical impurities exceeding the limit standards.
- Use of silicone-based sealants in the process of prevention.
- Overheating (boiling) of lambda probes due to incorrectly set ignition angle, excessive enrichment of the combustible mixture, unstable voltage supply in the circuit.
- Repeated engine starts at short intervals. As a result, carbon deposits accumulate in the combustion chamber, since the fuel is not completely burned.
- Diagnostics of spark plugs, cylinder operation with unscrewed spark plugs;
- Contact of chemically aggressive compounds and petroleum products on the tip of the DC.
- Damage to the insulating layer, wiring windings, short to ground.
- Depressurization in the system.
What problems can you expect in the event of a breakdown?
Of course, certain symptoms begin to appear immediately. For the oxygen sensor on the VAZ 2107, as well as on other cars in which an injector is installed, this is expressed very specifically. The saddest thing for the driver is an increase (and a significant one) in fuel consumption. The car begins to “eat” gasoline with a very good appetite. The movement also occurs with jerks, as if the engine is “troubling” or sometimes it does not have enough air.
Consequently, engine performance deteriorates and the crankshaft speed may even fluctuate. In this case, the catalytic converter stops working in normal mode, therefore, in this case, you cannot even mention that your VAZ 2107 car meets any Euro standards. Because when testing exhaust toxicity, you will get very high CO levels.
Checking the lambda probe: method No. 1
The simplest diagnostic method is visual inspection. To make sure that the Kalina oxygen sensor is faulty, you need to inspect its tip. It should not have any traces of soot. If any are present at the tip, it means that an enriched fuel mixture has entered the cylinders. As a result, part of it did not burn and went directly into the collector.
Another sign of a malfunction is a shiny coating. This indicates a high concentration of lead in the fuel. It is worth noting that this metal severely damages the ceramic particles of the sensor and the latter is not able to work normally. Usually the presence of lead indicates poor fuel quality. You should not refuel at questionable gas stations.
Gray deposits also lead to sensor replacement. This indicates the presence of engine oil in the exhaust. This happens due to worn rings in the cylinder-piston group. But gray deposits also form when using third-party fuel additives.
A more effective method of checking the Kalina oxygen sensor is to measure the voltage at the contacts. For this we need a voltmeter (or multimeter). So, turn on the ignition and connect to the contacts. The normal value is 0.45 V. If this parameter is below 0.42 V, it means the element has failed.
This method consists of computer diagnostics using an ELM adapter. For Lada Kalina, the optimal choice would be ELM-327. After connection, the computer reads all errors from the block. Below we list several codes indicating a malfunction of the Kalina oxygen sensor:
- PO134. No power to the sensor.
- PO136. The sensor shorts to ground.
- PO140. Talk about a broken circuit.
If you have a Kalina with a lambda probe heater, error PO135 may also appear. In this case, the element is also considered faulty.
In order to replace the oxygen sensor on Kalina, you will need a set of open-end wrenches and WD-40 fluid. If the design provides only one lambda probe, it is not necessary to carry out work in the inspection hole. This sensor is located on the exhaust manifold - to get to it, just open the hood.
Please note: work on removing and installing the oxygen sensor must be carried out with the engine cooled down. The lambda probe must first be treated with VD-40 liquid
What is it for? During operation, the thread strongly sticks to the manifold, so it becomes impossible to unscrew such an element. Next, remove the block with contacts. It can be mounted on a plastic clamp. The last one will have to be cut. The contacts themselves fit into the cooling system pipe. At the next stage, using a 22mm wrench, unscrew the oxygen sensor outward. Then all that remains is to install the new element in the reverse order
The lambda probe must first be treated with VD-40 liquid. What is it for? During operation, the thread strongly sticks to the manifold, so it becomes impossible to unscrew such an element. Next, remove the block with contacts. It can be mounted on a plastic clamp. The last one will have to be cut. The contacts themselves fit into the cooling system pipe. At the next stage, using a 22mm wrench, unscrew the oxygen sensor outward. Then all that remains is to install the new element in the reverse order.
Please note: the wires from the oxygen sensor must not come into contact with any metal part of the engine. Otherwise they may melt
Recommendation "Behind the Wheel"
There are three options for solving the problem with a failed converter - from good and expensive to simple and cheap.
- The most correct thing is to replace the failed catalytic collector with a new one. But the price of the issue is, as a rule, inhumane. On Rio or Solaris, a new collector costs about 50,000 rubles.
- Luckily for us, a number of companies produce repair catalytic units. It looks like a flame arrester, only inside the cylinder there is a full-fledged ceramic base coated with precious metals. And also, to the delight of intimidated car owners, the base is not ceramic, but metal. This one will definitely not collapse, turning into dust. Such blocks are installed instead of the standard neutralizer or inside its body, depending on the car model. The part itself will cost 6,000–9,000 rubles. Those with a metal base are the most expensive. Installation work costs another 1,500–2,000 rubles.
- Owners of some models have another option to solve the problem. For example, almost all Korean cars, in addition to the main catalytic converter, have an additional one in the exhaust manifold - under the bottom. It is significantly inferior in efficiency to the main neutralizer and will not be able to compensate for its loss. But in its place (under the bottom of the car) you can install a cheap but full-fledged catalytic converter, for example, from a VAZ-2107 with an injection engine. It will cost a little more than three thousand rubles. For poor car owners, this is a salvation. Just keep in mind that the rate of warming up of the converter under the bottom will not be the same. And so that the second oxygen sensor does not lie, you will need to reflash the engine control unit.
The catalytic converter is not the car owner's enemy. He, to the extent possible, preserves clean air for you and me. Therefore, if it fails, try to restore operation using one of the methods listed above.
Symptoms of a malfunctioning lambda probe
Signs of malfunction of this device can be different, and the most important signal for the driver will be a violation of the normal operation of the engine. If the device does not work well, the quality of the fuel supplied to the combustion chamber is significantly reduced.
Why does the lambda probe break? The reasons may be as follows:
- The car body was depressurized.
- Air or exhaust gases have entered the fuel system.
- The sensor has overheated due to problems with the ignition system or improper painting of the engine.
- Normal wear and tear on components.
- Power supply failure - signals are not sent to the ECU.
- Breakage due to impact or other mechanical impact.
In the latter case, the lambda probe breaks in an instant. Other symptoms indicate that the device is failing gradually. If you do not know how to diagnose this component and have no idea where it is located, then a faulty lambda probe will not be able to be determined.
How to understand that this part will soon come to an end? At first, the sensor starts working every other time. Sometimes the signal is simply not transmitted to the electronic control unit. This leads to a correction of the idle speed. This indicator begins to change and its fluctuations expand in the range. The quality of gasoline or diesel fuel decreases, and the car itself twitches.
The driver hears popping noises inside the engine, and the corresponding icon lights up on the dashboard. Then the sensor simply does not work on an engine that has just been started. The dashboard will inform you about this in all available ways. The power of the car is greatly reduced, and when you press the acceleration pedal, popping noises will be heard from the engine.
But the biggest danger for the driver is engine overheating, which causes a total breakdown of the system. If you ignore a broken sensor, its condition will worsen.
This directly affects the operation of the machine. The quality of movement will decrease, gasoline consumption will increase and the inside of the car will begin to smell of exhaust gases with a characteristic odor. Some modern cars are equipped with an engine locking system if the sensor does not work. You will have to call a tow truck and go to a car service center.
The worst alternative for the development of the event is depressurization of the device. If such an incident occurs in a VAZ car, then it is better to stop driving if you do not want to completely break the engine. When a spare part breaks down completely, exhaust gases begin to enter the atmospheric air tank. When the brake pads are applied, the device begins to detect a large number of air molecules and sends an excessive number of signals to the ECU. As a result, the VAZ injection control system does not work correctly or stops functioning altogether.
How do you know if the probe has depressurized? When driving at high speed, there is a lot of knocking inside the engine. The car begins to move jerkily, and an unpleasant smell of exhaust gases is heard. This failure can also be determined by visually analyzing the housing of the exhaust valves and spark plugs - soot deposits appear on them.
Design and purpose of the VAZ 2107 resonator
The resonator is a cylindrical metal tank designed to preliminary reduce exhaust sound. Connecting pipes with a diameter of 40 mm are hermetically welded to it at the front and rear. The front pipe is equipped with a mating flange for the catalyst or exhaust pipe, and the rear pipe has two longitudinal slots for docking with the muffler section.
The resonator consists of:
- a tightly sealed cylindrical body to which connecting pipes are welded;
- an internal pipe with a large number of holes (perforations) for passing exhaust gases;
- a transverse partition dividing the body into two internal chambers.
The operating principle of the resonator is based on the phenomenon of sound resonance. Getting inside the housing along with the exhaust gases, sound waves penetrate through the perforations in the pipe and are repeatedly reflected from the outer walls of the tank. Mutual damping of oscillations occurs, and the amplitude of the waves decreases. As a result, the volume of the exhaust sound is significantly reduced.
The VAZ 2107 resonator performs the following functions:
- Preliminarily reduces the exhaust sound level;
- unlike the main muffler, it creates virtually no resistance to the exhaust flow;
- promotes cooling of hot gas;
- taking on part of the load, extends the service life of the main muffler.
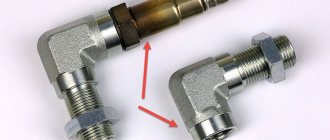
Replacing the lambda probe and lambda probe blende
" Back 06.09.2016 12:25
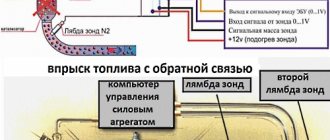
Effective operation of the exhaust system of any car is impossible without the presence of a catalyst in it. It is this part of the system that is responsible for reducing the level of toxins in the exhaust gases that “leave” the vehicle. A kind of “right hand” of the catalyst is the lambda probe, which is responsible for measuring the level of oxygen content in gases. Today, more and more often, two oxygen sensors are installed in exhaust systems - not only before the catalyst, but also after it. In the first case, the lambda probe performs the basic function of measuring the level of oxygen in the exhaust gases, in the second, signals from the sensor allow you to adjust the composition of the fuel mixture. Regardless of the number of oxygen sensors, they are extremely sensitive elements that can fail as a result of exposure to harmful additives that may be contained in low-quality fuel.
A proper check of the lambda probe using an oscilloscope allows you to determine what condition the sensor is in and whether it needs replacement. If replacing the lambda is inevitable, even with initial information about the specifics of this work, it is better to entrust it to experienced specialists who, using modern diagnostic equipment, will determine not only the presence of malfunctions in the lambda probe, but also in the entire exhaust system.
Today, lambda probes can be divided into two types according to their operating principle. In the first case, there is an electrochemical principle of operation, which is considered the most common, in the second - a resistive one. These features should be taken into account if the lambda needs to be replaced and you decide to carry out the work yourself.
Many specialized service centers that are ready to offer services for tuning the exhaust system and repairing it using the latest technologies can not only replace the lambda probe, but also install the sensor blende. The electronic decoy of the lambda probe is a module that contains the operating circuit of a specific catalyst. It is noteworthy that the catalyst operation diagram is drawn up on the basis of data on the engine operating mode, which the average person cannot know a priori.
The purpose of installing the blende is simple - to emulate the operation of the catalyst. It is immediately worth clarifying that the lambda probe emulator, or as it is called, the lambda probe decoy, can only be installed if the catalyst is replaced with a flame arrester. When installing a lambda decoy, no reprogramming of the exhaust system is required, which also has a positive effect on the cost of the service. Even if a snag is installed, the lambda test must be carried out on specialized equipment by experienced specialists who know the intricacies of the process.
For example, the lambda probe decoy can be not only electronic, but also mechanical, which should be taken into account when connecting the lambda probe or decoy. Among other things, one should take into account the fact that electronic modifications of the lambda probe blende are not very effective when working on cars with a manual transmission. Therefore, in this case, you should either give preference to another modification of the equipment or carry out work - replacing the oxygen sensor with a lambda probe using the proposed options.
For experienced specialists who have an understanding of the intricacies of working with the exhaust system and its components, the process of installing a lambda decoy or replacing an oxygen sensor is an ordinary task that they cope with every day. Only by choosing cooperation with true professionals can you count on the fact that the work will be carried out with high quality, using modern equipment and materials, in accordance with regulatory requirements for the process.
Do-it-yourself electronic catalyst blende and emulator circuit
A real electronic emulator is a microprocessor device consisting of a single-chip microcircuit. The principle of its operation is based on the formation of an output signal, which in shape corresponds to the information in the working neutralizer. This option is difficult to do on your own, so you should immediately consider a simpler method. To implement it you need to prepare:
- Electric soldering iron.
- Solder and rosin.
- Knife and side cutters.
- Resistance 200 Kom, power 0.25 W.
- The capacitor is non-polar with a capacity of 4.7 microfarads.
The principle of operation of the system is to average the readings of the oxygen sensor, which is installed after the converter. The method of connecting emulator components is simple and universal. All elements are connected directly to the vehicle’s on-board network conductors. Before connecting the electronic trick to the catalyst with your own hands, you should disconnect the battery terminals to eliminate the possibility of a short circuit.
Checking the lambda probe with a tester:
We take an electronic constant voltage millivoltmeter and connect it in parallel with the LZ (“+” “-” to the LZ, - to ground), and the lambda probe must be connected to the controller.
When the engine warms up (5-10 minutes), then you need to look at the voltmeter needle. It should periodically move between 0.2 and 0.8 V (i.e. 200 and 800 mV, and if less than 8 cycles occur in 10 seconds, it’s time to change the LZ. Also replace if the voltage “stands” at 0 .45 V.
When the voltage is always 0.2 or 0.9 V, then there is something wrong with the injection - the mixture is too lean or too rich. Since the oxygen sensor voltage should change all the time and jump from ≈0.2 to 0.9V.
There is another quick way to check the lambda probe. You should do this:
Carefully pierce the positive contact of the tester (black lambda wire), the other contact to ground. With the engine running, the readings should range from 0.1 to 0.9V. Constant readings (for example, 0.2 all the time) or readings that go beyond this range, or fluctuations with a smaller amplitude indicate a malfunction of the probe.
- all the time 0.1 - little oxygen
- all the time 0.9 - a lot of oxygen
- The probe is fine, the problem is something else.
If you have the time and desire to bother, you can conduct several tests for a rich and lean mixture and additionally check the lambda probe.
- Disconnect the oxygen sensor from the block and connect it to a digital voltmeter. Start the car and, by pressing the gas pedal, increase the engine speed to 2500 rpm. Using a device for enriching the fuel mixture, reduce the speed to 200 per minute.
- If your vehicle is equipped with an electronically controlled fuel system, remove the vacuum tube from the fuel pressure regulator. Look at the voltmeter reading. If the instrument needle approaches the 0.9 V mark, it means the lambda probe is in working condition. A malfunction of the sensor is indicated by the lack of response from the voltmeter, and its readings are less than 0.8 V.
- Do a lean mixture test. To do this, take a vacuum tube and provoke an air leak. If the oxygen sensor is working properly, the digital voltmeter reading will be 0.2 V or lower.
- Check the operation of the lambda probe in dynamics. To do this, connect the sensor to the connector of the fuel supply system, and install a voltmeter parallel to it. Increase engine speed to 1500 rpm. The voltmeter readings with a working sensor should be at the level of 0.5 V. Another value indicates a failure of the lambda probe.
Checking the voltage in the heating circuit
To check the presence of voltage in the circuit, you need a voltmeter. We turn on the ignition and connect it with probes to the heater wires (you cannot disconnect the connector, it is better to pierce it with sharp needles). Their voltage should be equal to what the battery produces when the engine is not running (about 12V).
If there is no plus, you need to go through the battery-fuse-sensor circuit, since it always goes directly, but the minus comes from the ECU, so if there is no minus, look at the circuit to the block.
Checking the lambda probe heater
In addition to measuring voltages with a multimeter, you can also measure resistances to check the serviceability of the heater (two white wires), but you will need to switch the tester to Ohms. The documentation for a particular sensor must indicate the nominal resistance (usually it is about 2-10 Ohms), your task is only to check it and draw a conclusion. The video shows this method:
https://youtube.com/watch?v=CxhGVt5_YUA
Checking the oxygen sensor reference voltage
We switch the tester to voltmeter mode, then turn on the ignition and measure the voltage between the signal and ground wires. In most cases, the lambda probe reference voltage should be 0.45V.
Most zirconium lambda probes, which are installed on cars starting from 1999, have the same color differentiation of zirconium sensors. The same is with lambda probes produced using titanium alloys - their pinouts correspond to the same values shown in the table. There is only one difference - there are a lot of cars with zirconium-based lambda probes, titanium ones are rare, but still found. Determining the purpose of each lambda probe contact can be determined using special tables that will be presented below.
If the color combination of your sensor is identical to the color combination of one of the columns of the tables below (zirconium or titanium lambdas), then the sensor has the specified design and the pinout of the 4-wire lambda probe corresponds to the data indicated in the table.
Errors generated by the ECU
The electronic on-board computer is a complex and at the same time very sensitive device. It is considered a kind of “brain” in the design of any car, as it is responsible for all processes occurring in the systems. Therefore, it is very important to periodically diagnose the “well-being” of your “on-board vehicle” so that all the errors it produces are not ignored.
What is an ECU error
As mentioned above, modern control units detect a variety of errors: from a lack of voltage in the network to the failure of a particular mechanism.
In this case, a signal about a malfunction is sent to the driver in encrypted form. All error data immediately enters the ECU memory and is stored there until it is deleted through a scanner at a service station. It is important that active errors cannot be deleted until the cause of their occurrence is eliminated.
Deciphering error codes
The VAZ 2107 ECU can detect several hundred different errors. The driver does not need to know the decoding of each of them; it is enough to have a reference book or a gadget connected to the Internet at hand.
Table: list of VAZ 2107 error codes and their interpretation
| Error code | Meaning |
| P0036 | The oxygen sensor heater circuit (bank 1, sensor 2) is faulty. |
| P0363 | Cylinder 4, misfire detected, fuel supply to idle cylinders cut off. |
| P0422 | The efficiency of the neutralizer is below the threshold. |
| P0500 | Incorrect vehicle speed sensor signal. |
| P0562 | Reduced voltage of the on-board network. |
| P0563 | Increased voltage of the on-board network. |
| P1602 | Loss of on-board power supply voltage in the controller. |
| P1689 | Incorrect code values in the controller error memory. |
| P0140 | The oxygen sensor circuit after the converter is inactive. |
| P0141 | The oxygen sensor after the neutralizer, the heater is faulty. |
| P0171 | The fuel supply system is too lean. |
| P0172 | The fuel system is too rich. |
| P0480 | Fan relay, control circuit open. |
| P0481 | Cooling fan 2 circuit malfunction. |
| P0500 | The vehicle speed sensor is faulty. |
| P0506 | Idle system, low engine speed. |
| P0507 | Idle system, high engine speed. |
| P0511 | Idle air control control circuit faulty. |
| P0627 | Fuel pump relay, control circuit open. |
| P0628 | Fuel pump relay, control circuit shorted to ground. |
| P0629 | Fuel pump relay, control circuit shorted to the on-board network. |
| P0654 | Instrument cluster tachometer, control circuit faulty. |
| P0685 | Main relay, control circuit open. |
| P0686 | Main relay, control circuit shorted to ground. |
| P1303 | Cylinder 3, misfire detected, critical for the converter. |
| P1602 | Engine control system controller, power supply loss. |
| P1606 | Rough road sensor circuit, signal out of acceptable range. |
| P0615 | Checking for open circuit. |
Using this table, you can accurately determine the cause of the error signal. It is important that the on-board computer rarely makes mistakes, so you can safely rely on the codes received.
Oxygen sensor location by engine type
On engines of different sizes, lambdas are located in different places in the exhaust system.
- 1.5 liters: stands on the exhaust pipe, screwed in from above, exactly in front of the resonator. It’s easy to find, there’s only one on the exhaust system, you can see it by driving the car into a pit.
- 1.6 liters: this engine is equipped with two oxygen sensors, they are located on the catalytic collector. There may be one - for euro 2, and for euro 3 - 2 pieces.
As always, part of the fourteenth system tends to break down, but don’t rush to run to the spare parts store. It is necessary to check the lambda probe for suitability; diagnostics often reveal completely different causes of malfunctions in the exhaust system.
Removing the catalyst for VAZ 2107
So, today we will talk about the catalysts that were installed on VAZs depending on the model and year of manufacture, and we will also discuss the advisability of removing the catalyst, supposedly this improves the dynamics, but does not have any consequences. So, the most common opinion, which serves as a reinforced concrete justification for the need to remove the catalyst, is “The catalyst is strangling the engine.” In my opinion, this is a fundamentally wrong opinion, from the category of superstitions. A working catalyst creates absolutely no resistance to the flow of exhaust gases. Melting and clogging of the catalyst honeycomb are usually the consequences of long-term operation of a faulty car coupled with lousy fuel. For example, many people like to add additives to gasoline. But no one thinks that this could be one of the reasons for the failure of the catalyst. Poor fuel quality is undoubtedly a good assistant in the process of “killing” the catalyst, but there is always the opportunity to change the gas station, right? Also, one of the reasons for cat failure may be an incorrectly prepared fuel-air mixture. On average, the service life of a catalyst ranges from 150,000 km to 200,000, but sometimes they last longer. If you still decide to remove the catalyst, then remember - you need to know the toxicity standards of your car. EURO 2 or EURO 3. Finding out is easy. EURO 2 does not have a lambda after the catalyst. EURO 3 must have a control lambda after the catalyst. It tells the brain how good the cat is.
In cars with Euro 2, removing the catalyst is very simple. The catalyst is located under the bottom of the car in the exhaust system and auto stores sell inserts that are installed instead of the catalytic converter.
But in systems with EURO 3 standards, everything is somewhat more difficult. It is necessary to “agree” with the lambda probe, which is located after the catalytic converter, otherwise there will be a check engine “reduced efficiency of the catalytic converter”. There are two ways here - mechanical snag or flashing the brain of your car. And finally, where is the notorious catalyst located in our VAZs?
Coolant temperature sensor
A coolant temperature sensor is necessary to transmit readings about the temperature of antifreeze or antifreeze. It also participates in the formation of the fuel mixture necessary for engine operation. Creates a richer mixture while the engine warms up. This can be noticed by paying attention to the engine speed during the warm-up period.
Located between the cylinder head and the thermostat.
Signs of malfunction:
Oil pressure sensor
The oil pressure sensor is necessary to indicate to the driver that there is no pressure in the internal combustion engine. The oil necessary to lubricate the engine's rubbing parts is located in the crankcase, but some rubbing parts that need lubrication are located much higher than the crankcase. To provide them with lubrication, the engine has an oil pump that pumps oil into the cylinder head and lubricates the camshaft, crankshaft and much more.
Signs of malfunction:
VAZ cars: repair, maintenance, tuning
In the fight to comply with environmental standards, engine manufacturers are tightening requirements for systems, fuel and, ultimately, exhaust emissions. As a result, older cars suffer more than others. Error P0036 on the Lada Granta and other front-wheel drive VAZ vehicles just demonstrates the discrepancy between the capabilities of the equipment and the growing requirements.