Many car enthusiasts don’t even know what mono-injection looks like, because carburetor and injection engines are now used. But this system of supplying fuel to the cylinders also existed, and even now can be found on older cars. It was a transition between carburetor and injection engines. It is also called a monoinjector.
This system was used on German cars of the 80s, as well as on many Japanese ones. Meeting them now is difficult, but possible.
Like any device, an engine with such a fuel supply has its advantages and disadvantages, but modern designs have supplanted it. The reason is mainly due to environmental requirements, which have become much stricter.
Single injection device
Revolutionary in the emergence of the new fuel system was the abandonment of the use of a carburetor and the installation of an injector. The idea itself was not new, but the implementation of mono-injection brought engineers closer to creating modern injection systems. The main distinctive feature of the technical solution under consideration was the use of a single nozzle that sprays fuel. Otherwise, the operating principle of single injection is similar to current fuel systems.
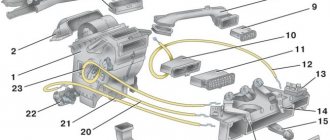
Single injection structure
The single-point injection system worked with fuel at low pressure by modern standards. The opening and closing signal came from the electronic control unit. There is an electromagnetic valve inside the injector, which is responsible for dosing gasoline. The mono-injection throttle valve is responsible for regulating the amount of supplied air.
Nuances of installation on Volkswagen
The car was loved for its reliability, impressive appearance, and prestigious technical characteristics. First, in setting up the Passat single injection, the following measurements are made: the resistance should be 1800 Ohms, the temperature should be 20 degrees.
The next step will be to correct the gap under the XX. A measuring device - a voltmeter - will help you determine if there is a short circuit in the circuit. By changing the position of the screw under the single injection, the gap is adjusted.
Then, in setting up the Passat B3 single injection, the throttle valve is connected. When the injector connectors are connected, mono injection is installed, fuel is supplied, it is necessary to turn off the battery and turn on the engine to reset the settings of the model we are interested in. The battery is reconnected, the voltage is checked between the 1st and 5th contacts of the connector responsible for controlling the throttle. Between the 1st and 2nd contacts the value should be 0.186V. In a different situation with indicators, you need to configure the system correctly. How is it going with other brands?
Advantages of the system
Advantages of mono injection over carburetor:
- simplified engine starting;
- fuel consumption is reduced while maintaining the same driving style;
- the mono-injection device eliminated the need to manually adjust the mixture supplied to the engine;
- reducing the amount of harmful substances in the exhaust as a result of a more optimal ratio of gasoline and air supplied to the combustion chamber;
- control by ECU.
One of the main advantages of cars with single injection was the absence of dependence of fuel consumption on the level of qualification and experience of the carburetor. The classic system, if the quality and quantity screws were incorrectly set, could burn gasoline several times more than normal, due to the low professionalism of the person who made the adjustment. In mono-injection, no intervention is provided during normal operation. Incorrect adjustment of a single-point injection system when troubleshooting does not have such a critical effect on fuel consumption.
Setup Tips
Setting up a single injection is most often required when the engine speed fluctuates. This can be observed both at idle and while driving. Engine malfunctions are most noticeable when changing gears. All these symptoms indicate that adjustment of the mono-injection will be required in the near future.
Carrying out the adjustment
Description of the sequence of actions:
- Using a multimeter, check the resistance of the intake air temperature sensor and compare it with the table values;
Intake air temperature sensor - Check whether the sensor circuit is operational;
- Check the pressure of the injectors;
- Set the idle clearance;
- Check the accelerator regulator and limit switches;
- Adjust the throttle position.
Once the adjustment is complete, you need to start the car. A test drive should show no floating rpm. Otherwise, it is necessary to additionally check the associated systems.
Maintaining a single injection in good condition is only possible with high-quality diagnostics. It is necessary to pay attention to any changes in the behavior of the car. The sooner a problem is noticed, the cheaper it will be to fix it. It is necessary to pay regular attention to injection.
Disadvantages of using one nozzle
The current lack of serial production of single injection is due to a number of shortcomings that have not allowed it to emerge victorious in the competition. The main disadvantages of the system under consideration are:
- high cost of components, especially compared to the carburetor power system;
- low maintainability, associated both with the design features of the units and with the small number of specialists capable of repairing a single injection unit;
- The speed fluctuates greatly with any deviations in fuel quality;
- inability to start the car with a discharged battery, since the mono-injection system is controlled by an electronic controller;
- Diagnostics, repair and adjustment of mono-injection are very difficult in garage conditions, as they require special equipment.
If the car does not start, then with a carburetor power system, the car owner will check whether the fuel is overfilled and can start the engine. In the case of single injection, only a few know how to adjust the fuel supply, so checking the performance of the system becomes an incomprehensible task for most. The complexity of the electrical circuit has made it impossible to test it with a multimeter; now the fault can only be identified by connecting a diagnostic scanner.
How to fix a similar problem on other cars
First of all, you need to find at least an approximate diagram of the car. Then it is necessary to determine the color of the twisted conductors or find it by examining the electrical wiring. The twist will look like two wires of different colors twisted together.
Then you should measure the resistance between the twisted conductors using a multimeter. To do this, they need to be cleaned (it is better to pierce them with a sharp needle). The resistance should be from several tens to a couple of hundred Ohms. If the resistance is close to zero, there is a short circuit in the circuit or some control unit is faulty. Very often the culprit is the ABS unit. You can turn it off, then clear the errors again and diagnose the car.
Often, after removing errors (not eliminating them), error U1900 disappears for a while, then appears again. This is a sign of poor contact.
In this case, you should disconnect the battery. Then you need to disconnect all the connectors of the blocks to which the CAN bus is suitable, treat them with a special compound (you can use silicone spray), connect the contacts again, and put on the battery terminals. At the service station, an oscilloscope is used to monitor the signal transmitted over the bus.
The penultimate stage of repair work is a visual inspection of all harnesses where the CAN bus passes. There may be broken wires or corroded wiring.
At the last stage, all units are turned off one by one and computer diagnostics are carried out. If the error disappears, the cause of the malfunction should be sought in this block.
Error U1900 is a time bomb. Its consequences do not appear immediately; you can travel with it for a very long time. This error may cause the car alarm to trigger abnormally. At one inopportune moment, U1900 can lead to more serious consequences - so it is recommended not to postpone solving this problem until “later”.
Video - how to remove the dashboard and fix error U1900 on Ford Focus 2:
May be of interest:
Scanner for self-diagnosis of a car
Compare the cost of MTPL for your car
Choose a DVR: an indispensable gadget for the driver
Some drivers prefer a DVR in the form of a mirror
Features of the operating principle of single injection
The principle of preparing the air-fuel mixture is simple. The injector, controlled by the ECU, dispenses the required amount of fuel, and the throttle valve supplies the required air. The combustible mixture is distributed among the cylinders using special sensors.
Engine compartment
Gasoline is supplied to the combustion chamber between the engine body and the throttle valve. To ensure good performance characteristics, ignition and mono-injection work harmoniously. This became possible thanks to the management of all processes from a single controller.
The operating mode of the fuel system is influenced by the following factors:
- crankshaft rotation speed;
- ratio of components of the fuel-air mixture;
- throttle position;
- gasoline pressure in the fuel line.
Mono-injection control has a lot of negative feedback coming from sensors. All information received by the ECU serves to reduce emissions of harmful substances and improve the dynamic performance of the vehicle. On a technically sound car with single injection, the exhaust fully complies with modern environmental requirements.
You may also be interested
Be sure to check the installation of the timing marks, set the ignition strictly according to the manual, no matter that your car does not drive with this ignition, on the Monomotronic MA1. Check for errors there should not be any errors, it is advisable that there should be no TPS either
We set the voltage between 1 and 2 to be equal to 0. All the following adjustments should be made with the power consumers turned off, even when the fan is turned on, there is no need to adjust anything as all the variables begin to float away!!!
It should not be desirable to check for errors; it is advisable that there should not be any TPS either. We set the voltage between 1 and 2 to be equal to 0. All the following adjustments should be made with the power consumers turned off, even when the fan is turned on, there is no need to adjust anything as all the variables begin to float away!!!
Do not turn the TPS quickly; the system reacts very slowly to turning the TPS and it takes some time for everything to stabilize; usually 10 seconds is enough, tighten the sensor bolts and watch the readings; they usually float away if we repeat the adjustment this way.
The data converges, everything is ok, it doesn’t converge, we change the sensor, there are no connections, we connect the wires to the sensor, it’s possible that it’s just a break and a soldering iron can fix it with a bang. The injector is checked by measuring the resistance from the central contacts of the brown terminal on the single injection. The resistance should be 1.
And then we begin the main entertainment. Carefully inspect your mono-injection for the presence of seals; they should be on 1.
This excerpt (second) is taken from the article: https://pol-z.ru/samostoyatelno-remontiruem-monovpryisk-na-volkswagen-passat/
Injection system malfunctions
The main malfunctions most often encountered on cars with single injection include:
- problems with the nozzle, its clogging or wear;
- incorrect operation of electronics.
Troubleshooting
The causes of the malfunction may be:
- natural wear and tear of fuel system elements;
- a manufacturing defect that can appear either immediately or after a certain period of time;
- unfavorable operating conditions, for example, refueling with low-quality gasoline, will, at best, cause clogging of the injector;
- faulty regulator;
- a sporty driving style that places critical loads on the engine and injection in particular.
To carry out diagnostics, you need to connect a laptop with special software installed. The good thing about a car with brains is that, if you have the right software for reading information, a tablet with a smartphone is also suitable. The obtained characteristics of engine operation allow us to narrow down the scope of troubleshooting.
Many car owners, in the absence of the opportunity to use a personal computer, act on the principle “I’ll check with an external inspection.” You can carry out any manipulations with the mono-injection only if you are confident in the performance of all other car systems. Some breakdowns, for example, if the sensors have oxidized contacts, can be determined by visual inspection. We clean oxidation and dirt without excessive effort.
After the car owner has cleaned the injector and sensor contacts, a test run is required. You should not interfere with the operation of the ECU. If it is impossible to fix the problem, it is advisable to contact professionals from the service center.
Repair and adjustment (with photo)
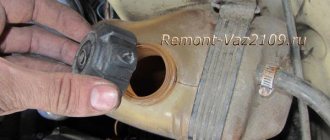
- The hood is opened, the mono-injection is unscrewed using a 10mm socket, and the gasket under it is replaced with a new one.
Single injection is removed with a socket head
- The contacts of the single injection sensor are carefully checked. If they are oxidized, they are cleaned with sandpaper.
- If problems are observed after replacing the spark plugs, the old spark plugs are returned to the engine and it is again checked for stability. If it turns out that the problem is in the spark plugs, another set of new spark plugs is installed in the engine (it is better if they are from a different manufacturer) and the test is carried out again.
- The distributor cover is replaced with a new one.
- The fuel pump is unscrewed and the throttle valve is cleared of soot.
The fuel pump has been removed, you can inspect the wires and sensor
- A visual analysis of the wires on the damper sensor is carried out and the integrity of their insulation and contact density are assessed. In damaged areas, the sensor wires are wrapped with electrical tape.
- As a rule, after some of the above actions, the problem of uneven injection is solved. But before installing it on a car, the mono-injection must be adjusted. Using a multimeter, the resistance at the outputs of the incoming air temperature sensor is measured. The measurement result is compared with the value specified in the car’s operating instructions (approximately: if the air temperature at the time of measurement is room temperature and is 25°C, then the resistance should be 1.8 kOhm).
The resistance at the sensor outputs is measured with a multimeter
- Next, the incoming air sensor is slightly heated using a conventional lighter, and the change in its resistance is monitored. If it decreases when the sensor heats up and increases when it cools, it means that the sensor is working and there will be no problems with it after installation.
- The same multimeter measures the injector resistance (on this Volkswagen model it varies from 1.3 to 1.6 Ohms).
- Now in single injection the exact idle clearance is set. A voltage of 12 V is supplied from the car battery to the contacts of the injection regulator. The accelerator is set to its extreme position. The multimeter switches to “short circuit” mode and its contacts are connected to the regulator on the accelerator. It is necessary to ensure that a small gap appears between the accelerator end and the rod, the width of which should not exceed 0.5 mm (this distance is checked with a flat feeler gauge, which is inserted into the resulting gap). A short circuit should appear on the multimeter. If it is not there, then the gap is too large and it is reduced using the adjusting bolt (it is located under the mono-injection).
- The throttle valve is now adjustable. The mono-injection unit is installed on the engine, the connector is connected to the injector. The damper position and incoming air sensors are also connected. Fuel pipes are connected. After this, the negative terminal is removed from the battery, and the key in the ignition is turned. This resets all settings in the on-board unit, including the damper position settings. They are automatically set to the manufacturer's default values. After reset, the negative terminal is reconnected.
The single injection is installed, the damper contacts are checked
- A multimeter measures the voltage on the fifth and first contacts in the damper connector (the ignition is on). It should not exceed 6 V. Then the multimeter switches to the first and second contacts of the damper connector. The voltage there should be 0.184 V.
This is how the contacts are located in the throttle connector of the Volkswagen Passat B3
- If these voltage values are not observed, then an adjustment is made: the 4 screws on the damper cover are loosened, the multimeter is connected to the first and second contacts of the connector, and the cover is turned either in one direction or the other. The voltage recorded by the multimeter changes. Once the position of the cover with the optimal tension is found, the bolts are tightened. This completes the adjustment.
Video about working with the system
As can be seen from this article, when repairing single injection on a Volkswagen Passat B3, the motorist will have to use the method of elimination, over and over again checking and discarding possible causes of uneven fuel supply until the real “culprit” is identified. This takes a lot of time, but it is the only way to accurately identify the cause of the problem. And then everything depends on the readings of the multimeter, which must be of high quality (it is strictly not recommended to use cheap Chinese devices when performing this work).
A word from the expert opinion
Why are settings reset? Difficulties and an urgent need to “reboot” the unit arise among those who like to drive short distances. This problem is inherent to vehicle owners who prefer to regularly start the engine while simultaneously pressing the gas pedal. How to proceed?
- The engine starts and warms up. The cooling fan should operate twice. The optimal oil temperature is +80 degrees.
- We turn off the power unit by turning off the ignition.
- The connector from the control unit must be disconnected to clear the RAM.
- The above connector is turned on again.
Sources
- https://portalmashin.ru/service/engine/chto-takoe-monovprysk.html
- https://AvtoNov.com/%D1%87%D1%82%D0%BE-%D1%82%D0%B0%D0%BA%D0%BE%D0%B5-%D0%BC%D0%BE %D0%BD%D0%BE%D0%B2%D0%BF%D1%80%D1%8B%D1%81%D0%BA-%D0%B8-%D0%BA%D0%B0%D0%BA -%D0%BE%D0%BD-%D1%80%D0%B0%D0%B1%D0%BE%D1%82%D0%B0%D0%B5%D1%82/
- https://FB.ru/article/454806/nastroyka-monovpryiska-poshagovaya-instruktsiya-sovetyi-spetsialistov
- https://DriverTip.ru/osnovy/chto-takoe-monovprysk-kak-on-rabotaet.html
- https://scart-avto.ru/remont/chto-takoe-monovprysk-kak-on-ustroen-kak-rabotaet-i-chem/
- https://SwapMotor.ru/ustrojstvo-dvigatelya/monovprysk.html
- https://KrutiMotor.ru/nastrojka-monovpryska/