Filling the clutch release hydraulic system with working fluid
Only special brake fluid is poured into the clutch release hydraulic drive system (TU MXP 1608-47, TU 35-ХП-430-62 or TU 35-ХК-482-64).
You cannot mix brake fluids of different brands and add to the system even the smallest amount of mineral oils, glycerin, gasoline, kerosene or mixtures thereof, which cause swelling and then complete destruction of rubber parts and, as a result, failure of the system. The use of ethylene glycol is also unacceptable due to the corrosion it causes to metal parts.
If special brake fluid is not available, you can use a mixture of 50% (by weight) castor oil and 50% butyl alcohol. It is possible to replace butyl alcohol with isobutyl or ethyl alcohol. It is important to keep in mind that ethyl alcohol evaporates more easily than butyl alcohol, and the composition of the mixture will change (especially in hot weather).
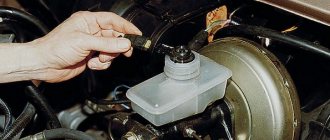
When switching to a different type of working fluid, it is necessary to remove the old one and thoroughly rinse the entire hydraulic clutch system with alcohol or new brake fluid. Brake fluid is poured into the body of the nutrient tank 3 without removing the strainer 2 from it in order to avoid foreign impurities entering the system. The brake fluid level should be 10-15 mm below the top edge of the reservoir.
It must be remembered that brake fluid leaves stains on the painted surface of the car body; therefore, you need to fill the system carefully, avoiding liquid getting on the body.
It is very easy to monitor the liquid level in the nutrient tank, since the tank is made of translucent plastic.
It is necessary to fill the hydraulic clutch release system with brake fluid and remove air from it in the following order:
- Fill the reservoir with liquid through a strainer to the normal level. To fill the tank faster, it is recommended to slightly raise the strainer.
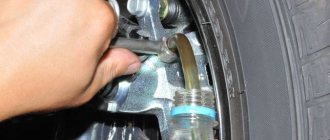
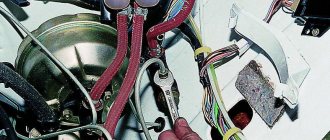
- Clean the air release valve on the working cylinder from dust and dirt and, having removed the rubber protective cap 2 from the valve head, put a rubber hose (included with the car) on the valve head. Immerse the free end of the hose in brake fluid poured into a clean glass container with a capacity of at least 0.5 liters, which must be filled to half its height.
- Press the clutch pedal sharply with your foot 4-5 times in succession (with an interval of 1-2 seconds between presses), and then, leaving the pedal pressed, unscrew the air release valve 1/2-1 turn. Under the influence of the pressure created in the system, part of the liquid and the air contained in it will be released through the hose into the container with the liquid (the air will come out of the hose in the form of bubbles).
- After the liquid flows out of the hose stops, turn the air release valve all the way.
- Repeat operations 3 and 4 until the release of air from the hose immersed in a vessel with liquid completely stops (this will require up to 75-80 pedal presses).
During the operation of removing air from the hydraulic drive system, add brake fluid to the nutrient tank, preventing the level in it from decreasing by more than 2/3 of the normal value. Insufficient height of the liquid column above the bypass and compensation holes in the master cylinder body can lead to atmospheric air being sucked into the cylinder (and into the system).
After air bubbles stop coming out of the hose, keep the pedal pressed, turn the air release valve all the way, and only then remove the hose from its head. Next, put the protective cap on the valve head, add liquid to the tank to the normal level and replace the tank cap.
After bleeding is completed, wipe the surfaces of the clutch hydraulic drive parts with a cloth.
To completely fill the hydraulic clutch system, 150 g of brake fluid is required.
The brake fluid released into the vessel when pumping the system can be reused to refill it only after it has settled (at least 24 hours) and the air has been completely removed from it, then it must be filtered.
The quality of the system pumping should be judged by the full stroke of the clutch slave cylinder piston rod when pressing the clutch pedal all the way to the rubber mat of the body floor.
With a fully pumped system, the stroke of the piston rod, as indicated above, must be at least 10 mm. With a smaller amount of rod movement, if the system is in good condition and the full stroke of the clutch pedal is at least 150 mm, pumping should be continued, as indicated above, until air is completely removed from the system and normal stroke of the piston rod is obtained.
A properly pumped hydraulic clutch system should ensure shock-free engagement of first gear in the gearbox.
If, when the clutch pedal is pressed all the way, there is a shock engagement of the first gear, you should make sure that the free play of the outer end of the clutch release fork is installed correctly and that the clutch mechanism is in good condition.
Design and operating principle of clutch master cylinders
The most simple design of the GCS is with the tank removed and installed on the body. The basis of the device is a cast cylindrical body, on which lugs for mounting bolts and other parts are made. At one end the housing is closed with a threaded plug or a plug with a fitting for connection to the pipeline. If the housing is closed with a blind plug, then the fitting is located on the side surface of the cylinder.
In the middle part of the cylinder there is a fitting for connecting to the tank via a hose or a seat for installing the tank directly on the body. There are two holes made under the fitting or in the seat in the cylinder body: a compensation (inlet) hole of small diameter and a bypass hole of increased diameter. The holes are located in such a way that when the clutch pedal is released, the compensation hole is located in front of the piston (from the drive circuit side), and the bypass hole is located behind the piston.
A piston is installed in the housing cavity, on one side of which there is a pusher connected to the clutch pedal. The end of the body on the pusher side is covered with a corrugated protective rubber cap. When the clutch pedal is depressed, the piston is retracted to its extreme position by a return spring located inside the cylinder. In double-piston gas pumps, two pistons are used, located one behind the other, with an o-ring (cuff) between the pistons. The use of two pistons improves the tightness of the clutch drive circuit and increases the reliability of the entire system.
Such cylinders work as follows. When the clutch pedal is released, the piston is in its extreme position under the influence of the return spring and atmospheric pressure is maintained in the clutch drive circuit (since the working cavity of the cylinder is connected to the reservoir through a compensation hole). When you press the clutch pedal, the piston moves under the influence of the force of your foot and tends to compress the fluid in the drive circuit. As the piston moves, the compensation hole closes and the pressure in the drive circuit increases. At the same time, through the bypass hole, liquid flows behind the back side of the piston. Due to the increase in pressure in the circuit, the piston of the working cylinder moves and moves the clutch release fork, which pushes the release bearing - the clutch disengages and you can change gear.
When the pedal is released, the piston in the main circulation center returns to its original position, the pressure in the circuit drops and the clutch is engaged. When the piston returns, the working fluid that has accumulated behind it is squeezed out through the bypass hole, which leads to a slowdown in the movement of the piston - this ensures smooth engagement of the clutch and the return of the entire system to its original state.
If there is a leak of working fluid in the circuit (which is inevitable due to insufficient connection density, damage to seals, etc.), then the required amount of fluid comes from the tank through the compensation hole. This hole also ensures that the volume of working fluid in the system remains constant when its temperature changes.
The design and operation of a cylinder with an integrated reservoir for working fluid is somewhat different from that described above. The basis of this GCS is a cast body installed vertically or at an angle. In the upper part of the housing there is a reservoir for the working fluid, under the reservoir there is a cylinder with a spring-loaded piston, and a pusher connected to the clutch pedal passes through the reservoir. On the wall of the tank there may be a plug for adding working fluid or a fitting for connecting to a remote tank.
The piston has a recess in the upper part, and a small diameter hole is drilled along the piston. The pusher is installed above the hole; in the retracted state, there is a gap between them, through which the working fluid enters the cylinder.
It is not difficult to operate such a GVC. When the clutch pedal is released, atmospheric pressure is observed in the hydraulic circuit and the clutch is engaged. When you press the pedal, the pusher moves down, closes the hole in the piston, sealing the system, and pushes the piston down - the pressure in the circuit increases, and the working cylinder actuates the clutch release fork. When the pedal is released, the described processes are performed in reverse order. Leaks of working fluid and changes in its volume due to heating are compensated through a hole in the piston.
Replacing clutch fluid on a VAZ 2101-VAZ 2107
Welcome! Clutch fluid - over time it becomes unusable like any other fluid, and therefore over time it needs to be changed, but not everyone knows how to do this, so especially for these people we have prepared this article, which describes in detail the replacement of fluid in the clutch hydraulic drive .
Note! To change the fluid in the hydraulic drive, you will need to stock up on: New brake fluid, and you will also need to take an assistant with you, so changing the fluid with him will be much easier, and you will also need any container into which the used fluid will be drained, and You will also need to stock up on a small hose about 0.5 meters long, with the help of which the fluid will be drained from the clutch hydraulic drive!
And also, to replace the fluid in the clutch, you need to stock up on: A clean or slightly dirty rag, and you will also need to take a basic set of wrenches, which will include small “8” and “10” wrenches!
What should be poured into the clutch hydraulic drive? We are often asked this question, and the answer is very simple. Only brake fluid should be poured into the clutch drive, because it does not compress, thereby not creating depressurization in the system, which in turn can lead to complete failure of the clutch.
Where is the clutch reservoir located? Many people very often confuse the clutch reservoir with the brake reservoir, and therefore, so that you never get confused in these nuances, we will explain it right away. The clutch reservoir has always been and is currently located on classics closer to the fender, so that you understand in more detail, in this case, look just below the photo in which the hydraulic reservoir is clearly visible and indicated by an arrow.
When do you need to change the fluid in the clutch reservoir? As was said a little earlier, over time, any fluid loses its properties and thus can no longer normally perform the function for which it was created, therefore it is recommended to change the fluid in the hydraulic drive after five years of operation of the car, or if it gets into the system air that should not be in the system, and thus you have to bleed the clutch system of the car and thereby also have to replace the brake fluid in the clutch tank with a new one. (For information on how to bleed the system, see the very bottom of the article in the “Important!” section, there will be a link to bleeding the clutch on a VAZ)
When do you need to adjust the clutch on Lada 2107?
It is recommended to check the settings regularly at every car maintenance. But there are still signs when the procedure should be started immediately, so it wouldn’t hurt any owner to know how to bleed the clutch on a VAZ 2107 on their own. Malfunctions in the operation of the coupling during operation are expressed by the following symptoms:
- Slipping – the clutch disc slips when the pedal is fully released, and is unable to transfer all the power from the internal combustion engine to the transmission.
- Drives - the disc does not move away from the flywheel when the pedal is fully depressed, which makes it difficult to change gears.
What should I check?
The clutch may engage too early or late due to the pedal not moving properly, resulting in jerking while driving. The free play of the pedal should be within 0.4-2.0 mm; if these indicators are violated, then adjustments are necessary.
If you look under the car, you can check the free play between the pusher (indicated by the red arrow) and the release fork (blue arrow). Before adjusting the clutch on a VAZ 2107, you need to pump the fork by hand; if there is no free play or exceeds 5 mm, then adjustment of the unit is necessary, because the release bearing will be subject to constant loads.
If all adjustment parameters are normal, the pedal stroke before the clutch starts engaging should be 25-35 mm. This is determined using a ruler; if the indicator does not correspond to the norm, then you will have to adjust some components of the clutch drive system.
How to replace clutch fluid on a VAZ 2101-VAZ 2107?
Draining: 1) First, before you start working, use a clean or slightly dirty rag to wipe the clutch reservoir, or just its cover, to make it more pleasant to work with.
2) Next, grab the tank cap with your hand, and thereby completely unscrew it and put it aside so as not to lose it.
3) Next, if the crankcase protection installed on your car bothers you, let’s say it’s too big, then remove it to gain access to the clutch slave cylinder. (For information on how to remove the protection, see the article: “Replacing the crankcase protection”)
4) Now perform the following operation, to do this, again using a cloth, wipe the protective cap located on the fitting of the clutch slave cylinder and at the same time clean the cylinder fitting itself from dirt.
5) After the dirt has been removed, take a wrench and use it to unscrew the fitting itself by about 3 or 4 turns (At your discretion), and after unscrewing the fitting, at this time let your assistant help you, thereby pressing the pedal clutch several or even more times, generally until all the fluid flows into the container you prepared in advance.
Note! When pressing the pedal, be sure to warn the assistant that it may fail, that is, fall to the very bottom and not go back, then in this case, let him return the pedal to its place with his hand, bending it to do this and thereby lifting it!
Filling: 1) When all the liquid has been drained from the tank, then in this case tell the assistant that you don’t need to press the pedal anymore, and at this time you tighten the bleeder fitting that was unscrewed earlier so that the liquid no longer pours out of the working cylinder and always remained in it.
Note! At the very end of the operation, fill the clutch hydraulic reservoir with brake fluid to the required level!
And after pouring the liquid before screwing the lid, visually inspect this lid for defects, and also check the compensation cavity, which is indicated by the arrow and which is also removed from the lid, so if after removal you see signs of rubber aging, signs of cracks and tears, then In this case, replace this cavity with a new one!
Advice! By the way! You can also replace the fluid in the clutch drive, displacing the old one, to do this you need to ask your assistant to add fluid to the reservoir as it is displaced, and do all this until normal, clean fluid begins to flow into the container you are holding!
Important! Be sure to bleed the car’s clutches when you finish replacing. (For information on how to bleed the drive, see the article: “Bleeding the clutch on a VAZ”)
Purpose of the container
The design of the domestic VAZ 2107 car uses a hydraulic braking system, consisting of drive and actuator mechanisms, as well as lines in the form of tubes and hoses, and a reservoir filled with liquid. This liquid substance acts as a drive source, and it is called brake fluid - an acid that is hygroscopic. It is poured into a transparent plastic container under the hood, but more on that.
The container in question on the seven is made of soft and impact-resistant plastic. It is almost impossible to break the tank, but it is easy to damage it with a sharp tool. The reservoir is filled with fluid, which goes to the master cylinder. The piston moves in the cylinder when the middle pedal is pressed, thereby increasing the pressure in the system. When the pressure increases, the working cylinders are activated, in which the pistons move under the action of a liquid substance.
From a brief description of the principle of operation of the brake system on the VAZ 2107, it is clear that the reservoir plays a fundamental role. It ensures an uninterrupted supply of working substance to the main cylinder of the system. If lines or operating mechanisms are damaged, the tightness of the system is compromised. Due to the fact that the tank has transparent walls, it is possible to identify system malfunctions easily and quickly. To do this, you need to open the hood and look to see if the container is full.
How to change the tank
Before replacing the brake fluid reservoir, you need to understand its location. The reservoir is located on the driver's side under the hood. When you open the hood, you need to look at the wall closest to the cabin, where there will be two plastic tanks next to each other. The first reservoir, which is located to the left, is a container for brake fluid. Next to this tank there is another tank of a smaller volume - this is a container for a similar substance, which is used in the clutch system.
Vehicle owners should be aware that brake fluid must be replaced every 40 thousand km. If the car has mileage above this indicator, then the quality of the mixture deteriorates, which can cause brake failure at any time. In addition to replacing the mixture every 40,000 km, it is also necessary to periodically monitor the level of brake fluid in the reservoir and, if necessary, top it up.
Replacing the tank may be necessary in rare situations when its integrity is compromised. These are rare cases, however, they are appropriate, for example, when repairs are being carried out and the tank structure is accidentally touched. Instructions for replacing the tank are as follows:
- At the initial stage, you need to disconnect the connector of the sensor, which is activated when the brake fluid level decreases.
- Unscrew the tank cap.
- Pump out the composition from the reservoir using a syringe or bulb.
- Using a screwdriver, loosen the clamps that secure the rubber hoses.
- Disconnect the rubber hoses.
- Unscrew the bracket that secures the tank.
Now you can dismantle the device and install a new tank in its place. The assembly process is performed in the reverse order of removal. After replacement, the brake fluid is filled and the system is bled (air removed).
What is poured into the clutch reservoir of a VAZ 2107
In the Service, Maintenance, Tuning , answer the question What kind of fluid should be poured into the hydraulic clutch release reservoir? ? VAZ 2107 and what is this tank for? asked by the author Bloodsucking The best answer is that brake fluid must be poured there in order for this very clutch to “disengage”
CLUTCH FLUID
LEVEL CHECK
• Make sure the fluid level in the reservoir is between the “MIN” and “MAX” marks when the engine is cold.
• Visually check for fluid leaks around the reservoir.
• If the fluid level is extremely low (below the MIN mark), check for fluid leaks from the clutch system.
BLOWING PROCEDURE
Note: Do not use a vacuum or mechanical device to bleed the hydraulic drive, as such devices will not completely remove air from the system.
Attention:
• Monitor the fluid level in the reservoir and do not allow it to empty.
• Do not spill clutch fluid on painted surfaces. If liquid is spilled, wipe it up immediately and rinse the area with water.
• Bleed the coupling (1).
1. Fill the reservoir with fresh clutch fluid.
2. Connect the clear vinyl hose to the bleeder fitting on the coupling.
3. Slowly press the clutch pedal all the way 15 times and release it at intervals of 2-3 seconds and keep it pressed.
4. Press the locking pin (1) of the coupling (2) and lock it in this position,
Caution: Keep the pedal depressed to prevent the tube from moving away from the coupling when applying pressure to the tube.
5. Slide the clutch tube (1) in the direction shown by the arrow.
Dimension "A": 5 mm
2: Clutch housing
Dimension "A": 10 mm
6. Quickly press the clutch pedal and keep it pressed. Then release the air from the tube.
Caution: Keep the pedal depressed to prevent the tube from moving away from the coupling when applying pressure to the tube.
7. Return the clutch tube (1) and locking pin to their original position.
8. Release the clutch pedal and wait 5 seconds.
9. Repeat pp. 3-8 until there are no air bubbles in the clutch fluid.
Section 14: - clutch of a VAZ 2107 car
Review of Manufacturer Prices
| Name/catalogue number of brake fluid | Price in rubles |
| DOT4 250ml TRW PFB425 | From 145 |
| DOT5.1 250ml TRW PFB525 | From 180 |
| DOT4 500ml TRW PFB450 | From 220 |
| DOT5.1 500ml TRW PFB550 | From 220 |
| DOT5.1 ESP 500ml TRW PFB750 | From 220 |
| DOT4 1L TRW PFB401 | From 220 |
| DOT5.1 1L TRW PFB501 | From 220 |
| DOT4 ESP 1L TRW PFB440 | From 220 |
| DOT4 ESP 1L TRW PFB440 | From 220 |
| DOT4 5L TRW PFB405 | From 220 |
| *prices are as of May 2022 | |
hydraulic clutch release of a VAZ 2107 car - fluid replacement - bleeding the clutch
To perform the work of replacing the fluid and bleeding the clutch on a VAZ 2107, you will need an assistant, as well as a container and a hose for draining the fluid.
The sequence of work to replace the fluid and bleed the clutch on a VAZ 2107 car
1. We install the VAZ 2107 car on an inspection hole or overpass (see “Preparation of the VAZ 2107 car for maintenance and repair”). 2. Clean the clutch reservoir from dirt and open the lid. 3. On a VAZ 2107 car with an injection engine, remove the additional mudguard (see “Splash guard - removal and installation”). 4. We clean the protective cap and bleeder fitting of the clutch slave cylinder from dirt. We remove the cap and put a hose on the fitting, the other end of which is lowered into the prepared container.
Using an 8 mm wrench, unscrew the fitting 3/4 turn. Press the clutch pedal repeatedly until all fluid is removed from the system. We wrap the fitting. 5. If the clutch pedal on a VAZ 2107 car has “failed,” lift it by hand. 6. Fill the working fluid through the clutch reservoir into the hydraulic drive of the system. Note Clutch fluid can be replaced by gradually displacing the old one. To do this, add fluid to the clutch reservoir as needed and unscrew the clutch bleeder nipple, press and release the clutch pedal. When clean fluid begins to come out of the clutch slave cylinder, tighten the fitting.
Bleeding the clutch on a VAZ 2107
1. Immerse the free end of the hose into a container with working fluid.
Using an 8 mm wrench, turn the clutch bleeder 3/4 turn. 2. An assistant sharply presses and smoothly releases the clutch pedal. In this case, liquid with air bubbles will begin to be forced out of the clutch hydraulic drive into the container. If the release of air bubbles has not stopped and the clutch pedal has reached its lowest position, tighten the fitting. Check the fluid level in the clutch reservoir and add fluid if necessary. 3. Repeat operations 1 and 2 again until the bubbles stop appearing. 4. When the release of air bubbles from the clutch system stops, sharply press the clutch pedal and hold it, tighten the fitting. ATTENTION If the release of air bubbles does not stop, check the tightness of the clutch system connections. If leaks are detected, repair the clutch system on the VAZ 2107.
Types of Clutch Master Cylinders
All GCS have a fundamentally identical design and principle of operation, but are divided into several varieties according to the location and design of the reservoir with the working fluid, the number of pistons and the general design of the housing.
According to the location and design of the tank, the cylinders are:
- With an integrated reservoir for working fluid and a remote tank;
- With a remote tank;
- With a reservoir located on the cylinder body.
| Clutch master cylinder with integrated reservoir | Clutch master cylinder with remote reservoir | Clutch master cylinder with reservoir mounted on housing |
The first type of GVC is an outdated design that is rarely used today. Such a mechanism is installed vertically or at a certain angle; in its upper part there is a reservoir with working fluid, the supply of which is replenished from a remote tank. Cylinders of the second and third types are more modern devices, in one of them the tank is remote and connected to the cylinder via a hose, and in the other the tank is installed directly on the cylinder body.
Based on the number of pistons, GCS are:
- With one piston;
- With two pistons.
| Single piston clutch master cylinder | Clutch master cylinder with two pistons |
Bleeding the clutch on a VAZ 2101-VAZ 2107
Welcome! Clutch - sometimes it happens that some units in the system have to be changed, but this mainly concerns the clutch drive cylinders, after replacing or simply removing them, the clutch hydraulic drive must be pumped, and if this is not done, then when you press the pedal the clutch itself simply does not work will turn off completely, and the pedal travel will be very light. The clutch drive must also be pumped if the brake fluid level in the clutch reservoir has reached its minimum and gone even lower than the mark, because in this case air gets into the hydraulic drive and the clutch pedal, which is pressed all the way, may not fully disengage the clutch, Read more about when you need to bleed the clutch hydraulic drive just below!
Brake fluid reservoir
Hello again, my readers, today I decided to write about the brake fluid reservoir, an important part in the brake system. It stores a supply of fluid, which ensures that the brakes operate during braking without air getting into the system. Thanks to the lid, it also prevents moisture and debris from entering the liquid. If you do not make sure that there is enough fluid in it, then at the decisive moment you can be left without brakes. The level of brake fluid in the reservoir helps to identify a leak in the brake circuit; if it begins to drop sharply, you just need to monitor it periodically.
How to bleed the clutch on a VAZ 2101-VAZ 2107?
Note! Always remember that you need to bleed the clutch together in a car, because it’s difficult to do this without the help of an outsider, but there is still a way out, so if you are going to bleed the clutch alone, then first read the entire article to at least visually understand how it’s done , and then run the video clip located at the very end of the article, and this video shows a visual process of bleeding the clutch, performed by just one person!
And it’s best to do all the work in a pit, because it’s much simpler and more convenient, but if it’s not there, then you can do the work without it, it’ll just be a little problematic!
1) At the very beginning of the operation, pour new brake fluid into the clutch reservoir, and then close the reservoir with a plug.
Note! The liquid must be filled strictly to the very top edge! (For more information on how to fill the brake fluid into the reservoir, and why you need to fill the brake fluid at all, see the article entitled: “Replacing clutch fluid on a VAZ”)
2) Next, take a small hose in your hands and put one end of it on the fitting of the working cylinder.
3) Then ask an assistant to sit in the car and press the clutch pedal about 5 times, for the last time let him leave the pedal fully depressed.
Note! Ask an assistant to press the clutch pedal sharply and at intervals of 3 seconds!
4) Meanwhile, while the assistant holds the pedal down, prepare an empty container into which you will drain the brake fluid with bubbles, and then lower the other end of the hose into this container.
5) Then loosen the fitting with a wrench and at this time brake fluid with bubbles will begin to drain into the container you are holding.
Note! As you already understood and this was already mentioned earlier, bubbles are air that should never be present in the brake fluid, otherwise the system will begin to malfunction, in general, we continue!
6) Now wait until the clutch reservoir containing the brake fluid is almost completely empty and then immediately tighten the bleeder fitting tightly, and let the assistant take his foot off the pedal.
Note! Be sure to pay attention to the words: “It will not empty almost completely,” so you don’t have to wait until all the fluid comes out of the reservoir; in no case should it fall less than 15 mm, otherwise you will be bleeding the clutch for a very long time and most likely the system it won’t even be pumped if you do this, because when the fluid is completely emptied from the tank, during this time air begins to enter the system, and therefore the clutch hydraulic drive will depressurize again, which will lead to constant pumping!
7) Now, as you already understand, when the level reaches almost to the very bottom, then stop the bleeding operation by screwing in the bleeder fitting and the assistant removing his foot from the pedal, and then again add liquid to the tank and repeat the entire bleeding operation again.
Note! Do this operation again and again until liquid begins to flow into the container without bubbles!
Additional video clip: More details about that? You can see how to bleed the hydraulic drive in the video below:
Clutch device for VAZ 2107, VAZ 2105, VAZ 2104, do-it-yourself repair
Clutch VAZ 2107, VAZ 2105, VAZ 2104
Answers (1)
Replacing clutch fluid is very simple. To replace it, you will need 150 grams of brake fluid; if, for example, the brake fluid reservoir is at its maximum, then you can pump it out from there and pour it into the clutch.
According to the regulations, the fluid in the clutch hydraulic system should be changed every 30,000 km or every 2 years. Fill with DOT4
1) Open the fluid cap - it is located near the brake fluid reservoir.
2) Pump out the old liquid from the tank using a syringe or bulb or other device.
3) as soon as the oil has been pumped out. We open the bleeder fitting, put a hose on it and start pumping the fluid. Someone should sit in the car and press the clutch pedal regularly, then press and not let go. Before doing this, pour fresh oil into the tank. We pump the system until fresh oil flows out of the fitting.
That's all the replacement is. Typically, clutch fluid is replaced at the same time as brake fluid is replaced, since they have the same service life.
Clutch fluid reservoir
where is the clutch fluid reservoir located again?
from here we pump the oil out of the system
This is what fresh clutch oil should look like
Guys, where is the clutch fluid filled in on the injector of the VAZ 21099? For the brakes, did you find where the clutch is located? (thank you in advance)
Similar articles
31 comments on “For the brakes, I found where to find the clutch”
pour it into your head. It might help.
There is no clutch fluid. Before writing here, just open a book on repairs and read it. And no one will laugh.
And such people live on this sinful earth!!
You should first buy clutch fluid for this model()
Although I would sell
Egor, well, you can advise pouring it into the hole where the VMT is looked at! A couple of liters of oil!! And then I’d like to see how it drives!!
Someone switched to PP. From the classics. Why are you doing so right away?
Pour into the box
They are crazy, they live, and the worst thing is driving.
put a spacer between the seat and steering wheel
At 99 the clutch is dry, driven by a cable
There, everything is poured into the gas tank and all liquids and oils are then distributed to their places through distribution channels
Why did you start trolling? He doesn't have to know this. Moreover, only the damn VAZ had this insanity in the form of a cable clutch
Have you changed the fluid in the headlights?
Trossss
Straight to the fucking box
Anton, this is not enough, you need at least half a bucket
Slavik, it’s a normal system.
Slavik, who told you that this drive is bad? Absolutely ideal drive for this car model!
You're probably kidding me about what kind of fluid is in the clutch, where the cable is
Is there also a clutch somewhere?
So you gave me coal.
Greetings my readers!
It’s time to change the clutch hydraulic fluid, since the old one was very dark, the reservoir itself is also dirty, and I don’t know how long ago it was changed... These indicators are a quick replacement for me.
I didn’t time the time itself, of course, about 15-20 minutes maximum I think.
Point 2. Necessary:
What do you need for this whole operation: - brake fluid;
— syringe
(preferably large capacity), to pump out old fluid from the clutch reservoir;
— a key for 10
(take a shorter one, as a long key will not be convenient);
— WD 40
(you will have to poke at the fitting itself) without it it will be more difficult to unscrew it due to inconvenience;
— some kind of container
(for the old liquid that will drain from your fitting), I took an ordinary one and a half rack and cut it as it was convenient for me;
— a cloth
(for removing various stains);
Point 3. Algorithm of actions:
— remove the clutch barrel cover itself; — we pump out the old, dirty in my case, liquid from there using a syringe; — take a rag and clean the dirty tank;
— pour new liquid into it, carefully, slowly, you might miss!);
— then we go to the fitting (I didn’t take a photo, there is info on the Internet), remove the cap from it, spray WD on the fitting so that you can unscrew it; — take a container for the old liquid, put it under the fitting; — I forgot to say, you need a partner to bleed the clutch pedal, he, in turn, bleeds the pedal 5 times and holds it until... - you turn the fitting a little with a wrench to 10 so that the old fluid flows out and flows forward... (it would be more correct to use a tube under the fitting so that the old liquid flows out into the container through it, I didn’t have one, I just put the container under the fitting and that’s it); — as soon as the fluid stops flowing, tighten the fitting and ask your partner to pump the pedal again, and you, in turn, monitor the level of new fluid in the tank;
- pump the pedal again, unscrew the fitting, and do this until new, fresh fluid flows from the fitting...
In the end, it took me about 250 ml of fresh liquid. I haven’t driven it yet, but I’m sure that replacing the fluid is a useful, necessary operation! Yes, there are not enough photos, but I tried to tell it like this...
Thank you all for your attention, I advise you to do this at least once a year!
Bleeding the hydraulic clutch of VAZ 2107, VAZ 2105, VAZ 2104, Lada Zhiguli, Classic
Air in the hydraulic clutch of the Lada Classic is indicated by incomplete disengagement of the clutch, as well as “softness” and “sagging” of the VAZ 2105 clutch pedal.
To remove air from the hydraulic clutch of a VAZ 2107:
— clean the tank and bleeder fitting from dust and dirt; — check the fluid level in the hydraulic drive reservoir and add fluid if necessary;
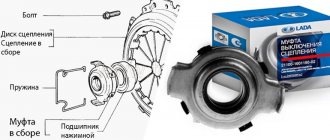
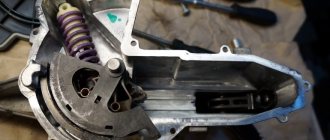
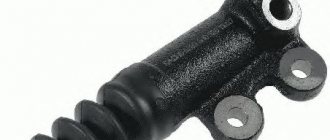
Slave cylinder and clutch release fork VAZ 2104, VAZ 2105, VAZ 2107: 1 - clutch release bearing; 2 — ball joint; 3 — clutch release fork; 4 - pusher; 5 — adjusting nut; 6 - lock nut; 7 — tension spring; 8 — housing plug; 9 — fitting for bleeding; 10 — cylinder body; 11 - sealing ring; 12 — protective cap; 13 - piston; 14 - seal; 15 - plate; 16 - spring; 17 — support washer; 18 — retaining ring
— put a hose on the head of fitting 9 of the working cylinder and immerse its lower end in a vessel with hydraulic fluid (30–50 g); — unscrew fitting 9 1/2–3/4 turn, sharply press and smoothly release the pedal until the release of air bubbles from the hose stops; - Press the pedal and tighten the fitting as far as it will go. Remove the hose and put on the fitting cap.
If, despite prolonged pumping, air bubbles come out of the hose, check the reliability of the connections, find out if there are cracks in the tubes or leaks in the connections with the fittings. It is possible for air to penetrate through damaged sealing rings of the main or working cylinders of the VAZ 2104.
What kind of service is this?
Like any other part of the car, the clutch requires constant maintenance. Changing the clutch fluid, changing the engine oil or replacing the brake fluid is a simple but very important procedure to ensure the normal operation of this mechanism.
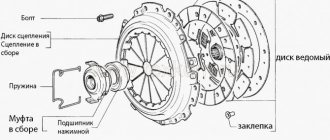
The clutch in a car is necessary to temporarily disconnect the engine crankshaft from the gearbox. This procedure is needed to change gears. This mechanism also allows you to move off smoothly without significant jerks. Untimely replacement of brake fluid in the clutch hydraulic drive or untimely change of oil in the transfer case leads to disruption of these functions, which significantly complicates the operation of the vehicle. Using the example of the “classics” we will analyze this procedure.
Replacing brake fluid in the clutch
Only brake fluid is poured into the clutch drive due to its special properties, due to which it resists compression. This helps to avoid depressurization, leading to complete breakdown of the mechanism. When you fill the fluid, the main thing is not to mix up the brake and clutch reservoirs. The latter in the “classic” is closer to the wing.
Replacing clutch fluid is carried out in several steps:
- Before starting work, it is recommended to wipe the tank to remove dirt and dust.
- Unscrew the lid and set it aside in a visible place.
- Call an assistant while you unscrew the cylinder fitting with a wrench. Take the container, point it to the desired location and ask an assistant to press the clutch pedal until all the liquid has drained.
- Once all the liquid has been pumped out of the tank, ask an assistant to stop his actions. At this time, tighten the fitting yourself to the initial position.
- Fill with new fluid and check the cap for defects. If they are present, this may cause a lack of tightness and replacement of the lid.
Our recommendations
- After filling the fluid, you must bleed the clutch.
- Clutch fluid should be replaced at least once every five years. This figure may be significantly less depending on the intensity of use of the machine and a number of other factors.
- Use only the fluid recommended by the manufacturer. Ignoring this recommendation may result in damage to the clutch mechanism.
Replacing clutch fluid
Clutch fluid level
Oil in transfer case
Keep in mind
There is no special clutch fluid. This is regular brake fluid. It is poured into the clutch master cylinder. The method described above is not universal and may not be suitable for your car model. If you have doubts, it is better to consult a specialist.
The working fluid in the clutch hydraulic drive is brake fluid.
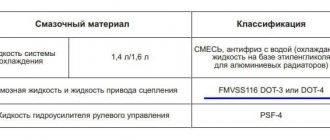
RECOMMENDATION Type of brake fluid: “Tom” or “Rosa” with a class of at least DOT-4.
WARNING Brake fluid is toxic. Observe safety precautions when working with brake fluid. Do not allow brake fluid to come into contact with wires, plastic or painted parts. If brake fluid gets on such parts, wipe them off immediately. Use only brake fluid recommended by the manufacturer of the VAZ 2106. Do not reuse fluid drained from the system - such brake fluid is contaminated, saturated with moisture and air. Beautiful sex with your daughter's mother and your favorite friend Add brake fluid to the clutch reservoir of the brand that is already used in the system, or compatible with it.
On a VAZ 2106 car, the hydraulic clutch reservoir is located in the engine compartment in the left rear corner next to the brake reservoir.
1. This should be the normal level of brake fluid in the clutch reservoir.
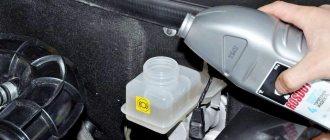
2. To add fluid to the clutch reservoir, unscrew the cap and remove it. Place the lid on a clean cloth, avoiding either soiling the lid or allowing liquid to drain from it.
3. Carefully add brake fluid to the clutch reservoir to the bottom edge of the filler neck. 4. Close the lid. NOTE
A compensation cavity combined with a gasket is fixed on the inside of the cover with a slight interference fit.
If there are signs of aging, cracks, tears or other damage, replace the cavity.