How to replace rear silent blocks on a VAZ 2114
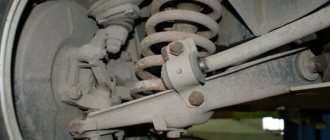
Preparatory stage. Initially, the repair site and vehicle are prepared. It is necessary to drive the car onto an overpass or use an inspection hole. It's good to fix it in place and let the car cool down. It is recommended to move away all cables, pipes, and wires passing nearby so as not to damage them during routine repairs of the machine.
It is also important to thoroughly rinse the area where the hinge is located, clean everything from dirt and open access to the fastening system so that nothing interferes and it is possible to replace the rear silent blocks of the VAZ 2114. Fixing stage. The car is installed well, raised on a jack, a place is prepared for repairing the vehicle, wooden blocks are also used to fix some parts of the car
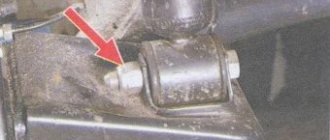
If you are afraid of damaging parts of the brake system and engine, you can dismantle them for a while. Direct replacement of rear silent blocks on a VAZ 2114. Gradually unscrew all the nuts. If necessary, the fasteners that have frozen forever are cut off with a grinder. The metal parts of the hinge are lowered to allow access to the rubber or polyurethane layer. Then, using a chisel and a hammer, the damaged part of the hinge is removed from the niche. A new part is installed in the freed space, which can be clamped in a vice at the time of installation. This is how the replacement of the rear silent blocks of the VAZ 2114 is completed.
It is recommended to carry out a wheel alignment diagnosis at the end of the repair work; this will be more reliable. We observe the behavior of the machine for several days; if the alarming signs disappear, it means that you have discovered the correct location of the problem and fixed it in time. The “stuffing” of a car is complex and consists of small parts, but never discount them. Clearly understand: if it is vital to replace the rear silent blocks on a VAZ 2114, then act, look for opportunities to put the vehicle in order. Transform the powerful “steel horse” into a source of supreme pride! Don't lose sight of a single detail, not a single little thing!
Wheel alignment
How should the silent block be changed? What tools will be needed for this?
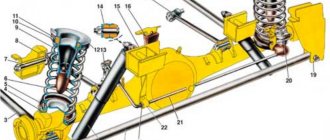
But it’s worth starting, perhaps, with the selection of the silent blocks themselves. For models 08, 09 and 099 you need to purchase the specified elements with the following catalog number: 2108-2914054. For versions 10, 12, 14, 15, silent blocks with number 2110-2914054 are suitable. The difference between these structures is in the outer diameter (the difference can be seen in Fig. No. 1a). If you try to install silent blocks from the tenth model on the beam of the “nine” or vice versa, an unpleasant surprise awaits you. It's better not to confuse anything.
Now about the tool. In addition to the traditional set of tools, such as 19mm spanners, a pair of jacks and a hammer, you will need a wooden beam and a device that will help press the silent blocks. You can make this device yourself or buy it. If the purchase cannot take place for some reason, then photo No. 1 shows the main details. Their dimensions are as follows: the diameter of the bolt is 12 mm, its length is 170 mm. The diameter of the ring-clip is 50 mm, height is 40 mm. All other elements of the device are easy to select.
Tips for replacing and operating VAZ 2110 silent blocks
Sometimes, when replacing silent blocks on a VAZ 2110, they try to install a silent block from a VAZ 2109. Despite the external similarity (you can hardly tell the difference by eye), the dimensions of the silent block of the rear beam of a VAZ 2110 are a couple of millimeters larger, therefore the hinge from the “nine” will dangle in the mount. But from the “ten” the rubber bushing, if you try, can be pressed into the VAZ 2109 beam.
- Rear silent blocks must be replaced every 50,000 km, because they are the least durable products compared to other rubber beam bushings.
- Even if one silent block fails, the other one should be changed, because if you replace only the non-working one, the remaining one will “knock” after it, because its resource was already running out.
Photo report with comments
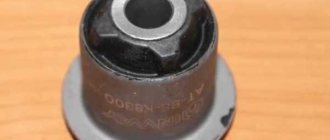
The catalog number of these silent blocks is as follows: 17-06-104 (If anyone decides to buy one, the colors, hardness and prices for them are also different).
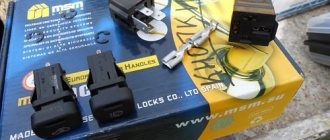
And now, after a few months, I finally decided to replace it in early June. As always, I was prepared for this task both spiritually and physically, and in order to make my work easier, I spilled the nuts a week in advance. I also bought clips and washers of different diameters at a building materials store and assembled a type of puller for all occasions.
And at the auto parts store I bought two bolts and two nuts to replace the old ones. So, there are these silent blocks:
Left-hand side
Right side
The first thing I decided to do was start on the left side. The nut, of course, didn’t work, even a week’s soaking with water didn’t help, but I wasn’t confused and was ready for such a turn. I picked up a grinder and sawed off half of the nut, and then simply knocked off the remains with a chisel.
I jacked up the car and safely lifted the beam out of the eye.
Then I put on my puller and started turning it, but no matter how wrong it was, the silent block had turned sour that it didn’t want to get out of anything.
I had to trim its edge a little and, after straining, after half an hour it finally gave up. The main reason for souring is the rust that formed inside the seat, well, in principle, there is nothing to be surprised about.
After the silent block was removed, I decided to clean the entire seat and process it. I did everything slowly and with conscience, so that such problems would not arise in the future. Using abrasive rollers, I completely cleaned off the rust, then treated it with zinc. I let it dry for a while, and then went over it again with cutters. The result is a completely clean and shiny seat, without sinks.
Next, I started pressing in the new silent block. I did everything according to my old tradition: I sprayed the silent block itself and the seat with silicone grease, and then simply pulled it in using a puller. Everything went fine, the silent block went in like clockwork.
On the spot
Then all that was left was to insert the beam into the eye and screw in a new bolt. I jacked up the beam with a second jack and in this way got into the seat. Of course, I had to sweat a little, I didn’t manage to get it the first time, because it’s inconvenient to do it alone, but after a few minutes everything fell into place.
I lowered both jacks and smoothly moved to the second side. Fortunately, the nut on the right side unscrewed quite easily and did not have to resort to the help of an angle grinder. I jacked up the car and pulled the beam out of the eye.
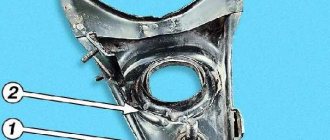
It’s not entirely clear from the photo, but the inner metal sleeve was already spinning inside the silent block in the same way as the silent block itself in the eyes, because it was visible that it had been rubbed with rubber. Then I started pressing out. To my surprise, the silent block came out of its seat very easily, killing literally 3-4 minutes, not to mention on the opposite side, although it may have already filled my hand.
Next, using the same technology, I cleaned the seat and pressed in a new silent block.
Then he tightened the bolt, lowered the car and, after swinging it a little towards himself by the towing hook, tightened the nuts. That's all, the work is finished, here are also photos of stock products.
Now regarding the income from this work. Of course, I didn’t expect that anything would increase or decrease, but I noticed a couple of nuances:
- Firstly:
the rear suspension has become softer, that is, there is no breakdown over serious bumps, it floats less, although I didn’t notice this before, so everything can be learned by comparison. But now with the new silent blocks I noticed complete composure, but don’t forget about the installed rear body amplifier, which makes a big contribution to the operation of the rear of the car. - Secondly:
I noticed such a small plus in this, in our city there is such a section of the road where you have to go down the mountain and, turning smoothly, continue straight ahead, but there are such patches, well, you know what, like flat cakes were put on, well, Well, before, in this turn at speed, the back of the car would jump up as if by chance, but now it drives smoothly, the rear part seems to be steering itself at this moment, a cool feeling!
We diagnose the condition of silent blocks ourselves
- Machine creaks in the rear left side of the car body while in motion. The driver can increasingly hear a dull creaking sound, as if small and frequent impacts are being made on the rubber. They are especially activated when the car is overloaded and overcomes obstacles on the road, in particular high artificial bumps, or follows paving stones. The so-called “rubber” squeak is also detected at high speeds when performing sharp maneuvers. In such cases, an experienced driver will analyze the situation and think about how to change the front struts on a Passat B3, and what new equipment is worth purchasing. Problems should be diagnosed as soon as possible, because if, in addition to cracks and chips, ruptures appear on the silent block, then it is difficult to predict the behavior of the machine, and repairs will require large financial costs.
- The creaking of a car without a running engine. The most common diagnosis among car enthusiasts is to park the car on a flat surface, go to the trunk and lift the body with your hands, holding the rear left wheel arch. And if you suddenly hear a creak, then one question arises: how to change the silent blocks of the rear beam of the Passat B3, who to turn to for help if you lack knowledge in the field of repairing foreign cars.
- Deterioration in vehicle maneuverability. You notice that the brake pedal has become worse, as if it is falling somewhere, sluggishly responds to the driver’s demands, and sometimes does not work 100%.
- Cracks and chips on the rubber inserts of the silent block. External damage is noticeable only during a visual technical inspection, when the car is on an overpass and there is an opportunity to evaluate everything in the inspection pit. It’s difficult to find, other equipment elements get in the way, but the task is still doable.
Silent block diagnostics
Thus, it is possible to recognize problems in a car if you are vigilant and want to keep your vehicle in good condition at all times. With the help of a specialist or on your own, it’s not difficult to figure out how to change the rear struts on a Passat B3.
Front arm
Replace the silent blocks on the front suspension arm of a VAZ 2114 with your own hands. To do this, try to strictly adhere to the instructions we offer.
- Place the car on the inspection hole.
- Remove the engine protection, if equipped.
- Unscrew the bolt nuts from the front arms.
- Using a 17 key, remove the fasteners of the front stabilizer strut, which secures it with the lever.
- Knock out the bolt.
- Loosen the wheel bolts, jack up the car and remove the wheels.
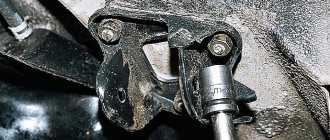
- Use a 24mm wrench to remove the brace nut. To avoid having to exert enormous force, first clean the fastener with a wire brush and treat it with WD40. This should help completely unscrew this nut.
- Then remove the two ball joint bolts from the steering knuckle to remove the arm.
- Problems often arise with this nut. It is rarely possible to remove it easily. A good way out of the situation is to remove the lever with a crab and a stretcher. To do this, slightly loosen the extension nut near the crab and remove the three bolts securing the crab and the body. Now remove the entire assembly and, in a more comfortable position, begin to unscrew the problematic nut. The most extreme method is heating or using a chisel.
- You managed to remove the lever. First of all, replace the silent block of the extension. Dismantling the old element is carried out using the most ordinary chisel. Be sure to clean the lugs and take a new suitable silent block.
- It's up to the vice. The silent blocks are pressed one by one into your lever. It is usually not possible to seat the element completely, so the lever should be placed on a flat floor or a sturdy table. The silent block must be installed using a hammer. A few accurate and fairly strong blows should be enough.
- Using the method without using a vice is very risky. Such measures are resorted to either by self-confident specialists or by those who do not mind experimenting with their car.
- Now we change it on the front lever. The first priority is to get rid of the old silent block. If it was completely broken, you just need to remove the bushing and remove the remaining rubber elements of the silent block from the eyes.
- If this method is not relevant, the silent tape will have to be pressed out. You already have a puller.
- The new element is pre-treated with water diluted with any soap, dish gel or simple liquid soap.
- Use the press-in tool to place the new part in its rightful place.
- The fastening bolts should be tightened gradually. The silent block can be twisted at the same time, so try to hold it with a screwdriver.
- Alas, the process of replacing silent blocks on the front lever is much more complicated than in the case of a stretcher.
Reasons for failure of the rear silent blocks of the VAZ 2110
- The rubber of silent blocks, cast with rubber-metal bushings, is capable of absorbing up to 300 kN of load, but if the part turns out to be of poor quality or the hinge is fixed in the wrong position, then its life will be short.
- An aggressive and careless driving style contributes to the destruction of silent block rubber. When braking sharply directly on potholes or when jumping over tram and railway rails, the silent blocks are the first to fail.
- Violation of the wheel alignment angles on a car also leads to the destruction of rubber-metal joints, and as a result, the suspension begins to knock.
- Over time, so-called fatigue cracks begin to appear on silent blocks. They are usually identified by careful inspection of the pillows.
Axial play, what is it and how to eliminate it
This is a fairly common “disease” of the lower arm of domestic cars, and the VAZ 2110 is no exception. Backlash occurs when the bracket on the body to which the lever is attached has loosened for some reason, and a gap has appeared between the lever and the bushing, which is why the silent block begins to move inside the lever.
Axial play has a very negative effect on the operation of the front suspension, so, of course, it should not exist. If there is a backlash, it can be eliminated in several ways. First, you can try to slightly compress the bracket on the body. It will be very difficult to do this, because it is undesirable to hit the body with a hammer, and in order to use pliers or a clamp, you will need a fair amount of physical strength, and it will be inconvenient to work under the car with these tools.
It is much easier to eliminate axial play by placing several washers between the bracket and the silent block. Although according to the rules it is necessary to replace the entire lower arm along with the silent block.
Choice
Before you start replacing the silent blocks of the rear beam, you need to decide what exactly you will replace the old, worn bushings with.
We figured out the markings and realized that for the VAZ 2109 you need to take only those that are suitable in size and diameter for the rear beam of the nine.
Today, for the VAZ 2109 they offer two types of silents, differing in the material of manufacture.
Size difference
What you need for garage repairs
- Purchasing new silent blocks, the required size and category
- Purchasing a new fastening system, because most often old bolts may be ineffective or damaged during cleaning and installation.
- Prepare a jack and small wooden beams to fix the vehicle at the required height.
- Find or borrow from friends tools for pressing in the silent block, or choose improvised means that can be used to remove the product from the grooves without damaging the levers and boxes.
- A whole set of open-end, socket, and ring wrenches is formed. You never know how your vehicle repairs will end.
- You will also need a hammer, standard automotive tools, and rags so that the replacement of the rear silent blocks of the VAZ 2114 can be carried out without surprises.
Features of elements
The main function of silents is to eliminate vibrations and deformations that occur during vehicle operation.
When choosing new silent blocks for the rear beam of a VAZ 2109, pay attention to the markings. It should be 2109-2914054. For VAZ 2114-15 models, the markings are different, but the elements themselves are very similar.
In principle, it is possible to install a silent block from a dozen on a VAZ 2109, but you will have to work hard with pressing in the rubber bushing due to the difference in size. The reverse procedure is not possible.
Rear beam