VAZ 2110 backstage and oil seal replacement
It is noteworthy that on the VAZ 2110 the rocker seal must be replaced when there is an oil leak from the gearbox. Replacing the VAZ 2110 rocker seal can be done in two ways, which will be discussed in this article. One of the ways to replace the cuff cuff involves dismantling the gearbox. The second method is not so cumbersome and is carried out directly on the car without removing the box. Needless to say, this method requires knowledge of certain secrets and skills.
Two ways to replace the gearbox seal on a VAZ-2110
It is easier to change the oil seal with the gearbox removed.
Replacing an element that has become unusable can be done in two ways.
- The first of them is very labor-intensive , since it will be necessary to remove the gearbox. But replacing the oil seal will be much easier.
- The second method seems less time-consuming and labor-intensive , but in practice it is very difficult to carry out this procedure. Only experienced motorists who have repeatedly had to repair their cars can replace the oil seal directly on the car without removing the gearbox.
Troubleshooting
Experienced car owners know the visual reasons why they can determine the failure of the rocker seal. Naturally, for such reasons it is impossible to accurately determine the cause of the leak, but this gives a signal to carry out diagnostics, in which the cause of the oil leak can be accurately identified.
The most important sign is oil stains under the car, especially in the gearbox area.
An oily rubber boot indicates a malfunction of the rocker seal.
But these spots do not always indicate oil seal failure. It happens that this is due to the oil filter, which sometimes does not tighten properly. In any case, the driver is obliged to monitor for any oil leaks in the checkpoint area . To do this, you need to monitor the oil level. This is the only way to save the box from damage, which will certainly happen if it operates with a minimum amount of oil.
Another way that indicates the oil seal is worn out is a characteristic crunch that is heard when changing gears . But only an experienced VAZ-2110 owner can diagnose this crunch. In any case, if you hear unusual sounds when shifting into gear, it is better to diagnose the gearbox.
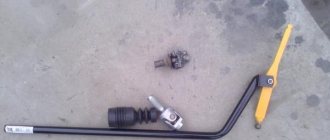
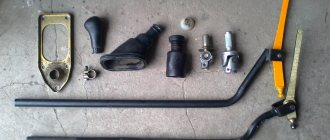
Set of tools required for replacement
A minimum set of tools for replacing the oil seal without removing the gearbox.
In order for the replacement of a part to take place without problems, you need to prepare the place and the necessary set of tools in advance. You will need:
- A set of keys and sockets, and for 13 you need two keys and there must be a key for 10. There must also be a socket head for 22.
- A chisel or screwdriver will be needed to knock out the oil seal.
- The hammer is small so you can get under it.
- Silicone sealant.
- Awl and hook.
Additional accessories
A regular self-tapping screw will allow you to do without a special puller.
For those who decide to replace the gearbox seal without removing it from the car, you will need additional equipment:
- Several long screws.
- A piece of pipe for pressing in a new oil seal.
It should be noted that the replacement process without removing the gearbox is much more complicated. In addition, there is a possibility of damaging the part being replaced during pressing.
Finalization
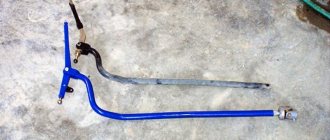
At the moment, a situation has arisen where the happy owners of a VAZ 2110, in order to refine and modify the gearbox, are discussing replacing the standard rocker with a so-called “short-throw” one.
The latter is a product (consequence) of tuning done with your own hands. How justified such an event is, each owner must decide individually.
If we evaluate it objectively, then the installation of a gearbox is exclusively for the benefit of the gearbox, since it makes gear shifting clearer and more responsive.
There is no need to dismantle the standard version if you decide to install a short walker. To do this you need to perform the following manipulations:
- disassemble the ball joint from the outside;
- after this, you should unclench the metal ring of the support, and also spread the plastic legs;
- in this way the ball will come out;
- then the rod is disconnected from the support, and then a sheet piece of metal having high strength and a small piece of pipe are welded to it;
- In order to avoid spontaneous inclusion of speeds, you need to lift up the hinge with the hook.
It should be clearly understood that this type of installation will require great effort when switching stages. The positive thing is that such switching will become more pronounced and smooth, which in itself is convenient.
What parts to choose for replacement
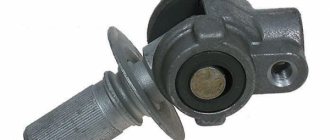
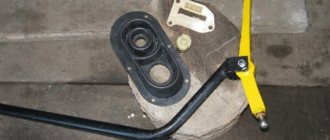
It is better to immediately change the boot along with the oil seal.
Before you begin repair work, you need to purchase the necessary parts for replacement.
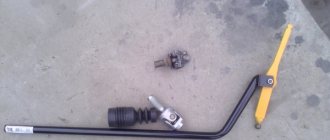
As for the oil seal, Balakovo products are very popular. You need an oil seal with article number 2110–1701043 and 21100-1701043-00 .
Manufacturers offer two options for oil seals - simple and reinforced.
In addition, it is recommended to immediately purchase a cardan boot, as there is a high probability that it is also worn out. Even if this is not the case, it may break during the repair process. Therefore, it is better to spend a small amount on anther than to bother with disassembly again.
Recently, reinforced oil seals have appeared on sale, which are called that way. If you believe the assurances of sellers, their service life is significantly higher than that of standard products.
Conclusions (video)
If you are not confident in your abilities, you can watch a video that shows the entire replacement process in detail. Self-repair will guarantee that everything will be done efficiently, since the owner of the VAZ-2110 will control the process.
Is the shift rod seal leaking?
Questions torment me - How to replace the rocker seal? Is it possible to replace the oil seal yourself? If so, then you have come to the right place. An article on replacing the gear shift rod oil seal on VAZ-2112, VAZ-2115, VAZ 2108 cars will be useful for you. After reading it, you will be able to replace the oil seal with your own hands without any problems and in a short time. At the same time, you can enjoy the work done and save the Nth amount of money))). Let's start with choosing a replacement method. There are only two of them. The first one, which I use and recommend to you, is replacing the rocker seal in the inspection hole by knocking out the bushing along with the seal. The second method does not require a viewing hole or overpass, but will require you to have a certain dexterity of hands, body flexibility and the presence of one (two) long screws. Since screwing these screws into the oil seal, pulling it out and pressing it into place while lying under the car... This is not for everyone! Both dexterity and flexibility will be very useful to you here. But, let's take things in order. From the introduction we move on to the main thing. Let's start with the arsenal of the necessary tools for replacing the gear shift rod oil seal on VAZ-2108, VAZ-2109, VAZ-21099, VAZ-2110, VAZ-2114, VAZ-2115: two 13 keys, a 10 key, a wrench or screwdriver for knocking out the oil seal bushing, a small hammer, a 22mm socket, silicone sealant (Abrovsky 999 is perfect). For those who are still going to change the oil seal from the “lying on the ground” position, the list of tools does not change much: two 13 wrenches, a 10 wrench, a small hammer, one or two long self-tapping screws, a piece of pipe of suitable length and diameter for pressing the oil seal. (I can’t tell you the exact dimensions, since I don’t use this method). Spare parts. Everything is simple here. We buy a Balakovo shift rod oil seal and immediately a cardan shaft boot, look at photo number 2. Practice has shown that in most cases this boot is either already torn or will tear during the removal process. So, we don’t rely on chance, and we buy the boot right away, and the costs are small. And you can save your nerves and time. And one more thing... Recently, new gear shift rod seals appeared on the market, codenamed “Reinforced”! Look at comparative photo No. 3, on the left. I won’t praise or recommend them yet, since I’ve only installed one so far. On the problematic rod, which was leaking even with two seals. As they say, time will tell how reinforced it is))) Now the final part is a description of replacing the gearshift rod oil seal on VAZ-2108, VAZ-2109, VAZ-21099, VAZ-2110, VAZ-2114, VAZ-2115:
Process in detail (algorithm)
It is recommended to carry out replacement work in a pit. In this case, you must take care of safety. The car must be secured using a handbrake and wheel chocks, which must be installed on both sides of the rear wheels.
Having prepared a workplace and a set of tools, you can begin to work. To replace the gearbox seal, you need to do the following:
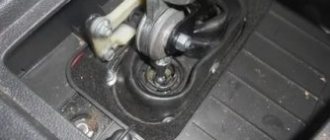
- Most often, the VAZ-2110 wing is closed with a rubber boot. If this part is covered in oil, this immediately indicates that the oil seal is really worn out. The boot needs to be bent. To do this, you just need to pull it by the wide part.
Oil leaking from under the “glass” - the rocker seal definitely needs to be changed.
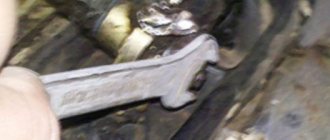
Before loosening the clamp, you need to put a mark so that you don’t have to adjust the link later.
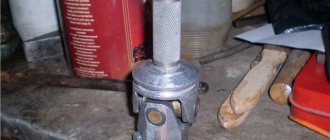
The oil seal is located deep in the bushing.
Only after this you need to press the new part into the rod. This procedure is quite complicated, since there should be no distortions. Many drivers use various homemade devices when pressing. When working, it is very important not to damage the new part, otherwise everything will have to be redone.
After the spare part is in its place, assembly is carried out in strictly the reverse order.
Adjustment
If the slide shows the very first signs indicating a deterioration in its working condition, then it should be adjusted. Almost everyone can do this correctly if you follow the algorithm below:
- At the very beginning, you need to make every effort to activate first gear.
- To ensure maximum safety, the car should be secured on the overpass, and then put on the hand brake and place additional supports under the wheels. This will ensure that the vehicle is insured against involuntary movement.
- We do not turn off first gear.
- You need to get under the hood of the vehicle to find a special clamp at the bottom that simultaneously holds and secures the rocker. Finding the gearbox will not take extra effort, after which you need to try to loosen the clamp.
- If all manipulations were carried out as correctly as possible, you should return to the salon to move the lever to the left all the way. If you move it in any other direction, the slide will definitely come off. This is undesirable, so extreme care should be taken.
- We return to the starting position and tighten the clamp back.
- It should be noted that it is often enough to move the rocker in relation to the cardan by just a couple of millimeters.
During this process, the condition of the driveshaft should not be neglected; on the contrary, it is advisable to evaluate its current condition, since it may require replacement if it is severely worn.
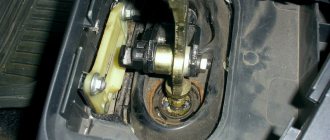
VAZ 2110 gearbox mechanism and principle of operation
The gearbox linkage is a multi-component device that is designed to connect the selector (gearbox lever) and the rod. The design of this unit includes the following components:
- Backstage fork.
- Rocker fork oil seal.
- Finger locking device.
- Gear selector fork pin.
- Gear selection rod.
- Gear shift lever.
All these elements are interconnected.
Signs of a malfunction of the VAZ 2110 gearbox oil seal, fault diagnosis
The first indicators indicating the need to replace the gearbox seal are oil marks and smudges on the asphalt after the vehicle has been idle for a long time. However, it is necessary to understand that there may be several reasons for this defect, in particular, an incompletely tightened oil filter.
However, if the problem is with the oil seal, it is important to detect the problem in a timely manner and fix it, since oil outside the gearbox may lead to the need to replace the gearbox. To avoid this, systematically check the oil and monitor its level in the box and engine. In addition, a crunching sound when shifting gears may indicate a malfunction of the oil seal.
When and how to replace the oil seal on a VAZ 2110 gearbox?
The VAZ 2110 gearbox is manual. To extend its service life, it is advisable to use original transmission oils. It should be noted that the VAZ 2110 is equipped with injection engines.
When does it become necessary to replace the VAZ 2110 gearbox oil seal?
The VAZ 2110 transmission system includes reliable components that, when interacting, ensure smooth running and decent power performance of the vehicle. Among the consumables that periodically have to be changed on a car are oil seals. These components are located on the front wheel drives and the gearbox input shaft. Among the reasons for their deformation are:
- natural wear and tear;
- factory defect of the product;
- mechanical damage as a result of external influence.
The result of this is an oil leak from the gearbox. The failure of a spare part can be indicated by the presence of an oil slick under the car or the appearance of a characteristic crunch when changing gears. An independent inspection often reveals fuel leaks at the junction of the gearbox and the power unit. In case of these manifestations, vehicles must be sent for diagnostics.
What tools are needed to replace consumables? To carry out this procedure, you need a set of keys and heads, a chisel (punch punch), and a hammer. The sooner a breakdown is detected, the less damage will be caused to the automotive system.
How to replace the gearbox drive oil seal, the input shaft of the VAZ 2110 gearbox?
When servicing a car's gearbox, the driver often needs to change the rod seals along with the seals on the manual transmission. If these elements have lost their physical properties, then the owner of the VAZ 2110 will face a problem such as oil leakage in the gearbox. To fix the problem, you need to replace the seals, seals and sealants.
Tools
- Hammer;
- Screw;
- New part;
- Lubrication.
In order to replace the oil seal in a VAZ 2110 gearbox, you need to purchase the correct part. Before purchasing, pay attention to the broken part, where it was located on the left or right. This is the part you need to purchase. The left and right ones differ in the arrow indicators on the inside, the color and different numbers on the ends. You can purchase them at any car market or specialty store.
Replacing the VAZ 2110 gearbox oil seal (details)
- The backstage on a VAZ is actually always covered with a special rubber boot. If the cuff is faulty, this boot will be covered in oil, which will once again indicate the need for replacement.
- Bend down the wide part of the boot. At the bottom there is a cardan.
- Disconnect this cardan from the lever and rod, thus gaining access to the cuff.
- Unscrew the nut completely, which will loosen the connection between the lever and the cardan.
- Remove the lever from the cardan.
- Engage first or third gear.
- Completely disconnect the driveshaft from the linkage.
- Remove the cardan.
- Remove the rubber boot.
- Now in front of you there will be a cuff located in the recess. This is where the oil seal enters the gearbox. It must be removed from this recess.
- It is worth noting that it is virtually impossible to remove the cuff from the rod without using a special tool.
- So, insert the awl and the hook inside and thus remove the cuff. You can also use a self-tapping screw, which must be screwed in like a corkscrew and uncork the seal.
- After removal, clean the seat and press a new cuff inside the rod.
- We perform assembly in reverse order.
Repair and restoration work
Regardless of the repair, adjustment or replacement of the link, the need to disassemble this unit does not disappear.
The parsing process includes the following procedure:
- First, you need to remove the casing from the gearshift lever, or, more precisely, from its handle.
- The front of the car needs to be raised with a jack or placed on a pit.
- Unscrew the mounting bolts that hold the front console, and then remove it.
- Now you need to unscrew the six bolts that hold the rocker and also remove it.
- When dismantling, you should be extremely careful, paying attention to the condition of each part and element, so that if their condition is unsatisfactory, replace it with a working analogue.
- To gain direct access to the cardan shaft, oil seal and support, you need to bend the boot.
VAZ short-stroke rocker - all the nuances in repairing this mechanism
Replacing the drawstring cuff
Replacing the backstage seals of a VAZ 2110
First you need to arm yourself with the necessary set of tools, which includes:
The oil seal must be replaced in a viewing pit or overpass. If this is not possible, then an option with a lift will do. In addition, there is another option, which involves placing two spare tires flat under the car, like stops. Two strong boards are placed on them, and the car drives onto a makeshift overpass. Simple and brilliant.
Preparation
If the listed symptoms appear, it is necessary to conduct an independent inspection of the drive.
Prepare a set of wrenches, a hammer, a pry bar, screwdrivers, a chisel, and pliers. Organize workplace lighting. Place the car over the inspection hole (overpass; lift the front part with a jack, place safety supports). Place chocks on the outside of the wheels. Disconnect the negative terminal of the battery. The check begins in the salon.
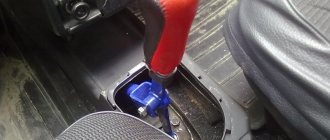
Provide access to the floor tunnel.
For ease of operation and to avoid damage or contamination of the upholstery, dismantle the passenger seat:
- remove the torsion bars from the front side with a pry bar, unscrew the nuts, remove the fastenings of the tubular stop;
- Unscrew the bolts of the runners from behind, move, tilt the seat back;
- Unscrew the front fasteners of the guides and take out the chair.
Disassemble the floor tunnel:
- unscrew the self-tapping screws of the right and left facing panels;
- disconnect the handle with the casing;
- remove the four screws of the top cover, the plastic plug, lift it, pull it slightly back, lay it on its side;
- disconnect the wires, sign, attach marking tags, remove the box;
- Unscrew the nut and remove the metal air duct;
- Unscrew the four retaining nuts and remove the bottom of the tunnel structure.