Let's say the key in the VAZ-2109 lock does not turn or, conversely, turns and does not unlock the door. Repairing car locks involves one of the following actions: replacing the cylinder (cylinder), replacing or repairing the internal lock. In official manuals, by the way, it is recommended not to repair the internal lock mechanism, but to replace it. Be that as it may, you first need to get to it, for which you remove the door trim. Each of the actions required for dismantling is further illustrated in the photo. The entire sequence must be considered in order.
"Nine" and the door lock device
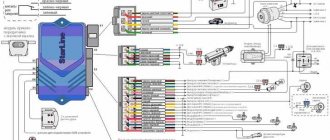
Theoretically, the lock mechanism can be divided into 3 parts: a handle with a cylinder and a button, the main mechanism, and the inner door handle. All nodes and connections between them are shown in the diagram.
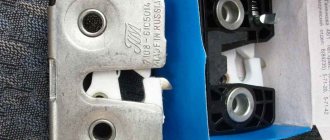
The node labeled “2” looks like this.
4 rods fit to it, that is, to this node. Two of them are connected to the external handle, and in order to dismantle it, the rods are disconnected.
If there is no electrical wiring inside the door, you do not need to disconnect the battery before performing repairs.
In other cases, that is, when power windows or locks are installed, the battery must be disconnected. To do this, as many people know, it is enough to remove the “negative” terminal. This means that before repairing locks, the hood is opened first, not the doors. Anyone who violates such a requirement will, at best, have to change burnt fuses.
Optimizing space in the seven
It is not at all necessary to have an apiary for twelve hives or a serious homestead, so that sometimes you need to transport a fairly large load or a lot of small items. Situations are different, and especially when going on a trip in a VAZ 2107, not everyone wants to burden themselves with a trailer. This is why there are additional luggage racks.
But first, let’s deal with the standard, ordinary trunk of the seven. It is far from the ideal of rational distribution of space, in fact, as in all classic Zhiguli cars. The side members, wheel arches, niches, gas tank and rear suspension cups form a kind of labyrinth for dumping all sorts of rubbish. Only the size of the trunk of a VAZ 2107 is quite difficult to measure with a tape measure. It turns out to be an intricate figure, however, there are heroes who did it. The photo shows the dimensions and geometry of the trunk.
Replacing the door lock cylinder
To gain access to the locking mechanism, you need to remove the trim. On the “Nine” it is quite simple to remove it - the casing is held in place by plastic pistons. These pistons are located around the perimeter; they are simply pressed out and, if necessary, replaced with new ones.
First, as is easy to understand, you need to dismantle three elements: the side handle, the window lifter handle, the socket of the inner handle of the lock. The “dog” must be pulled up, but it is better to remove the seal that protects the glass during the dismantling of the casing.
Removing and disassembling the door handle
When the door trim is missing, you can freely disconnect the two rods that go from the door handle to the lock. The following shows exactly what elements we are talking about.
By squeezing the plastic tab with a screwdriver, the rod is disengaged. We will assume that all of the above actions have been completed. Then, you can move on to the next stage.
The outer handle is attached to the metal using two nuts. One of them is located under the trim, the second is on the back side of the door. Both nuts need to be unscrewed.
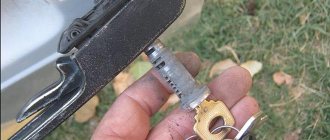
After dismantling the specified unit, it will be easy to remove the cylinder. This is done like this:
- Push out the pin holding the outer plastic cap;
- Dismantle the mounting spring (see figure);
- By installing the key and turning it, the cylinder is pulled out.
The appearance of the spring holding the cylinder and the handle together is shown below.
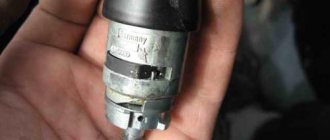
It is important to know that the knot itself, called the “larva,” needs careful handling.
Experience shows that it will be easy to lose the metal pins that ensure secrecy. The cylinder is secured inside the handle body and the pins remain in place. But if you pull the cylinder out, each pin is “free.”
Repair of interior door locks
Losing keys or jamming a lock is an unpleasant situation for any car enthusiast. Do not break the door or locking mechanism. Carefully open the door so as not to damage the rods and the body of the locking mechanism. After this, proceed to the rest of the work. Instructions for removing and replacing the Euro handle cylinder are as follows:
- Remove the door trim. This job won't take much effort, but be careful not to damage the material.
- Disconnecting the rods is one of the most difficult parts of the job. Pick up the bottom one with pliers and remove it from the handle. Then it is easy to insert it back. To remove the top one, press the screwdriver against the handle, thread the unnecessary wire through the rod and pull sharply. Without a screwdriver, the rod will bend.
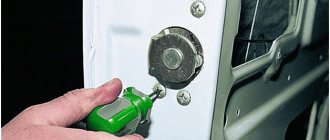
- Using a 8 key, unscrew the handle.
- Before further work, remember the position of the lock. Pull out the pin from the side and remove the rod.
- Remove the spring and pull out the cylinder.
- Lubricate the groove where the cylinder was located with WD-40.
- The new cylinder is supplied with the key. Do not remove it until the lock is installed. Sometimes a new part needs to be carefully finished with a file. This happens if it is made in China or is simply of poor quality.
- If the pin does not fit into the hole freely, then you need to lightly file the place for it.
Tools
To repair or replace a car lock, you need to prepare:
- flat-head and Phillips-head screwdrivers;
- pliers;
- socket wrench 8;
- silicone grease;
- larva
If desired, you can immediately replace the standard part with a European pen, which is purchased in advance.
Repair work is carried out in a well-lit room and at a comfortable temperature.
Features of door adjustment
The adjustment work involves changing the height of the rods.
The rods are attached using plastic tips that have a ball joint inside. Correct adjustment of the door lock is carried out by pulling out the groove. Next, you will need to twist slightly counterclockwise or clockwise. The lock is adjustable by selecting the ideal length. So please be patient. After the repair, you will have to adjust the sash slamming mechanism. By the time you move on to setting it up, you can already return the trim back to the door, since the work will be carried out with the latch on the body. Move the clamp up or down until you achieve the perfect result. The door should latch easily, without noise or effort. This adjustment can be made without replacing the lock cylinder if you are not satisfied with the need to apply force when closing.
Recommendations for changing the cylinder in a VAZ 2109 lock
If you disassemble the core, you can avoid replacing the cylinder or the entire mechanism. When the door opens with a creak, then most likely the internal pins are not deformed. Then lubrication work is carried out and the serviceability of the device is checked. Tips from the experts:
- Partial repairs will bring life back to the castle for a short period of time. If serious problems arise, it is better to immediately replace the larva.
- It is recommended to use silicone during lubrication.
- When dismantling, you will need a set of screwdrivers: flat, Phillips, impact.
Experts advise purchasing clips in advance that hold the casing and spring, since during dismantling these parts most often become unusable.
Replacing and adjusting the trunk lock
The work is carried out in the following order:
- The casing is removed.
- Replace the support mechanism. If the lock's supporting tooth breaks. Replace not only the cylinder, but also the new body. In general, this work is no different from what needs to be done to repair a door lock.
- Adjustment is carried out using the lower clamp. Unscrew the nuts and remove the washers. Assembling and disassembling the lock will help you adjust the lock. In this case, you need to act using the selection method. The desired result is the moment when the door closes effortlessly and does not vibrate when slamming and driving the car.
More extensive work is required if the retainer bushing is broken. If you are changing the lock assembly, then before its fasteners are fully tightened, you need to adjust the latch. Only after the lock closes perfectly can you tighten the fastening nuts to the maximum.
Step-by-step change of the lock cylinder
doors VAZ-2109
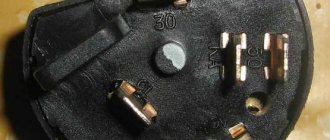
The problem with the VAZ-2109 is that over time the door becomes loose and the operation of the locks is disrupted. As a rule, the lock needs adjustment and adjustment. The situation is more difficult when the lock simply jams. This often happens on the driver's side. In such circumstances, it is worth changing the lock, but do not knock it out using a wheelbrace. door lock cylinder on the VAZ-2109 car was changed .
Main reasons
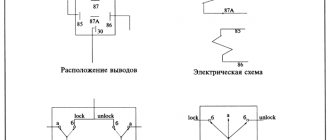
The most common reason why the trunk lock is jammed is that the mechanism is clogged with dirt or dust. Dirt can get into the lock directly from under the wheels of the car, because a so-called vortex appears in the rear part of the body while driving, which can pick up snow, water or dust from the road surface. And even a special lock protection screen cannot help you avoid trouble, because the particles are so small that they can easily penetrate inside and damage the mechanism.
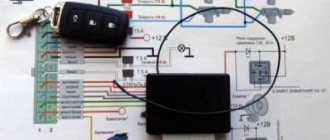
Some vehicles are equipped with a central locking system, which is responsible for locking each door at once. And very often the reason for the inability to open the trunk lid lies in the malfunction of the electric drive, which is responsible for the operation of the latches of the lock mechanism. The problem in this situation can be solved in a fairly simple way. It is enough to insert a simple key into the keyhole and simultaneously turn it clockwise and press the button to open the luggage compartment. However, the same situation as described earlier may arise. Then to open the trunk you will have to get to the lock through the interior.
In addition, it may not be possible to open the trunk lid due to a banal failure of the lock mechanism itself. In such a situation, only skills and knowledge that allow you to unlock the door from the inside can help.
Typical faults:
- tightness of locking the door;
- increased noise when opening/closing;
- the central lock does not lock the door and does not respond to signals;
- unlocking is accompanied by a creaking, metallic grinding sound;
- While driving, the door vibrates, cracks are visible in the places of contact with the standard seal.
Common causes of premature wear:
- failure to comply with the deadlines for technical inspection, preventative maintenance, lubrication, and replacement of worn elements;
- third-party mechanical damage resulting in deformation of the door or lock;
- manufacturing defects at the factory;
- the lock has become loose due to loosening of the fastening;
- violation of the adjustment algorithm;
- human factor: systematically locking the door with force.
The defect is eliminated by replacing the constipation assembly.
This is interesting: Refinement of standard Lancer X acoustics
Repair of interior door locks
Losing the keys or jamming the lock is a nasty situation for any car owner. It makes no sense to break the door or locking mechanism. Open the door carefully so as not to destroy the rods and the body of the locking mechanism. Then proceed to the rest of the work. The summary for removing and changing the Euro-handle larva is as follows:
- Remove the door trim. This job won't take much work, but try not to destroy the material.
- Disconnecting the rods is one of the most difficult parts of the job. Pick up the bottom one with pliers and remove it from the handle. Later you can simply stick it back. To be able to remove the top one, press the screwdriver against the handle, thread the unnecessary wire through the rod and pull sharply. Without a screwdriver, the rod will bend.
- Using a 8 key, unscrew the handle.
- Before future work, remember the position of the lock. Remove the pin from the side and remove the rod.
- Remove the spring and take out the cylinder.
- the groove where the cylinder
with WD-40. - A brand new cylinder comes with a key. Do not remove it until the lock is installed. The newest part requires careful finishing with ratfil. This happens if it is made in China or is simply bad.
- If the pin does not fit into the hole freely, then you need to file the area a little.
Features of door adjustment
The adjustment work consists of changing the height of the rods. The rods are attached using plastic tips that have a ball joint inside. Correct adjustment of the door lock is carried out by pulling out the groove. Next you need to twist it a little counterclockwise or clockwise. The lock is adjustable by selecting the perfect length. Therefore, be patient.
After the repair, you will have to adjust the sash slamming mechanism. By the time you move on to setting it up, of course, you will have already returned the trim back to the door, because the work will be carried out with the latch on the body. Move the clamp up or down until you achieve a perfect result. The door should latch easily, without noise or effort. This adjustment can be made without changing the lock cylinder.
, if you are not satisfied with the need to apply force when closing.