On the Kia Rio model, the cabin filter must be changed according to regulations every 40-45 thousand km or once every 24 months (whichever comes first). At the same time, experts recommend changing this filter more often.
Replacing the Rio cabin filter is not a complicated procedure and can be done independently. In order to replace the cabin filter on Kia Rio of different generations:
- you will need to remove the glove compartment lid;
- gain access to the compartment with the installed filter;
- remove the old filter and install a new filter element.
It is important to take into account a number of nuances in order to correctly remove the old filter, as well as select and install a new Kia Rio filter (Rio II or Rio III). Read more in our article.
Where is the cabin filter located in the Kia Rio?
The cabin filter is located in the Kia Rio, like in Sportage and Cerato, on the passenger side, behind the glove compartment. It is necessary to open the door; behind it there is an air duct outlet, onto which the cleaning element is attached. The air filter is located under the hood on the right side when facing the car.
You can also determine where the cabin filter is located on a gasoline Kia Rio using the technical manual that is included when purchasing the car.
What types of cabin filters are there for Kia Rio?
In total, two types of cleaning elements can be distinguished:
- For rough cleaning – designed to block coarse dust and dirt. Apart from the price advantage, it has such disadvantages as short service life and fragility.
- For fine cleaning – blocks the smallest particles, prevents the penetration of external odors into the car. Made from synthetic materials.
There are also regular and carbon filters. The latter trap particles of harmful substances more efficiently.
Choosing a cabin for Kia Rio 4
Purifiers targeted at China, not Europe, are supplied to Russia. Article number for cars produced before 2012: 97133-D1000 (length - 22.5 cm, width - 20.5 cm, height - 2.8 cm). The problem is that this cabin filter can only capture coarse dust. Therefore, it makes sense to buy a carbon element.
Carbon filter composition
- ASIN: ASINFC 2753 - regular and ASINFC 2753C - carbon.
- Fortech fs-150c - with coal.
- RU54 CF944C - coal
- KUK 0239 - with coal.
Anti-dust (regular) - base - made of corrugated paper, synthetic or cellulose fibers. Detains small particles, incl. flower pollen is inexpensive. However, it is powerless against unpleasant odors and volatile toxins. The standard replacement period is up to 30,000 km.
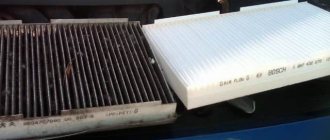
Cabin filters: regular dust filter (left) and carbon filter (right)
Carbon - consists of electrified synthetic fibers that stop the smallest (up to 1 micron) dust particles. Neutralizes up to 95% of toxins. Service life is up to 60,000 km, but the price is steep
Which filter to choose: original or analogue
Before replacing the 4th generation Kia Rio cabin filter, the driver needs to decide between the original and analog spare parts:
- The service life of high-quality products is allowed up to one and a half years. If you plan to do quiet and infrequent driving around the city, then this option is ideal.
- If the issue of replacement does not frighten the car owner, then for the price of an original spare part you can purchase several products of lower quality and replace them every 3-4 months.
Also read: Cruise control “Kia Rio 3” - types, installation methods, instructions, advantages
Brands of original cleaning elements (some are supplied from the factory): NIPPART, Cangoo.
For pre-restyling models of 2012 (2009, 2010, 2011), only non-original spare parts for large filtration with article numbers MANN CU1828, VALEO 698681, TSN 9.7.117 are suitable.
How much does a filter cost?
Replacing the cabin filter for Kia Rio 2016 and 2022. release is not considered an overhead repair. The price ranges from 250 to 500 rubles for the analog coal version. The cost of a part with deep air purification starts from 600 rubles and reaches 1.5 thousand rubles.
see also
Comments 21
I change the cabin air every 5000 km, because the summer is very dusty (we have to drive not only on asphalt). And recently I received advice to install regular ones in the summer and coal ones in the winter.
Original, sucks. I began to whistle after some time. Now I constantly take Fortech FS-130C. The cabin filter is carbon, the price is a penny, carbon and never whistles.
For a year no whistling was noticed.
Original, sucks. I began to whistle after some time. Now I constantly take Fortech FS-130C. The cabin filter is carbon, the price is a penny, carbon and never whistles.
I’ve never had a whistling sound, I change it every 5000 and it’s still good.
Well, I didn’t have a whistle, even at 1st or 4th fan speed.
I’ve never had a whistling sound, I change it every 5000 and it’s still good.
It's fatty to change it so often.
Original, sucks. I began to whistle after some time. Now I constantly take Fortech FS-130C. The cabin filter is carbon, the price is a penny, carbon and never whistles.
I'm sorry, but explain what this “whistle” is?) Thank you
Although I still don’t understand now why take the original if there are a bunch of substitutes at a better price)
The price of the filter is 214 rubles, so I think that the error in the price of 20-40 rubles is not that important, original or analogue. When you take something more expensive, then yes, you can think about it, but here...
Well, offhand, at first I thought it was so, but now it’s a hundred rubles, or 200, I still don’t see the difference) just my personal opinion)
Believe me, before ordering, I studied a single blog and one way or another, everyone doesn’t seem to have a common opinion, there are many options, so for now I settled on the original.
Signs of a clogged filter on a Kia Rio
You can understand that the Kia Rio 4 or Sportage cabin filter needs to be replaced by the following signs:
- Extraneous unpleasant odors penetrate into the interior of the car, this is especially evident when the air conditioning is turned on: you can feel the soot, your nose itches from the dust.
- The amount of dust on the dashboard and seats increases even with the windows closed.
Also, when the filter is clogged, the amount of air that enters the cabin is reduced. This leads to accelerated fogging of the windshield and side windows.
Cabin filter diagnostics
To understand whether you need to change the cabin filter on a Kia Rio 2022 model or any other, you don’t have to contact hired specialists. The diagnostic process follows from the previously described signs of blockage:
- Start the car and warm up the engine without turning on the heater.
- Turn on the heating system at maximum power.
- Place your hand against the air duct in the cabin.
- If the blown air does not correspond to the set temperature, it means that the filter is clogged and it does not allow you to quickly heat the interior of the car.
Also read: Instructions for changing the oil in a Kia Sid automatic transmission
How often should it be replaced?
The frequency with which the Kia Rio and Rio X-Line cabin filter changes depends on several factors:
- selected model;
- driving habits;
- vehicle mileage.
If you add up all the nuances, then it is recommended to change the cleaning element once a year, provided that the car travels no more than 30 thousand km during this time and the majority of trips are within the city.
If most of the operation involves driving on dusty country roads, then even the highest quality cleaning element is recommended to be replaced after 15 thousand km.
There are recommendations that replacing the cabin filter for Kia Rio 2014, 2015 and later models should be done twice a year: before winter and before summer. However, it needs to be changed only when there is less dirt on the roads.
When to change, what interior to install
To perform scheduled maintenance operations, there are regulations, as well as manufacturer recommendations. According to them, replacing the cabin filter of the Kia Rio I DC heating and air conditioning system should be done every 15,000 kilometers or once a year.
Considering that the operating conditions of the car in most cases will be far from ideal, experts advise performing this operation approximately twice as often, in spring and autumn.
Characteristic symptoms:
- Windows often fog up;
- the appearance of unpleasant odors in the cabin when the airflow is turned on;
- deterioration of the stove and air conditioner;
They may make you doubt that the filter element is coping with its tasks and an unscheduled replacement will be required. In principle, these symptoms should be relied upon when choosing the correct replacement interval.
Suitable sizes
When choosing a filter element, owners do not always use products recommended by the car manufacturer. Everyone has their own reasons for this, some say that the original is unreasonably expensive. Some people in the region sell only analogues, so there is a need to know the sizes by which you can subsequently make a selection.
2 elements with dimensions:
- Height: 25 mm
- Width: 100 mm
- Length: 235 mm
As a rule, sometimes analogues for the Kia Rio I DC may be a few millimeters larger or smaller than the original, there is nothing wrong with that. And if the difference is measured in centimeters, then of course it’s worth looking for another option.
Selecting an original cabin filter
The manufacturer recommends using exclusively original consumables, which, in general, is not surprising. They themselves are of good quality and are widely available in car dealerships, but their price may seem overpriced to many car owners.
Regardless of the configuration, on all first-generation Kia Rios (including the restyled version), the manufacturer recommends installing a cabin air filter with article number 97619-FD200 (97619FD200).
The salon in this model is composite and consists of 2 parts. They are completely identical in size, the only difference being the so-called tongue-and-groove system on the side plastic edges.
It is worth noting that sometimes consumables and other spare parts may be supplied to dealerships under different part numbers. Which can sometimes confuse those who want to purchase an original product.
When choosing between a dust and carbon product, car owners are advised to use a carbon filter element. This filter is more expensive, but it cleans the air much better.
It is easy to distinguish - the paper filter accordion is impregnated with a carbon composition, and therefore has a dark gray color. The filter cleans the air flow from dust, fine dirt, germs, bacteria and enhances the protection of your lungs.
Which analogues to choose
In addition to simple cabin filters, there are also carbon filters that filter the air more effectively, but they are more expensive. The advantage of coal SF is that it does not allow foreign odors coming from the road (street) to penetrate into the car interior.
But this filter element also has a drawback - air does not pass through it well. GodWill and Corteco carbon filters are of fairly high quality and are a good replacement for the original.
However, in some retail outlets the price of the original first-generation Kia Rio cabin filter may be greatly inflated. In this case, it makes sense to purchase a non-original consumable item. In particular, cabin filters are considered quite popular:
Conventional dust cabin filters
- Mann Filter CU 2521-2 – high-tech consumables from a well-known manufacturer
- Amd FC45 – popular brand, good fine cleaning
- Nevsky filter NF-6167-2 - Russian manufacturer with an affordable price
Carbon cabin filters
- Amd FC45C – high-quality and thick carbon coating
- BIG filter GB9935/C – activated carbon
- Nevsky filter NF6167C2 – normal quality, affordable price
It makes sense to take a closer look at the products of other companies - they also specialize in the production of high-quality consumables for passenger cars:
- Corteco
- Filtron
- SCT
- Sakura
- GoodWill
- Fram
- JS Asakashi
- Champion
- Zekkert
- Masuma
- Nipparts
- Purflux
- Knecht Mahle
- RU54
It is quite possible that sellers may recommend replacing the Rio I DC cabin filter with non-original cheap substitutes with a much smaller thickness. They are not worth buying, since their filtering characteristics are unlikely to be at the proper level.
Consequences of a faulty filter
If the driver does not have time to change the cabin filter on the Kia Rio in time, every day more and more fuel combustion products, soot, dust, and various reagents that previously settled on the cleaning element will penetrate into the car’s interior. All these microelements will enter the human body, accumulating in the bronchi and lungs.
At first it will manifest itself as a sore throat and nose, but later it can develop into more severe cases, including allergic reactions and chronic diseases.
Instructions for replacing the cabin filter on a Kia Rio
The process of dismantling the cleaning element does not require any special skills. Replacing the cabin filter for Kia Rio 2015 and subsequent years begins with preparation:
- Wear gloves and any protective mask on your face to avoid inhaling harmful particles.
- Prepare a flathead screwdriver, a clean damp cloth for wiping, and a new filter element.
Also read: Replacing the belt on a Kia Rio 3, how to replace the alternator belt
If you have to change the cabin filter near your home in a Kia Rio, make sure that during the work you will not interfere with the movement of passing vehicles. Proceed to work following the instructions:
- Stop the engine and open the glove compartment.
- Use a screwdriver to remove the side door latches.
- Gently press the plastic cover latches and pull it out.
- Take out the old filter element, wipe the place where it is attached with a damp cloth, removing loose dirt and dust.
- Insert the new filter, close it with the plastic panel until it clicks.
- Place the glove compartment door back, securing it with the clips.
At this point, replacing the Kia Rio cabin filter can be considered successful; all that remains is to check the operation of the air conditioner. To facilitate the work process, you can watch the video instructions, which can be found freely available on the Internet.
Replacement for cars produced in 2012-2015
For cars of later releases, the sequence of actions is the same, but there are some features.
In these cars, the glove compartment latches are removed by turning them 90 degrees, after which they easily come out of their seats.
The filter element cover has only one lock, on the right side.
On the left side of the cover there is a small protrusion that fits into the groove of the body.
Therefore, after changing the consumable, putting the cover in place, first insert the protrusion into the groove, and then snap the latch into place.
As you can see, replacing the cabin filter element in a Kia Rio is not difficult and can be done quickly.
By performing it periodically, the comfort in the Kia Rio cabin will be at its best.