How to carry out maintenance and repair of the caliper yourself?
Car enthusiasts, discovering ineffective braking in their steel favorite, immediately complain about faulty pads, trying to replace them as soon as possible. Replacing pads on passenger cars is as easy as shelling pears, but sometimes changing them does not solve the problem. It is unnecessary to talk about the consequences of brake malfunctions.
Often the reason is not in the pads, but in the neglected state of the caliper (English: support - holder). Of course, you could easily go to a car service center to find out the reasons, but for residents of the periphery, this is sometimes quite difficult to do.
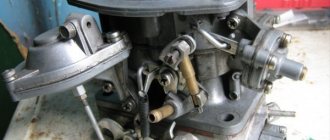
The first and main signs of a faulty caliper are jerks or characteristic shocks during braking, weak braking, rapid and unbalanced wear of the pads (the pads wear out at an angle). In this material we will try to describe to you in detail how to carry out maintenance and repair of the caliper so that the subsequent change of pads happened painlessly. The caliper is a component of the brake knuckle on the car disc. The main part in the design of the caliper body is: a hydraulic piston - cylinder and two guide bolts. The bolts are attached to the brake knuckle and balance the entire caliper body on themselves, ensuring uniform pressure on the working surfaces of the pads to the disc. It is a misconception that only lubricating the caliper bolts will solve the problem. It is not always so.
Let's look at a simple caliper design without a guide bracket to understand the main causes of malfunctions. First of all, check the functionality
piston If he moves normally, then we move on. We remove the caliper from the knuckle: unscrew both bolts, remove the old pads and disconnect the brake fluid hose. We see that the entire caliper structure moves along the guide bolt by means of a bushing threaded into it.
In addition to acidification of the guide bolts and bushings, the main cause of jamming is the build-up of hardened dust on the walls of the internal hole where the rubber gasket is inserted. Thus, by squeezing, it prevents the caliper from moving along the guide bolts.
Never try to clean a hole with a round file. Firstly, it is ineffective, and secondly, you will break its tightness, creating potholes and allowing large amounts of dirt to collect in the cavity. The best option would be to use a drill bit of the required diameter.
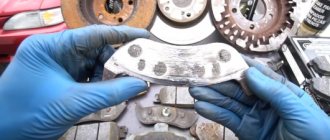
Next, lubricate the inner surface of the housing hole and the surface of the cylindrical rubber gasket with a special lubricant. There are many varieties of them, use the most proven ones according to the recommendations of “experienced” ones. Don't be afraid to apply too much - the unnecessary amount will still be pushed out. We also lubricate the bushing and guide bolt and reassemble everything in the reverse order.
Next, we’ll clean the boot itself from any dirt build-up, or better yet, replace it with a new one. We put it on the piston and secure it with a ring. This will make the piston non-corrosive, ensure its smooth operation and save the boot from hardening at high temperatures.
We attach the caliper to the knuckle, insert new pads and tighten the second bolt.
The well-functioning operation of the caliper will ensure easy replacement of pads during subsequent maintenance, protecting the guide bolts from acidification.
To prevent corrosion, it is also advisable to paint the caliper surfaces with anti-corrosion paints.
To do this, first clean the surfaces to be painted from dirt and corrosion, isolate the surfaces from accidental spraying, and carefully spray the paint. One can of paint should be enough for all four calipers, applied in three layers.
It happens that even the best quality pads produce squeaking noise when braking. To avoid this, the main four points of the caliper should be kept lubricated - the piston surface, the guide bolts and the non-working surfaces of the pads. In each case, when changing pads, the caliper should be lubricated.
Thus, prevention and repair of the brake knuckle mechanism can easily be carried out independently.
Signs of trouble
A common symptom of brake problems is a decrease in braking efficiency.
- the car pulls to the side when braking - one of the calipers is faulty;
- an increase in pedal effort at the same deceleration intensity;
- shaking of the pedal during braking;
- increasing the free play of the pedal until a noticeable deceleration begins;
- jerking the car until it stops;
- jamming of the pads, the wheel does not release the brakes and the caliper gets very hot;
- brake fluid leaks;
- uneven wear of pads and discs.
After removing the wheel and checking the pedal, you may notice that the pads do not move smoothly enough, the pistons move jerkily, and may even make clicking sounds or squeaks.
This can be caused by either corrosion of the pistons or cylinders, or a violation of the geometry of the guides.
The reasons are almost always the penetration of moisture, leaching of lubricant, destruction of rubber parts and neglect of the timing of brake fluid replacement.
Brake caliper piston - device, purpose, repair + video
If the brake system breaks down, the car owner immediately checks the brake caliper piston and adjacent components. This is justified because this device affects the safety of vehicle operation and ultimately the preservation of people’s health and lives. But what else do we know about calipers and their operation?
Brake caliper piston and other system elements
If we consider the brake caliper design as a whole, we should remember that this is a unit that, with the help of pistons, ensures uniform pressing of the pads.
The very design of disc brakes requires them to operate in critical temperature conditions.
Between the pad and the disc, as a result of friction, the surfaces of the parts are heated to a temperature of 500-600 degrees Celsius.
Considering the design of a disc brake with a floating caliper, one should note its characteristic features.
Its movement relative to the disk during braking occurs in such a way that it can quite easily provoke various malfunctions in the form of critical accumulations of dirt, corrosion, and jamming.
In such situations, the pads wear out quickly and fuel consumption increases. A more reliable design is considered to be a fixed version of the caliper, where there is no movement of it relative to the disc.
Front and rear brake calipers
The design and design of the front brake caliper is an open unit, allowing it to be effectively cooled while driving.
It consists of a disc mounted on the wheel hub and the caliper itself. The sockets house cylinders that are installed in a certain position using special clamps.
Inside the cylinders there are pistons sealed with rubber rings.
In order to protect the internal cavity from dust and dirt, a brake caliper guide boot is installed. The outer cylinder contains a special valve that removes excess air.
The rear brake caliper has a more complex design due to the presence of an additional handbrake mechanism. Thus, the braking system of the rear wheels can operate from two drives - conventional hydraulic and mechanical, which provides additional operation of the parking brake.
The integrity of the brake caliper protection is the key to safety.
A preventative repair that your brakes may need to prevent serious problems is replacing the brake caliper boot, which protects the exposed parts from the penetration of moisture, dust and dirt particles, and other chemically active substances. If this small part is not maintained in good condition, then any dirt that gets inside will ruin your complex structure.
However, before removing the boot, you must disconnect the rear brake caliper piston. To remove it from the body, it must be unscrewed from the rod, which is an integral part of the handbrake. The front part of the brakes will be a little simpler.
Many car enthusiasts repair brake calipers with their own hands. However, in modern cars, the design of this system is a rather complex mechanism, the repair of which most often requires the help of qualified specialists.
Replacing the boot - we try to do it ourselves
In what order should I get to the boot and replace it? Remove the cap from the caliper that protects the guide head (also called the “finger”). We take a suitable hexagon, turn it out and take it out. Now we have access to the boot itself, we remove it too.
If there is dirt underneath, it needs to be washed thoroughly, preferably not only from the visible part of the caliper surface. If possible, press in the piston; usually a special tool is used for this.
This will prevent damage to the system inside, where sand will scratch the inner surface of the caliper and the outer piston.
When you have washed everything well, you can return the piston to its usual place and check its progress. If it now moves smoothly and there is no sand grinding inside, then you have achieved your goal, you can install the boot and assemble the system.
But once you are under the car and look into the caliper, you can remove it and check it completely for defects.
Front caliper jammed: reasons
When the driver is used to driving at high speed, a little carelessly, then the front caliper often jams. This type of breakdown is more common in modern vehicles, where this mechanism operates faster in the front part. As a result, a colossal load falls on the caliper.
Most cars have a pressure regulator, which is popularly called a “sorcerer”. If you brake sharply, fluid access to the rear of the car is blocked. The front one continues to function and heat up.
DIY caliper development procedure
Let's move on to a description of the repair itself. The algorithm will be something like this:
- First you need to lift the car using a jack and unscrew the wheel, locking the steering wheel in the extreme position.
- The mounting spring is removed, and the surface near the brake hose is thoroughly cleaned. To do this, you can blow it with compressed air.
- The brake hose must be clamped with a clamp to prevent leakage of working fluid.
- We continue to repair the caliper ourselves. After this, unscrew the bolt that secures it and remove the hose itself to the side. It is necessary to ensure that dirt particles do not penetrate inside it.
- After this, the caps on the guides are removed, and they themselves are unscrewed using a 7 mm hexagon.
- Using a screwdriver, we recess the piston, moving its body away from the disk to a sufficient distance. You can begin dismantling the old caliper.
- First, take it out of the case and check for moisture. We take the piston out of the housing. To do this, you can remove it from the disk without disconnecting the caliper from the hose. Just press the brake pedal and it should fall out on its own. How to clamp a brake hose? Any tight clamp will do, you can even use the one that is used to secure caps to wheel rims at a tire shop. You can use a vice in which to firmly clamp the body, and remove the piston itself with pliers. Or use compressed air, making sure that the part is not damaged during removal.
- We take out the old cuff, first removing the remaining working fluid. We thoroughly clean the surface in which the protective cover was located and the cuff seats. We rinse and blow with air, after which you can install a new cuff.
- When repairing the front caliper, lightly water the working surfaces of the piston with brake fluid. The piston itself is laid strictly vertically and slightly recessed. We put a protective cover on top. In this case, you need to make sure that the rubber band does not jam.
- Now the piston can be recessed completely, but you need to be careful to prevent the boot from twisting.
- We unscrew the brackets that are equipped with the caliper. We clean the surfaces on which the pads move. Care must be taken not to damage the threads in which the guides are attached. The bracket is screwed into its original place.
- We lay the block, making sure that it has taken its position and is not stuck anywhere. The guides must be cleaned of the slightest particles of dirt. The caliper is put on the bracket, and its guides are tightened with your fingers. We put on the caps and fix the springs. Don't forget to put grease under the brake pistons boot and remove any excess grease from around it.
- All that remains is to put the hydraulic fluid hose back in place and bleed the entire system with a few presses of the brake pedal. We lower the car to the ground using a jack and check the level of working fluid in the tank - refill if necessary. This completes the caliper rebuild.
In short, as soon as you encounter overheating or uneven wear of the brake pads, the appearance of odors and noise, you can be sure that the effectiveness of the braking system will no longer be the same.
Immediately pay attention to the condition of the caliper and, if necessary, use the caliper repair instructions described above
Much has been said about the importance of uninterrupted operation of all elements responsible for applying the brake. This article will talk about repairing the components of the caliper: the piston (cylinder), guides and replacing their boot - with your own hands, you can also learn about this clearly from the attached video.. To fully understand how to repair and replace these parts without any problems, it’s worth understanding in the design of the front and rear calipers and the reasons for their failure, what repair kit may be required for this
To fully understand how to easily repair and replace these parts, it is worth understanding the structure of the front and rear calipers and the reasons for their failure, and what repair kit may be required for this.
Technology
By pressing the brake pedal, the driver squeezes brake fluid towards the caliper and sets the piston in motion. This closes the pliers, pressing the brake pads against the disc. When braking, the piston in the caliper moves a fraction of a millimeter, thereby deforming its O-ring. If the driver takes his foot off the brake, this O-ring pulls out the piston again, weakening the brake action. In this case, the minimal lateral impact of the brake disc ensures that the brake pads in their guides move away from the disc and no longer touch it.
Lapping
After repairing the calipers, the first 200-250 kilometers should be driven carefully, without sudden braking. This will allow the parts to get used to each other and fit perfectly into the seats.
Brake fluid must be replaced every one and a half to two years. If the vehicle is used harshly, it should be changed at least once a year. If the brake system overheats at least once, the fluid must be replaced immediately. When heated to boiling temperature, small air bubbles form in it. In normal operating modes this is not noticeable, but during sharp braking you can notice a complete absence of brakes.
To ensure that repairs do not bother you for as long as possible, they must be dealt with periodically. Timely maintenance of calipers will prevent breakdowns, save money on purchasing new parts, and avoid ending up on the road with a broken brake system.
You can find a service station where they will service and repair calipers in the TAM.BY catalog.
If you notice an error in the text of the news, please highlight it and press Ctrl+Enter
The piston (cylinder) is faulty
Poor quality of brake fluid, the appearance of rust on the surface when the boot of at least one piston (cylinder) ruptures or as a result of prolonged downtime of the machine entails its partial jamming.
This will initially be heard when its operation is delayed, when the pads begin to knock on the disc. In order to make the repair yourself in this case, you need to disassemble the caliper and pull out the rusty piston; this must be done after the guides have been unscrewed and the boot and retaining ring have been removed.
If the cylinder still moves even slightly, you can squeeze it out using a compressor by inserting a hose into the hole for supplying brake fluid. This can also be done without first disconnecting the housing from the brake system; you just need to press the pedal, after which the created pressure will squeeze the cylinder out of its seat. If it is tightly jammed, then a preventive measure can be soaking it in gasoline and other similar liquid.
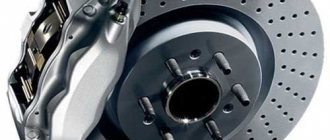
Types of brake discs
There are several types of them. Discs differ in the material they are made of. The element can be made of cast iron, steel, cermet or carbon fiber. The last two types are high cost, and therefore are not used on most production cars.
Kinetic energy,
Metal ceramics and carbon fiber can heat up to 1200-1400 degrees, and this is quite normal for these materials. The coefficient of friction is higher here, but these materials are not so susceptible to thermal deformation. For metal disks, the maximum heating temperature is 500-600 degrees. Overheating will lead to loss of geometric characteristics.
The brake cylinders have soured, what should I do?
- Registration
- Entrance
- To the beginning of the forum
- Forum Rules
- Old design
- FAQ
- Search
- Users
- List of forums AUTOLADA.RU
- “Tenth” family (VAZ-2110, VAZ-2111, VAZ-2112) and LADA PRIORA
- 1
- 2
- 3
- 4
- >
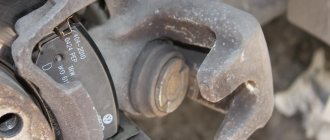
In short, today, having nothing better to do, I took off the wheels and looked at the condition of the rims.
In short: the left brake disc is loose and not cool! You need to apply enough force to turn it! I got into the car, pressed the pedal hard back and forth, turned the disc again - nothing changed!
Then he drove around and touched the disc - he was a bad man, he was hot!
What is this? Is the cylinder soured? Replacement?
PS On the right side everything is ok! And when braking it doesn’t lead anywhere!
What is this? Is the cylinder soured? Replacement?
By the way, could the bearing be jammed?
Nope. The bearing is fragile, the grinding of the pads on the disc is clearly audible.
and it seems like it’s better to change the caliper assembly!?
And if you develop the old one. Pull out the pads and use a pry bar to move it back and forth? Or a bad thought?
What is this? Is the cylinder soured? Replacement?
300r is for one. Better change in pairs. They say that there are front cylinders Lucas installed the Phoenix for himself - everything is ok. Be sure to change the brake hoses, Balakovo is probably the place to be.
Lubrication is the key to caliper durability
Maintenance of calipers involves timely replacement of lubricant. At least once every six months it is necessary to disassemble the system, clean the guides and re-lubricate them. After all, over time, the old lubricant loses its properties, and if the anthers are damaged, water and dirt freely get inside the unit.
When preventing breakdowns, pay attention to the presence of corrosion stains and cracks, and the geometry of the brackets. If the bracket is driven due to heavy loads, then often they simply sharpen the guides themselves and lubricate them generously
But for safety reasons, it is better to replace the bracket itself.
Old grease is removed with rags and special chemical compounds. When servicing calipers, you should not save either your time or flushing fluid. Everything should be cleaned so much that no particles of the old composition remain on the rag.
Use only high temperature grease, not graphite. Considering the performance of the unit, an unsuitable compound will quickly harden, and, consequently, the brakes will catch a wedge.
If the brakes rattle
This type of brake has pressure springs or floating calipers.
They are responsible for securing the pads to the caliper body. The reason for their failure is metal fatigue or poor quality. As a result, they lose their elasticity and stop pressing the pads against the body. Because of this, the pads rattle at the slightest passage of irregularities and may come into uneven contact with the disc, which will lead to the appearance of a shoulder or grooves on it. Also in this case, the staples themselves may rattle.
What should you do when your brake calipers or pads rattle? If it is not possible to replace them, then you should try to loosen them with your own hands using pliers to make them more rigid. To do this, you need to pull them out of their seats, unclench them and insert them into place, after which they will stop rattling for a while.
Engine repair kits
An engine repair kit is a set of seals needed to repair an engine.
The repair kit includes the following elements: 1. Cylinder head gasket. Original repair kits for diesel engines produced by Toyota and Nissan do not include the head gasket in the kits since the gasket is produced in different thicknesses and is selected separately according to the distance of the pistons from the block. 2. Valve cover gasket. 3. Spark plug rings. Not all engines are included in repair kits. 4. Gaskets for the valve cover nuts. 5. Breather gasket. Not included in all repair kits. 6. Manifold gaskets (intake and exhaust). 7. Throttle valve gasket. 8. Idle air valve gasket. Not included in all repair kits. 9. Injector rubber bands - for gasoline engines or injector gaskets - for diesel engines. 10. Valve seals. On some engines there is a difference between the intake and exhaust caps, on some engines the same caps are used. 11. Seals: camshaft(s), crankshaft (front and rear), oil pump (on some engines it coincides with the front crankshaft oil seal, on some it is separate), balancing shaft seals (if present on this engine). On engines with a chain drive gas distribution system, there are no camshaft seals. On some engines, the rear crankshaft oil seals are in aluminum housings - in such cases they are not included in the repair kits. Oil pump seals are not always included in the kits. A number of engines have additional seals, for example, fuel injection pump drives; such seals are not always included in the kits. 12. Gaskets for the front and rear engine covers. 13. Oil pump and pump gasket. 14. Engine sump gasket. Not included in all kits, since many engines use sealant instead of a gasket. 15. Gasket under the turbine. Included if the engine is equipped with a turbine. 16. Various small gaskets.
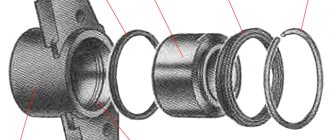
The design of this brake element
There are two types of disc calipers - front and rear, their design and repair method are slightly different, but their main elements are the same:
- The housing in which the piston (cylinder) is mounted.
- Bypass valve.
- Sealing ring.
- Piston (cylinder).
- Cylinder boot.
- Retaining ring.
- Frame.
- Pressure bar.
- Pads.
- Guide boot.
- Guides.
- 14. Fastening bolt.
- Brake hose.
The difference between the rear disc caliper is the presence of a parking brake.
Therefore, the piston (4) has a special thread through which it is screwed onto the parking brake rod (1). Thanks to this, it can operate under the influence of two drives - mechanical (parking) and hydraulic.
The brake cylinders have soured, what should I do?
If, when braking, the car clearly deviates from straight-line motion, most often this is a sign of jamming or jamming of the pistons in the brake cylinders due to corrosion of their working surfaces.
Restoring the mobility of pistons in brake cylinders of drum and disc brakes, removing pistons from brake cylinders.
The pistons jam in both the rear and front brake cylinders. Particularly favorable conditions for jamming are the front disc brakes. There is much more heating here, and brake fluid, as you know, is hygroscopic; there is almost always moisture in it.
If, in addition, you have not changed the brake fluid for a long time, then there may be more than 5% water in it. The latter is very dangerous and not due to the jamming of the pistons. During intensive braking, for example on a mountain road, due to the strong heating of the brake mechanisms, the fluid will boil and the service brakes will become ineffective.
If the pistons of the drum brake cylinders return to their original position after braking by a spring that tightens the pads, then the disc brake pads are retracted from the disc only due to the elasticity of the rubber sealing rings and the end runout of the disc.
If the pistons in the brake cylinders “stick”, you can replace not only the brake fluid, but also the cylinders with the pistons. However, practice shows that they can still serve - just change the brake fluid and “swing” the pistons in the cylinders. In the case of the rear brake cylinders, everything is simple - these cylinders are through, but the front ones are blind.
You can “swing” the pistons in the front cylinders of disc brakes in various ways. The simplest one: using improvised means, we recess the piston into the cylinder, after which, pressing the brake pedal, we return it back. And so on until the piston restores the necessary mobility. When “swinging” the pistons, you must not lean the tool on the disk (cast iron), as it can easily be damaged.
A device for swinging pistons in brake cylinders of disc brakes.
If there is slight jamming, you can “swing” the pistons faster by placing rubber gaskets between them and the disk, which act as springs. In more complex cases, the pistons are “swinged” using the device shown in the figure above. When using it, remove the caliper and remove the brake pads. Then disconnect the brake hose.
When the screw is rotated with a crank, the legs diverge, recessing the pistons into the cylinders. The screw has right-hand and left-hand threads at the ends. The device is fixed with M6-20 screws screwed into one of the legs.
Removing pistons from brake cylinders.
If it was not possible to “swing” the piston in the brake cylinder or a major repair of the brake system with replacement of seals is planned, the pistons must be removed. The usually recommended method of removing pistons, which consists of supplying compressed air, is simple and convenient. But, firstly, it is necessary to have compressed air, and, secondly, air under pressure (as opposed to liquid) is an energy accumulator. The latter makes the method in question unsafe.
On VAZ cars, the piston can be removed by lightly tapping the rod with a hammer (diameter 5 mm, length 50 mm). But in order to reach the piston with the rod, it is necessary to drill a hole with a diameter of 5 mm along the axis of the cylinder (then an M6 thread is cut into the hole to install a plug screw).
Based on materials from the book “Car Repair Devices.” Ross Tweg.
Moderator: flashLAV
The caliper tool didn't help.
It was also not possible to press the cylinder with the pedal. And then an idea came to me. I inserted the bolts and nuts into the holes and began to slowly tighten them, using the block as a press.
And then I managed to slightly press the lower cylinder (the only caveat is that it is better to use an old worn-out block, it bends and there is a danger of peeling off the abrasive material).
Well, then I loosened it back and forth with varying efforts. I took off the boot, lubricated it with a bucket, and increased the amplitude. Then we managed to squeeze it out as much as possible. Cleared. Lubricated. I installed a new boot. I moved it from one extreme position to another 20 times. Only then did I put everything back together.
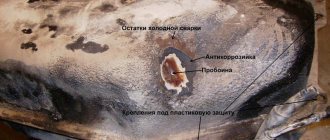
Inspection of the old boot showed a hole.
Through which the moisture came. I don't understand where the hole comes from. I don't believe in marriage. Or they accidentally damaged it during the service last time. Or I hurt it at some point. Hard to say.
I hope this experience will help.
Classic approach: - buy a repair kit for both calipers in advance - buy a couple of pistons for future use - remove the calipers from the car, disassemble them (into two halves), pull out all the pistons, inspect, clean, where there is rust - replace, lubricate and put/assemble everything in place (the rubber bands are all new).
A simplified option is to squeeze out the pistons as much as possible (but not completely) on the caliper with the pads removed, remove the boots, clean, fill with new lubricant, and put them back together. But this is not entirely correct. Yes, half measure.
In general, how to clean calipers is a childish topic, it has been chewed over 1000 times.
By the way, according to the service, if the pistons turn sour regularly (they had to be replaced with new ones more than 3 times due to rust), then the caliper assembly needs to be replaced with new ones, because supposedly nothing will help.
In general, I am surprised by such an ambush on the J120. I had a 95 Prado. He covered 450 thousand km. Sold at age 16. The front calipers have never been touched (I knew the service history before me)! Everything was from the factory. How could it be possible to screw up the design so that it suddenly becomes a disease on the next generation of the platform? People are also suffering on 200. At least on pre-restyle
The hand (parking) brake cable is jammed.
Causes: The braid is frayed inside or outside - this can be solved by replacing the cable. The return spring has weakened - this can be solved by replacing the spring with a new one. The mechanism of two return brackets has become sour and rusty - clean off the rust and spray with WD-40.
• A quick solution on the go is to return the cable to its original position by hitting the return bracket or spring with a hammer. You can check how the pads are wedged by turning the brake disc by hand. It should turn easily, but with a slight tightness. You can continue driving, but before replacing the cable or spring, DO NOT use the handbrake!
We are working on a jammed front brake piston 2108, 2109, 21099
The brake mechanisms (calipers) of the front wheels of VAZ 2108, 2109, 21099 vehicles operate under constant exposure to an external aggressive environment (salt, dirt, water, etc.). In this regard, it is recommended to inspect and service calipers and brake pads every 15 thousand km. Jamming or “souring” of the pistons in the caliper cylinders is most often the result of a lack of periodic monitoring of the condition of the brake mechanisms, damage to their protective boots, severe wear of the brake pads in which the pistons extend too far from the cylinders, thereby coming under external influence, the presence of water or foreign substances. impurities in brake fluid.
Reference: the pistons of the brake mechanisms of the front wheels of VAZ 2108, 2109, 21099 cars have a mirror coating, the same coating is found inside the cylinders. The cylinders are equipped with rubber rings that return the pistons to their original state after extension. On the outside, the pistons are protected by anthers (protective caps with retaining rings).
Damage to the mirror coating of the pistons (“souring”) leads to a loss of their mobility in the cylinders and, as a consequence, to incomplete release of the front wheels, since the pads are constantly pressed against the brake discs. In this case, accelerated wear of the pads, overheating and warping of the brake discs occurs, fuel consumption increases, the vehicle's controllability (pulls to the side) and its dynamics are impaired, vibration and beating appear when the brake pedal is pressed.
There are at least two ways to develop a soured piston:
— without removing the brake mechanism from the car;
- with the brake mechanism removed.
In the first case, it is necessary to jack up the car, remove the wheel, clean the outside of the caliper from dirt, disconnect and lift its floating bracket.
We remove the retaining ring and the cylinder boot, remove dirt from under it using a rag soaked in gasoline and a hard brush or toothbrush. Lightly press the brake pedal so that the piston moves out a little (a centimeter at most) from the cylinder. We clean it again, being careful not to damage the piston mirror and remove only dirt and deposits. You cannot clean the piston with sandpaper, as this can damage the mirror. A popular way to clean deposits is to use a rough wooden block, which will remove deposits and not damage the cylinder. Remove the cap from the brake fluid reservoir and, using an adjustable wrench or vice, push the piston back into the cylinder. We press the brake pedal, pushing out the piston, and press it down again. We carry out this procedure for developing his mobility 20-30 times. Then we apply graphite lubricant to the protruding part of the piston, install a new boot and retaining ring.
The advantage of this method is that there is no need to drain the brake fluid from the car’s brake system circuits and pump the brakes.
In the second case, we remove the brake cylinder and disassemble and develop it. This method is suitable for a major overhaul of calipers, since it is necessary to either drain the brake fluid or plug the brake pipe, which still risks losing a certain amount of fluid and requires bleeding the brakes after the work is completed.
The piston must be squeezed out of the cylinder either before removing it (by pressing the brake pedal), or with the piston already removed, pressurized air must be supplied into the hole under the brake pipe. Before extruding, remove the retaining ring and boot from the piston. We try not to scratch the removed piston. We clean it from dirt and oxidation using the method described above, if necessary, change the rubber sealing ring, rinse and blow through the cylinder. Before assembly, lubricate the inside of the brake cylinder with brake fluid, and lubricate the piston itself with graphite lubricant. We press it inside the cylinder (for example, using a vice), put a new boot and retaining ring on top.
All of the above manipulations make sense only if there is minor damage to the piston or cylinder. If the piston is completely jammed and it is impossible to develop it, the brake cylinder with the piston should be replaced.
Notes and additions
— After developing the pistons of the brake cylinders of the front wheels of the car, it is necessary to lubricate the guide pins.
Caliper - we repair it at home
The safety of the driver and passengers of the vehicle directly depends on the performance of the braking system. After a certain mileage, its components wear out, one of which is the caliper. Nevertheless, it is quite possible to repair the brake caliper, although most often it fails due to the process of souring of the guides or pistons.
Why is this dangerous in practice? If this unit malfunctions, the brake pads begin to wear unevenly. The same goes for brake disc wear. As for the pads, increased wear may be observed, for example, on the outside compared to the inside. Uneven wear indicates that the pistons are putting too much pressure on only one of the pads, while the other does not take part in the process. Urgent repair or replacement of the caliper is required, without waiting for it to completely jam.