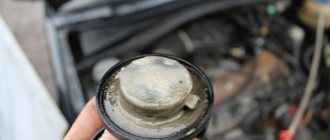
Lada Priora: engine oil
First of all, engine oil protects internal combustion engine parts from dry friction, reduces wear, cools engine parts, cleans the engine from the inside, etc. On Lada Priora, about 3.25-3.5 liters of oil are poured into the engine
In this case, it is important to correctly set the oil level in the engine, monitoring it using an oil dipstick. Neither an insufficient oil level nor an overflow above about
Having figured out how much oil to pour into the engine, you need to decide what kind of oil to pour into the Priora
More precisely, it is important to know the basic tolerances that the oil in a Priora 16 valves must have. At the same time, it is necessary to adhere to the recommendations of the engine manufacturer
So, oils are synthetic, semi-synthetic and mineral. Taking into account the fact that the VAZ 16 valve engine is a more modern design, pouring cheap mineral water is not recommended, since this type of lubricant quickly loses its properties and changes its chemical composition.
The best option would be synthetic or semi-synthetic oils. Next, you need to select a lubricant based on SAE viscosity. In general, all-season oils with a viscosity from 5W30 to 20W50 are suitable for Priora (the manual contains a wide list).
In any case, it is important to note that the first number indicates the “low temperature” viscosity, while the second indicates the “high temperature” viscosity. Simply put, the lower the first number, the thinner the oil in the cold.
This means that cold starts will be easier and wear will be minimized. However, after reaching operating temperatures, such a lubricant also dilutes greatly, and protection deteriorates after the engine warms up.
In turn, if the oil has a high “low temperature” value, this oil thickens much more in cold weather, but after reaching operating temperature it remains more viscous, forms a denser and more stable oil film, etc. Of course, a warm engine is better protected.
Volkswagen Polo sedan
The dipstick for measuring the oil level in the Volkswagen Polo sedan engine has two marks, lower and upper, in the grooved area. Do not confuse with marks further down and up the dipstick.
Measuring the level is no different from the previous ones, just place the car on a flat surface, turn off the engine and wait 5 - 10 minutes.
The check is also carried out the second time. The oil level should be midway between the marks in the grooved area or 2/3 and 3/4 of the distance from the bottom mark.
VAZ 2170 | Checking the oil level
| Rice. 117. Location of the oil dipstick on a 2.3 liter engine (208D, 308D, 408D) |
| Rice. 118. Location of the oil dipstick (1) and oil filler cap (2) on a 2.9 l engine (212D, 313D, 412D) |
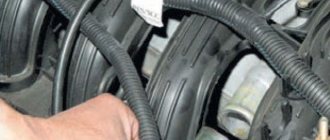
It is best to check the oil level at each refueling. The oil dipstick, as you know, is located in front of the engine on the side. In Fig. 117 and 118 show the location of the dipstick on both types of engines. Check the engine oil level as follows:
— park the car on a level surface;
— after stopping the engine, wait at least 5 minutes until the oil drains into the crankcase. It is better to check the oil level before leaving with the engine still cold;
- remove the dipstick - be careful when the engine is hot! Wipe it with a lint-free cloth or paper towel. Insert it back all the way, wait a little and take it out again;
- You can determine the oil level using the scale on the dipstick. If it is between two divisions, everything is fine;
— if the level does not reach the lower mark or the oil level indicator light is on, you need to add oil.
The oil volume between the lower and upper divisions of the dipstick corresponds to 2 liters. Thus, if the oil level is in the lower third of the scale or the control lamp is on, it is convenient to use a one-liter canister to top up. When topping up from a five-liter canister, use a funnel. Oil is poured through the neck in the engine head cover.
With a calm driving style, the oil level may be in the lower third of the scale. When actively driving or towing a trailer, it is recommended to maintain the oil level closer to the upper mark. With a larger volume, the oil cools the engine better.
Don't add too much oil. The oil level should not exceed the MAX mark on the dipstick. Therefore, it is better not to try to fill the oil exactly to the upper mark. Excess oil is consumed faster and contributes to excessive carbon formation.
Note: Oil dipsticks vary from engine to engine and are not interchangeable.
Therefore, if you need to replace the dipstick, pay attention to the engine type. Oil dipstick handles are color coded.
Is it possible to mix oil?
Brands of oils from different manufacturers can be mixed without any danger; this also applies to seasonal and all-season oils. Such compatibility without causing harmful consequences is a basic requirement of international regulations. The specific characteristics of individual oil brands may vary slightly when mixed, since each brand uses a different combination of additives. However, the main characteristics of the lubricant are not affected.
The exception is some synthetic and semi-synthetic oils, which are also not included in the list recommended for use by Mercedes. If engine oil is mixed with them, an unsuitable combination may occur that may cause engine damage.
automn.ru
Ford Focus 2
The car is also placed on a flat surface, the engine is turned off and wait 5 - 10 minutes until the oil drains into the crankcase.
The measurement algorithm is no different from that described above. Everything is also checked the second time.
The Ford Focus 2 dipstick has only risks, there are no letter designations. There are also no indicators for “cold” and “hot”, so we take measurements only on a warm engine.
Allowed oil level readings are 0.5 (the middle between the marks), 2/3 and 3/4 of the distance from the bottom mark.
Above the top line, drain off the excess; below the bottom line, add more.
Algorithm of actions - taking measurements
In order for measurements to show the actual oil level in the crankcase, you need to adhere to a certain algorithm of actions:
The check must be carried out only on a level surface; tilting the engine forward or backward is unacceptable; If there are no “hot” and “cold” marks on the dipstick, then you need to check it on a warm engine; After you have turned off the engine, let it cool for about 5 minutes. During this time, some of the oil from the system will drain into the crankcase, under such conditions the measurements will be more accurate; Prepare a clean rag and remove the dipstick from the hole; Wipe the dipstick, avoiding any old grease remaining on it, and insert it back (measurements cannot be taken the first time); Remove the dipstick again and take readings; The ideal oil level should be 2/3 of the distance from L (lower mark), i.e. slightly above the middle
In rare cases, 3/4 (75%) of the bottom mark is allowed; Check the condition of the fluid to see if it needs replacement; If the oil level suddenly appears above the F mark, then pay attention to its condition and the color of the smoke from the exhaust pipe; If the level is below the L mark, then you need to remember when the last measurements were taken and where the oil went, proceed according to step 9; Traces of liquid on the dipstick should be examined carefully; if in doubt, measurements should be repeated; Please note that the dipstick can be completely covered with oil from the L to F mark, this especially often happens when fresh working fluid is poured into the engine. In this case, find the side of the dipstick that will be partially dry, this will be the real level. It is advisable to add working fluid of the same brand as in the engine; read here whether it is possible to mix motor oils; Topping steps are 50 - 100 ml, since some engines between the L and F marks can accommodate from 0.5 to 0.8 liters of oil
So as not to drain the excess later.
Many car owners recommend waiting 30 to 60 minutes after turning off the ignition before checking, so that all the oil will drain into the crankcase and the measurements will be more accurate.
In part, they may be right, but on some cars, for example, the Toyota RAV 4, the engine is designed in such a way that almost all the lubricating fluid drains into the crankcase in 5 minutes and there is no need to wait up to 1 hour to take measurements.
As for other cars, in any engine hot oil will drain into the crankcase quite quickly - 5 minutes is enough, and those milliliters that remain in the engine will not significantly affect the accuracy of the measurement. If there is no level or it is exceeded, it will be immediately visible.
Requirements for carrying out repair and maintenance work on VAG series vehicles
Many car owners do not bother checking their engine oil. As noted above, the machine is placed on a flat surface, and after a few minutes of standing, the dipstick is taken out and the level is checked.
Information on this subject is provided on the Internet based on the experience of car owners. It is difficult to find official data on this issue.
As an example, you can take information from ELSA - documentation that sets out the requirements for carrying out repair and maintenance work on VAG series vehicles.
Level check
At the first stage, you need to find out where the oil is located, and here everything depends on the part of the scale:
- A - no refilling is needed.
- B - it is permissible to add a little lubricant.
- C - topping up is required.
Conditions
An important point is the conditions that must be observed when performing work.
General instructions, except for V6 diesel and V8 gasoline engines:
- oil temperature - not less than 60 degrees Celsius;
- the waiting time after turning off the motor is several minutes, which is enough for the lubricant to drain into the pan;
- horizontal position of the car.
For V6 diesel engines the following requirements apply:
- oil temperature 90 degrees Celsius (warming up to this level is required);
- wait 2 minutes for the oil to drain into the pan;
- horizontal position of transport.
V8 gasoline engines are tested taking into account the following requirements:
- lubricant temperature - 90 degrees Celsius;
- Idle for 60 seconds;
- turn off the engine and pause for 5 minutes to allow the oil to drain (the process is slower);
- level control for 60 seconds;
- the car is horizontal.
Verification algorithm
Now let's look at the inspection instructions on VAG series cars.
Do the following:
- Remove the dipstick and wipe it with a clean cloth.
- Insert it into place until it stops and remove it again.
- Look at the oil level on the scale.
- Assess the situation and decide whether refilling is necessary.
The approach discussed above, as a rule, corresponds to the generally accepted algorithm. At the same time, experienced drivers recommend keeping the level between the Min and Max marks, and checking it in the morning before starting the engine.
VAG experts recommend a slightly different approach, focused on checking with heated oil.
Body and exterior of the 2016 Priora
During the modernization of the VAZ 2170 style, there were no significant changes in body parameters.
| Dimensions | Linear dimensions |
| Length | 4.35 m |
| Width | 1.68 m |
| Height | 1.42 m |
| Wheelbase length | 2.49 m |
| Front wheel track width | 1.41 m |
| Rear wheel track width | 1.38 m |
| Clearance | 16.5 cm |
The trunk volume, as for a sedan, is quite large: 430 liters. The car has front-wheel drive, that is, the driving pair of wheels is the front one. Body type: sedan with four doors.
The appearance of the Lada is characterized by simplicity and sophistication. Despite repeated restyling, AvtoVAZ did not make fundamental changes to the exterior of the Priora. The front of the car is convex, the headlights have a triangular rounded shape, and their image is complemented by stylish head optics. The air intake is separated from the radiator grille by a license plate, and a massive front bumper completes the moderate image of the front end.
In profile, smoothed body shapes are observed. The stern turned out to be stylish due to the large rear lights, chrome trunk handle and massive rear bumper.
Restyling
In 2013, an updated version of the Lada Priora was presented in Tolyatti. It is worth noting that even before the official debut, pictures and videos of new items appeared on the Internet.
In terms of exterior design, the car has not undergone significant changes. The reforms slightly affected the bumpers, radiator grille, and moldings. But the rear lighting optics have acquired LED lamps, which provide brighter light compared to conventional ones and are also more durable.
The interior looks more modern due to a different layout of the instrument panel, as well as the multimedia system screen. The analog chronometers on the center console disappeared, and in their place was a storage niche.
Features of the motor brand 21128
This power unit is installed not only in Priora. They are also supplied to other brands of VAZ cars. Wanting to reduce the cost of production, the authors of the modernization of the 21127 engine decided to leave the cylinder-piston block unchanged. The solution was simple - increase the volume by increasing the piston stroke. To implement it, the connecting rod and crank mechanism was changed. Shortened connecting rods allow the pistons to increase their stroke.
Despite the manufacturer’s assurances that the engine’s service life is 200 thousand km, in practice it turned out to be much less. This is explained by the fact that the parts of the cylinder-piston block began to experience much greater loads. The engine itself is a 4-cylinder, injection. The timing camshafts are located at the top, the gas distribution mechanism drive is a belt drive.
But if it breaks, the valve cylinders do not bend. But wear of the rings and cylinder walls progresses quite quickly. As a result, the engine becomes so “hungry” that it consumes oil for the Priora from 0.7 to 3 liters per 1 thousand km. Thus, without major repairs, it cannot travel even one hundred thousand kilometers.
In addition to the above-mentioned shortcomings due to the fault of the manufacturer, there are a number of other reasons why synthetics or semi-synthetics poured into the engine are overused. This applies to all engine models, regardless of manufacturer.
- A non-recommended oil has been poured into the engine, and another oil, for example, with a low viscosity, or counterfeit.
- The oil seals in the engine are worn out, the piston rings are coked or worn out. Other reasons are possible - such as leaking crankshaft seals, breakdown of gaskets.
- An overly aggressive driving style, accompanied by fast accelerations, maximum revs and engine temperature conditions.
- The power unit has undergone a major overhaul, the rings and cylinder walls have not yet gotten used to it.
As the first fill for Lada Priora engines, a good semi-synthetic composition from the domestic manufacturer - Lukoil is used. The first maintenance with a lubricant change is performed after 2.5–3 thousand km. Further, changing the oil in the Lada Priora engine depends on operating conditions, fuel quality, brand and manufacturer of motor fluid.
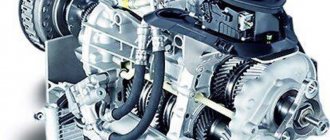
Technical parameters and interior of the VAZ 2170
The two modifications differ almost only in engines. The remaining technical characteristics of the VAZ are identical. The first version of the car has a built-in 8-valve petrol engine 21116 with a volume of 1.6 liters. Fuel is supplied electronically and the 4 cylinders are arranged in a row. The maximum power of 87 forces is achieved at 5100 rpm, the maximum torque is 140 Nm, the highest speed is 176 km/h. The car does 100 in 12.5 seconds. Gasoline consumption: 9.0/5.8/7.0 liters, respectively, in the city, on the highway and in the combined cycle. The fuel tank with a volume of 43 liters must be filled with A-95 gasoline.
The second modification of the car is equipped with a 16-valve 106-horsepower gasoline unit 21127 with a volume of 1.6 liters. To develop maximum thrust, 5800 engine rpm is required. The maximum torque is 148 Nm, and the acceleration time to hundreds is 11.5 seconds. The main source of electricity is the 2170 generator, which has an adjustable voltage of 13.8 - 14.4 V.
The Lada Priora is equipped with a 5-speed manual transmission with a gear ratio of 3.7. The front has a semi-independent suspension with MacPherson struts, springs, shock absorbers and a stabilizer bar. The rear suspension is semi-independent with levers, springs and shock absorbers. Shock absorbers in both cases are hydraulic or gas-filled telescopic.
Wheels and tires are different for the two Priora modifications. The car with an 8-valve engine has 13-inch wheels. The model with a larger engine, depending on the configuration, can be “shod” with tires with rims of 13 or 14 inches.
Tires of various modifications are represented by the formulas 175/70 R13 (82, T); 175/65 R14 (82; H), The marking is deciphered as follows: 175 - tire width, mm; 70 (65) — ratio of tire profile to width in%; R — tire type (radial); 82 and T, respectively, are the load and speed index.
The interior of the VAZ Priora is distinguished by good spaciousness. When getting into the cabin, a person taller than average can fit comfortably in height; their legs also do not rest against the back of the front seat. The upholstery of the chairs is made of high quality fabric.
Lada Granta
The algorithm of actions is the same (see above). But when measuring the oil level in a Lada Granta, there is one feature that many people do not know about.
The crankcase pan is structurally equipped with an antifoam plate, which is located parallel to the bottom of the pan.
It serves to calm and prevent foaming of the liquid and for normal operation of the oil pump.
This plate has two holes, the main one for the oil intake and the second for the dipstick.
In the Lada Granta, this hole is slightly offset, so when measuring the oil level, the dipstick rests against the edge of this hole and does not go in completely.
Those who know about this get used to it and no problems arise, but those who don’t know how to bend the feeler gauge.
But this is not the only problem. When removing the probe, it touches the edge of the hole in the defoamer plate, which is at the level of the top mark when the probe is inserted.
As a result, the oil film moves smoothly along the dipstick from mark F to L, which misleads the driver. Therefore, here you need to adhere to the rule - the level is checked not at the edge of the oil on the dipstick, but in a dry place. The probe needs to be rotated, viewed and analyzed.
How the dipstick works
There is no point in considering the design of the probe itself, everything is clear here, let's talk about the marks, because you need to navigate by them when taking measurements.
Most car brands follow one principle: the lower mark L is the minimum level, the upper mark F is the maximum. The designations “MIN” and “MAX” may also be found.
Also on some dipsticks there are marks for measuring the oil level at cold and hot.
But that’s not all; in order to measure readings correctly, you need to adhere to certain rules and conditions, which we will talk about below.
Modifications of the Priora line
In 2007, this car replaced the VAZ 2110 model. Restyling allowed the new car to differ significantly from the previous version, as more than 900 changes were made. The very first modification is called Lada 21701 and is a sedan with five doors. It was equipped with the lowest-power engine in the line: 80 horsepower. Number of valves - 8.
Various modifications and configurations of the Lada 2170 have characteristic differences and a corresponding prefix in the model number. Model 217030 was the first upgraded version of the basic version. This car is equipped with a more powerful 98-horsepower engine, and the interior was equipped with a number of options:
- tinted windows;
- headlight corrector;
- ABS (anti-lock braking system),
- front power windows;
- airbag;
- alarm.
In 2011, AvtoVAZ made a slight restyling of the body, in particular, the front and rear bumpers. Several options were also added: new rear-view mirrors and a redesigned steering wheel. The shortcomings of the first model were eliminated. The updated car was named VAZ 21704. The Lada 217050 modification, released later, became even more modern thanks to electric power steering and a brake force distribution system.
Starting in 2014, VAZ Priora cars began to be equipped with a semi-automatic robotic transmission, which was developed by AvtoVAZ based on a 5-speed manual transmission. The electronic control unit is assembled from components manufactured by the German company ZF. A year later, the concern decided to stop producing cars with AMT.
During its release, Priora was available in 4 body styles. In addition to the existing sedan, production of hatchbacks with both five and three doors began in February 2008. In the spring of 2009, the concern began production of serial models of the Lada 2170 station wagon. Production of the car in hatchback and station wagon versions was discontinued at the end of 2015. Today, only Lada 2170 sedans are produced.
Today, there are 2 modifications left in the Priora line. Their main differences are engine size and power. The first option is equipped with a 16-valve, 106-horsepower power unit. The second one has an 8-valve engine with 87 horsepower under the hood.
Lada Priora - checking the level and adding oil to the engine
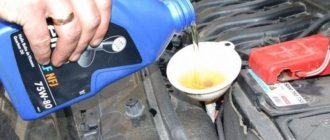
Checking the oil level in the engine crankcase on a Lada Priora car must be done according to the technical inspection card or several times a season, provided that your oil consumption is normal. If the consumption is increased, it is recommended to check it as often as possible or before each trip, especially over long distances, so as not to exceed the critical level. To carry out repair work, prepare a standard set of tools and oil that matches the parameters currently poured into the engine. Do the following sequence of actions:
- It is worth considering that the level check is performed 10-15 minutes after stopping the engine, thereby giving time for the oil to drain from the walls.
- Next, we take out the level control dipstick and wipe it of oil with a clean rag, after which we install it and remove it again. A level is considered normal when the oil film is located between the maximum and minimum marks. If the level is lower than recommended, then top up.
Unscrew the oil filler cap and carefully add. We top up a little at a time and at the same time control the level so that it does not exceed the maximum mark. Also check the level 5-10 minutes after, so that the oil drains well from the walls. Exceeding the level contributes to increased pressure in the system, which can lead to leaks through weak points, usually oil seals. If the level is exceeded, then drain it through the oil pan plug.
At this point, the repair work to check the oil level and top up the oil on the Lada Priora car has been completed.
zubilovaz.ru
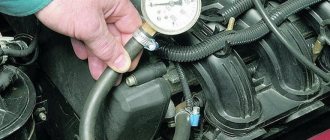
Mercedes w211
The peculiarity of checking the oil level in a Mercedes w211 car is that you won’t find a dipstick there, it simply isn’t there, so don’t waste your time searching.
The w211 only provides an electronic probe, which is located in the form of a float in the engine crankcase. By the way, the w210 e280 has a probe and electronics, which is much more convenient.
In order to measure the amount of mass in the crankcase, you need to activate the electronic probe. The data will be displayed on the instrument panel.
The car must be on a horizontal platform. Insert the key into the ignition and turn it to the right once. Go to the menu and find the speed.
Press the reset button 3 times.
The battery voltage will be displayed.
Now, to find the electronic probe, press the arrow button shown in the photo 1 time.
A menu will appear.
Turn on the ignition by turning the key to the right one more step. After a few seconds, the display will show the engine oil level in liters. In our case it is 6.1 liter, which is the norm.
The following indication may appear on the display:
Useful tips
Having considered the main nuances and dealt with the question of what kind of oil to pour into the Priora, it should also be noted that it is necessary to adjust the viscosity and replacement intervals of the oil itself, taking into account a number of certain factors.
First of all, although the manufacturer recommends changing engine oil every 15 thousand kilometers, in practice the replacement intervals should be reduced to 10 thousand km. mileage
To put it simply, the “budget” version of semi-synthetics will lose its properties by 9 thousand km in urban use, while expensive synthetics will last up to 11 thousand km. mileage However, the difference in price between the two products can be very large.
We also note that as the engine wears out (with increasing mileage), it is also recommended to increase the oil viscosity. This means that up to 100 thousand kilometers you can use 5W30 oil, but then you should switch to 5W40 or 10W40 oil. In practice, this allows you to somewhat compensate for the natural wear of the engine, reduce noise during engine operation, etc.
For example, if the oil in a Priora is 16 valve with mileage - synthetic with a viscosity of 5W30 and lubricant must be added in an amount of more than 150 ml. per 1 thousand km. mileage, this indicates a certain wear of the internal combustion engine. Moreover, after switching to a more viscous oil (for example, semi-synthetic oil in Priora 5W40), the overall lubricant consumption should become less, and the engine itself will run quieter and “softer”.
Instructions for replacing DDM
For safety reasons, replacement work should be carried out with the engine cooled down and wearing cloth gloves. From the tools you should prepare a key for “21”.
The procedure consists of a sequence of steps:
- First, the minus terminal from the battery is disconnected.
- For convenience, remove the air filter.
- The DDM and around it should be wiped with a rag to prevent dirt from getting inside.
- By pressing the wire block, disconnect it from the regulator.
- Using a key, loosen the sensor and unscrew it from the socket.
- We install a new device. In this case, a metal O-ring should also be installed.
- Assembly is performed in the reverse order of removal.
Oil rating
Domestic oil Lukoil 10W-40 received excellent reviews from car owners and experts. Pour it into Priora without fear - the product is of high quality and excellent characteristics. It is strongly recommended for drivers living in regions with extreme weather conditions or who are forced to constantly drive off-road.
Lukoil also has a “Lux” option. Its formula is ideal for a 16-valve car. This product has many awards and is of the highest quality.
Rosneft also produces decent Premium oil. Its use will keep the 16-valve Priora in working condition for a long time. The lubricant is suitable for both summer heat and frosty winter. She is not afraid of sudden changes in temperature. Drivers who use Premium in their cars claim that it needs to be changed less often than usual.
The most ideal choice for Priora is Motul 8100 X-cess 5W40. This product is, however, very expensive, but it is also consumed more slowly than cheaper analogues. In addition, the owner receives a guarantee that his car will serve faithfully for many years.
Electrics
Battery, Terminal, Alternator, Alternator Belt, Alternator Belt Tensioner, Alternator Brushes, Diode Bridge, Alternator Belt Roller, Overrunning Clutch, Alternator Belt Kit, Alternator Pulley, Alternator Clutch, Alternator Bearing, Starter, Bendix, Solenoid Relay, Starter Brushes, Bearing starter, Control unit, Comfort unit, Fuse block, Steering column switch, Tempomat, Sensors, Oil pressure sensor, Throttle sensor, Injector sensor, Oil level sensor, Air pressure sensor, Engine temperature sensor, Camshaft sensor, Air temperature sensor, Signal sensor, Parking sensors, Crankshaft sensor, Fan sensor, Tire pressure sensor, Fuel pressure sensor, Knock sensor, Mass air flow sensor, Rain sensor, Hall sensor, Idle speed sensor, Relay, Turn signal relay, Signal relay, Wiper relay, Buttons, Horn, Antenna , Wiring harness
Priora engine oil 16 valves
Taking into account the features discussed above, in practice the suitable Priora oil for most regions is: 5W30, 5W40 or 10W40. In a climate zone where winter temperatures are usually not lower than -25 or -30, for the Priora model with 16 valves, 5W40 oil will be the best option. If winters are colder, then you should choose 5W30. For hot summers and high loads, 10W40 seems most suitable.
In other cases, the selection is carried out taking into account the climatic characteristics of a particular region. It is also possible to change the oil according to the season, when for the summer, conditionally “summer” oil with a higher viscosity when heated is poured, while for the winter, “winter” low-viscosity oils are poured into the engine.
We also add that in addition to the air temperature, you need to take into account the year of manufacture of the car, since engine oil standards changed in 2003. For example, when using synthetics for a Priora before 2004, oil marked SL/SM is recommended, after 2004 you need to pour oil marked SM.
If we talk about manufacturers, you can choose either a domestic manufacturer of oil for the Priora engine or foreign-made products. For example, domestic oils include motor oil Lukoil 10W-40, Lukoil Lux, Rosneft Premium, etc. As for imported products, products from Shell, Liqui Moly, Motul, Mobil and a number of others are in stable demand.
At the same time, for many car enthusiasts it is important which oil is best to fill in the Priora. In fact, there is no point in using expensive “pure” synthetics
The fact is that such oils are designed for the highest loads and modes in which Priora is simply not used.
Currently reading:
Suspended propeller shaft bearing: replacement, diagnostics,…
Jul 19, 2020
Power steering oil Ford Focus 2: selection of power steering fluid and replacement
Jul 19, 2020
In other words, there is no need to pour Motul’s “sports” line of oils into Lada Priora. The engine will not get “better” from such oil, and lubrication costs will be unreasonably high. Moreover, even expensive synthetics does not mean that such oil lasts longer than others without replacement. In fact, pure synthetics must be changed according to regulations, which are the same for all motor oils (for example, 15 thousand km).
Which products to choose
Now let’s devote a few lines to what kind of oil should be chosen for the engine in the Priora. The most important thing is to always make a choice in favor of quality products. What do you need to do to buy a truly suitable and correct oil and not cause damage to your engine? The answer is obvious: contact only trusted retail outlets, read reviews from other customers. You shouldn’t chase savings so that you don’t have to pay for early repairs of cylinders, pistons or valves.
This car comes off the assembly line filled with semi-synthetic oil produced by Lukoil. But not only the products of this manufacturer are suitable for filling, but also a number of other brands, such as:
The oil must be filled with oil that is suitable for use in gasoline engines. This is a classification type A3/B3 according to the standards of the international organization ACEA. There is another important criterion - the viscosity of the lubricant. It is also very important to pay attention to it. It must be selected taking into account the conditions in which the vehicle will be operated, and this is true not only for the Priora in this case. If frosts in your region exceed 35 degrees Celsius, but there is no great heat, then it is better to use 0W-30 grade lubricant. For the temperature range -25 - +25, 10W-30 oil is suitable. In hot regions, 15W-40 products may be optimal.
Audi Q5
On the AUDI Q5, the oil level is also checked with an electronic dipstick, but here the manufacturer has gone overboard with this matter. Why? You will understand further.
Algorithm of actions:
- Turn on the ignition;
- Simultaneously activate and hold the “SETUP” and “CAR” buttons;
- Release the buttons when the hidden menu appears;
- Go to “CAR” - “Carextdevicelist” - “Oil level gauge” and activate the latter;
- Next, go to “Carmenuoperation” - “Oil level” and set the value to “5”;
- Press and hold the "Return" and "CAR" buttons to close the hidden menu;
- To reboot the system, click the buttons shown below;
- After reboot, go to “Oil level”;
- If the oil level is normal, the message “Engine oil level OK” will be displayed. It will also be visible where the level is between the MIN and MAX marks.
Toyota RAV 4, Corolla, Camry
The oil level in Toyota RAV 4, Corolla and Camry cars is checked using the algorithm described above.
Since these models do not have o and “hot” on the probes, the engine warms up, waits 5 minutes and measurements are taken. You need to focus on all the same indicators - 0.5 (middle of the probe), 2/3 and 3/4.
On Toyota RAV 4, depending on the engine model, the dipstick may be corrugated on one side or smooth on all sides. There may also be different designations - Max and Min or F and L.
The Toyota Corolla dipstick is smooth without any letter designations, there are only lower and upper marks. Measurements are carried out the same way.
On a Toyota Camry, depending on the engine model, the dipsticks can also be different, one may have the letters F and L, the other may simply have marks.
But this does not change anything; the oil level on the Toyota Camry is checked in the same way as indicated above.
Why do this?
There is an opinion among inexperienced drivers that the more oil is poured into the engine, the better, since there is no need to check it often.
But it is important to understand that if the lubricating fluid is above the upper mark of the dipstick, then its excess will enter the crankcase ventilation system, and this is dangerous for the catalyst. This can also lead to an increase in pressure in the lubrication system, and this, in turn, can adversely affect the condition of the gaskets and seals and subsequently lead to their extrusion
This can also lead to an increase in pressure in the lubrication system, and this, in turn, can adversely affect the condition of the gaskets and seals and subsequently lead to their extrusion.
Due to the low level of working fluid, air is sucked into the oil pump, i.e. some engine parts will run dry, and this will reduce the interval until the unit is overhauled.
Also, during the measurement, you can check the condition of the lubricant and replace it in time, and this is also important
Volvo XC60
Volvo XC60 cars are equipped with D3, D4, D5 engines, which can be equipped with either two types of probes at the same time, electronic and conventional, or only electronic.
For example, on the Volvo XC60 D5 205 and 2.4D 175 there are two types of dipsticks, but the usual dipstick is very small and is located at the very bottom of the engine and is difficult to reach. You need to either lift the car or drive it into a pit.
Therefore, they mainly check the oil level on the Volvo XC60 electronically and for this:
- Get into the car and close the door;
- Insert the key into the ignition;
- Press and hold the START-STOP button for a few seconds;
- The on-board computer will go into “ON” mode;
- We look under the steering switch until the oil gauge appears;
- We activate the mode and see the computer readings;
- This completes the check.