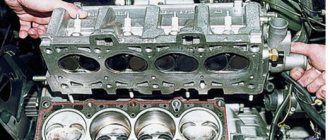
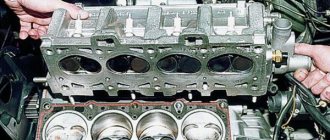
The cylinder head is a technically loaded part of a car engine; valves, camshafts, ignition elements and other parts are located here. But at the same time, she experiences constant stress during work. Therefore, any, even the most insignificant, hole or crack should be detected and corrected at the first opportunity.
Any engine repair is a costly and complex matter, but with the information we have collected, you can even repair the cylinder head yourself.
Symptoms and causes
The following describes the signs by which you can indirectly determine a crack in the block or head. Although, the described symptoms may also indicate other malfunctions.
- The engine overheats and antifreeze completely leaks out of the system. If there is no question about the tightness of the cooling system itself, in this case it is necessary to check how well the cylinder head bolts are tightened. Important: be careful, they may burst when pulling the bolts.
- Incorrect operation of the temperature control device (thermocouple), due to overheating, deformation of the cylinder head occurs.
- A malfunction of the expansion tank plug, in which the valve does not hold pressure, air pockets form.
- In warm weather, the engine temperature fluctuates. The temperature sensor needle makes sharp jumps in the direction of increasing or decreasing temperatures.
- Engine vibration or “triple”, this is especially noticeable when going uphill. As practice shows, this is one of the common symptoms of the formation of microcracks.
Important: to confirm the presence of microcracks on the cylinder block or to verify that there is a crack in the cylinder head, unscrew the spark plug.
- If the candle is wet, try the liquid on your tongue. The sweet taste means that it is antifreeze entering the oil through a microcrack. Add coolant and turn on the engine without closing the hood and expansion tank cap. If the liquid immediately begins to boil, this is a sure sign of a crack in the cylinder head.
- There is a high probability of cracks appearing near the intake valve guide or bushing. In this case, the head will have to be replaced.
- Gases escape. To determine the leak, you can put a rubber medical glove on the expansion tank or radiator neck and secure it with a rubber band. If the glove inflates, there is a problem.
It is better to use imported and silicate-free antifreeze G-11 for aluminum blocks. For cast iron cylinder blocks it is better to use standard red antifreeze. It is designed for temperatures -80 +135.
Note: cracks may appear on the upper surface of the cylinder block due to poor washing and purging of the block before assembly. As a result, dirt and liquid remain in the threaded holes for the bolts.
Repair methods
Shallow microcracks on the planes of contact between the cylinder head and the cylinder head, as well as almost all defects on the outside can be repaired. External splits can be repaired using cold or electric welding. “Cold” welding means applying a special polymer composition to the defect. Before repairing, it is necessary to thoroughly clean the area around the defect, and it is also advisable to drill the ends of the crack to remove residual stress and prevent further splitting of the part.
Removing cracks in the block and cylinder head using electric welding requires preheating the part. Aluminum parts are heated to at least 250ºС, and cylinder blocks made of heavy metals, which include cast iron, to 350-400ºС. This minimizes the risk of local deformation of the part in the welding area. Before heating and melting the defect, the crack in the cylinder head/cylinder block is cleaned with abrasive, and its ends are drilled to relieve residual stress. Using this method, you can remove not only microcracks, but also restore missing parts of the part and weld broken brackets.
Seal
Determination methods
To finally verify the formation of microcracks, there are several ways to determine defects.
- Magnets are installed on the device body or cylinder head. Metal shavings are poured on top. It begins to move towards the places where the magnets are installed, getting into the cracks.
- Apply special liquid paint to the cylinder head surface thoroughly washed with acetone or kerosene and wait 10 minutes. After this, use a clean rag to wipe off the remaining paint. Defects after this method are detected immediately.
- Liquid can be used to check integrity. To do this, you need to seal all the holes and pour water into the channel. Using a pump, we pump air into the channel at a pressure of 0.7 MPa. Leave the block in this state for several hours. The leaking water will indicate that there are defects in the block head.
In the same way, integrity is checked by immersing the block in a container of water. In this case, the bubbles will show the location of the cracks.
Locations of defects that are not worth attempting to eliminate.
- on valve seats;
- on the cylinder mirrors;
- on the plane of contact between the block and the head.
Options for diagnosing the problem
To make repairs and eliminate microcracks, you need to be completely sure that they exist. Let's look at several diagnostic options that can be done at home.
Magnetic powder diagnostics
The method is the fastest type of repair in detecting microcracks. It consists of the following: install magnets on all sides of the cylinder head. Sprinkle the cylinder head with metal shavings on top; they will begin to move towards the magnets, remaining on cracks and dents. So, it won’t be difficult to notice cracks.
Metal shavings for diagnostics
Diagnostics using liquid
To check the cylinder head for defects using this method, you will need a special coloring liquid.
- Rinse the surface of the head thoroughly; to do this, use acetone, kerosene or another type of solvent.
- Apply a special liquid to the cleaned surface and wait a few minutes.
- Then use a clean cloth to rinse off any remaining liquid. If there are defects on the cylinder head, they will be visible to the naked eye.
Pressure test
The method can be implemented in several ways: with and without immersing the cylinder head under water. Perform an immersion test:
- If you decide to carry out diagnostics by immersing the cylinder head in water, then you need to tightly close all the circuit channels of the upper part of the unit, then place it in a container and pour hot water into it.
- Then apply compressed air to the cylinder head circuit and where bubbles appear, there will be microcracks.
Pressure diagnostic equipment
The method without immersing the block in water is used to search for holes in punctured tires:
- It is necessary to tightly close all channels of the cylinder head circuit.
- After this, a soap solution should be poured onto the surface of the head cover.
- Air must be supplied to the circuit. Where a defect is found on the surface of the head, soap bubbles will appear.
Four reliable ways to repair a cracked cylinder head
Electric or gas welding.
- To begin with, holes are drilled along the edges of the crack, then the crack itself is slightly deepened and widened. This is done to improve the adhesion of the weld to the metal of the block head.
- You also first need to warm up the block head itself to a temperature (600 - 700C).
- Next, using a copper-cast iron filler material and flux, a neat seam is applied to the defect site. Note that the welding seam should rise above the surface of the head by about 1 - 1.5 millimeters.
- After completing the welding work, the block head should cool slowly in the oven. In some cases, welding is carried out without preheating, but then it is better to use direct current electric welding.
Another option is to install a patch in place of the crack. To carry out such repairs, it is better to use electric welding with copper electrodes wrapped in tin. After performing such work, the welding seam must be cleaned and coated with epoxy paste.
Using epoxy resin.
- The crack and the surface in the immediate vicinity of it are thoroughly cleaned, preferably to a shine.
- Next, again, holes are drilled along the edges of the crack (diameter 3 - 5 mm). They are threaded and aluminum or copper plugs are screwed in (flush).
- After this, the crack itself must be processed to a depth of ¾ of the wall thickness and at an angle of 70 - 90 degrees.
- Notches must be applied to the surface of the crack; this is done to give it a certain roughness.
- After this, all that remains is to thoroughly degrease the entire surface and apply a layer of epoxy paste. The paste (resin) itself must be applied with a spatula in about three layers.
The thickness of each applied layer is 2 mm. Hardening of the applied layers occurs within 24 hours. If the surface of the head is subjected to intense drying or heating, the resin will harden within three to four hours. Finally, the applied layer of epoxy resin must be sanded with a grinder or a regular file.
Epoxy resin (paste) and fiberglass.
- The preparatory work for this method is similar to the previous paragraph.
- And the principle of applying the paste is also similar, but in this case, after applying each layer of resin, a patch of fiberglass is installed, which must be rolled with a roller.
- It is worth considering that from the edge of the patch to the extreme point of the crack there must be at least 20
millimeters. In total, you can apply from two to eight such layers. The final layer must be covered with resin and cleaned with a grinder or a standard flat file.
Use of pins.
- Holes with a diameter of 4–5 millimeters are drilled at the edges of the crack.
- Next, more holes are drilled throughout the entire crack, the step between them should be within 7 - 8 millimeters.
- All holes are threaded.
- Next, copper rods are screwed into the prepared holes, the tops of which are necessarily trimmed, but not completely, but so that the tips remain on top at a height of 1.5 - 2 mm.
- The next step is to drill new holes along the crack so that they necessarily overlap the existing holes.
As a result, you should have a continuous strip of rods. The last step is to hammer the copper tops of the rods, this way you create a continuous copper seam. For greater reliability, the finished seam is coated with epoxy resin.
After completing all the work, the head must be pressure tested. Please note that all work must be performed by professionals or people who know how to handle materials and tools, and also understand the complexity and seriousness of such repair work.
Repairing cracks using welding
It should be noted that splits must be eliminated in strict accordance with all recommendations. Residual mechanical stresses in the weld area can lead to damage to its integrity and the need for repeated repairs.
A cast iron block is repaired by drilling out the ends of the crack and then grinding the entire length of the split at a 90-degree angle. Drilling is necessary to prevent further spread. As for welding, at the initial stage the cylinder block is heated to 650 degrees Celsius. After this, a continuous seam is applied using a cast iron-copper rod and flux. The final stage is the gradual cooling of the part, which requires a special heating cabinet.
In order not to warm up the block, you can use electric welding and copper electrodes in a tin wrapper. Upon completion, the surface of the resulting seam is degreased with acetone and an additional layer of epoxy paste is applied with a special spatula. Epoxy hardens within 24 hours at room temperature and about 2 hours when heated to 100 degrees Celsius. The final stage will be sanding the treated seam.
DIY repair
- Drill out the cracks with a drill so that they do not go further and begin to grow during work. Sand.
- We heat the block to 600-650 degrees. For embedding, we use a filler rod made of a cast-iron-copper alloy, 5 mm in diameter, and flux. Protect the seam from oxidation using borax.
- There should be an even layer on the surface of the engine block with a protrusion of no more than 2 mm. After this, cool the block in a heating cabinet.
Arc welding
In this case, heating the block is not required. Electronic wire is used as a filler material. Argon is used as a welding medium. Do not allow overheating above 60 degrees.
Heat the head to a temperature of 200 degrees. We use an acetylene torch for this. Sealing is carried out using direct current. The diameter of the electrode is selected depending on the width and thickness of the wall.
Application of epoxy paste
Cut the crack by grinding and drill the ends of the cracks with a drill with a diameter of no more than 85 mm. Place copper plugs into the holes. We make a notch along the outlines of the cracks to create an artificial roughness.
We degrease the surface using acetone and heat it with an infrared lamp to a temperature of 80 degrees. Apply epoxy paste to the fracture in the following sequence:
- 1 layer 1 mm,
- the second 2-3 mm,
- third 3-4 mm.
Conclusions: repair or purchase
Welding is considered the most effective method. To do this, you will need a special material whose composition is similar to that used in the manufacture of the assembly. Repairs are made using argon welding or a gas torch. After the procedure is completed, the seam is cleaned, milled, and polished. Next, a control check is carried out.
This method is quite effective. However, special welding is required by an experienced craftsman. Therefore, repairs will not be cheap. But a new cylinder head, especially for foreign cars, costs a lot. As an option, you can purchase a contract part: it is removed from a used car that, for one reason or another, is not suitable for further use. In this case, you can be sure that you are installing an original part and not a counterfeit one.
DIY elimination
A crack in the engine block head is a serious problem that can be eliminated, at best, by expensive repairs, and at worst, by overhauling or replacing the engine. Mostly, cracks in the head appear as a result of overheating, freezing of the coolant, or after third-party mechanical impact.
The first signs of a crack in the head:
- — decreasing the liquid level in the expansion tank;
- — oil traces on the surface of the coolant in the tank;
- — bubbles in the expansion tank;
- — air jams;
- — problems with the coolant temperature (critical heating or vice versa).
A microcrack in the engine block is no longer a problem
The engine is the iron heart of every vehicle. If any of its components fails, there is a high probability of complete failure of the entire unit.
Especially when we are talking about such severe damage, such as deformation of the cylinder head or block. If you do not eliminate them in a timely manner, you will have to do a major overhaul of the engine.
Note that cracks in these components are among the most complex faults. They usually occur after a traffic accident with a high level of wear of parts or manufacturing defects.
Finding a Crack
Diagnosing such a malfunction is very simple, all the signs are “on the surface,” but finding the crack itself is extremely difficult, and sometimes even impossible. Sometimes even experienced mechanics can tinker with an engine for many hours before finding where a crack appears.
Next, we will try to list the places where cracks most often appear in the cylinder head.
- In the gaps between the valves. Such a crack is visible to the naked eye; it clearly passes between the seats of adjacent valves.
- Between the spark plug and the valve. A similar situation - the crack is clearly visible and there is no need to look for it.
- From the valve location to the prechamber (on diesel engines). This crack is also visible.
- Crack under the prechamber. It is very difficult, and sometimes even impossible, to notice such a defect.
- Directly below the valve guides. An unpleasant defect is rare and invisible. Firstly, such a crack is covered by the valve guide, and secondly, it is always dark in the channel and it is very difficult to illuminate there.
We are done with the diagnostics, and then we propose to understand the methods for eliminating such a serious defect as a crack in the cylinder head.
https://autoremka.ru/vaz/samostoyatelnaya-diagnostika-i-ustranenie-treshhin-v-gbts-dvigatelya.html
How to find a crack
The following methods are used to identify cracks:
- ultrasonic detection method;
- use of magnetically sensitive equipment;
- pneumatic crimping method;
- searching for cracks using hydraulic control;
In practice, crack detection in many car repair shops is carried out by pumping air or water into the faulty engine element. In the case of air, the part is additionally immersed in a bath and defects are found by bubbles. If water is pumped into the element, then the need for immersion is eliminated, since cracks are diagnosed by liquid seepage.
To determine the exact boundaries of the crack, a pair of magnets are attached to both sides of the split, and the space between the magnets is filled with special conductive filings. The presence of a crack will cause the magnetic field lines to break, causing sawdust to partially cluster on the crack surface. This method allows you to clearly identify a crack in the cylinder block or cylinder head.
How to check the cylinder head
The defects that most quickly appear on the cylinder head are the smallest cracks. Their appearance does not have the best effect on the operation of the cylinder block, and therefore the engine as a whole. What signs indicate the appearance of damage to the head, how to check the cylinder head - we will find out in this article.
Signs of the appearance of microcracks on the BC head are as follows:
- Vibration or so-called engine tripping when the car goes uphill. This phenomenon may be a consequence of the appearance of microcracks. If coolant gets into the cylinder block, it will definitely be on the spark plugs.
- Just unscrew one of the spark plugs; if its electrode is wet, taste the liquid. If it is antifreeze or antifreeze, then the taste will be slightly sweet, and this will indicate that antifreeze enters the cylinder block through microcracks in its head.
- Foaming of the engine oil should also lead to suspicions of microcracks, so check the cylinder head head. Engine oil foams due to antifreeze (antifreeze) getting into it. At the same time, the coolant level in the tank is constantly decreasing and requires replenishment to a normal level, and an oil film forms on the surface of the antifreeze in the tank.
- The engine also reacts to this, in warm weather - either by dropping the temperature or by increasing it.
- Antifreeze is boiling. To determine if the cylinder head is faulty, you need to open the expansion tank, add the required amount of antifreeze and start the engine. If the coolant boils almost immediately, then the cylinder head is not working properly.
- Engine oil drains too quickly. If a crack in the BC head has formed near the intake valve, then when the engine is running, oil will constantly be drawn into the cylinder.
- If antifreeze, rather than oil, is drawn through the intake valve, the cylinder pistons will become perfectly clean - you can check this by unscrewing the spark plugs.
This is the fastest and easiest option for checking the cylinder head. Magnets are installed along the entire plane of the head, and the head itself is sprinkled with metal shavings. The chips begin to move towards the magnets, getting stuck in cracks and small depressions and thus making them obvious to the eye.
Checking with a special liquid
- Wash the head surface with any solvent.
- Apply a special liquid to the washed surface and let it stand for several minutes.
- As soon as you remove the remaining liquid with a dry cloth, any defects on the head will appear.
Pressure test
You can pressure check the cylinder head by immersing it under water or without immersing it.
Submerging underwater:
- Before immersion in water, all head channels must be closed. Then put the cylinder head in a container and fill it with hot water.
- Apply compressed air to the head circuit. If there are tiny cracks somewhere, then bubbles will appear in this place.
Without immersing in water:
- Just as in the first case, close the channels of the head contour.
- Prepare a soap solution and then pour it onto the head cover.
- Apply compressed air to the circuit. Microcracks in the cylinder head can be detected by soap bubbles.
Testing with water
- Close all head openings tightly.
- Pour a large amount of water into the channel.
- Raise the pressure in the channel to 0.7 MPa by pumping air into it.
- Leave the cylinder head for several hours. If, after this time, the water leaves the head completely, then there are cracks in the part.
https://mob.autoinfa.com/post.php?id=509
Signs of cracks in the cylinder head
In most cases, wear on the motor occurs in its upper part, that is, on the head. There are many reasons that influence the failure of a unit. It is common for the engine to overheat when antifreeze completely leaks from the cooling system. This occurs as a result of incorrect tightening of the cylinder head pins. This and improper operation of the temperature control device can cause deformation of the cylinder head plane.
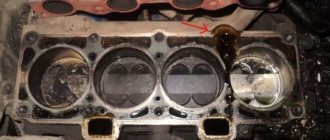
The arrow indicates a surface defect
Let's consider the signs and symptoms that indicate the appearance of cracks on the cylinder head and the need to repair the unit:
- The engine fluid foams and bubbles appear in it. If there is a crack in the head, coolant may leak into the oil. In this case, antifreeze will leave the expansion tank for an unknown reason. If you need to constantly add refrigerant to the system, this should alert the owner of the car. In this case, an oil film will form in the antifreeze expansion tank - this is an accurate symptom of the appearance of a microcrack in the engine head. With such a malfunction in warm weather, the engine temperature will either fall or rise. This symptom is not common, but if you notice that the arrow on the temperature sensor drops and then rises again, then this should alert you.
- Engine tripping. The internal combustion engine vibrates a lot, especially when driving uphill. This symptom is a consequence of the formation of a microcrack. If antifreeze gets into it and the oil is not foamy, then there is another way to determine the malfunction. To do this, you need to dismantle the candle and look at it: if there is liquid on the candle, then wipe it off with your finger and apply it to your tongue. Any antifreeze has a sweetish taste. If this is the case, then a crack has formed on the head of your car.
Defect on the cylinder head
- Engine fluid runs out and needs to be topped up constantly. In this case, it will not be possible to identify the crack using antifreeze. If a gap appears near the intake valve guide, then when the engine is running, oil will be drawn into the cylinder. If coolant gets into the intake valve, then during a long drive it will literally wash the pistons to perfect cleanliness. This is easy to check: unscrew the spark plugs and look at the condition of the pistons.
- Coolant boiling. If you notice that the antifreeze is constantly boiling, open the hood and the expansion tank cap. Add as much fluid as you need and start the engine. If the antifreeze immediately starts to boil, then there should be no doubt about a malfunction.
Diagnostics and methods of repairing damage
Such an unpleasant concept as “crack” probably has a negative meaning in any case, be it figurative or direct, cracks are always bad. The appearance of cracks in the cylinder head (cylinder head) does not bode well for the owner, at best an expensive repair, at worst a major overhaul or complete replacement of the engine.
Causes of cracks in the cylinder head
Most often, cracks in the cylinder head appear as a result of mechanical damage, overheating or due to freezing of the coolant in the cooling system.
Signs of cracks in the cylinder head:
- Gradual decrease in the level of coolant (coolant) in the system;
- Bubbles in the expansion tank of the cooling system;
- Oil in antifreeze or vice versa;
- The appearance of an air lock;
- Constant problems with coolant temperature (sometimes too high, sometimes vice versa).
How to find a crack in the cylinder head?
Despite the above signs, finding the crack itself can be quite difficult, and sometimes even impossible. Even an experienced “motor mechanic” can spend a very long time looking for the place where a crack has formed. The thing is that cracks appear in different places on different engines.
We list the main places where cracks appear in the cylinder head.
- Between the valves. As a rule, a crack is immediately visible; it passes under the seats of two adjacent valves.
- Between valve and spark plug. The situation is similar, and the crack itself is immediately visible, you don’t have to look for it.
- On diesel engines, a crack can easily form at the location of the valve and go towards the prechamber. Again, finding this crack won't take much time or effort. However, if a crack in the cylinder head forms under the prechamber, it is unlikely to be visible.
- Under the valve guide. This place is also one of the unpleasant ones from the point of view of detection. First, the channel is quite dark, second, the crack is covered with a guide bushing. In such a situation, a special approach and diagnosis are required.
Causes
Identifying a microcrack in a cylinder head is not easy. Before diagnosing problems, we recommend understanding the reasons why the cylinder head may crack.
Exceeding the permissible temperature difference
Often, cracks and defects in the cylinder head appear as a result of disruption of the combustion process of the air-fuel mixture in the chamber. This may occur due to incorrect operation of the fuel component or incorrectly installed ignition. Such problems will lead to an increase in engine temperature by 200 degrees or more compared to standard. As a result, microcracks will appear on the thinnest walls of the block head. We are talking about holes for nozzles, nozzle cups, etc.
“Man-made” mechanical impact
In a cylinder head 406 or another cylinder head, the problem may be due to mechanical stress. For example, the mounting hole for the valve seat will rupture in a place next to the injector seat. This occurs as a result of overtightening the nozzle itself. In this place, the thickness of the metal of the head is no more than 2 mm. It is possible to identify such microcracks, but repairing them is usually impractical.
Problems of this kind can be avoided by taking into account the following nuances:
- Before installation, new washers should be heated on a stove or over gas. The parts are heated until they turn blue, after which they are lowered into cold water and cooled. These actions ensure the softness of the washers.
- Copper washers and other types of seals previously used should not be placed under the nozzles.
- Before installing new washers, their condition should be checked using a magnet. There is a possibility of purchasing copper-plated parts.
- After taking these points into account, the injector can be tightened, but it is important to comply with the regulations established by the automobile manufacturer. If these steps do not help to achieve tightness, it is recommended to contact a specialist.
The appearance of microcracks in the cylinder head of a VAZ car or other car is often caused by the installation of guide bushings in thin-walled heads. When installing, you must carefully check the dimensions of the outer diameter of the bushing, as well as the dimensions of the hole for its fixation. The installation technology must not be violated - bushings cooled in liquid nitrogen are pressed into the heated block head. If this rule is not followed, it will lead to radial defects from the outer diameter of the guide bushing.
Factory defects
The need to determine damage to the block head arises due to defects during production. The cylinder head itself has a complex configuration, and its walls are characterized by different thicknesses. During manufacturing, errors may be made that will lead to failure of metal in certain places and disruption of its structure. As a result, this leads to the appearance of small voids and an increased rate of rust formation in them. During subsequent operation, the surface of the water jacket and the combustion chamber will be connected, or cracks will occur due to serious weakening in thin areas.
If the metal structure is damaged, the intermolecular bonds of the cylinder head will be greatly weakened. This will cause the material to become more brittle, leading to defects. In practice, faults of this type are usually found in the jumpers between the holes for seats and injectors. Cracks appear in the channels located behind the valves.
A video about damage to the block head was published by the YouTube channel.
Symptoms and signs of cracks
Cracks can appear in different places, hence different consequences. Basically, there is an opinion that when the head is broken, white smoke comes out of the exhaust pipe, but this is only one special case. A crack in the head can occur between different channels, and accordingly, the signs of a crack in the cylinder head will be different.
Next, we will consider some cases of cracks between the cooling system and other engine systems.
- Oil system - when oil and antifreeze are mixed in the engine, instead of oil, an emulsion appears, a whitish foam, like biscuit dough, and an oil film forms in the expansion tank of the cooling system.
- Intake channel - if coolant starts to get into it, then first of all it will wash the pistons to a shine, you can look through the spark plug hole - the pistons will be like new. And when it gets into the combustion chamber, this is exactly the case when white smoke may come out of the exhaust pipe, although it is not a fact that it will come.
- With an exhaust channel - here the coolant will simply fly out into the pipe in the form of steam. The engine is constantly releasing steam and it is unlikely that you will notice anything in this case; the liquid will simply leave the tank. Most likely, there will not even be a smell of exhaust gases in the tank.
- With a combustion chamber , some of the liquid will go through the crack into the combustion chamber, but a very small amount, all due to the pressure difference.
Liner defects in the engine cylinder block: wear, broken collar, cracks
Damage to the piston group of a car engine is an extremely unpleasant problem, the solution of which quite often requires major repairs. One of the components that can be damaged in this group is the cylinder liner. It constantly operates in an aggressive temperature environment due to fuel detonation, which, if the slightest defect occurs, will lead to its failure. In this article, we will look at what problems can occur with the cylinder liner, and how they can be prevented and eliminated.
Contents: 1. Common defects of the cylinder block liner 2. Wear of the outer surface of the cylinder block liner 3. Cracks in the cylinder block liner 4. Fracture of the cylinder block liner collar 5. Damage to the cylinder block liner mirror
There are 4 main defects inherent in the cylinder block liner of the piston group:
- Increased wear on the outer surface of the part;
- The appearance of cracks in the liner area;
- Fracture (or other mechanical damage) of the cylinder liner flange;
- Damage to the mirror (inner surface) of the sleeve.
Each of these defects leads to problems in engine operation and potential failure.
Wear of the outer surface of the cylinder block liner
Perhaps the most common problem with this part of all those mentioned above. During operation, almost the entire outer area of the cylinder block liner comes into contact with the coolant. This causes the cavitation process to occur, which occurs due to the formation of small bubbles in the liquid, which “explode” at the surface of the liner when it vibrates. This causes wear on the outer surface of the cylinder liner.
This situation is dangerous because the slightest damage to the outer surface of the part can lead to the formation of corrosion in microcracks. Over time, these cracks grow and the liner cannot fully contain the coolant. Through it, the liquid enters the engine crankcase, and an emulsion forms in the engine oil.
It is possible to eliminate wear on the outer surface of the cylinder block liner by removing the part and applying polymer composites to areas with cracks. But it is worth noting that such repairs are not always economically feasible, since this work is quite labor-intensive, and the effect of such actions is low, and after some time the sleeve will have to be replaced.
To reduce wear on the outer area of the liner, it is recommended to use high-quality coolants that are recommended by manufacturers for a specific motor.
Cracks in the cylinder liner
The problem discussed above causes the formation of microcracks on the surface of the liner. But more serious damage may occur on the part if the motor is operated in an aggressive mode or in violation of operating rules. For example, the formation of cracks on the liner will lead to:
- Using low-quality fuel or fuel that is not recommended by the engine manufacturer;
- Aggressive start at high speeds;
- Frequent vehicle movement at high speeds;
- Driving on a cold engine;
- Using low quality motor oil;
- Poorly performed repair work related to the engine.
In addition to factors that depend on the driver of the car, it is also worth noting that the formation of cracks in liners is possible due to a manufacturing defect.
There are a number of symptoms that indicate the presence of cracks in the cylinder liners:
- Reduced car engine power;
- Formation of an emulsion in the engine oil and expansion tank;
- Incorrect temperature conditions in the absence of problems with the thermostat;
- The smell of exhaust gases from the expansion tank.
If the listed symptoms occur, it is recommended to stop using such a car and go to a service station, where specialists can carry out diagnostics and determine the presence or absence of cracks on the liners.
To diagnose cracks in the cylinder block liner, the following methods are used:
- X-ray - examination of the engine using special equipment;
- The introduction of coloring chemical solutions to detect the presence of cracks.
If cracks have formed in the cylinder block liner, it cannot be repaired and the part will need to be replaced.
Broken cylinder liner collar
Inside the cylinder block of a car engine there is a small rounded recess that secures the liner in this block. This recess is usually called the “shoulder saddle”. If the seat is damaged, the sleeve will no longer fit entirely over the seat area.
Please note: The cylinder head gasket is located on top of the cylinder block. It must fit as tightly as possible to the top of the bead seat. The maximum force on the shoulder seat is transmitted through the bolts and gasket, and when bolting the gasket, it is necessary to exclude the possibility of its horizontal movement.
A fracture of the cylinder liner collar can occur for a number of reasons:
- Incorrect parts selected. For example, the height and size of the cylinder head gasket does not correspond to the required dimensions;
- Ingress of debris. If there is high-hard debris between the cylinder block liner and the collar, for example, pieces of an old gasket or sand, this will cause the collar to break;
- Distortion in the area of the sleeve collar seat;
- Incorrectly carried out repair or restoration work on the cylinder block liner.
Service station specialists, when assembling the engine after a major overhaul or in other cases, must follow strict rules that will avoid breaking the collar:
- Prevent the entry of various debris, that is, carry out work on a clean surface;
- Select the correct cylinder head gasket, based on the engine manufacturer’s recommendations;
- Select the correct rings to be installed under the sleeves. In this case, you need to check them for defects before installation;
- Refer to the information in the vehicle maintenance book when tightening the cylinder head bolts.
If damage to the cylinder head collar occurs, it is possible to eliminate the problem with a defective liner by welding the metal, but most often it is advisable to replace the liner.
Damage to the cylinder liner mirror
Various types of defects can also occur inside the cylinder block liner. Most often, this is the formation of scratches and scuffs, which reduce the tightness of the piston rings, which leads to a decrease in engine compression.
Most often, this problem occurs on cars that regularly drive on dusty roads, especially if a low-quality air filter is installed. Foreign objects can also get inside the cylinder block liner through a leaky connection of air ducts or with various liquids - fuel, engine oil.
To restore the smoothness of the cylinder liner mirror, the chrome plating method is used. If the damage is extensive, the liner will need to be replaced.
(121 votes, average: 4.42 out of 5)
Typical crack locations
Automakers allow cracks to form in the head, and this will not be considered a malfunction, since the crack will be shallow and it will not connect two containers. In VW diesel engines, a head with a crack between the valves is allowed to be used.
But finding all the cracks is a problematic task even for an experienced mechanic. It would seem that cracks should form in the same places on the same engines. But this does not make the search any easier. There are places that can be detected with one glance at the head:
- - between the valves - the crack is immediately visible, passes under the seats of two adjacent valves.
- - between the spark plug and the valve - the same situation, again, everything is in sight and you don’t need to look anywhere
- — in a diesel engine, a crack can go from the valve towards the prechamber , such a crack is easy to notice, but how can you see it if it forms under the prechamber and does not come out?
- — under the valve guide is another sweet spot where the crack is not visible, firstly, it’s already dark in the channel, and secondly, the crack is covered by the guide bushing.
This requires a different approach, not just a visual one. And what is the use of detecting a crack between the valves if gases do not escape through it? Let’s not rely on chance, especially since the diagnostic method was invented a long time ago and has proven itself to be the best.
A crack in the block or complete disappointment - logbook Lada 2108 1.5i Grean 2001 on DRIVE2
Previously, I already wrote about the fact that I capitalized the head, and in this blog I will tell you how the story about its installation ended in more detail.
In general, we installed the cylinder head, changed all the pipes, sealed everything, installed new gaskets everywhere. Let's start it up.
Does not start.
We check all sensors. All is good. We unscrew the spark plugs, they are dry)) The thought immediately appeared that the fuel lines were mixed up. We swapped the lines. Let's start it up.
He barely grasps it.
We check whether we have set the marks correctly... Everything is fine! But it won’t start! What is the reason?
We measured the compression. All cylinders have 11 atmospheres with the throttle closed. Everything seems ok! Let's start it up.
Does not start.
We look into the expander. And soooo gases come out and it smells like gasoline.
Only one thought comes to mind. Since the head was pressed and pulled through with a torque wrench, there is probably a crack in the cylinder block...
If anyone has other suggestions, write in the comments, I’ll be looking forward to your options!)) And so I’m probably waiting for an engine replacement...
Mileage: 67000 km
Checking the cylinder head
To check the cylinder head for cracks, it must be pressurized, that is, all holes must be hermetically sealed, and air must be blown into the channels. If you put the head in water, bubbles will come out of the crack. Or vice versa - plug all the holes and pour water into the channel, then pump air into it with a pump, creating a pressure of 0.6-0.7 MPa, and let the head stand for 1=2 hours.
If the water goes away, it means the head is broken.
There are also dyes that are used to tint water. They are very clearly visible on the crack. And the holes in the cooling jacket are closed very easily: a rubber gasket, which is slightly larger than the hole, is placed on the nick, a metal plate is placed on top, which is screwed to the head.
And no water will pass like that.
And a pump is connected to the fitting that will protrude from the head and air is pumped in. This type of crimping allows you to identify all cracks.
Water test
This method is similar to the previous one. The whole difference between them is that you don’t need to lower the head with water, but quite the opposite - you need to pour it into the head:
- Check all the holes for leaks.
- Then pour the channel into the water.
- Next, using a pump, pump air into the channel.
- Leave the part to be treated for several hours. If you notice that the water has gone, it means there is a problem with the head and it needs to be changed or, at best, repaired (which will be cheaper, but... will not guarantee the longevity of this component).
We repair damage ourselves
The only way to properly seal a crack is by welding.
No adhesive composition can properly seal a crack in the heads.
When heated to operating temperatures, the head will expand and the crack will become larger, that is, a composition is needed to seal the crack, which would have the same linear temperature expansion as the head material, and also be resistant to other loads. All this can only be achieved by welding.
Part preparation
Before welding, the crack must be cut; to do this, the metal is drilled out along the entire length of the crack using a milling machine. The groove should be quite deep, 6-8 mm in depth and approximately the same in width; it is advisable to make it wedge-shaped in shape. This will help to better weld the metal.
To cut a crack between the saddles, you first need to remove the saddles, and only then cut the crack. After cutting the cracks, the head must be heated to a temperature of 200-250°C, but not higher, so that the head does not lead.
Heating allows you to reduce the stress in the metal that occurs during welding. For heating, it is best to use an acetylene torch or oven, but you cannot use a blowtorch, because it can easily overheat the cylinder head.
Welding work
Gas welding using filler material can be used to weld the cylinder head, but argon arc welding (TIG) gives better results. A ground is connected to the head, and the arc burns in an argon environment between the tungsten electrode and the head, where the aluminum filler wire is inserted.
After welding, the seam must be cleaned, pressed again, and if all is well, then the surface adjacent to the block must be milled so that it is perfectly flat.
https://kakavto.com/?p=1496
Welding the patch
To perform this operation, you need to select a piece of metal that matches the size of the crack. Next you need to weld the selected material. The next stage is grinding and coating the treated area with a special paste.
Well, now you know what a cracked cylinder head is, as well as how to deal with this problem. In any case, it is better to prevent a breakdown than to fight it.
Source
Microcracks
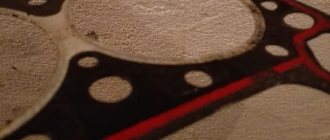
A microcrack in the cylinder is probably the biggest headache for both the car owner and the mechanic he contacts. The whole point is that it cannot be seen visually, but the symptoms are that the gasket under the head is starting to burn out.
I have come across such engines several times. But there can also be a microcrack in the head. The sign of a microcrack in the cylinder and head is the same as the beginning of burnout of the gasket under the head.
- A guy drove up in a VAZ-2106 and said the car was boiling all the time, he waited a little until the engine stopped boiling, opened the radiator cap and added coolant to the radiator, started the engine at idle.
- I started looking into the radiator, I saw how bubbles were coming out of the radiator (but if you added liquid to the radiator, then usually several bubbles pop up at once, but they quickly stop), in front-wheel drive cars the reservoir into which coolant is poured begins to swell and bubbles also appear.
- If the gasket under the head is badly burned, then the liquid goes into the cylinder, through the piston the liquid seeps into the engine block and enters the oil, a sign that the oil becomes the color of a white emulsion and increases in volume.
I immediately determined that the gasket was starting to burn out, I removed the head and the gasket was new (very fresh) and there was no hint of burnout, I asked if they had already changed the gasket, he said two days ago he bought the head second hand, they replaced it and it has been boiling ever since.
I asked if it was boiling on the old head before, he said, no, it was boiling, but it was leaking due to a burnt-out valve, I decided to buy this head, especially since they offered it inexpensively so that I wouldn’t have to worry about it.
I say, you have two options, buy another head, or bring the old one, I’ll fix it, he decided to repair the old one (the head was really badly damaged, I had to change all the valves and valve guides).
- I installed the repaired head and the boiling stopped.
- But what’s funny is that after a while another guy drove up to me in a VAZ-2107 and also complained that the engine was boiling, opened the hood and recognized the head that was causing the six to boil (there was a spot of red paint on it, that’s why I remembered it).
- I asked him, he changed the head a long time ago, he said, the other day. I told him the story of this head. Visually, I never found a microcrack in this head, and I still couldn’t figure out where it was.
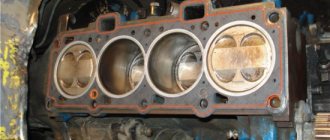
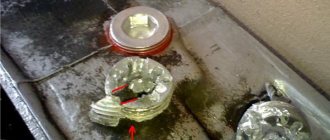
- Most often, a microcrack in the head occurs as shown in the photo, and most often in my practice it occurs in the second or third cylinder. The photo shows in red the location of the microcrack. It’s easier to find a microcrack this way: clean off the carbon deposits with a knife in the place where the crack is shown, and it will appear.
And once I came across a head with two microcracks at once, it is in the photo and the cracks are shown by arrows, I found them right away, I just had to remove the carbon deposits with a knife.
The sign of these microcracks in this Niva was this: the second and third cylinders were tripped, at low speeds, the antifreeze escaped and flew out through the muffler, bubbles also entered the radiator, but the antifreeze did not go into the oil.
Maybe because this engine has a very good piston group, but if the piston group were bad, then antifreeze would penetrate into the block. It remains a mystery why the antifreeze did not penetrate into the oil through the pistons; I think very little of it entered the cylinders, mainly the pressure forced the air into the head and completely sucked drops into the cylinders.
Restoration of blocks and heads. Bend, wear and cracks
Restoring the engine... A seemingly simple procedure. I unscrewed the liner caps, took out the pistons, and checked the diameters and surfaces. I changed the rings, or at least the same liners, plus bored out the cylinders, switching to repair sizes if necessary. As a rule, for the average person, engine repair looks like this. In reality, and often, restoring an engine involves more than just these relatively simple operations. We do not mean the sleeving of blocks that we talked about. Instrumental processing of them and their heads is required, sometimes non-trivial solutions that can bring a worn-out engine back to life. Without pretending to be a definitive analysis (after all, even in this area there is a certain pluralism of opinions), we will present the view of a person who has been engaged in such restoration of “hardware” for many years. He has a wealth of experience and his own point of view.
Typically, such structures do not strive to loudly declare themselves, to convey information to the end consumer - there is no street advertising, no promotions or discounts that can interest the client. Not even a flashy building in a busy area of the city, a beautiful room, a rest room for visitors. Only harsh industrial reality - industrial workshops with concrete floors and machine tools. In our case - exclusively imported, with software. Plus a website and, of course, a must - connection with services from where blocks and heads come for repairs, as well as work with enterprises that have a fleet of trucks or special equipment. After all, it is from the latter that the main flow of parts for processing comes from. But we are certainly interested in passenger engines.
In general, more than one such “production” can be found in regional or regional centers. What can I say, we learned how to restore blocks and cylinder head. True, it is not the same everywhere. For example, my interlocutor, when asked whether they will take on the liner of all motors, directly answers - no, there are unpleasant but common exceptions. Thus, Vagov “fours” and “sixes” have extremely thin inter-cylinder bridges. And the cooling channels are connected closely to the cylinder walls themselves. When boring they open and... What to do? Is it technically difficult to put cartridge cases on glue? Or jam the channels, which can lead to overheating? In short, there is no technology yet that simultaneously ensures the tightness of the cooling system and trouble-free operation of the engine as a whole. Although work in this direction is underway. Nevertheless, a number of services will undertake this and even promise results. There is no need to delude yourself - it is possible that the engine will “be enough” for the time of selling the car, but longer...
Here is one example of a Vagov engine - 3.0 TFSI. Pay attention to the jumpers between the cylinders. However, this is a topic for another conversation
The warranty issue is also an interesting one. However, you shouldn’t hope here in any case - they almost certainly won’t give it anywhere. The fact is that division of labor is usually practiced here - some disassemble and assemble the engine, others process the blocks and heads on machines. Tying a guarantee to a specific structure is difficult.
They also refer to the practice of replacing failed engines with so-called short blocks (examples of these in the photo below) - blocks with a crankshaft and a piston, but without a sump, attachments and, most of all, without a head. As a rule, they are not guaranteed.
Finally, it is noted that automakers are now eliminating any kind of tooling of blocks and cylinder head. If there are changes in coatings or geometry, the hardware is thrown away. So we do everything without manuals, taking into account the experience already gained. But without this work it is impossible. In fact, don’t throw away such financially intensive parts just because they “have developed a curvature somewhere.”
Level up the “resting area”!
It turns out that you even need to remove the head by unscrewing the studs or bolts in a certain (reverse) sequence. After all, when mounting it on a block, we do this precisely so that the part does not move. Why should they deviate from this rule during dismantling? True, there are features associated with generations of engines. Until the early 90s, paronite gaskets under the cylinder head were almost universally used. Having a limited resource, they could compensate for some curvature of the mating surfaces obtained during repair or operation. Between 1993 and 2000, manufacturers switched to metal gaskets. With a significantly longer service life (in fact, they are designed for the entire service life of the engine), they are no longer able to fill small cavities and “level” the removed surfaces.
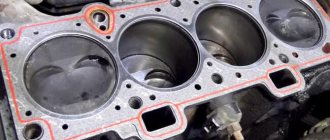
What kind of caverns? For example, traces of a gasket breakdown, when a gas stream, breaking through between two planes, gnaws out the metal. This is invisible to the eye, but can easily be determined with measuring instruments (in the photo above on the left there is blackening on the jumper between the cylinders). If the plane is not brought out, there may be further penetrations by gases or, say, seemingly causeless entry of antifreeze into the oil or vice versa. But on the mating surfaces there is also something that is visible to the naked eye - cavities from the consequences of cavitation of the coolant (photo on the right), when additives are activated in it or water is used altogether.
The last photo, of course, is a blatant case. Apparently, this is already a sentence. However, somewhere they will undertake the restoration of such cylinder heads. In light of such situations, our respondent notes that the maximum that can be removed from the mating surfaces is a few tenths of a mm. Moreover, the value applies to old gasoline engines, developed back in the 90s and having a compression ratio of up to 9.5-10:1. On modern installations, the curvature of the block and cylinder head should not exceed 0.05 mm. For diesel engines the situation is more complicated. In addition to the block and head, it is necessary to process valve seats, and in extreme cases even the ends of the pistons.
We sorted out the caverns. Why, in addition to improper installation and removal of the head, does warping of the mating surfaces occur? Due to boiling and long runs! It does not matter how many cylinders and what their arrangement the engine has. Both “opposite” and in-line “fours” with “sixes” and V-types are deformed. But, for example, it has been noticed that on Subarov EJs, when overheated, the block can move more than the head. Among modern engines, the N-series from BMW is often used for cylinder head milling. And not necessarily after boiling, gasket breakdown or with significant mileage. We can assume with a high degree of confidence - due to the extremely lightweight design and intense operating temperature conditions.
In a word, if there was overheating/burnout, the engine has a decent mileage or it was developed relatively recently - in general, in most cases - a high-quality result during repair can be ensured at least by checking all mating surfaces.
Despite the fact that there are descriptions and videos on the Internet about how to measure the “bevel” with a ruler and then polish it manually, it is better to trust specialists and machines. Only in this case will it be possible to guarantee a smooth surface. In the photo on the right you can see the newly formed mating plane and the remains of the old one - another pass of the cutter is needed.
Bed matters
A curious thing is that the block and head are ordinary blanks, no matter whether they are made of cast iron or aluminum, albeit with a precise internal organization of channels and calculated in terms of rigidity. And how they can suffer! Seizures in the cylinders! Warping and wear of mating surfaces! And that is not all. The crankshaft and camshaft beds are those parts of the block and cylinder head that often become victims of the owner’s negligence and the unprofessionalism of the craftsmen.
The beds of the heads, by the way, lead together with the “resting places”. Usually by 30–50% of the latter. This is also possible with blocks, but in exceptional cases. Once a 2JZ-GTE of a well-known drifter in the country came in for repairs. So it was necessary to remove both the mating surface and the crankshaft bed. But there were 800 or more “horses”. With such a boost, multiplied by races that are not short, like, say, in drag, such a result is probably natural. Of the serial engines, the Mitsubishi 4D56 in versions before the use of common rail suffered from the same thing over long runs. Moreover, there the crankshaft bed was bent so much that the crankshaft itself broke. They installed a new one and after a while everything repeated itself. In the mid-2000s, with the advent of a new fuel system, the unit was strengthened, and the breakdowns stopped. And for Minsk diesel engines D240 and D245 (installed on many GAZ models), the crankshaft bed is often crooked from the factory.
To be fair, we note that more often than not, shaft beds are damaged not as a result of tuning or as a result of design miscalculations, but from oil starvation, critical temperature conditions and non-compliance with tightening torques.
Wear of the camshaft bed during oil starvation is not very common, but it does occur. If you don’t keep track of the level/quality of lubrication, the bed is one of the first to suffer. In addition, it is subject to natural wear and tear - on fairly similar engines. There are different restoration options: making bushings (pictured), welding, spraying, moving the camshaft axis. All these methods require boring the bed to a nominal diameter.
The crankshaft bed, in addition to oil starvation, often suffers just during engine assembly.
One example of an engine with a solid crankshaft bed is the Mitsubishi 6G74 (top left). And it is often deformed! Repairs are made by installing inlays and boring to a standard size. Here, as in the case of the cylinder head, it is very important to maintain a minimum deviation from the previous shaft axis. Otherwise, if there is a discrepancy of just a few tenths of a mm, problems with the timing gears, crankshaft seals, and the connection between the shaft and gearbox are possible.
There is another option for restoring beds - various types of material spraying: gas-dynamic, plasma, detonation.
The most popular process of gas-dynamic spraying (in this case, using the example of a worn main liner cover) consists of applying a layer of metal powder to the part, which is accelerated by an air flow to enormous speed and binds to it when it hits the surface. Then surface treatment and... My interlocutor admits that he does not provide such a service. Because it is dirty for the premises, harmful for employees and it is not always possible to obtain the original surface quality and its hardness.
Let us add on our own that gas-dynamic spraying (the video below shows how this happens) is a fairly popular technology for restoring various parts. True, in a number of cases regarding sliding surfaces, manufacturers themselves or equipment suppliers note that it can be restored, but the wear resistance of the coating will be lower than in the factory version.
Welded passions
Alas, it happens that the machine industry is powerless to eliminate the consequences of operation. Which? For example, damage to combustion chambers. Cracks in the bridges between valves caused by overheating or mechanical damage. Deep cavities from the same cavitation. It doesn’t matter if the engine is old and common. You can find the head separately, or purchase the entire contract one. What if it’s rare, exclusive? Finally, just modern ones, for which buying a used unit is a dubious option?
There is an exit. The country has been welding cracks in heads for a long time. At some time, they began to restore combustion chambers, mating surfaces and walls between the cylinders by welding. Services specializing in such operations note that in order to obtain a high-quality result, before welding/surfacing it is necessary to heat the entire part, and also use filler material whose composition matches the material of the cylinder head or block.
In “our” structure we agree with the nuances of such specific welding work. And yet they doubt the final result. How to choose a filler material so that it completely matches the alloy of the block or head (and not just aluminum to aluminum)? Tungsten electrodes, which are used in argon arc welding, leave behind small cavities or inclusions, which are then difficult to process. The situation is the same with welding cracks in the heads. Some people do it, but the results are usually short-lived. What can we say about cracks in the cylinder walls. As mentioned above, modern engines are not always properly lined. And here is such a complex thermal process. What is the chance that even when heated to a temperature close to the “welding” temperature, the block will retain its geometry and tightness during the process?
“Knee”... about the knee
People here are also quite skeptical about the restoration of crankshafts. More precisely, they could tackle this at the proper technical level (purchase expensive equipment), but they do not see financial prospects. But they give examples of what not to do. It is known that crankshafts sometimes bend. So, no one bothers with specialized equipment for leveling them. A dull chisel and a sledgehammer to help, in general, almost hit the knee. Is it correct? Cheap, definitely! It is difficult to predict how long it will last. Still, certain intervals of time and deflection are maintained on the equipment. In any case, after editing the crankshaft, it is necessary to check it for cracks, grind it and balance it.
Restoring crankshaft journals is possible, but the technological process is very complex, and in some cases the client cannot count on high quality of the restored surface.
The options are different - welding of tape, welding of wire, application of material by spraying, selection of a repair size liner or an alternative one. The problem is that very few people can properly polish a crankshaft. For the most part, shafts are ground using a simplified technology, without restoring the radius - the fillet. And without it, the shaft takes the bending load much worse, which can lead to its breakage. Finally, it is impossible to help those owners whose engines (for example, Honda K and J series) have chipped camshaft cams. Theoretically, restoration is possible, but there are no practical examples yet.
This is a view that may very well seem subjective and even biased to someone. We know that there are “oppositional” opinions. And besides them, there are other features of the restoration of engine hardware. Therefore, if necessary, we will continue the conversation.
Microcrack in the cylinder
The signs are such that even a microcrack in the head will not be repeated, but I will immediately be taken aback by the method of repairing such a cylinder. It’s good if you can visually find such a crack, it could be a chip in the cylinder, but more often it is not visible, but it appears when the engine is running and heats up to operating temperature.
I encountered a microcrack when the engine was running for a long time, and suddenly a microcrack appeared, but it was unknown where it was.
I came across several cars with a VAZ 2106 block bored for 82mm pistons. and basically worked fine. But I do not recommend doing this, since the cylinder liner becomes very thin, and there is a high possibility of such a crack forming.
I always warn the owner of the car after I remove the head and do not find a burnout in the gasket or a crack in the head or block, that there can be two reasons, and I give him a choice of what to start with first, replacing the head or we will line the block.
The main thing is that the boring person who bores the cylinders and lines the block is a professional in his field. A good boring machine can perfectly fill even an obvious crack in the cylinder. Therefore, immediately warn the borer that there is a microcrack in some cylinder (I don’t know the details of how the cylinders are lined), but several such engine blocks have been running for several years after the liner and everything is fine.
Usually the owner of the car chooses to start with the block sleeve, and if that doesn’t help, then of course you will have to change the head.
I know one ninety-ninth who drives with such a microcrack; the driver simply screws the cap slightly onto the expansion tank so that it does not swell, and it does not boil.
Block crack from outside
In addition to internal microcracks, there are also external splits that lead to antifreeze (less often oil) getting out of the engine block. Most often the reason is a manufacturing defect in the cylinder block. There are cases in which the engine block cracked after the tightening torque of the gearbox bolts was exceeded or it was improperly mated to the BC.
The problem of manufacturing defects is well known to owners of Suzuki cars with a 2.4 liter gasoline engine produced between 2008 and 2010. Already on short runs, antifreeze leaked out of the engine through a crack in the cylinder block. And although the recall company’s practice was not applied, if a malfunction occurred during the warranty period, the owners had the BC replaced free of charge.
What is the cause of the damage?
It happens like this: the engine is started, it works fine, but after some time coolant begins to flow from under the expansion tank cap. You might think that the reason is a microcrack in the gasket, head, or cylinder of the engine, but there are no bubbles in the expansion tank during warm-up.
Usually the expansion tank plug is to blame for this, the valve in it does not hold pressure, as soon as it is replaced with a new one, everything stops. Interestingly, I have seen cars that drove even without plugs in the expansion tank, but did not boil, while others begin to boil and form air pockets from -for a bad valve in the expansion tank cap. This is a mystery to me/
https://www.make-1.ru/1g/5_avto_2.php
Broken cylinder liner. Causes of failure and elimination
The cylinder liner belongs to the piston system. The peculiarity of the sleeves is that they operate in a critically aggressive environment, including: high temperature, sudden temperature changes from 500 to 2500 degrees, vibration loading and detonation. As a result of the above points, the liner wears out to the point of deformation and crack formation. To avoid more serious problems with other engine systems, cylinder damage must be diagnosed early.
About defects in engine liners
There are 4 possible sleeve defects in total:
- natural wear of the outer part of the liner (due to the use of low-quality coolant, if the liner is of a wet type)
- cracks
- liner flange fracture
- wear of the internal part (mirror) due to direct contact with the piston.
Repair methods
Gas or electric welding.
In the case of a cast iron block, for example, like that of a VAZ, a hole is drilled at the ends of the crack, then the crack is deepened and widened for better adhesion of the weld to the wall.
The cylinder head itself is heated properly before welding (~600-650°C). Afterwards, using flux, a neat, even seam is applied to the cast-iron-copper filler rod and a neutral gas welding flame. The seam itself should protrude above the surface, but no more than 1.0-1.5 mm. Upon completion of all welding work, the block is subjected to slow cooling in a heating cabinet.
Also, sometimes welding is performed without preheating the block, but in this case electric welding with direct current of reverse polarity is used. If the crack requires it, a mild steel patch can be applied using electric welding and copper electrodes wrapped in tin. Afterwards, the welding seams are processed and coated with epoxy paste.
Epoxy paste.
The surface next to the crack, as well as the crack itself, is thoroughly cleaned, almost to a shine. Next, as in the previous case, a hole Ø 3-5 mm is drilled. A thread is cut into the holes, after which copper or aluminum plugs are screwed into it flush. The entire crack is processed at an angle of 60-90° to a depth of up to ¾ of the wall thickness.
The surface around the crack itself is covered with notches to give it roughness. Before applying epoxy paste, the surface must be cleaned with a degreaser, acetone or, in extreme cases, gasoline. The resin itself is applied with a spatula in 1-3 layers. The thickness of each layer is at least 2 mm, and the total thickness is approximately 3-4 mm, complete hardening occurs within 24 hours.
In case of heating or intensive drying, hardening will occur in just 3-4 hours. Once drying is complete, the surface can be sanded with a file or grinder.
Epoxy paste + fiberglass.
All preparatory work is the same as the previous method. The principle of application is almost the same, the only thing is that in this case, a patch of fiberglass is applied to each layer of paste, after which the layer is rolled with a roller.
Important: from the edge of the patch to the edge of the crack there should be at least 15-20 mm. Each new layer must overlap the previous one.
All layers can be from 2 to 8. The finishing layer is covered with paste and, after drying, processed with a file or grinder.
Installation of pins.
- Holes Ø 4-5 mm are drilled along the edges of the crack. Afterwards, using the same drill, you need to drill holes along the entire length, the distance between the holes is 7-8 mm.
- The holes are threaded, then copper rods are screwed into the holes to the thickness of the wall. After this, the rods are cut with a hacksaw, but not completely; it is necessary to leave the tips approximately 1.5-2 mm above the surface.
- Then, additional holes are drilled between the installed pins so that they can overlap the previous ones.
- When all the rods form a continuous strip, the tips are flattened with a hammer, thereby hammering the surface of the pins and forming a continuous copper seam.
- For reliability, the surface is coated with epoxy paste or resin. After completion of the repair work, the block or head must be pressure tested.
All of the above work must be performed by specialists, or people who understand the complexity of the process and know how to handle certain materials.
https://www.autoposobie.ru/kak-zadelat-treshhinu-v-gbts-prichinyi-poyavleniya-diagnostika-i-sposobyi-ustraneniya/
Alternative methods
To begin with, minor cracks can also be repaired using epoxy paste and fiberglass. Before starting work, the metal surface must be thoroughly degreased. Layers of paste and fiberglass alternate when applied, the last layer should be epoxy.
Among the most popular technologies today, it is also worth noting a solution called SEAL-LOCK. The advantages of this method include the absence of the need to dismantle the engine. The method is suitable for repairing serious holes or cracks in the cylinder block. Also, repairs do not require the use of a welding machine.
The method is based on filling the crack with a special layer of soft metal, which as a result is securely bonded to the surface of the part being restored.
- The crack is localized, after which the edges of the split are drilled. Next, holes are drilled across the crack at the pitch established by the technology. Cable ties are inserted into these holes to tie both edges of the crack. The staples are selected according to the type of split, as they can have different lengths and differ in shape.
- Next, a hole is drilled in the space between the installed brackets, after which the conical thread is cut using a special tap. After this, it is necessary to treat the resulting hole with a composition to remove the oxide film. Then a cone plug is screwed into the machined threaded hole with little force, the material of which is in active contact with the metal of the part being repaired.
- Next, the part of the plug that rises above the plane needs to be filed a little, after which screwing is carried out with great force, which is created by a special tool. Under such force, the soft plug will break in the place where the cut was previously made. Protruding residues are additionally sanded.
- The next step is to drill the next hole. This hole is drilled so as to achieve partial overlap of the previous threaded hole with the plug installed. The repair procedure involves filling the entire crack with plugs.
Riveting the seam eliminates possible voids and also accelerates the diffusion of rivet materials and the part. The result will be the appearance of a plastic seam that has a strong connection with the surface. This seam has a number of advantages compared to a welded seam:
- does not suffer from temperature changes;
- is able to maintain integrity under operating conditions at high temperatures;
- does not receive significant stress;
As for installing large patches that can literally “seal” a cracked engine block or cylinder head, then the solution method according to the implementation scheme is similar to that described above. You will need to cut and fit a metal patch, after which it is installed by filling the entire perimeter with ties and cone plugs. Subsequent testing of the finished seam for tightness is carried out using crimping under a pressure of about 6 atmospheres.
Video “Repair of microcracks”
In order for engine parts to serve for a long time and fully perform their functions, when repairing an engine, troubleshooting of parts should be carried out. For detection of microcracks
use appropriate equipment, many damages cannot be detected with the naked eye. Some equipment is great for identifying hidden problem areas in a part, such a tool will be discussed below. There are several methods for detecting microcracks, porosity, and cylinder wall thickness.
Sound testers
These devices are well suited for measuring thickness, but they are useful for measuring the cylinder wall (not all cylinders can be removed from the block). And so the tester consists of the device itself and a separately connected probe that emits a signal that passes through the material. When the signal reaches the opposite side of the material, the signal returns to the probe, the tester, based on the time during which the signal was reflected and returned to the probe, displays thickness readings on the display.
Probe measurement checks are carried out from the top of the cylinder to the very bottom and throughout the entire diameter. It is especially important to check areas where there are cooling ducts. The ability to measure the thickness of the cylinder walls gives a complete picture for boring if we want to significantly increase the engine displacement. Walls that are too thin are caused by wear or corrosion on the cooling ducts.
The thickness of the cylinder walls cannot be thinner than 3 mm, otherwise the cylinder will simply burst during operation.
For turbocharged engines, the minimum thickness will be slightly larger, it all depends on the operating gas pressure.
Before using the sound tester, it must be calibrated.
Measurements are taken in all cylinders without exception, especially cast iron blocks may initially have different wall thicknesses. In this way, you can assess the condition of the unit and its suitability for use, whether it is worth investing in its repair and whether it can withstand the load.
Magnetic microcrack tester
Applies to cast iron and steel materials only. The testing process is based on the distribution of metal powder on the surface of a metal having magnetic properties. That is, the part is subjected to a magnetic field, a very fine metal powder is applied to the suspected area with a crack, and based on the results of the distribution of the powder, one can judge the integrity of the part being tested.
For example, let's check the valve seat for microcracks; to do this, you should clean the surface with a solvent and a rag, in no case mechanically, with a knife or sandpaper, this can hide the crack and further complicate its detection. And so the surface is clean and dry, we apply a special metal powder to the surface of the valve seat and bring a magnet, if there is a microcrack, the powder will collect in it and it will be noticeable, or, on the contrary, it will spread away from the crack, depending on how the poles are located magnet in relation to the part being tested. Therefore, we rotate the magnet relative to the surface of the head
Search for microcracks using ultraviolet light
To diagnose microcracks, magnetization of the part is used, again only steel or cast iron and a special liquid that has the ability to penetrate into the smallest cracks and also glows under the influence of ultraviolet rays.
To begin with, the part is doused with a solution, using the crankshaft as an example; connecting rods can also be diagnosed. The second stage is magnetization of the part using a special device. After this, an ultraviolet lamp is lit in the dark, any microcracks will be shown as a brightly glowing line. The final stage, after identifying the defect and marking it, the part should be demagnetized with reverse polarity and cleaned of the solution. You should not leave the parts magnetized as metal particles and wear products from the oil will stick to them in the future and may affect the further operation of the engine.
Penetrating paint
This photochemical microcrack detection process is used without ultraviolet light. We can apply steel, iron, copper, aluminum, titanium, etc. to any metals. The part is painted with a special paint since there is no need for a magnetic field; this process can also be used for plastic parts.
The kit usually includes 3 chemicals, solvent, paint and developer. The solvent prepares the surface by cleaning and degreasing. Penetrating paint is sprayed onto the surface of the part. It seeps into any cracks, holes and defective areas.
After some time, the paint saturates the part and dries, a special developer is applied, which reacts with the paint and areas with a high concentration of paint in places such as cracks become clearly visible. There are two types of these kits: Each allows you to detect cracks, the second type can perfectly identify a crack under ultraviolet light. After identifying a crack, the same solvent is used to remove paint.
Deformations of key engine elements, such as the cylinder block and cylinder head, are serious malfunctions that, if not corrected in a timely manner, can lead to the need for major engine repairs.
The formation of cracks in the engine block and cylinder head is one of the most difficult breakdowns in a car. Cracks can occur due to impact (for example, during an accident), due to high wear or manufacturing defects. In this article, we will look at how to determine that the engine cylinder block or cylinder head is cracked, and what can be done about it. Table of contents:
Solutions to the problem
One of the most common is the welding method (electric or gas). In the case of repairing an engine block made of cast iron, it is necessary to first drill out the crack at the ends 0.5 cm deep, then cut it along its entire length with a chisel, grinding wheel or similar tool so that the angle of application is 90 degrees.
The depth of impact should reach 80% of the total wall thickness. Before starting welding work, the block must be heated to a temperature of at least 600 degrees Celsius.
Next, you need to start welding using a neutral flame of a gas torch (gas welding method), using a five-millimeter (in diameter) copper filler rod or flux. The metal is applied to the damaged area evenly, completely, allowing the seam to protrude outward by no more than 1.5 millimeters.
Having completed the welding process, the block must be subjected to gradual cooling in a special pit or heating cabinet.
If electric welding equipment is used for work, you can do without heating the engine block to be restored. In this case, it is necessary to use reverse polarity direct current. If you want to install a steel patch in place of the crack, you will have to use copper-based electrodes in a tin wrapper.
For greater safety, the weld area can be coated with epoxy-based paste.
Another way to repair cracked structural elements of an engine block is to seal the cracks with a special epoxy-based repair paste. In this case, the area where the crack is located is thoroughly cleaned inside and out using a metal-based brush. Then holes with a diameter of no more than 4 millimeters are drilled at the ends of the crack and used for cutting threads.
A plug made of wire on an aluminum or copper base is screwed into the resulting hole. Next, the surface of the crack is processed using a tool (chisel, grinder, wheel, etc.) to a depth of up to 75°/o of the total value, making an impact at an angle from 60 to 90 degrees.
Along the entire length of the crack, retreating from its edge within three centimeters, it is necessary to apply notches using a tool. The surface of the block prepared for repair is degreased using gasoline or acetone, and then proceed to applying an epoxy-based paste.
The paste is applied in two layers, each of which should not have a thickness of more than 2 millimeters. Hardening of the material occurs within one to two days, depending on the final thickness of the layers. If the repair area is heated to one hundred degrees Celsius, the curing time will be reduced to three hours.
After the paste has hardened, the surface is leveled and ground using a file or abrasive materials.
You can also repair cracks in the block and engine head using a fiberglass patch and the already familiar epoxy-based repair paste. In essence, this method differs little from the previous one. The only difference is that each layer of applied paste is covered with a duplicate layer of fiberglass, followed by covering the surface of such a patch with paste and leveling it using roller devices. In this case there can be no more than eight layers in total.
You can also repair the surface of the block by installing pins on it. In this case, holes are drilled not only at the ends of the crack (up to 0.5 cm deep), but also along its entire perimeter, 7-8 millimeters apart.
Next, threads are cut and copper rods are installed (the depth should correspond to the thickness of the block wall). Then the excess parts of the rods are cut off (as a result, they should not protrude above the surface by more than 2 millimeters).
And in the spaces between the installed pins, additional holes are drilled, the diameter of which should be a quarter larger than the size of the plugs. Copper rods are also placed into these holes and trimmed.
The resulting row of pins is hammered until a continuous, seamless seam is formed. If desired, the resulting surface can be further strengthened by coating the outside with an epoxy-based paste. Upon completion of the repair, the unit must be pressure tested.
Repairing a cracked cylinder head is done in the same way , but only if the areas where the valve guide bushing is located, the combustion chamber or the valve seat in the seat area are not cracked.
Pressure diagnostics
This technique is performed in several ways: immersion in water or without it. Read below on how to perform these operations.
Immersion in water:
- Initially, close all channels of the spare part that may be adversely affected by water.
- After this, place the part in a container filled with water over 40 degrees Celsius.
- Then use compressed air (there is a crack in the places where bubbles appear).
The procedure without “immersion” is performed as follows:
- As in the previous case, make sure that all GBU channels are closed.
- Pour the soap solution onto the lid.
- Supply air masses into the circuit of the “sick” part. If there is a defect, soap masses form at this place.
Checking the cylinder head for cracks
Magnetic powder diagnostics
This method is considered one of the most efficient and accurate. The principle of testing is as follows: the head is installed on a special magnetic stand, after which the head is sprinkled with metal shavings. In places of cracks, the chips will not be able to magnetize, which will indicate the presence of a crack in a particular area.
Checking the cylinder head using a special fluid
This method requires a special liquid. The head is completely cleaned of dirt and then degreased. The coloring liquid is applied to a clean surface and after a few minutes is removed with a rag. Any, even the slightest cracks and defects will be painted in the color of the liquid, and you will be able to see them without any problems.
Checking the head under pressure in water
The principle is to connect the head to the compressor, having previously sealed all the holes in it. Next, the cylinder head is immersed in a bath of water. If there are cracks in the head, they will somehow appear in the form of air bubbles. This way you can see where the crack is, after which you can carry out a more detailed study of the damage.
There are variations of this method, for example, some do not immerse the “head” in the bath, but simply pour water into it, and then supply air under pressure.
How to Diagnose the Problem
It is not always possible to see defects on a cylinder with the naked eye. Most often they are microcracks, so to detect them, use one of the following methods:
Each of these methods allows you to effectively find the problem, but even specialized salons do not always have the necessary equipment. Therefore, they usually use the water or air method.
To do this, pour water inside the cylinder block and inspect it from all sides. If in some place water begins to seep and drip, then there is a crack there. To use the air method, air is pumped into the block and immersed under water. If bubbles come out of it on one side, then the crack should be looked for there.
Another way to quickly detect a crack is with magnets. They should be placed on both sides of the intended split site, and the space between them should be filled with sawdust that conducts current. If there is a crack on the device, then sawdust will gather in a heap in the place where it is located.
Where do cracks most often occur?
Finding a crack in the cylinder head is perhaps the most difficult thing, since it can appear at different points in the head. Even an experienced craftsman is not always able to complete this task quickly, despite the fact that cracks usually appear in certain places.
- Between the valves. This type of damage is not difficult to detect; the crack is visible between the seats of adjacent valves.
- Between valve and spark plug. In this case, you can also easily find the location of the damage.
- Under the valve guide. It is quite problematic to detect a crack in such a place; it is covered by a guide bushing, and besides, it is dark in the channel. The visual detection method will not work in this case.