One of the main systems that ensures safety when driving a car is the braking system. The most widespread are brake mechanisms that use the frictional force of different materials. Such mechanisms are installed on all cars, including VAZs belonging to the “Classic” family.
As an example of a classic VAZ, model 2107 will be used. The brake system of the VAZ-2107 includes working and parking systems. The task of the working component is to reduce the speed of movement of the car until it is completely immobilized.
It consists of two components: the first is the brake mechanisms, which act on the wheels, which is why their rotation decreases. The second component is the drive, through which the driver operates the mechanisms.
The parking component ensures that the wheels of one of the car's axles are locked, in the case of the VAZ-2107 - the rear axles, while the car is immobilized. The use of this brake prevents spontaneous movement of the car. This system uses a separate drive that acts on the rear axle mechanisms.
In more detail, what the brake system of the VAZ-2107 looks like is shown in the diagram:
Now let's take a closer look at the design of the VAZ-2107 brake system. First, let's go through the working component. Its drive is hydraulic and includes:
- Control pedal;
- Vacuum booster;
- Main cylinder;
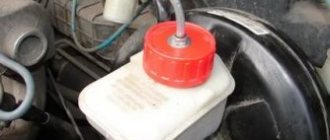
- Tank for working fluid;
- High pressure pipelines;
- Rear axle bellows pressure regulator;
The use of liquid as a working element of the drive is due to a number of positive qualities: a complex system of levers for the drive is not required, the wiring of pipelines to the mechanisms is facilitated, the transmission of force from the driver’s foot is enhanced several times due to the vacuum booster.
Related link:
Insulation of VAZ-2107 for the winter
The working mechanisms on the VAZ-2107 are of two types: disc brakes are installed at the front, using calipers; drum-type mechanisms are used on the rear axle, which also includes a parking mechanism.
Now in more detail about the elements of this system. So, the pedal that the driver presses is located on the same axis as the clutch control pedal. To ensure that it can be returned to its original position, it is spring-loaded.
Vacuum brake booster
A rod connected to the amplifier is connected to the pedal. The design of the VAZ-2107 vacuum brake booster is quite interesting; it is shown in the figure:
The amplifier is a sealed container, internally divided into 2 chambers by means of a membrane. The chamber located closer to the pedal is called atmospheric, and the chamber separated from it by a membrane is called vacuum. The diaphragm itself is connected to the piston rod of the master cylinder.
The vacuum chamber is connected by a pipe to the intake manifold of the engine, where the vacuum comes from. The design also includes a follower valve controlled by the pedal rod, which does all the work.
When the pedal is released, this valve connects the chamber cavities through a channel, providing identical pressure. When the pedal is applied, the valve closes the channel connecting the chambers and opens the channel connecting the atmospheric chamber with the atmosphere. Since a vacuum is maintained in the second chamber, atmospheric pressure begins to put pressure on the membrane. Since it is connected to the piston rod of the master cylinder, due to the movement of the piston, fluid is displaced from the cylinder into the pipelines.
How to change rear pads on Kalina
The brake systems of different variations of the LADA Kalina are distinguished by the absence or presence of an anti-lock braking system. Changing the rear brake pads of a Kalina with or without ABS is equally simple. The only difference is that in the first case, before dismantling the pads, you must disconnect the wires from the sensors so as not to damage them. To prevent brake fluid from spilling out of the reservoir and getting on the paintwork or rubber parts of the Kalina when replacing the pads, it is necessary to take some of the fluid from the reservoir into a prepared container. This operation should be carried out only when the brake fluid level in the reservoir is close to the maximum level. Replacement of the rear pads is carried out one by one: first from the left, then from the right side (or vice versa, the order is not important here). Some operations, for example, loosening the tension of the handbrake cable or adjusting it, are more convenient to carry out from the inspection pit or using a lift. Therefore, the work must be performed in an equipped garage.
Replacement of rear brake pads of LADA Kalina is carried out as follows:
- install wheel chocks under the front wheels;
- lower the handbrake lever down as far as it will go in order to loosen the tension on the Kalina handbrake cable as much as possible;
- by rotating the adjusting bolt under the bottom of the car, loosen the handbrake cable;
- use a wheel wrench to loosen the wheel bolts;
- jack up the wheel;
- Unscrew the wheel bolts with a wheel wrench;
- remove the rear wheel;
- unscrew the pins that simultaneously serve as fastening of the brake drum and guides for installing the wheel;
- Use a wire brush to clean the rear wheel hub where the drum fits;
- treat the place where the drum fits on the hub with WD-40, wait according to the instructions; tap the drum with a rubber hammer to “break” it out of place;
- evenly screw the M8 bolts into the mounting holes of the drum, pulling the latter off the hub;
Attention: if you press the brake pedal with the drum removed, the piston of the brake cylinder may fall out, which will lead to depressurization of the circuit, the need to bleed the brakes or even replace the brake cylinder.
- check the condition of the brake drum: it should not have chips, uneven wear, cracks or marks;
- if necessary, replace the brake drum with a new one;
- bring together the rear Kalina pads using pry bars (mounting blades);
- pry the end of the upper spring, which tightens the pads, with a slotted screwdriver and remove it from engagement with the pad;
- remove the upper spring from the second block, put it aside;
- remove the lower tension spring using a screwdriver or pliers;
- remove the “front” block located closer to the front of the car;
- remove the spacer bar installed between the pads;
- remove the end of the parking brake cable from the hook of the rear shoe spacer lever;
- using pliers, disengage the spring holding the second block;;
- remove the block located closer to the rear of the car;
- undo the pin securing the spacer lever;
- remove the spacer lever;
- clean the brake mechanism parts from dirt;
- secure the spacer lever to the new block;
- pin the finger;
- install the “front” brake block;
- put the spacer bar in place;
- install the “rear” block by putting the lower tension spring on it;
- put the end of the handbrake cable on the spacer lever of the block;
- Using a screwdriver or pliers, hook the lower and upper tension spring onto the pads;
- reinstall the brake drum;
- tighten the guide pins holding the drum;
- secure the wheel with wheel bolts;
- lower the jack so that the wheel is on the ground;
- Use a wheel wrench to tighten the wheel bolts.
Then the same operations must be done on the second wheel. Now you know how to change the rear pads on a Kalina.
Remember: after replacing the rear pads, you need to adjust the handbrake of the LADA Kalina.
- Increased disc wear. For new ventilated discs it must be at least 17.8 mm
- Furrows and surface irregularities left by pads or foreign particles (stones, sand, etc.)
- Bent surface - does not happen so often, but this may cause such features as vibration during braking and runout
If you notice at least one of the above symptoms, you need to check the condition of the brake discs and, if necessary, replace them. To perform this DIY repair you will need the following tool:
- Balloon wrench
- Jack
- 7, 13 and 17 mm wrench
- Torx head t12
- Ratchet and extension
- Hammer
- Copper grease
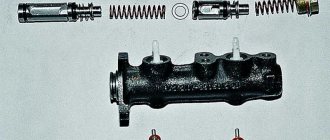
Brake master cylinder
The master cylinder is connected to the booster. This element is a housing to which the supply and return pipelines from the fluid reservoir are connected, and 3 pipelines leading to the brake mechanisms exit. There is one pipeline leading to the front brake mechanisms, and only one to the rear, leading to the regulator.
Inside this housing there are pistons that push the liquid into the pipelines. One of them is connected to the amplifier diaphragm rod. These are the main elements of the drive. The detailed design of the brake master cylinder is shown above.
Related link:
Homemade pre-heater for a VAZ car engine
Rear brake cylinder replacement:
To replace the brake cylinder on the rear wheel, you will need to carry out similar operations to remove the brake pads described earlier. Next, the following operations are carried out:
- Unscrew the brake pipe nut. You will need to thoroughly clean the mounting area and use an open-end wrench with the ability to grasp all edges of the nut.
- There are also two bolts (may differ on old and new models) for securing the cylinder, which will also need to be removed.
- The new cylinder assembly is installed in the reverse order.
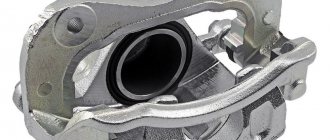
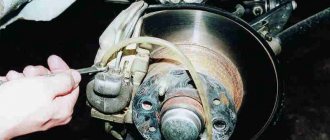
Caliper device
Let's move on. The front axle mechanisms are disk ones, consisting of calipers with the main brake elements - pads, and brake discs.
A caliper is a body with cylinders made in it for the pistons. This model has two of them, one for each block. The support structure is shown in the figure.
The caliper pistons have the form of a glass, which is placed in their cylinders, but they can move along it. To prevent fluid leakage, the pistons are equipped with o-rings.
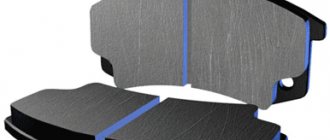
Pads are small metal plates onto which linings made of friction material are glued.
The brake disc is made of metal for better adhesion to the surface of the pads; its side surfaces are well processed so that there are no protrusions or shells on them.
The VAZ 2107 brakes work like this: the fluid moves into the caliper cylinders, where it begins to push out the pistons. They come out of the cylinders, pressing the pads against the disc.
Replacing the main (main) brake cylinder:
The need for such replacement occurs much less frequently. Basically, the reason for such interference is the appearance of brake fluid leaks, or the passage of fluid between different cavities through the sealing cuffs.
To remove the barrel, you will need to disconnect the battery and the electrical connector of the tank cap. Then remove the cap and pump out the brake fluid completely. The tank is attached to plastic clips and can be easily replaced.
Work on this brake cylinder (or installation after repair) is carried out after disconnecting the high pressure pipes. The main brake cylinder is attached to the body with two bolts. After reinstalling the cylinder, the brake system must be bled.
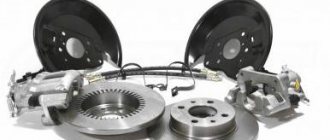
Rear axle brake mechanism
The brake system of the VAZ-2107 rear axle has a different device. All its elements are hidden inside the brake drum:
The working brake cylinder of the VAZ 2107 has the following device: there is a body, also known as a cylinder, with two pistons placed in it. When exposed to fluid pressure, they come out of the cylinder.
The pads are metal, made in the shape of crescents, with friction clutches glued to their upper edge. The pads installed on the hub form a ring.
In the lower part, the pads are installed in the seats made under them, and in the upper part - in the grooves made in the pistons. To prevent the pads from moving apart spontaneously, they are tightened with springs. The parking brake mechanism is also located there.
On top of all this there is a drum mounted on the hub shaft. When braking, the fluid pushes the pistons, and since the pads fit into their grooves, this movement of the pistons is accompanied by the divergence of the pads. At the same time, they are pressed towards the drum and the rotation slows down.
Related link:
Causes of detonation of VAZ engines and solutions
Absolute vehicle malfunctions
During operation, the braking functions of the system deteriorate. This is due to wear and tear of components, assemblies and parts that require repair. Some vehicle malfunctions are included in a special “List...”, and driving with them is prohibited.
Inefficiency of the working vehicle
The most common malfunction of the brake system (including the VAZ-2107) is inefficiency, which is diagnosed by two main parameters (when carrying out a specialized instrumental study):
- increasing braking distance;
- increase in steady deceleration during braking.
Parking system
Although it engages the mechanism of the rear axle wheels, it is in no way connected with the working mechanism. It uses a cable as a drive connected to the handbrake located inside the car.
Under the car, this cable is divided into two parts, going into the rear axle mechanisms. Inside, the ends of the cable are connected to the drive lever, which in turn is connected to a spacer bar. The drive lever is connected to one of the pads.
When the handbrake is engaged, the cable pulls the lever, and since it rests against the bar, the pads are released. The toothed sector of the handbrake fixes the position of the lever when the pads are spread apart.
Replacing the parking brake cable:
In most cases, the tension of the handbrake cable is adjusted by its tension at the point of attachment to the equalizer. However, if adjustment cannot be made, replacement will be required:
- Remove the brake drum.
- Remove the muffler from the hanging clips and lower it to the ground.
- Dismantle the equalization device.
- Remove the cable end from the equalizer.
- Release the cable attachment to the body elements.
- Remove the opposite end of the cable from the brake mechanism by disconnecting it from the drive lever. Pull the cable out of the stationary shield.
- Carry out reverse laying, fixing and tensioning of the cable.
Pressure regulator
It is installed in the rear wheel drive and not only distributes fluid to the mechanisms, it also prevents possible skidding due to different forces on the mechanisms. This is done by limiting the supply of pressure to the mechanisms, depending on the position of the car body relative to the bridge.
The regulator is driven by a rod, one end of which is fixed to the rear axle, while it itself is fixed to the body. As the load on the rear axle increases, the body changes position relative to the axle; as a result, the rod puts pressure on the regulator piston, which adjusts the pressure supplied to the mechanisms.
Brake system in Lada cars of the 2101-07 family
The braking system (TS) of any vehicle is designed to control the speed of movement, stop and hold it stationary for the required period of time.
It is one of the most important vehicle control systems, since road safety functionally depends on the degree of serviceability and efficiency of the braking system.
The principle of operation of the VAZ-2107 brake system
If it is necessary to reduce speed, the driver presses the pedal. Its force is transmitted to the amplifier valve, which opens the required channel to supply atmospheric pressure to the membrane. The membrane is connected to a rod connected to the piston of the main cylinder. This rod displaces fluid into the pipelines leading to the operating mechanisms. Since the liquid is not compressed, all force is completely transferred to the mechanisms.
The liquid presses on the pistons of the working cylinders, and as they move out, they unclench (on drum bellows) or press the pads (on disk bellows) to the disk or drum connected to the wheel hubs. Due to the friction of the pads on the discs (drums), the rotation slows down.
Related link:
How to start a VAZ engine in winter
Relative vehicle malfunctions
This list of faults does not apply to absolute (or categorical) faults. Their presence is associated with the convenience (or inconvenience) of driving.
Increased hydraulic pedal travel (as an option - a “soft” pedal)
The reasons for the “sinking” of the pedal are determined by the presence of air in the system; extreme wear of brake pads; failure of the main or wheel cylinders. The action plan for eliminating technical problems includes checking and repairing all components and assemblies of the system; and, if necessary, replacing failed ones and bleeding the system.
Shift towards the vehicle's trajectory when braking
The malfunction is due to either a failure of the working (wheel) cylinder or wear of the pads. Replacing them (or repairing them) will solve the problem.
Increased background noise, friction (grinding) in the brake mechanism
Deficiencies are localized mainly in the rear mechanisms and are determined by contamination of the mechanism, critical wear of the pads, breakage of spring elements, uneven wear of discs or drums. Fault repair involves washing and replacing mechanism parts.
Vibration when braking
This is a fairly common malfunction that is associated solely with critical or uneven wear of the discs or drums, and the repair will consist of replacing them. » alt=»»>
Types of maintenance work
Despite the fact that the system is not so complicated structurally, it requires periodic maintenance, including:
- Checking the fluid level in the system;
- Checking the degree of wear of friction clutches, pads, discs, drums;
- Bleeding the system to remove air;
- Checking the condition of the handbrake cables;
- Adjustment of cable tension;
- Adjusting the rear brake adjuster;
Before each trip, you must always check how much brake fluid is in the VAZ-2107 system. An insufficient amount of it can lead to the fact that the efficiency of the system can be significantly reduced due to air getting inside the pipelines. In addition, a decrease in level may indicate damage to pipelines and fluid leakage.
The elements of the mechanism should be checked every few months, this is especially true for the pads, since they wear out quite intensively. If necessary, worn elements are replaced.
If air gets inside the drive of the working system, pumping is performed, as a result of which the air is expelled from the system.
Loosening the tension of the parking brake cables can lead to its failure, so you need to periodically monitor it and, if necessary, restore the tension.
Problems and their solutions
There are several common problems associated with brakes on a VAZ 2110 car. The reasons for their occurrence may be different, but the solution is always the same - timely and high-quality repairs.
- The brakes have completely lost their effectiveness, pressing the pedal does not cause any reaction. In such a situation, it is categorically impossible to drive anywhere under your own power, even if we are talking about a trip to a service station? How do you brake? About a wall or pillar? Call a tow truck and start repairs. In some situations, the problem can be solved on the spot, but these are temporary measures.
- During braking, strong vibrations are observed, most often in the steering column. At the same time, when you press the pedal, it is difficult to hold the steering wheel in your hands. There may be several reasons for this: If you have non-ventilated discs installed, similar situations may arise during rain or when braking through a puddle. Such devices do not like moisture, so to get rid of vibrations, replace the disks with ventilated ones;
- Another cause of vibrations is faulty drums. If there are dark spots on the working surface of the drums, the unit wears unevenly. Immediate repair or complete replacement of mechanisms is required;
- Be sure to check for signs of deformation on the front brake discs. They often cause vibrations.
- The vacuum booster air filter may be clogged, causing the brake pedal to feel stiff;
As you can see, the brake system of the VAZ 2110 car is far from perfect in its factory version, but it performs its functions effectively and reliably. All possible malfunctions can easily be fixed independently, but in some situations it is advisable to contact a professional service station.
Features of the braking system
One of the features of the VAZ-2107 brake circuit is the presence of a dual-circuit system. The essence of a dual-circuit system is that the working drive is divided into two parts, each of which supplies fluid to only two mechanisms, while the circuits do not interact with each other.
The presence of two circuits ensures the operability of the brakes of at least two wheels in the event of depressurization of one of the circuits. That is, even if the pipelines of one circuit are punctured, the second will remain fully operational, which will ensure the functioning of the brakes.
In the VAZ-2107, the circuits are divided in such a way that the drive of the front axle mechanisms is separated from the drive of the rear mechanisms. This allows you not only to maintain the functionality of the system when one of the circuits fails, but also to pump each circuit separately. That is, if one of the circuits is airy, then it needs to be pumped, but it is not necessary to service the second one.
Related link:
Choosing a battery for a VAZ-2107 car
This is only general information about how the VAZ-2107 brake system works, and does not include all the details on its maintenance and repair. In general, the brakes of this car work quite well, although some elements of it cause complaints from car owners.
Article on the topic - Bleeding VAZ brakes
Repair of brakes, calipers VAZ 2101, 2106, 2107 CLASSICS
Installation of front brakes from VAZ 2110-12 on VAZ Classic
Having gone through the procedure of replacing the brakes on my car, I would like to share my experience and advice with those who are just planning to perform such an operation. Let me remind you that the brake mechanisms of the VAZ 2110 are designed for 13′ brake and wheel discs, while the mechanisms of the VAZ 2112 are designed only for 14′ discs. Since I have both sets of 13′ wheels, the choice fell on the VAZ 2110 brakes. Let's start with the reasons. The main one is braking efficiency, especially from high speeds (about 110 km/h). It’s no secret to any of the owners of the Classic that the standard brakes are enough for two or three powerful emergency braking from decent speeds, after which you can safely go to the store for new discs, because the old ones are caused by overheating. Ventilated brake discs allow you to use your brakes without thinking about how hard they are working. Another reason is the ease of maintenance of the 2110-12 calipers; changing pads is a pleasure, plus the ability to install squeaks on the pads, which will help you remember to replace them in time. Well, for now the last reason, which was a pleasant bonus: the caliper with the VAZ 2110 disc to the touch weighs 4 kilograms less than the original brakes. Already when leaving work, I felt that the front suspension began to work out more little things and, in general, work more softly. Actually, let's move on to the procedure for purchasing and installing brakes. Purchase
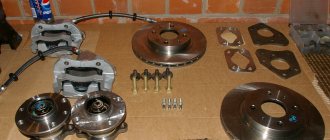
To install a set of VAZ 2110 brakes on a classic, you need to buy:
A set of adapters (2 pieces)
for installation on the front axle of the Classic calipers VAZ 2108-10-12, like these:
Brake discs VAZ 2110
, I opted for wheels in the Lada-Sport package - ventilated, perforated, with grooves. Upon closer inspection, the disks turned out to be manufactured by , which has established itself as a manufacturer of high-quality components.
I highly recommend purchasing in advance all the fasteners for the steering knuckles and bipods, as well as the steering bipods themselves (in stores they are listed under the name “steering knuckle lever VAZ 2101-07”). The long bolts soured in the bipods so much that I couldn’t knock them out or drill them out, so in the end I replaced both bipods; they were also purchased at the Rus-Trade store. I fastened the caliper to the adapter using the bolts for fastening the ball joints of a VAZ 2108 (there were a lot of new ones lying around at work, they have 16 turnkey hats, they come with a grower). Depending on the condition of the wheel bearings and hub seals, they can also be replaced; the hub will still need to be removed during installation. Installation
The installation should begin with the fact that under the hood of the car you need to tightly clamp the hose that goes from the brake fluid reservoir to the piston of the front circuit of the main brake cylinder (there are two of them, we need the one that is closer to the engine shield, i.e. the rear one in the direction auto).
This must be done to avoid severe airing of the circuits after removing the original calipers and hoses. It is very convenient to use a medical clamp with a lock for this; if you don’t have one at hand, you can get by with thin-nose pliers/pliers, repeatedly wrapping their handles with increasing force with a tight rubber band or rope. Next, we dismantle the original brakes, there are no difficulties here - we unscrew the caliper from the knuckle, then the brake hose, remove the brake disc, and, unscrewing the hub nut (it’s better to loosen them with a sharp bit before doing this, you won’t spoil the threads and you don’t have to buy new nuts), remove the hubs . Attention!
The thread on the right hub nut is right-handed, i.e.
the nut is unscrewed clockwise
. Next comes the most difficult part - you need to unscrew the original caliper adapter and bipod from the fist. On the one hand, I tried to unscrew them, the short bolts came out without any problems, but the long ones that hold the bipod were a problem. If you have access to an angle grinder, cut them down immediately, saving a lot of time and nerves. Another option is to drill out the caps. They come out of the caliper adapter and knuckle normally, but you don’t even have to try from the bipod. I forgot to say, the steering ends will also have to be removed, who knows what, I used the Force universal ball joint remover and a pneumatic impact wrench. The main thing is not to spoil the carvings on your fingers. It is better to do the next operation in advance. Back at home, having attached the adapters to the 2110 calipers, I saw that the adapters would have to be sharpened from the side of the brake cylinder, otherwise one mounting hole would not match. This is clearly visible in the photo:
After filing with a grinder along the intended lines, you should end up with something like this:
After this you can start assembling
. Thoroughly clean the mating surface of the knuckle from rust with an iron brush. During the assembly process, I highly recommend lubricating all mating surfaces and bolts with any grease (litol, CV joint, etc.) to avoid souring and to facilitate future disassembly of the assembly, if necessary. I used universal high-temperature lithium grease from MS
We install the adapter on the fist (do not confuse the right with the left), the bipod, and tighten all the bolts properly. You can ignore the fact that one edge of the head of the original bolts is ground off so that it does not touch the hub; nothing touches me with ordinary heads. We tighten the wheel nut by hand; adjusting the bearing clearance will need to be done at the very end, with the wheel installed.
We install the brake disc (if they are not standard, do not confuse the right with the left), and the caliper:
Next, we connect the hydraulics and pump the brakes according to the standard scheme. On the other hand, we repeat all operations. After installing the wheels, it is necessary to adjust the thermal clearance of the wheel bearings. There is nothing complicated in this procedure, the information is on the Internet, just in case, I’ll tell you how I do it. The bearing is slowly tightened until you can no longer feel the play of the wheel along the vertical axis with your hands (we shake the wheel by holding it with your hands at 12 and 6 o’clock), after which the nut is unscrewed by 10 degrees. This will provide the necessary thermal clearance for normal operation of the bearing. We lock the nuts with a sharpened beard. Don't forget, the thread on the right nut is right-hand, the nut is screwed counterclockwise. That's all. We drive and enjoy the work of the new system.
Even if they are not ground in, with crappy standard pads they brake a little better than the original brakes, I can imagine what will happen with the ground in TRW pads. And one more thing that will need to be corrected is the dangerous proximity of the brake hoses to the levers, this is clearly visible in the photographs, a little later I’m thinking of putting back the standard hoses, or coming up with some kind of fasteners for these to avoid chafing with the levers. Well, due to the replacement of the bipod, the toe-in was slightly out of whack, so we'll have to go to a wheel alignment.
Removal and repair of front calipers on VAZ 2101 (front brakes)
I noticed that when the car sits overnight after a trip, you can barely move it at normal engine speeds. I had to change the throttle and “rip off” the wheels, so to speak. I didn’t sin on the rear wheels, since I recently changed the pads and adjusted them more or less normally. But there is some kind of problem with the front brakes. Even when I got “wheels,” the first and second thing I did was change the running gear consumables and the front pads (the rear ones were still intact at that time). 3 years have passed and the problem has not gone away. So, vacation has arrived, a convenient moment to implement our ideas and off we go... The first thing we need is TOOLS, namely: a jack, a wheel wrench, keys for 10, 14 (many have 13) and 17 and, if available, the same heads, screwdriver, pliers , a hammer, a split wrench for pipes, a stationary vice, some kind of container for collecting parts. What I didn't indicate, look at the photos.
Tool used for removing front calipers on VAZ 2101
Parts: Brake fluid (1l, but less can be done), repair kit for front brake cylinders
I also had a Soviet set, but in the same quantity
If you decide to replace the brake cylinders completely, it is advisable to change them in pairs (internal + external). Let's start with... Jack up the wheel, turn it by hand and at the same time check for play in the bearings (it won't hurt)
Remove the wheel and see the following picture
We have a hub, caliper, hoses, etc.
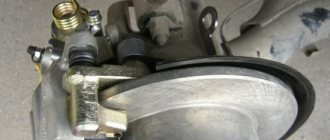
Unscrew the bolt securing the brake hose bracket to the caliper and remove the bracket.
We unscrew the bolt securing the brake hose and remove it with the upper sealing washer and the brake hose. You need to be careful here, because the second (lower) sealing washer remains on the brake cylinder. Don’t lose it, otherwise you will have to look for it in your hardware, because you can’t live without it. As soon as you start unscrewing this bolt, brake fluid will begin to ooze from under it, and only the degree of your skill will determine how much brake fluid you will then have to add to the reservoir. When you unscrew and remove the bolt from the hose, the hole will need to be closed with something (for example, a piece of rubber from a camera twisted into a cone did the job perfectly). So, the hole was plugged, the removed parts were put in one place and the copper washer was not lost. Remove two cotter pins from the fingers; we knock out the fingers from the brake cylinders; remove the brake pad pressure springs and take them out.
If they do not give in, and in most cases with jammed brakes this is the case, then a hammer, punch or something similar comes to the rescue and carefully knock out the pads. By the way, the pads may be prevented from coming out by the shoulder on the disc formed by the wear of the pads.
It's time to unscrew the two caliper mounting bolts. I read several manuals that write about lock washers, but I didn’t see (or feel) anything other than the Grover (which is essentially a lock washer anyway). We take the key (head and knob) 17 in our hands and boldly unscrew it with Virastyuk’s effort
This is the end of removing the caliper. By the way, without pads, the brake disc spins very happily!
Installing the caliper is the reverse of removing it, so there shouldn't be any problems. But I had an embarrassment - the batteries on the camera ran out, so no further photo accompaniment. We take the removed caliper and first go to a convenient place to remove the connecting line, and then to the vice along the way, grabbing a hammer and a wooden block (after all, it’s aluminum, it’s a pity). Here you need to remember about the retainer, which rests on each cylinder and can be seen by the slot in the caliper body. And it rests with me because everything is covered with dirt and after pressing it once, it never returned to its place. It's okay, we'll fix it. The main line can also become sour and not succumb to provocations, so you should consider purchasing spare ones. First, we fix one side of the caliper, and on the other we knock out the brake cylinder and remember and mark the side from which it was removed. We repeat the same procedure with the other brake cylinder. Having examined the removed cylinders, I fell into a stupor. How to pull out the pressure cylinder itself. and came to the conclusion that you need to connect it back to the brake hose and pump the brake pedal several times and it will come out of the housing. This is how it happened, but the main thing here is not to overdo it, because you can lose a lot of brake fluid, which is what happened on my first sampler. That's why you need 1 liter of liquid))). I did the same with the other cylinder, only I screwed the plugged tube from the line (lying around in the parts) into the adjacent hole. Now we carefully wipe them and diagnose them. I got by with a small scrape of oxidized aluminum on the edges with a knife and that’s it. For each cylinder there is one oil seal, which is placed inside the housing, and one boot - tensioned after installing the pressure cylinder in place. Before installation, coat everything in brake fluid and assemble it. I’ll say right away that the pressure cylinder is very bad, it almost doesn’t fit into the body, so it needs to be driven in with a hammer at both ends at the same time (I hope you’ll understand).
I forgot to mention the retainer. I pulled it out, blew out the hole with lung air, lubricated it with lithol and put it back. We put everything back together, and then back again, install it on the car and pump this wheel. There is no point in pumping other wheels, since the sorcerer (force distributor) did not allow air to enter the rear cylinders.
Installing VAZ 2112 brakes on a VAZ classic
I am posting a manual for installing VAZ 2112 brakes on a classic.
Necessary tools and small parts
7mm wrenches - unscrew the studs, 8mm - bleed the brakes, 13mm - install the pads in the new caliper, 14mm - unscrew the old brake hose from the old caliper and screw it to the new one, 15mm wrench - remove the brake hose from the VAZ 2112 caliper - provided that it is attached there, wrench 17mm head + ratchet and standard, 27 mm - socket or head.
Washers for the brake hose - 4 pcs., long bolts for fastening the washers plan 99% that the original ones are attached - 4 pcs. That's all. Litol - 24 and brake fluid.
So, the list of stages and sequence:
1. Remove the wheel - 4 unscrew the 4 bolts. 2. Remove the original 13″ caliper - without unscrewing the brake fluid hose
held on by 2 17mm bolts
caliper mounting points
3. Remove the 13″ brake disc along with the hub - 1 nut per 27mm, having previously unscrewed the studs. 4. Remove the original faceplate, along with the boot - 4 17mm bolts
Further about the stages of assembly and what needs to be done first: 1. You need to take metal scissors or a grinder to cut the boot - just like in the photo and straighten it with a hammer. Otherwise the 14″ disk will not fit.
Please pay attention to where else it is necessary to cut the boot so that the new caliper can easily fit into its seats. Cut only for installing the caliper.
2. We fasten the new faceplate (you can see how to install it in the figure above), I warn you, do not forget to insert the lower bolt into the new faceplate, otherwise the lever simply will not allow you to install it later, and I also advise you to install the upper bolt there instead of the lower one with a flat head, and not round
together with the boot also 4 bolts back, it is impossible to confuse the installation locations of long and short bolts). The only thing I draw attention to is the need to install brackets to firmly secure the bolts and nuts from loosening.
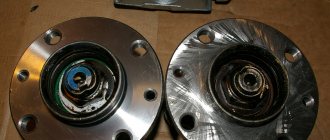
3. You must first grind off the small protrusion on the hub in a circle in any convenient way, otherwise the brake disc will not fit, see the photo, you can clearly see where to grind
4. Install the new disc back onto the hub. Sharpen the hub better - otherwise you will have ABS to check whether the disc is level. We put it on the hub without pulling it and try to swing it from side to side, if there is any play, then we continue sharpening
tighten with studs and twist; also check for evenness of rotation, do not overtighten the hub! It’s better to tighten it to the same riveted places on the nut and rivet them again. 5. We put pads into the brake caliper and put them on top of the disc, fix the caliper with 2 bolts). Once again we check for smooth rotation - runout of less than 0.2 mm is allowed... 6. Unscrew the brake hose from the old brake caliper - 14 mm nut. Take new bronze washers and attach the original hose from the VAZ 2101 or a new one to the new caliper. This is so that the main brake does not catch air and the loss of brake fluid is minimal. The nut is marked in the photo
7. Bleeding the brakes, preferably all circuits.
Here is the finished result:
From force majeure: I had to replace one hub (the thread on one of the bolts was eaten up); the disk and tires were held on by three bolts and a new internal boot was attached to it. I’m sharing my first impressions, the new brakes are starting to gain momentum, the pads are being quickly ground in, their effectiveness is starting to increase, but I feel that maximum aggression is yet to come.
Useful drawings for installing VAZ 2112 calipers in a VAZ 2107
And this is my drawing.
Here are some drawings that might be useful to someone.
https://www.drive2.ru/l/3010828/, https://www.drive2.ru/l/5668721/, https://www.drive2.ru/l/288230376152186883/, https://www .drive2.ru/l/925982/
next article:
Parking brake (handbrake) VAZ 2101, 2106, 2107 classic
Contents of the article: Installing a hydraulic handbrake on a VAZ 2101. Sound signaling device for the parking brake (handbrake) on a VAZ 2103 1.
Rating 0.00 [0 Vote(s)]