- Posts: 31
- From: Omsk
- GAZ 31105 Volga sedan Chrysler
February 12, 2014, 09:55 #27 123
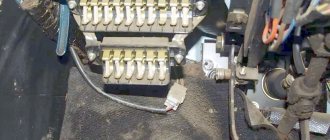
In general, the problem is in the starter. Everything needs to be removed and cleaned. a man looked and said the starter was taking over, something was burnt there
If you close the contacts on the starter on the retractor and there is no reaction? It turns out correctly that they suggested that there was a problem with the starter, that it needed to be removed and everything cleaned. check?
- Posts: 31
- From: Omsk
- GAZ 31105 Volga sedan Chrysler
February 12, 2014, 10:20 #28 123
drop a link to the instructions for disassembling and repairing the starter!
- Posts: 3060
- From: Novosibirsk
- ZIL 5301 Bull
February 12, 2014, 15:37 #29 123
Alexey31, February 12, 2014, 10:20, #28
drop a link to the instructions for disassembling and repairing the starter!
I burned out a couple of times, there’s a rotary and plastic all in a bunch :-(what kind of engine is yours?
- Posts: 31
- From: Omsk
- GAZ 31105 Volga sedan Chrysler
12 February 2014, 15:52 #30 123
Barmaley, February 12, 2014, 15:37, #29
I burned out a couple of times, there’s a rotary and plastic all in a bunch :-(what kind of engine is yours?
Chrysler. I've removed the starter and will now look at what's what.
- Posts: 3060
- From: Novosibirsk
- ZIL 5301 Bull
12 February 2014, 17:17 #31 123
Well, try it, although this is the first time I’ve heard that these starters are buggy: - (the gene could be lying, now after the frost I’ve started recharging, Akum doesn’t boil; it’ll be 75 warmer; I’ll take it apart;-)
- Posts: 31
- From: Omsk
- GAZ 31105 Volga sedan Chrysler
12 February 2014, 17:31 #32 123
Barmaley, February 12, 2014, 17:17, #31
Well, try it, although this is the first time I’ve heard that these starters are buggy: - (the gene could be lying, now after the frost I’ve started recharging, Akum doesn’t boil; it’ll be 75 warmer; I’ll take it apart;-)
I disassembled the starter, the rotor was burnt out. but this happened because the bushing was bitten, the whole nest there was broken for some reason. Is there somewhere in Omsk where I can buy a starter or maybe there is an analogue? the original costs a little more than 10 thousand.
- Posts: 3060
- From: Novosibirsk
- ZIL 5301 Bull
12 February 2014, 18:34 #33 123
Alexey31, February 12, 2014, 17:31, #32
I disassembled the starter, the rotor was burnt out. but this happened because the bushing was bitten, the whole nest there was broken for some reason. Is there somewhere in Omsk where I can buy a starter or maybe there is an analogue? the original costs a little more than 10 thousand.
What is this all of a sudden? the starter is around five thousand!!
- Posts: 3060
- From: Novosibirsk
- ZIL 5301 Bull
12 February 2014, 18:34 #34 123
five five hundred I think if memory serves ;-)
- Posts: 31
- From: Omsk
- GAZ 31105 Volga sedan Chrysler
12 February 2014, 20:16 #35 123
Barmaley, February 12, 2014, 18:34, #34
five five hundred I think if memory serves ;-)
I just looked in online stores.
- Posts: 31
- From: Omsk
- GAZ 31105 Volga sedan Chrysler
February 12, 2014, 20:40 #36 123
Reasons for starter failure on GAZ 31105 and ways to solve problems
There are many reasons for unstable operation of the starter and its complete failure. The main, most common:
- “sluggish” cranking of the starter;
- The starter shaft does not turn at all.
In the first case, the problem lies in the wiring or battery. In most cases, it is the battery that causes poor engine starting and other similar problems. First of all, you should check the voltage at the battery terminals, make sure that it is working properly and that the generator is performing the recharging. There may also be wiring difficulties. Poor contact, broken wire - all this can lead to the inability to start the engine.
If the battery is in order, there is ground, you need to make sure that the solenoid relay is working properly. To check it you need:
- put the car on the handbrake or block the wheels;
- set neutral gear;
- Using an open-end wrench, we wash the power contacts of the solenoid relay.
If, after carrying out such actions, it starts to turn old, the problem lies precisely in the solenoid relay. The best solution is to replace such a relay. But you can also try to repair it. Another problem is bendix. It is an elongated shaft with a gear at the end equipped with slots that mesh with the engine flywheel. It is this that is controlled by the retractor relay.
When the contacts of the latter are washed, the starter begins to spin the engine, after which it starts. Over time, the splines that engage are worn out. This leads to the starter cranking. Bendix is not up to the task. The problem can only be solved by replacing it or the entire starter. To determine the cause of the malfunction, it is necessary to use an inspection hole or a lift. This is the only way to get acquainted with the condition of the starter on the GAZ 31105. The device is located in a hard-to-reach place.
Sometimes the starter works, but makes strange noises. The reasons may vary. There are following ways to solve the problem:
- the attachment of the starter to the clutch bell has become loose - to check, just shake the starter by hand (if it wobbles, it is advisable to tighten the nuts);
- the starter clutch does not move enough in its working area, the gear does not fall into place - to fix the problem you will have to remove the starter and clean the shaft;
- sometimes extraneous noise occurs due to a special fork - it moves the sliding clutch (it sometimes wears out, breaks - it needs to be replaced).
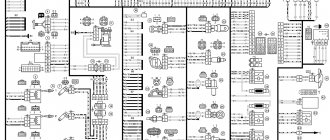
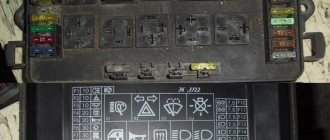
Blocks in the cabin
Fuse box
Option 1
It is located in the cabin, above the glove compartment and consists of two parts. To access, you need to slide the protective strip.
Photo - diagram
Description
Left block
| 1 | 25A Heater (air conditioning) electric motor |
| 2 | 15A High beam right headlight |
| 3 | 15A Main beam of the left headlight, high beam headlight indicator |
| 4 | 10A Low beam right headlight |
| 5 | 10A Low beam left headlight |
| 6 | 10A Rear fog light |
| 7 | 20A 2008 Radio equipment 2005 Injection system devices |
| 8 | 20A Cigarette lighter , horn relay, horns |
| 9 | 15A 2008 (Euro-3): Engine management system 2008 (Euro-2): Electric fuel pump, oxygen sensor 2005: Heated mirrors, electric fan relay coil |
| 10 | 10A 2008 (Euro-3): Electric fuel pump 2008 (Euro-2): Engine management system 2005: Radio equipment |
| 11 | 5A 2008 (Euro-3): Engine control unit 2008 (Euro-2): Turn signals, relays and turn signal indicators 2005: Electric drives of exterior mirrors, forced idle economizer unit (ZMZ-402), oxygen sensor (3M3-40621) |
| 12 | 15A Engine compartment lamp, glove box lamp, interior lamp |
| 13 | 10A 2008 (Euro-3): Turn signals, relays and turn signal indicators 2008 (Euro-2): Engine control unit, ignition coils 2005: Windshield wiper, headlight washer relay |
Fuse number 8 at 20A is responsible for the cigarette lighter.
| 1 | 25A Fog lights |
| 2 | 15A Heater (air conditioning) control unit, rear window heating relay, rear window heating (1 mode), additional heater |
| 3 | 15A Speedometer sensor, instruments, warning lights, reverse light, electric fan relay |
| 4 | 10A Brake lights |
| 5 | 10A Hazard Alarm |
| 6 | 10A Left side lights, fog light relay, side light indicator |
| 7 | 20A Heated rear window (mode 2), interior lamps, rear door, rotating headlight (medical car) |
| 8 | 20A Glass lifts |
| 9 | 15A 2008: Windshield wiper, headlight washer relay 2005: Ignition coils |
| 10 | 10A Anti-lock Brake System ABS |
| 11 | 5A 2008: Power and heated exterior mirrors 2005: Turn signals, relays and turn signal indicators |
| 12 | 15A Locking |
| 13 | 10A Right side lights, electric headlight range control, lighting: trunk, license plate, instruments, cigarette lighter, switches, medical sign lights, taxi |
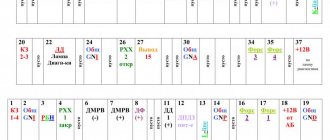
Option 2
Located in the cabin under the instrument panel, on the driver's side behind the protective cover.
Scheme
Designation
Upper block
| 1 | 25A Heater (air conditioning) electric motor |
| 2 | 15A High beam right headlight |
| 3 | 15A Main beam of the left headlight, high beam headlight indicator |
| 4 | 10A Low beam right headlight |
| 5 | 10A Low beam left headlight, low beam headlight warning light |
| 6 | 10A Rear fog light |
| 7 | 20A Radio equipment |
| 8 | 20A Cigarette lighter , horn relay, horns, instrument cluster, clock |
| 9 | 15A Euro-3 Engine management system, Euro-2 diagnostic connector: Electric fuel pump, oxygen sensor (ZMZ-40621) |
| 10 | 10A Euro-3 : Electric fuel pump Euro-2: Engine management system, diagnostic connector |
| 11 | 5A Euro-3: Engine control unit Euro-2: Turn signals, relays and turn signal indicators |
| 12 | 15A Engine compartment lamp, glove box lamp, interior lamp |
| 13 | 10A Engine control unit, ignition coils (ZMZ-40621) |
Fuse number 8 at 20A is responsible for the operation of the cigarette lighter.
| 1 | 25A Fog lights |
| 2 | 15A Heater (air conditioning) control unit, heater valve, front lamp, interior temperature sensor, fog lamp relay coil, + (ZMZ-40525, Chrysler 2.4L-DOHC (Euro-3): speedometer sensor, reverse light, instrument cluster ) |
| 3 | 15A Euro-3: Hazard alarm Euro-2: Speedometer sensor, reverse light, instrument cluster |
| 4 | 10A Brake lights |
| 5 | 10A Euro-3: Direction indicators, relays and indicators Euro-2: Hazard warning lights |
| 6 | 10A Left side lights, side light indicator |
| 7 | 20A Heated rear window and heated exterior mirrors |
| 8 | 20A Window lifters |
| 9 | 15A Windshield wiper and washer |
| 10 | 10A Anti-lock Brake System ABS |
| 11 | 5A Electric drive of exterior mirrors |
| 12 | 15A Locking |
| 13 | 10A Right side lights, electric headlight range control, headlight washer relay, trunk light, license plate light, instrument light, cigarette lighter light, switch light, medical sign light, taxi |
Relay block
It is attached near the left drain, under the driver's side panel, behind the trim.
Scheme with decoding
- Warning lamp relay
- Starter relay
- Fog light relay
- Signal relay
- Heated rear window relay
- High beam relay
- Low beam relay
- Rear fog lamp relay
- Wiper relay
- Engine cooling fan relay
Separately, outside the block, on the turn signal switch itself, there is a turn signal relay.
Original parts and their analogues: which is better
Today on the market all parts, including starters, are divided into two main categories:
The former have an undeniable advantage - the likelihood of purchasing unsuitable equipment is reduced to a minimum. But their cost is 30-100% higher than their analogues. The latter sometimes have a resource of slightly worse quality than the original ones. But the price is much lower. Original starter:
| vendor code | Exact name | Manufacturer | Cost, rubles |
| 56041436 | Engine starter (Chrysler) | Daimler Chrysler | 5190 |
There are a large number of analogues on the market. All of them differ in quality, both for the better and for the worse, from the original Chrysler part. The following have proven themselves to be good:
| vendor code | Exact name | Manufacturer | Cost, rubles |
| 0001362059 | Engine starter (Chrysler) | Bosch | 3400 |
| 0001367008 | Engine starter (Chrysler) | Valeo | 3560 |
| 0986016200 | Engine starter (Chrysler) | Delco | 4140 |
Unloading wipers — GAZ 31, 2.3 l., 2006 on DRIVE2
For those who are too lazy to read, and also for those who want to see the work of the wipers before and after the alteration, there is a small
For some reason I’ve been making frequent notes, but damn, you’ll be floundering in the middle of the sea in a tin can, and then in a short stop there’s so much I’d like to do and I’ll tell you that now in the rain, fortunately it’s summer and warm, I decided to slightly treat the windshield wipers)
So, problems with wipers have been haunting me since my first trip to Moscow, since then the problem with them has gotten very worse, but I was too lazy to get into it.
With great difficulty I found an old wiper relay in the garage and returned it to its place.
For a couple of days everything was amazing - the wipers worked, did not hover among the glass and seemed to be waving more or less cheerfully, but then glitches suddenly began - they might not turn on, they might not turn off, they might freeze, in short, nope.
Apparently, lying in the garage did not add life to the relay
I bought a new relay, it has a slightly different shape and with a different number, but it works correctly
Starter replacement and installation procedure
Replacing the starter with a new one sometimes causes some difficulties. The process has its own characteristics and difficulties. For repair work, you need to prepare the following tools in advance:
- open-end wrench – 13 mm;
- cardan joint – 0.75;
- extension – 0.75;
- head with ratchet – 14 mm.
All procedures must be performed in an inspection pit or using a special lift. The starter removal algorithm includes the following main steps:
- it is necessary to remove the terminals from the battery;
- Next, you should pull out the washer reservoir - where the liquid for washing the windshield is poured;
- carefully, trying not to damage it, remove the insulating rubber cap from the terminal;
- Use an 8 wrench to unscrew the nut securing the tip (control), disconnect the tip;
- using a 13-mm open-end wrench, unscrew the nut securing the tip of the power cable from the battery - the tip itself is disconnected;
- then the starter mounting nuts are unscrewed - using a socket with a 14mm extension (the fastener itself is carried out directly to the bottom of the car);
- if there is no inspection ditch or lift, you can unscrew it with an open-end wrench from the engine compartment - but doing so is not very convenient.
After completing all the above steps, you can remove the starter. To avoid unnecessary discomfort, you can remove the solenoid valve that controls the heater. Another difficult area is disconnecting the tap from the splash guard; it is then moved to the side. Then the starter is carefully removed.
ideas for unloading wipers. part — GAZ 31, 2.4 l., 2007 on DRIVE2
there was time and a donor to experiment with unloading the wipers on the 3110 1998 model year. (a friend’s car, he currently drives mine). The wipers barely crawled across the glass. I googled the diagram for the windshield wiper relay from a gazelle n/o:
At the same time I was going to unload the wipers. I know 3 types of them. 1) power the common positive wire directly from the battery:
This circuit supplies voltage from the battery directly to the standard wiring circuit, bypassing unnecessary meters of wire. It didn't seem very effective to me. The load on the controls remains, although lower than standard, but still large. put it aside for storage. but in vain. why in vain you, dear readers, will find out a little later.
2) “ the janitor is a booster of the Kuvaldych-Romanov) this method was eliminated by a friend. motivating this by the lack of 1st (or 2nd, depending on which way you look at it) speed. I'm not going to implement it yet. This is what the diagram looks like:
www.drive2.ru/l/1914674/ - diagram and description taken from the user SledgeHammer. I hope I didn't offend him with this.
3) this scheme greatly relieves all windshield wiper control elements. With its help, the windshield wiper motor is powered from the battery:
as if this is the most effective scheme. I practiced it on my own Italian (there seem to be Lancias in the BZ). I did not get proper work from it. The wipers did not stop after turning off. there is no pause at all. Then I was happy for the most powerful motor (as I had planned) and returned to the initial version. Now I’ve concocted one for the Volga - we connect it - the situation repeats itself. I warned my friend about possible trouble. on the standard circuit, his wipers barely moved on the glass at 1st speed. relay increases speed to 1st galactic