The vehicle control system is responsible for the direction of its movement, as well as, to a large extent, for the safety of the driver and passengers. One of the most important elements of this system is the steering rack. Its role is to transfer force from the steering wheel to the rods, which, in turn, force the steered wheels to turn in one direction or another.
With the exception of the latest versions in VAZ-2110 cars, the steering rack is not equipped with a power amplifier, but this does not mean that its mechanical design will last forever. Like any other moving mechanism, it sometimes fails. We will talk about what the VAZ-2110 steering rack is and what problems happen with it in this article. In addition, we will figure out how to repair or replace it yourself.
Design and role of the steering rack in the control system
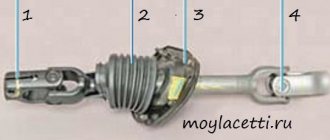
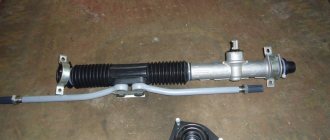
The VAZ-2110 steering rack is a steel form, one side of which has teeth that mesh with the teeth of the drive gear. The latter is driven by the steering wheel through the shaft and its cardan. In VAZ-2110 cars, the steering rack is located in a column, which is mounted on the partition between the engine compartment and the passenger compartment.
Its upper part has a mount for two rods, which are connected to the shock absorber struts through the tips and their fingers.
When you turn the steering wheel, its shaft rotates and transmits force through the cardan to the drive gear. As it rotates, it moves the rack along with the rods in the desired direction. This is how the car is controlled in such a simple way.
Naturally, to ensure normal operation of the rack, the design of the steering mechanism includes a number of other parts:
- column housing (case);
- protective casing (corrugation) with clamps;
- two drive gear bearings (ball and needle);
- support sleeve (fluoroplastic);
- emphasis;
- thrust nut;
- anthers, plugs, washers, etc.
Steering mechanism: parts and principle of operation
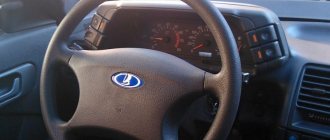
Cars of the Lada Samara model line received safety steering, which can be adjusted to the height of the steering column. The VAZ 2110 car has a rack and pinion mechanism, which includes the following parts:
- Retaining ring.
- Steering wheel.
- Casing.
- Column.
- Bracket.
- Adjustment lever.
- Traction and tips.
- Shaft bearing.
- Upper shaft.
- Hole for sound signal.
The steering mechanism works on a simple principle: the driver, by turning the steering wheel, changes the direction of movement of the car. Levers and shafts ensure the transmission of force to the chassis of the VAZ 2110. This model line does not provide an electric or hydraulic booster, so more effort is needed to turn the car than on foreign cars. The steering column allows you to adjust the tilt of the steering wheel; the mechanism is adjusted manually.
How to eliminate backlash?
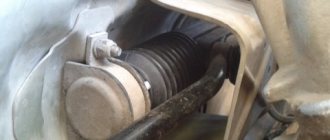
If you identify signs of a malfunction, do not despair; perhaps everything will cost you with minor repairs, especially since the rack itself very rarely fails. First, let's figure out whether there is play in the steering wheel and how to tighten the steering rack on a VAZ-2110 to get rid of it. First of all, open the hood and find the location of the column. We dismantle the engine elements that interfere with free access to it (air filter, air duct). Holding the steering rods with both hands, try to move the rack left and right. If play is detected, we get rid of it by adjusting the thrust nut.
Adjusting the VAZ-2110 steering rack is a fairly simple process, but this will require a special 17mm wrench with an octagonal head. Without this tool, work can not begin. If the key is at hand, go under the car and remove the engine protection. After this, move under the front of the car and find the location of the column. Remove the plastic plug from the thrust nut. Further adjustment of the VAZ-2110 steering rack is carried out by tightening this nut inside the column body. Rotate it 10-15 degrees, then check the amount of play. If necessary, repeat the procedure. It is important not to overtighten the thrust nut, otherwise the steering shaft will be difficult to rotate.
In addition, check the reliability of the tie rods. If necessary, tighten their fastening bolts.
Replacement and repair of main parts
When a malfunction is detected, you need to collect all the necessary parts and tools for the VAZ 2110. You will definitely need sets of screwdrivers and wrenches. It is also necessary to check the availability of socket heads, pliers, a metal brush and a special puller that is used to service the device. If it is not there, then a small crowbar or hammer will do as an alternative.
How to change tips and rods
Replacing tips and rods is as follows:
- The first step is to jack up the VAZ 2110 and remove the front wheel;
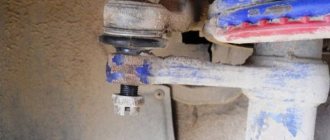
- The area where the rack tip attaches to the steering knuckle must be thoroughly cleaned, and then the nut must be treated with WD-40;
- Next, you need to remove the cotter pin securing the connection; for this you will need pliers;
Remove the wire fixing nut by pulling one end with pliers
- After this, you need to remove the finger using a special puller, after unscrewing the nut;
- Once the pin is removed, the tips can be unscrewed and removed. They must be checked for defects and replaced if necessary;
Removing the finger - Having removed the tips, you should bend the plate at the bolt to get to the rod;
- The next step is to unscrew the rod bolt;
- Done, now the rod and its ends can be dismantled. Replacement is carried out in reverse order. After installing new parts, you need to check the steering wheel without completely assembling the entire steering mechanism. If everything works, the steering wheel does not move tightly and does not wobble, then assembly can be carried out.
Replacing the steering wheel
It will be easier to dismantle the steering wheel than the ends and rods. It is worth saying that the steering wheel is rarely changed; usually a more stylish and convenient option is installed instead. It is necessary to check before purchasing whether the new part fits the steering mechanism.
The replacement takes place as follows:
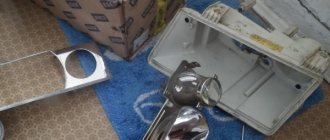
- The cover must be carefully pryed off with a screwdriver and removed;
Carefully pry off the trim using a flathead screwdriver
The steering wheel can now be completely removed
Removing the steering column
If after adjustment the problem with the rack does not disappear, you will have to disassemble and repair it. But to do this it needs to be removed. There are two methods of dismantling: with and without tie rods. The latter method is preferable as it requires much less time. Before removing the steering rack on a VAZ-2110, the front part of the car needs to be jacked up on both sides. This is necessary in order to unload the traction.
In the cabin, in the area of the pedal block, you need to unscrew the steering shaft cardan bolt. After this, we go to the engine compartment and unscrew the 2 bolts securing the rods, having previously bent the locking plate. Then you need to unscrew the 4 bolts securing the steering column to the car body. When this is done, remove the column and remove it through the opening of the left wheel arch.
Why is steering needed?
A complex system - steering - is an integral component of the car, supporting the motion vector set by the driver, synchronizing the position of the steering wheel with the angle of rotation of the wheels.
Car steering device
The driver's command to the wheels of any ground vehicle is transmitted through the steering control, be it a VAZ-2114 car or another car.
What is a do-it-yourself VAZ-2110 steering rack repair?
Take care of your tools in advance. Here you will need two special keys: a 17 octagon and a 24 octagon, as well as bearing pullers. It is worth noting that repairing the VAZ-2110 steering rack involves replacing parts that are most susceptible to wear. These are bearings and a drive gear boot, a stop, retaining rings, a support sleeve, and seals. All these elements can be purchased as a set. There are three types of repair kits on sale:
- minimal, including a support sleeve, boot, retaining rings and seals;
- standard, which in addition to the listed parts includes bearings;
- complete, which also includes a new rack.
It is recommended to buy a repair kit only after you remove the column, write down its markings (different versions of the VAZ-2110 may have different configurations) and disassemble it, identifying the spare parts that need to be replaced.
Disassembling the steering column
We begin disassembling the control unit by removing the protective casing by cutting the plastic clamps. After this, use a special key of 17 to unscrew the thrust nut, take out the retaining ring, the spring and knock out the rack stop. Next, remove the boot and drive gear seal, remove the lock washer, and then use a 24mm wrench to unscrew the nut securing the ball bearing. We remove the gear. Now that there is nothing holding the rail in the case, we remove it through the right side of the case. We remove the needle bearing of the drive gear from its seat. To do this you will need a special puller. Check the drive gear bearings for play. If present, the bearings will have to be replaced.
Assembly procedure
We begin repairing the VAZ-2110 steering rack by installing the needle bearing of the drive gear. The seat is first generously lubricated with a special lubricant such as “Fiol-1”. After this, we press a new ball bearing onto the drive gear shaft. Next, install the support sleeve from the repair kit inside the control unit housing. Now we fill the inner cavity of the column with lubricant and insert the steering rack into it.
We mount the drive gear and secure it with a locking ring and nut. We put a new boot on its shaft.
We install the stop with the seal in place, secure it with a stopper and a thrust nut. That's basically it. Now you need to adjust the control unit and put the protective cover on it.
Replacing the steering rack of a VAZ-2110
It is rare, but it happens that replacing consumables is not enough. The steering rack, although made of steel, is still subject to wear. Most often, the reason for this is the negligence of car owners who do not monitor the condition of the steering mechanism. In addition, the rack may also be damaged as a result of a traffic accident. But there is no need to despair here either. The VAZ-2110 steering rack is replaced according to the scheme described above. The only thing you need is to purchase a complete repair kit, which costs on average about 1,500 rubles.
Diagnosing the malfunction
Like any other mechanism, the steering rack fails sooner or later.
A similar mechanism is present in any car, both equipped with electric and hydraulic booster and without it.
Muffled sounds and impacts can be felt when driving over uneven surfaces, and can also be transmitted to the steering wheel.
The malfunction manifests itself in a similar way when the car is stationary and the steering wheel is turned.
When turning the steering wheel, a significantly increased force may still be observed.
These main symptoms indicate that the steering rack needs to be repaired, no matter what brand of car they appeared on: VAZ 2110 or another model.
To determine the state of this node, we do the following.
Steering VAZ 2110: fault diagnosis, replacement of tips and tie rods
Every part of the VAZ 2110 will sooner or later require replacement, and the steering mechanism will not be an exception. This is a fairly simple unit, since there are few elements in it, and some parts need to be changed no earlier than after 100 thousand kilometers. After studying this article, the reader will learn what is included in the steering and how it works. Also in this material there are three instructions that talk about replacing the steering rod, tips and the “steering wheel” itself. The only special requirements that can be highlighted are the presence of an inspection hole and a jack, but these components are present in almost every garage.
Important! You can find out the service life of each part that is included in the steering in the VAZ 2110 operation and maintenance manual. The manual also contains a description of malfunctions and ways to solve them. It is recommended that you go through the entire manual at least once so that you know approximately when a part requires replacement or service.
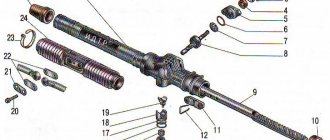
Steering rack device for VAZ 2110
In order to repair the rack yourself, you will need to study the design of this unit.
1 - clamps; 2 — protective cover; 3 — internal plate; 4 — steering rod; 5 — outer plate; 6 — bolt for fastening the rod; 7 — locking plate; 8 — protective cap; 9 — crankcase pipe; 10 - sealing rings; 11 — support sleeve; 12 — bracket for fastening the rod support; 13 — rod support; 14 - rack; 15 — nut securing the crankcase pipe; 16 — retaining ring; 17 - sealing ring; 18 — crankcase cover; 19 — gear boot; 20 — washer; 21 — cover fastening bolt; 22 — separator with rollers; 23 — steering gear; 24 — lock washer; 25 — support plate; 26 — plate body; 27 — lower gear bearing; 28 - crankcase; 29 — left protective cap; 30 — rack stop insert; 31 — emphasis; 32 - sealing ring; 33 - spring; 34 - sealing ring; 35 — stop nut; 36 - plug.
Useful tips
Finally, here are some useful tips that will extend the life of the steering rack and other elements included in the control unit:
- At least once a quarter, check the condition of the steering at a service station or yourself.
- Pay attention to the condition of the steering column protective cover.
- Try to limit driving on uneven surfaces, especially at high speeds.
- Do not test the strength of the steering rack and the entire mechanism by moving away with the steering wheel turned all the way to the side.
- If play or other signs of steering rack malfunction are detected, repair or replace it.
Steering mechanism assembly with drive
| 1 – tie rod end; 2 – ball joint of the tip; 3 – rotary lever; 4 – adjusting rod; 5 and 7 – inner tie rod ends; 6 – bolts securing the steering rods to the rack; 8 – steering gear mounting bracket; 9 – steering gear support; 10 – protective cover; 11 – locking plate; 12 – connecting plate; 13 – rubber-metal hinge; 14 – damping rings; 15 – rack support sleeve; 16 – rack; 17 – steering gear housing; 18 – coupling bolt; 19 – elastic coupling flange; 20 – roller bearing; 21 – drive gear; 22 – ball bearing; | 23 – retaining ring; 24 – protective washer; 25 – sealing ring; 26 – bearing nut; 27 – intermediate steering shaft; 28 – boot; 29 – protective cap; 30 – sealing ring of the stop; 31 – rack stop; 32 – spring; 33 – stop nut; 34 – retaining ring of the stop nut; 35 – plug; 36 – liner spring; 37 – ball pin insert; 38 – ball pin; 39 – protective cap; A, B – marks on the boot and crankcase; C, D – surfaces on the ball joint and swing arm |
Steering column
| 1 – intermediate steering shaft; 2 – coupling; 3 – steering shaft mounting bracket; 4 – cardan joint; 5 – spacer sleeve; 6 – bushing of the support plate; 7 – universal joint crosspiece; 8 – needle bearing of the crosspiece; 9 – support plate; 10 – pipe of the steering shaft bracket; 11 – fixing plate; 12 – welded body bracket; 13 – steering shaft bearing; | 14 – upper part of the facing casing; 15 – upper steering shaft; 16 – contact plate holder; 17 – steering wheel fastening nut; 18 – steering wheel; 19 – lower part of the facing casing; 20 – steering column position adjustment lever; 21 – retaining ring; 22 – tension spring; 23 – lever adjusting sleeve; 24 – coupling bolt; 25 – spacer sleeve |
Steering parts
| 1 – inner tie rod ends; 2 – steering gear mounting bracket; 3 – steering gear support; 4 – spacer ring; 5 – steering mechanism; 6 – sealing gasket; 7 – thrust plate of the seal; 8 – seal; 9 – lower flange of the elastic coupling; 10 – intermediate steering shaft; 11 – coupling bolt; 12 – spacer sleeve; 13 – facing casing (upper part); 14 – upper steering shaft; 15 – steering wheel; 16 – signal switch cover; | 17 – adjusting sleeve; 18 – steering column position adjustment lever; 19 – retaining ring; 20 – facing casing (lower part); 21 – steering shaft mounting bracket; 22 – steering shaft bearing; 23 – adjusting rod; 24 – outer tie rod end; 25 – spring ring; 26 – protective cover; 27 – sealing ring |
The process of removing the rack
You can begin repairs only after removing this mechanism.
Dismantling can be done either by removing the rack with or without rods.
For the first option, you will need to press out the pins of the outer rod ends.
The second method will require disconnecting the inner tips.
- Unscrew the elastic coupling bolt in the passenger compartment using a 13-mm open-end wrench;
- take a 13 key and in the engine compartment on both sides loosen the nuts securing the steering rack brackets;
- bending the edges of a special plate that prevents the bolts from unwinding themselves, we unscrew the latter from the body;
- To remove the steering rack without any problems, wedge the intermediate shaft mount;
- remove the splined end of the gear from the hole by moving the steering rack forward and remove the latter;
- The steering gear housing should be clamped in a vice with soft jaws, something like this;
- remove the spacer ring and support from the right side of the steering rack housing;
- we find clamps on the protective cover and safely cut them off, since they are disposable;
- the protective cover should be removed from the support;
- on the left side you need to remove the support and the protective cap;
- The rack stop nut will require a special tool in the form of a 17 octagonal head to unscrew.