Print this article Font size 16
Despite their small size, valve stem seals play a big role in the operation of the VAZ 2109 engine.
The task of these elements is to reliably seal and protect against oil ingress into the contact areas of the guide bushings and valves.
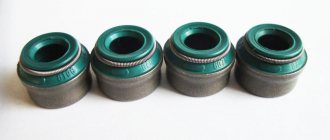
Appearance of elements
Over time, the caps wear out because they are constantly exposed to a fairly aggressive environment, which is engine oil. The temperature changes regularly, exhaust gases affect it, and overheating occurs.
In other words, there are more than enough reasons for the caps to wear out. Your task is to identify the problem in time and replace the elements.
What are valve stem seals and where are they located?
Oil seals for the VAZ 2109 car
These caps are located directly on the engine valves, in the cylinder head. Another name for these caps is valve seals. Their main task is to prevent excess oil from entering the engine. These caps are made of special rubber. And rubber, even special ones, deteriorate over time and oil begins to flow directly into the combustion chamber of the engine. In this case, it is worth changing these parts.
We will replace valve stem seals on a VAZ 2109
The engine of a modern car is a complex mechanism. Structurally, its components consist of many elements, many of which are very small, but their good condition affects the performance of other parts and the power plant as a whole. Such an important role is assigned to the valve stem seals in the design of the engine. Inattention to detail can lead to serious engine malfunctions, even complete failure of the engine.
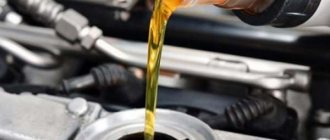
Structurally, oil seals are oil seals; it is not for nothing that they are also called valve seals. Like many engine parts, these elements are made of special rubber that is resistant to gasoline and oil. But with prolonged use, the material is subject to severe wear, which is why the valve stem seals begin to leak engine oil into the cylinders. As a result, there is a so-called “oil burn” or, simply, increased oil consumption.
How to know when it's time to change
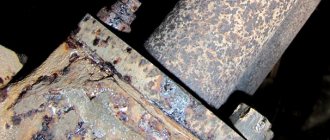
Worn caps of a VAZ 2109 car
It’s simple: if thick bluish smoke comes from the exhaust pipe of the car, then it’s time to change the caps . As a rule, this smoke appears only when the engine starts and when it stops. But if the caps are very worn, thick smoke constantly comes out of the chimney. However, smoke is not the only sign that the caps need to be urgently replaced. Sometimes smoke is practically not visible, but oil consumption in the car increases several times, while no external oil leaks (through various oil seals and gaskets) are observed. All this also suggests that it’s time to change the caps.
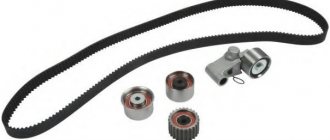
Tools for work:
- Ratchet driver;
- Power wrench;
- Extension;
- Spark plug head;
- Eight, ten, thirteen socket head;
- Phillips screwdriver;
- Socket wrench for seventeen;
- Technical syringe with tube;
- Slotted screwdriver;
- Tweezers;
- Mandrel for installing caps;
- Tool for removing oil seals;
- Valve desiccant;
- Timing belt tensioner;
- Engine sealant;
- Telescopic magnet;
- Torque wrench;
- A stick of tin solder 15-20 cm long.
Sequencing
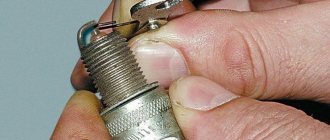
- There is a striker on the collet. You need to hit it accurately with a hammer. This will cause the cap to crumple and it will be possible to remove it from the collet with pliers.
The oil seal is removed from the guide bushing using a collet - Once the crackers are removed, the valve plate and its spring are removed.
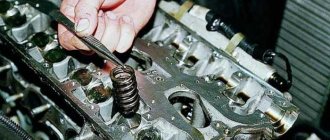
When the spring is fixed, the valve nuts are removed using medical tweezers - After this, a tool is installed to decompress the valves and, with its help, the valve spring is pressed.
- After the piston reaches the dead center, the spark plug is unscrewed from the cylinder, and a tin rod with a diameter of 8 mm is inserted into the opened hole. The tip of the rod should be between the valve and the bottom of the piston.
- Now the crankshaft must be turned so that the piston in the cylinder where the caps are planned to be replaced reaches top dead center.
The camshaft is removed, then the oil seal is removed - First of all, you need to remove the wires from the battery.
- The timing belt is removed.
- The pulley with teeth is removed from the camshaft.
- The wires are removed from the first fastening, and the nuts are unscrewed from the third fastening.
- Four nuts are unscrewed from the front cover, then the nuts from the rear cover are unscrewed (there are six of them).
- Both covers are removed.
- The camshaft is removed.
- The oil seal is removed from the camshaft.
The valve spring is pressed firmly using a collet - After pressing the valve spring, the crackers can be removed using tweezers.
First, the valve plate is removed, and then the spring underneath it is removed. - Now, using a collet, you need to remove the oil seal from the guide sleeve.
By hitting the handle with a hammer, the cap is compressed in the collet and removed - The new cap is pressed into the valve plate, then a spring is installed on it.
- Similar operations are performed with all caps that need replacement.
- After replacement, the cylinder head is reassembled.
DIY video on replacing valve seals on a VAZ 2109
Important points
- After removing the worn cap, you should carefully inspect the walls of the guide sleeve, since any scratch on this wall left by the collet can lead to renewed oil leakage into the combustion chamber and will negate all efforts to replace the cap.
- Before installing new caps, you must remember to remove the springs from them.
- Before pressing in the new cap, the installation site is generously lubricated with oil. This helps to place the cap in place more accurately, without putting extra effort into it.
This is interesting: Towbar
As can be seen from the article, it is quite possible to replace valve stem seals on a VAZ 2109 with your own hands. The main thing is to be patient, follow the sequence of operations and not make much effort when pressing the new caps into place.
Copywriter with five years of experience.
Recommendations for troubleshooting
If, when starting the engine, the indicator of too low engine oil level in the crankcase comes on in your car (it is only present in cars with a high front panel; in cars with a low one, the indicator only has an emergency oil pressure sensor), you must first turn off the engine immediately. Then you need to inspect the power unit for leaks. If they are not there, then after 20 minutes you need to check the lubricant level in the crankcase using a dipstick. If the level is normal (between the min and max marks), you should check the oil level sensor. It is located next to the oil filter. It is always much easier and cheaper to replace a faulty sensor than to disassemble the power unit due to an imaginary breakdown.
To replace the caps you will need the following tools:
- a device used to press the caps (mandrel);
- device for compressing valve springs;
- pliers;
- tweezers;
- a tin rod with a diameter of approximately 8 mm and a length of at least 20 cm.
In addition, a standard set of keys will come in handy.
Device
Oil seals are a modern version of valve seals, which are equipped with a powerful steel sleeve inside and an expander spring. Springs are used to secure the edges of the caps and valve stems.
Actual size of the caps
Gaskets are made primarily of rubber, which becomes harder over time and wear occurs, so the element ceases to properly perform its functions. As a result, oil ends up inside the combustion chamber.
There is only one sign of wear on the valve stem seals - thick blue smoke begins to actively pour out of the exhaust pipe, plus oil consumption increases.
There is only one solution to this situation - replacement.
Replacement methods
There are a few basic options you have if the caps stop working properly.
Replacement
To work on replacing oil scrapers you will need:
- Set of flat screwdrivers;
- Head for removing spark plugs;
- New caps;
- Cap puller;
- Desiccant (for valves);
- Platypuses;
- Rod with a cross section of 8 mm.
Having prepared everything you need, you can start working.
- First remove the air filter, fuel pump, ignition distributor. All this is relevant for carburetor VAZ 2109.
- Some argue that to replace the caps it is necessary to remove the cylinder head. Not true. To get around this step you will need a rod. Next we will talk about how to change oil scrapers without removing the head.
- Remove the negative from the battery.
- Remove the gear from the camshaft.
- When disassembling, try to preserve the key. It is located in a pair of camshafts. Pull it out carefully and there will be no problems.
- Dismantle the cylinder head cover by unscrewing all the bolts located around the perimeter.
- Remove the rear part of the cylinder head cover - the ignition distributor plug. Here you will have to unscrew the 2 nuts securing the ground wires, plus remove the conductor tips from the studs.
- On both sides of the camshaft bearing housing, unscrew the nuts, put them aside, but do not lose them.
- Remove the camshaft from the cylinder head and after that you can dismantle the oil seal.
- Rotate the crankshaft until the piston on which the oil seal needs to be replaced is not at top dead center.
- Using a special head, unscrew the spark plug from the block head, insert a rod prepared in advance with a diameter of 8 mm. Preferably made of tin. Insert the rod so that it is between the piston and the valve.
Causes of illness and required skills
If the oil in the chambers begins to burn, resulting in bluish smoke appearing from the exhaust pipe of your car, then the prerequisite for this may be:
- weakening of oil scraper rings;
- similar weakening of compression (pressing) rings;
Read
If you find something listed above, there is no need to panic or prepare for serious repairs at a service center. If you know at a theoretical level how to change valve stem seals, then even a beginner can cope with a similar task, and if you have at least a little experience in engine repair, it won’t be difficult to quickly solve this problem. The only thing you will need is to stock up on the necessary tools and consumables.
Materials and tools
- Locksmith's hammer.
- A piece of soft (preferably tin) reinforcement (rod) 7-8 mm in diameter.
- Regular pliers.
- Medium sized tweezers.
- Valve desiccant.
- Special frame for pressing new valves.
- Set of ratchet heads.
- A long flat screwdriver (minus).
- Candle key.
- Soap, water, rags to clean your hands.
- A cheerful company of friends and women.
Replacing valve stem seals on a VAZ-08
Rozsukharyuvach valves: In this video I will show you how you can do it yourself without shame
Read
Replacing oil pick-up valves VAZ 2108, 2109, 21099
Replacement method
valve seals (
caps
) at home.
As you can estimate from the list, nothing extraordinary is required for this work. Moreover, if you take everything calmly, such an experience will be useful in the future and will take place in a comfortable environment, you just need to do everything exactly. By the way, to carry out similar actions on other VAZ
, for example, on the classic 2106, 2107, you will need everything the same as for the front-wheel drive 2109, 08 or the latest generations of the Tolyatti plant.
Let's look at the signs of valve seal failure and the consequences
Symptoms of cap failure:
- Increased oil consumption
- Smoky exhaust when starting the engine
- Carbon deposits on spark plug threads
However, all of them only indicate that lubricant has entered the engine cylinders, to make sure that it is the valve seals that are needed:
- At the first suspicion, you should pay attention to the condition of the camshaft bed
- If everything is in order with the caps, the bed is clean and neat, and if there are problems with the valve seals, then black stripes are clearly visible on the camshaft bed, which mean that the working edge of the cap has hardened and it no longer performs its function
- Take a compression gauge and measure the compression in each cylinder (the caps do not affect it), if everything is in order with the compression, you need to replace the seals on the VAZ 21093
- Otherwise, you have more serious problems, and a major engine overhaul is required.