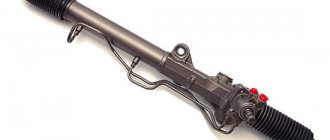
In classic cars, such as the VAZ 2107, the main element of the steering mechanism is the gearbox. Thanks to it, the rotational movements of the steering wheel are transmitted through the rod system to the front wheels. Repairing a VAZ 2107 gearbox is a fairly rare occurrence. The only case is the replacement of the steering worm pair due to its significant wear.
In other cases, you can get by with the standard steering system maintenance procedure. These operations are not particularly difficult and can be easily done with your own hands. As part of maintenance, the manufacturer recommends checking the level and periodically changing the steering gear oil. To do this, it is not necessary to remove it from the car; all operations are performed without disassembly.
Level control is carried out using a thin, clean screwdriver. Using a 8 key, unscrew the plug and use a screwdriver to check for the presence of oil. Its level should be just below the filler hole. If the level is less than required, you need to add oil.
To replace, you must first drain the old lubricant. This can be done by removing the steering gearbox cover, which is secured with four bolts. After all the oil has flowed out, the cap is put back in place and new oil is poured through the filler hole. At this point, replacing the lubricant in the steering wheel can be considered complete.
In addition to the issue of oil control, it is periodically recommended to check for play in the VAZ 2107 steering mechanism. If it is present, adjustment is performed. To work, you will need a large flat-head screwdriver and a 19 mm wrench. It is also advisable to involve an assistant; together, the work will be completed much faster.
To adjust, use a 19-mm wrench to loosen the locking nut and use a flat-head screwdriver to gradually tighten the adjusting screw. In this case, the assistant checks the play while inside the car. After completing the adjustment, hold the screw with a screwdriver and fix its position using a locknut.
If adjustment to eliminate backlash does not help, then the worm pair has too much wear and repair is necessary. In this case, only replacing it can solve the problem. This work can also be done with your own hands, without the help of specialists.
Here you will need to completely remove the gearbox from the VAZ 2107:
- Disconnect the rod ends of the steering system - unscrew them and tighten the nuts with a 22mm wrench.
- Release the clamp that secures the column and gearbox.
- Unscrew the three bolts that secure the gearbox to the body.
Further removal and repair will not cause any difficulties. You just need to remember a few basic rules:
- The worm pair is replaced as a set, both elements at the same time.
- After disassembly/assembly, adjustments must be made.
- It is better not to fill in the old lubricant, but to replace it with a new one.
After the repair is completed, the gearbox is assembled and installed in the reverse order.
Hello). If you got an old Zhiguli car from your Father or Grandfather; or maybe you yourself already bought a Zhiguli; then perhaps you are familiar with this problem, which is actually widespread among old VAZ cars.
As you understand, from the title of the page that I visited, I’m talking about an unadjusted steering gearbox. How does this problem manifest itself?
Main syndromes – 2; - this is a very tightly clamped steering wheel (so tightly that some people turn it not only with two hands, but also help themselves in this with the weight of their own body).
Agree, the situation is very unpleasant, especially in the summer, somewhere in a traffic jam). And in winter it’s probably not good either. And if, when the driver turns such a tight steering wheel, he becomes muscular and strong, then a tight steering wheel definitely has a negative effect on the health of the car; — the resource of such a gearbox will be several times less than what is normally adjusted.
Do you think nothing could be worse with the steering gear)? Now imagine that you are turning the steering wheel (and by the way, it rotates very, and even very easily), but the wheels do not turn at all). By the way, I heard stories where the steering gear was so worn out that even when the steering wheel was turned 180 degrees, the wheels did not even think of moving.
Of course, the last case is completely neglected, and here the usual adjustment will certainly not help. But imagine; - you are driving along the highway 80 - 100 km per hour, the steering wheel is at the zero point, you turn it by 10 degrees, and - the car goes straight. Agree, this is also not at all pleasant.
Adjusting the Steering Gear VAZ 2101 – VAZ 2107
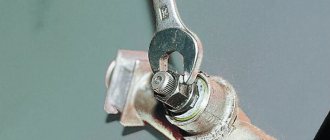
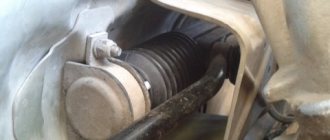
So, take a look at the photo of Rulevogo Reductor - a; - Do you see the nut (by the way, it is 19-size), and the pin with a slot - coming out through exactly that nut? The nut is a lock nut that locks the one we need and directly performs the adjustment - the stud.
Let's assume that the steering gearbox of your VAZ 2101-2107 is too tight. Then, you should take a wrench or a 19-point socket, loosen the nut (which we mentioned above), remove the locking gasket, and Unscrew the Pin with the Slot. This reduces the load on the steering mechanism of the column. Did you unscrew it? — try the steering wheel now.
Elimination
The fight against backlash should begin by checking and tightening all threaded connections. Often the reason is here
Particular attention should be paid to the nut securing the column to the gearbox. With frequent trips on dirt roads and worn-out asphalt, this fastener regularly becomes loose.
If you do not respond to the problem in a timely manner, you risk getting more serious steering problems. The nut may unscrew entirely, leading to complete failure of the steering. This also leads to increased wear of all parts of the mechanism.
Read more: The fuel pump on the UAZ Bukhanka does not work
Adjusting the gearbox also helps combat backlash. To do this you will have to look under the hood. There you will see a gearbox. There is an adjustment screw on it. To get to it, you will have to remove the plug. The screw is protected from turning with a 19mm locknut. It is slightly loosened with an open-end wrench. After this, adjustment is made with a screwdriver. The task is to reduce the backlash. If you can’t do this, then it’s time to change the gearbox. It's easier to do the job with two people.
Malfunction of the steering gearbox.
The VAZ 2107 gearbox does not require excessive intervention. The main condition for normal operation is the presence of lubrication.
Creaks or extraneous sounds in the structure are common damage. Since in this model the steering wheel is attached to the shaft using splines tightened with a nut, if the fastening is loosened, the splines will be most subject to wear, and the steering wheel will dangle. Squeaks may be heard from the driveshaft crosspieces, which appear as a result of wear of the mechanism parts or lack of lubrication.
Also, damage to the steering wheel play is common.
The driveshaft may come off and, as a result, a gap appears. To adjust the steering column, a bolt with a lock nut is provided. The nut is pulled back and the bolt is screwed in until the play returns to normal. This nut is then tightened and secured in position. After this process, the steering wheel will turn much tighter, but the play will be reduced.
Before you start checking the steering mechanism malfunction, subject to the identified symptoms, you need to adjust the gearing. If the adjustment is unsuccessful (for example, the steering wheel rotates tightly, but the play has not disappeared), then you should disassemble the gearbox to find faulty or non-functional parts of the mechanism.
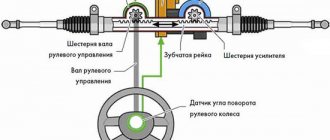
How does an electric booster work?
About replacing the rear axle gearbox of a VAZ 2107
The electric power steering on the VAZ-2107 starts to work and creates additional torque, which reduces the force required to turn the wheels. Moreover, it begins to work simultaneously with the driver turning the steering wheel. The device is able to reduce the load required to turn the steering wheel by 5.7 times.
In other words, if you applied a force of 20 kg before installing the device, then after that only 3.5 kg will be enough for a similar action. Stages of device operation:
- Using a torque sensor, it is determined in which direction the driver rotates the steering wheel.
- The control unit allows you to read all data related to engine speed and vehicle speed.
- Using an electric motor, the propeller shaft of the steering mechanism rotates. As a result, the force required to turn the steering wheel is reduced.
Using a speed sensor, a normal relationship is ensured between the gain of the device and the intensity of vehicle traffic. If the speed is low, it becomes harder to turn the steering wheel. Therefore, the control unit understands that the gain needs to be increased. Conversely, if you are moving at high speed, then you need to apply less force. Therefore, the electric power steering is not involved in steering.
Step-by-step adjustment of the worm gear.
In order to independently adjust the steering gear of a VAZ 2107 car, you need a flat screwdriver, a 19mm wrench, the help of another person and follow the step-by-step work:
- In order for the steering mechanism to be adjusted efficiently, the car must be placed on a flat surface, and the wheels must be in a straight position.
- Next, open the hood and clean the gearbox from dirt. Then you need to find the adjusting screw located in the center of the crankcase cover. This screw is covered mostly by a plastic plug. Before removing it, the plug must be pryed off with a flat screwdriver.
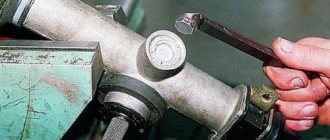
- Then you need to use a 19mm wrench to loosen the nut located on the adjusting screw.
- After loosening the nut, the assistant intensively turns the steering wheel in both directions. At this moment, together with it, it is necessary to start rotating the adjusting screw so that the necessary clearance appears in the meshing of the gears. Free play should be minimized and steering wheel rotation should become much easier.
- After the gap is adjusted, it is necessary to tighten the lock nut tightly, while holding the screw with a screwdriver.
How to identify a faulty pendulum
Ford Focus Sedan Sold Logbook Rear suspension arm transverse crescent curve replacement
The easiest way to determine if the lever is faulty is to listen for knocking noises while driving on rough roads. You shouldn’t deliberately drive into a hole or run over a bump, so you can pull over to the side of the road and experiment
But this is not the only way to determine the malfunction of such an important part as the pendulum
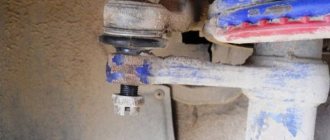
The second way to determine whether the VAZ 2107 pendulum arm is faulty is the presence of large play in the steering wheel. This can be determined quite simply by turning the steering wheel in one direction and the other. But the most common case of pendulum failure is the presence of load when turning the steering wheel. But these factors do not always indicate that the pendulum lever is the culprit. Malfunctions with such symptoms may include loosening of the bolts or overtightening of the adjusting nut. Therefore, before you start replacing the device, you should definitely make sure that it is broken. This can be done after dismantling it. The first sign of a part malfunction is the presence of defects on its component elements, so to determine the failure you will need to disassemble the mechanism.
Location of the pendulum on the VAZ 2107
This product is located on a VAZ 2107 car from below the engine compartment. You can see the pendulum when you open the hood and look at the bottom of the car on the passenger side. It is most convenient to dismantle or examine the device from below from an inspection hole or on an overpass.
A bipod extends from the pendulum, which controls the rotation of the front wheels of the VAZ 2107. The photo below shows a view of the pendulum arm on the VAZ 2107.
Checking the steering gear.
After adjusting the steering gear of a VAZ 2107 car, axial displacement of the steering wheel is possible. It can be detected if the front wheels are placed in a straight position and at this moment you pull the steering wheel up, in which case the shaft will move.
Increased play in the VAZ 2107 steering wheel is a fairly common problem, characteristic of the entire “classic” family. In most cases, you can fix the problem yourself without resorting to complex, expensive repairs. It is only important to correctly diagnose and localize the causes of play in the steering mechanism.
Steering problems
The steering mechanism, like any other vehicle component, wears out and requires repair over time. To simplify the troubleshooting, there are certain signs that allow you to find out the nature of the breakdown and fix it in a short time.
Oil leak
On a classic, the problem of a “wet” steering gear is quite common. There can be many reasons for this:
- oil seal wear;
- leakage from under the gasket;
- loosening of the fasteners that secure the mechanism cover;
- Corrosion of the input shaft.
If the oil seal and gaskets can be replaced and the bolts tightened, then if the shaft is damaged, the part will have to be ground.
One of the options to get rid of oil leaks from the gearbox with working seals is to treat the cover with sealant
Tight steering wheel
Sometimes it happens that to turn the steering wheel it is necessary to apply noticeably more effort than usual. Several reasons can lead to this malfunction:
- incorrect wheel alignment;
- failure of one of the elements in the steering mechanism;
- the gap between the worm and the roller is broken;
- The pendulum axis fasteners are too tight.
Steering play
One of the reasons for free play in the steering mechanism is wear on the shaft crosspieces. In addition to them, play appears in the gearbox itself. If the unit has a high mileage, then it is advisable to disassemble it, inspect the condition of all the elements, replace parts with high wear, and then carry out adjustments.
Knock and vibration
If you feel feedback on the steering wheel while driving, there can be many reasons for this phenomenon. Driving a vehicle in such a technical condition leads to rapid fatigue and reduces the level of safety. Therefore, the steering mechanism needs diagnostics.
Table: causes of vibrations and knocking on the steering wheel and ways to eliminate them
| Cause of steering failure | Troubleshooting method |
| Increased clearance in front wheel hub bearings | Adjust the front wheel hub clearance |
| Loosening the tie rod ball pin nuts | Tighten the tie rod ball stud nuts |
| Increased clearance between the pendulum arm axis and the bushings | Replace the swingarm bushings or bracket assembly |
| The adjusting nut of the pendulum arm axis is loose | Adjust the tightness of the swingarm nut |
| The clearance in the engagement of the roller with the worm or in the worm bearings is broken | Adjust the gap |
| Increased clearance in steering rod ball joints | Replace tie rod ends or tie rods |
| Loosening the bolts securing the steering gear housing or the pendulum arm bracket | Tighten the bolt nuts |
| Loosening the swing arm nuts | Tighten the nuts |
Checking the steering play of the VAZ 2107
Large play in the VAZ 2107 steering wheel is a vague concept. Meanwhile, the permissible steering play has established standards. For “classics” it is 5 degrees. To check the play, a special device is used at the service station - a play meter. At home you can do without it. To do this you will need a ruler, chalk (or wire) and the help of a partner. Checking the amount of play is carried out as follows:
- place the machine on a level surface;
- check the tire pressure and inflate them if necessary;
- align the steering wheel so that the wheels are directed parallel to the axis of the car;
Causes of steering play in VAZ 2107
If you notice unacceptable play in the VAZ 2107 steering wheel, the reasons may be as follows:
- The central nut securing the steering wheel to the axle is not tightened;
- the nut securing the steering column to the gearbox is loosened;
- The worm gear of the steering mechanism is not adjusted;
- the steering pendulum bushings are worn out;
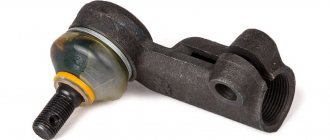
- The tie rods are damaged or their ends are worn.
All of these problems require immediate intervention. Otherwise, the steering mechanism may fail and the car will lose control.
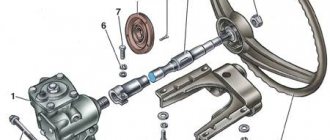
Mechanism design
To repair the steering column on a VAZ 2107, you first need to understand its structure, as well as the principle of operation.
The seven is in many ways similar to the “penny”. Therefore, the device and design received minor changes. The structure includes:
- A mechanism that transmits the driver’s force to the executive components;
- A steering drive that turns at an angle specified by the driver.
In turn, the steering mechanism consists of:
- Composite shaft with cardan transmission;
- Steering wheel (steering column together with a steering wheel with a diameter of 520 mm);
- Worm gearbox of the VAZ 2107 steering mechanism.
The control system has the following components:
- Bipod;
- Pendulum arm;
- Swivel arms;
- Steering rods for VAZ 2107 (one middle, two side).
The outer rods include two parts, which allows you to change their size by adjusting the toe angle.
Tie rod/end set for VAZ 2107
The operating principle of the steering mechanism looks like this:
- The driver begins to rotate the steering wheel, the wheel size of which ensures that this task can be performed quite simply;
- By means of a composite shaft, a worm gear is activated, which reduces the speed;
- The steering mechanism is lubricated with special oil (TAD 17) poured into the gearbox;
- The worm gears rotate, which causes the double ridge roller to move;
- This, in turn, causes the secondary shaft to rotate;
- The tray mounted on the secondary shaft makes a turn and pulls the rod system behind it;
- These components influence the levers that synchronously rotate the wheels to the required angle specified by the driver.
How to remove steering play on a VAZ 2107
You should begin work by checking the tightness of the threaded connections of the steering mechanism and the condition of the steering rods (tips). Bent rods or worn tie rod joints must be replaced. To do this, you will have to use a puller and a 22mm wrench. You should not try to align the rods or repair the ends. For safety reasons, these parts should always be replaced with new ones. Next, you should check the condition of the pendulum and the adjustment of the worm gear. Worn pendulum bushings must be replaced with new ones. To do this, you need to unscrew the steering rods from it (use a 22mm wrench and a puller) and remove the pendulum from the car by unscrewing the mounting bolts. Clamp the pendulum in a vice, remove the cotter pin and unscrew the adjusting nut. Once the nut is unscrewed, you can disassemble the pendulum and replace the worn bushings with new ones. When assembling the pendulum, it is necessary to tighten the adjusting nut so that its bipod rotates with a force of 1-2 kilograms. If all parts are replaced or in good condition, and the threaded connections are tightened, the VAZ 2107 steering play is adjusted by adjusting the steering gearbox. To do this, you will need a 19 mm wrench and a powerful slotted screwdriver. The adjustment is carried out as follows:
In this way, you can adjust the play of the VAZ 2107 steering wheel in accordance with the limits established by the manufacturer.
In other cases, it will be enough to carry out maintenance of the steering system. These activities do not cause any particular difficulties and can be done by hand. The manufacturer’s specialists recommend monitoring the oil level and periodically changing it in the steering gearbox. There is no need to remove it from the car for this; all actions are carried out without disassembly.
The level is checked with a clean thin screwdriver. Using an 8 mm wrench, unscrew the plug and measure the presence of oil. Its level should be slightly below the filler hole. If the level is less, you need to add oil.
To replace, you first need to drain the old lubricant. This can be done by removing the gearbox cover, which is secured with four bolts. After the liquid has completely drained out, the lid is put back in place and a new one is added through the filling hole. At this point, the oil change in the steering system is considered complete.
In addition to monitoring lubrication, it is recommended to periodically check for play. If there is one, adjustment is made. For work, use a large flat screwdriver and a 19 mm wrench. It is advisable to find an assistant, as it is much faster to regulate with two people.
To carry out the process, you need to loosen the clamping nut with a wrench and gradually tighten the adjusting screw with a screwdriver. The assistant simultaneously checks the play while inside the car. After completing the adjustment, hold the screw with a screwdriver and fix its position with a lock nut.
If the procedure performed did not help eliminate the backlash, then this indicates that the worm pair is badly worn and requires repair. In such a situation, the problem is solved by replacing it. This work can be done independently, without the help of specialists.
Here it is already necessary to remove the gearbox from the VAZ-2107:
- the tie rod ends of the system are disconnected - they are unpinned, and the nuts are twisted with a 22 mm wrench;
- the clamp that secures the gearbox and column is released;
- Unscrew the three bolts securing the gearbox to the body.
Steering wheel play
The appearance of steering play can be caused by two reasons. First, the nut securing the steering wheel to the shaft is loosened. If the nut is not tightened promptly, the splines on the handlebar and shaft will become damaged over time and one of these parts may need to be replaced. The second reason may be wear of the worm gear. To eliminate this malfunction, a special device is provided - an adjusting bolt with a lock nut.
In order to adjust the worm gear, the nut is released, the screw is turned using a screwdriver until the backlash is eliminated, after which the nut is tightened to prevent spontaneous unscrewing. If it is impossible to eliminate the backlash by adjustment, it means that the gearbox needs to be repaired and the worm pair replaced.
To prevent premature wear of gearbox parts, periodic monitoring of the oil level and its replacement is recommended. Level control is carried out as follows:
- Using a 8 key, unscrew the filler plug;
- Use a screwdriver or other object to check the oil level. It should be level with the bottom edge of the filler hole.
- If necessary, add oil using a special supercharger until it begins to flow out of the hole.
To change the oil, unscrew the screws securing the gearbox cover, having previously placed a container under it to collect used oil. Since complete removal of the cap is not required, it is moved to the side and the oil is drained. This operation is best performed on a hot engine. Warm oil has greater fluidity and drains faster. After all the oil has drained out, the cap is screwed into place and new oil is poured into the gearbox using the method described above.
Further repairs will not be a problem.
You only need to follow a few rules:
- the worm pair is changed simultaneously, as a set;
- after assembly/disassembly, adjustments need to be made;
- Do not use old oil, but replace it with new lubricant.
After the repair is completed, the gearbox is assembled and mounted in the reverse order.
The steering gearbox is a rather old mechanical device that is now used mainly on cars of the classic LADA family. Today you will learn what a steering gearbox is - repair, replacement, adjustment with your own hands.
Video - Steering gear repair
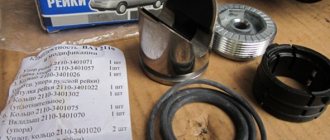
In most cases, this unit is not repairable, since it is relatively inexpensive and consists of only two main parts. However, the manufacturer left the option for car technicians to purchase a repair kit.
Before repairing the steering gear, let's determine the malfunctions.
- Firstly, it can be repaired if the steering wheel rotates but the wheels do not. This means that there are defects on the threaded part of its shafts that prevent the two interacting parts from touching.
- The second type of fault is oil seals. If they have reached critical wear, then the oil from the gearbox will certainly leak, which already leads to its accelerated wear. If there are other mechanical damages, the gearbox must be replaced.
First, remove the faulty unit from the car. After this, press the bipod off its shaft using two hammers. Drain the oil from the gearbox through any technological hole. Now unscrew the four bolts that secure the cover and remove it. To access the worm shaft, you need to unscrew a similar cover on the other side of the mechanism. Pull out the remaining parts and replace the faulty ones. These may include oil seals and damaged shafts. After this, reassemble the gearbox in the reverse order. Don't forget to add oil!
How to change the steering gear on a VAZ 2107
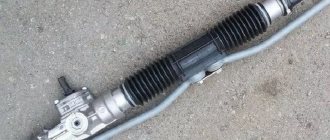
If there is more serious damage, the steering gear must only be replaced. To do this, you need to purchase a new VAZ 2107 gearbox and immediately fill it with transmission oil. Now you need to remove the faulty gearbox from the car.
- Disconnect the tie rod ends from the tie rods. To do this, first unscrew them, and then unscrew the fastening nuts using a 22mm wrench. To pull them out, you need to use a special puller, which is available in any auto parts store.
- Go inside the car and loosen the clamp that secures the steering shaft to the steering gear. Pull the shaft out of engagement with the gearbox.
- All that remains is to unscrew the three bolts that secure the mechanism to the engine compartment of the car.
- Install the new gearbox in reverse order. Before you start operating the car, do not forget to adjust it.
Gearbox oil
To reduce friction of the internal elements of the steering column, GL-4, GL-5 transmission oil with a viscosity grade of SAE75W90, SAE80W90 or SAE85W90 is poured into the mechanism. In the old fashioned way, many car owners use TAD-17 oil for the unit in question. The filling volume of the gearbox on the VAZ 2107 is 0.215 liters.
Checking the oil level
To avoid premature failure of mechanism parts, it is necessary to periodically check the oil level and replace it.
It is worth taking into account that the fluid from the gearbox, although slowly, leaks, and the leak occurs regardless of whether the column is new or old. The level check is performed as follows:
- Use a 8 wrench to unscrew the filler plug.
- Using a screwdriver or other tool, assess the oil level in the crankcase. The normal level should be at the bottom edge of the filler hole.
- If necessary, add lubricant using a syringe until it begins to flow out of the filler hole.
- Tighten the plug and wipe the steering gear from smudges.
How to change the oil in a gearbox
As for changing the oil in the steering device, this procedure should be carried out every year and a half. If the decision has been made to change the lubricant, you need to know how to perform the procedure. In addition to the new lubricant, you will need two syringes of the largest possible volume (purchased at the pharmacy) and a small piece of washer hose. The procedure is carried out in the following order:
- Use a key to unscrew the filler plug, place a piece of tubing on the syringe, draw in the old oil and pour it into the prepared container.
- Using a second syringe, new lubricant is poured into the gearbox to the required level, while it is recommended to rotate the steering wheel.
- Tighten the plug and wipe off traces of oil.
Video: changing the oil in a classic steering gear
Despite the complex design of the steering mechanism of the “seven”, every owner of this car can perform preventive maintenance, repair or replacement of the unit. The reason for repair is characteristic signs of malfunctions in the mechanism. If parts with visible damage are found, they must be replaced. Since the steering column is one of the critical components of the car, all actions must be performed in strict sequence.
Adjusting the VAZ gearbox
Adjustment of the steering gear is carried out to get rid of play in the steering wheel, as well as all kinds of discrepancies when it rotates with the position of the wheels. The car wheels must first be aligned.
To adjust the steering gear, you need to unscrew the lock nut on its cover from above and loosen the special adjusting screw. Ask your partner to sit behind the wheel and rotate the steering wheel in different directions with energetic, but not wide movements, while you gradually tighten the adjusting screw. As soon as the steering wheel begins to rotate tightly and the wheels move with the slightest movement, the locknut is tightened.
This completes the adjustment of the steering gear. As you can see, this procedure is not long at all and can be performed with just a 19-mm wrench and a regular flat-head screwdriver.
Adjustment of the steering gear mechanism on a VAZ 2107 car is carried out in cases where the steering wheel becomes difficult to rotate, jamming occurs during rotation, or in the case when axial movements of the steering shaft appear when the wheels are in a straight position. To adjust the mechanism, you will need the help of an assistant, a nineteen wrench and a flat-head screwdriver. To obtain a high-quality result, it is necessary to place the car on a flat horizontal plane with the front wheels aligned straight. Open the hood and wipe off any dirt. The adjusting screw is located in the center of the crankcase cover and is closed with a plastic plug, which must be removed by prying it off with a screwdriver.
The adjusting screw is secured against loosening using a locknut. Loosen the locknut with a nineteen wrench. Now ask your assistant to start turning intensively in both directions, and in the meantime you rotate the adjusting screw and achieve the desired clearance in the gear mesh, at which the steering wheel will rotate as easily as possible (as much as possible), and so that the free play decreases . After adjustment, hold the screw with a screwdriver and tighten the locknut. During operation of the steering gear, worm gears wear out and as a result, axial movement may appear, which manifests itself when the wheels are in a straight position. With the wheels straight, pull the steering wheel up; if the shaft moves, it means there is sufficient wear.
You can try to eliminate it by placing additional gaskets under the steering gear cover. To do this, unscrew the four bolts securing the cover and place one or two gaskets, 0.1-0 thick.
How to diagnose play in the steering rack and eliminate it: advice from car enthusiasts
1. “How to determine the backlash yourself”
I realized that my rods were loose while replacing the silent blocks in the front arms. I suggest this procedure:
- Remove the wheel.
- Unscrew the nut from the steering knuckle that secures the linkage to the steering knuckle. Knock out or remove the steering rod from the steering knuckle using a puller.
- Grab the rod with your hand and slowly move it back and forth along the axis. I was able to get a good feel for the backlash in this way. Weak efforts applied to the rod are a guarantee that it is the rod that is causing play and not the rack.
- Collect everything as it was.
Then check the second link in the same way.
We recommend
“Maximum steering play: what to do if the value is exceeded?
» More details 2. “The presence of play can be easily determined by the free movement, but you need to understand where it is”
- To check the outer tips, place your finger on the boot where the tip enters the hub, then jerk the wheel.
- To check the inner tip, feel the hinge on the extended boot and do the same as indicated in the first point.
- Play can also occur due to the ball joint, but when it is already dead, check with a mounting tool. Apply jerky pressure, being careful not to damage the boot or the joint between the ball and hub.
- When the steering rack gives play, both wheels will move; the slack may occur due to wear. To check, place the car in a pit and sharply pull the steering rod up and down. Pull up 5-100 if you hear a knock on the right. The steering wheel does not return to the rack when driving? Then you need to loosen it up. Please note that by adjusting, you remove the knock, that is, the gap between the tops of the teeth of the worm and the rack. However, it will not be possible to remove the free play, since the teeth are worn out and the angle of inclination does not match. Therefore, the knocking will return after some time.
The reason for the knock on the left is a broken support bushing, which means the rack needs to be repaired or replaced.
3. “Checking for backlash according to the inspection principle”
What is the easiest way to remove play in the steering rack? Carry out the check as during a technical inspection, when one person turns the steering wheel in different directions with the engine turned off, and the second person checks the rods and play in the rack for the presence of knocks. The play can even be seen, if the helmsmen are completely killed, and heard. To remove it, use the adjusting nut to tighten it (it seems to be set to 22) - counter it to 41. I did it this way: the assistant lightly turned the steering wheel in different directions, and I tightened it slowly, as soon as the knocking noise disappeared - countered it. Then he started the engine and drove a little, checking how the amp works and whether the steering wheel returns on its own after a turn. This is important, because if it is overtightened (which can be immediately heard from the operation of the amplifier), the hydrach will quickly break. All this is not difficult; if you wish, do not be afraid to make adjustments yourself to remove the defect.
4. “I made the adjustment alone at the dacha and drove from the dacha in a completely different car.”
I removed the fan and shroud, after which I was able to see the steering rack adjustment assembly. I made the key myself by welding a 27 nut (nut with a skirt) to the plate and bending the plate a little.
Didn't sharpen anything. I marked it with paint and unscrewed the locknut using a chisel, which I had previously extended by welding part of the round reinforcement. To remove the play, I installed the key, then turned it to the right until it stops, loosened it a little and locked it. Based on the mark, I turned the adjusting nut about 35-40 degrees.
5. “A few additions to replacing the steering rack”
After studying posts on the forum about replacing the steering rack bushing, I decided to take action. I removed the cover from the bushing side and saw that it was in poor condition and needed to be replaced. I would like to advise:
- When starting repairs to remove play, make sure that the cause is in the bushing itself, and not in insufficient tightening of the adjusting nut on it.
- The easiest option is to place a jack under the subframe. Almost completely unscrewing the nuts was not enough for the rack to come out.
- The marks on the nut will not help remove the defect, since in any case you will need to unscrew it until it stops.
- I was unable to get the shaft out until I loosened the adjusting nut on the rack.
- The shaft wear was significant where it rides on the bushing. In addition, I found rust on it, so I had to use sandpaper.
- To remove the malfunction, the easiest way to adjust the nut is with two people and on an assembled car: one turns the steering wheel, the other tightens it until the knocking in the rack disappears and a slight force appears on the steering wheel. Please note that the stabilizer must be unscrewed from the struts.
We recommend
“How to remove the knocking sound of the steering rack (new bushing)” Read more
- Do you want to remove the knock? Immediately change the stabilizer rubber bands. I was convinced of this from my own experience: I thought all the knocking was due to the rack, but it turned out that they were also knocking.
Having replaced the rack assembly bushings, I drove the car. As a result, I realized: it was not possible to remove the knocking noises. Then I decided to tighten the adjusting nut on the rail. I would like to point out that I did something wrong earlier - I set the nut in the same position in which I twisted it. I tightened the adjusting nut and took the car for a spin. I was convinced that it was possible to remove almost all the knocks, except those coming from the stabilizer rubber bands.
I'm happy with the result - the rack doesn't knock at all. It is his own fault that the stabilizer rubber bands rattle when hitting speed bumps at an angle. It was necessary to change them at the same time when performing the previous operations in order to remove the fault.