Every car owner, no matter how much he loves his iron horse, periodically thinks about what modifications could improve it. A smoother and more confident ride, external gloss, excellent visibility, a powerful engine and reliable brakes, excellent acoustics - every motorist dreams of all this. And if all this can be done with your own hands, then such an “update” has no price at all. In this article we will try to touch on all the subtleties of what tuning is most often performed by owners of the Lada Kalina 2 station wagon.
Variety of materials for cases
If you do a search, you can find a wide variety of types of covers for such a common car as the Lada Kalina. It’s difficult to make a choice right away. Therefore, before going to a car store, you should still study the general recommendations and familiarize yourself with the models offered.
One of the most popular types of covers for Kalina. Such cases have a number of advantages:
- external attractiveness;
- practicality and wear resistance;
- minimal care;
- providing body ventilation for the passenger and driver.
When purchasing such cases, you need to pay special attention to the quality of their manufacture. Velor covers are highly practical
They are not only pleasant to the touch, but also do not get so cold in winter, which allows you to feel comfortable when getting into the car.
Velor covers are highly practical. They are not only pleasant to the touch, but also do not get so cold in winter, which allows you to feel comfortable when getting into the car.
The upholstery is made of velor
However, over time, velor not only wears off, but also stretches. Therefore, after the first wrinkles appear, the covers will have to be replaced.
Covers for Lada Kalina, combining velor and eco-leather inserts, are in great demand. This combination allows not only to combine the advantages of materials, but also to extend their service life.
Time-tested material that allows you to choose any color and pattern. In addition, such covers not only retain their properties for a long time, but can also be easily washed if necessary.
The only drawback of fabric covers may be the inconvenience of use in hot weather. But if the car is equipped with air conditioning, there will be no problems.
Always up-to-date material that creates additional comfort in the cabin. This is due not only to its velvety structure, but also to its comfort of use even in cold weather. The material is quite resistant to wear, but due to the relatively high cost there are not many offers on the market.
This type of car seat trim will not only make the interior of your car look chic, but will also provide the necessary comfort in cold weather.
But such finishing collects a lot of dust and other contaminants; if used carelessly, it will require dry cleaning.
This material is accessible and will allow you to realize any fantasy. But vinyl covers offer minimal comfort because they easily change the temperature to match the outside temperature. Covers made of vinyl practically do not “breathe”.
Interior tuning
Car owners also make a lot of changes to the Kalina’s interior.
Replacement of upholstery. The standard interior trim in Kalina is a combination of plastic inserts and leatherette. Many tuning enthusiasts remove the tabs and replace them with leatherette. Connoisseurs of comfort also get rid of leatherette, replacing it with velor or carpet. These materials can transform the interior, but they cannot be called durable. Genuine leather is also used for finishing. But this option is only available to very wealthy drivers, so it is extremely rare.
Replacing seats. When a car undergoes deep tuning, it rarely happens without replacing the standard seats with sports ones. They are more suitable for the aggressive driving style for which the car is being prepared. Anatomical Kalina-Sport seats with high headrests and back support are in great demand. The cost of one such seat is from 7 thousand rubles.
Tuning enthusiasts often install sports seats on Kalina, making aggressive driving easier.
Dashboard and steering wheel trim. To add individuality to the dashboard, Kalina owners usually use vinyl film. Film painted to look like carbon is in particular demand. It looks very stylish on the dashboard. But there is also a minus - after 5 years, even the highest quality vinyl film becomes unusable. As for the steering braid, you can purchase it at any specialized store. The range of braids is now very wide.
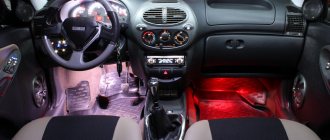
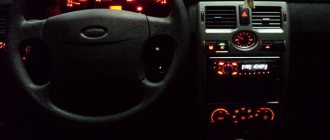
Additional interior lighting. For illumination, various LED strips are used, connected to the vehicle’s on-board network. The cost of one such tape is from 400 rubles. Most often, additional lighting is installed on the floor of the car. Its purpose is not only aesthetic, but also practical: if the driver drops some small item on the floor of the cabin, it will not be difficult to find it. Drivers also illuminate the door handles inside the cabin using the same diode strips. This is a relatively new direction in tuning, which is quickly gaining popularity.
They started lighting door handles in the Kalina cabin just a couple of years ago
Car modifications
Lada Kalina was produced for 14 years. The manufacturer offered the consumer two generations of small class cars.
First generation
The debut car of the Kalina family appeared at AvtoVAZ in 2004. It was released as a sedan. The first generation cars were equipped with 1.4 liter (89 hp) and 1.6 liter (81 and 98 hp) petrol engines. In 2006, Kalina hatchbacks appeared, the next year - station wagons, and a year later - a sports modification. Depending on the configuration, the car was equipped with ABS, electronic power steering, airbags, and an air conditioning system. During production, changes were constantly made to the equipment of the vehicle. In 2009 and 2011, Lada Kalina became one of the best-selling brands in the country.
Second generation
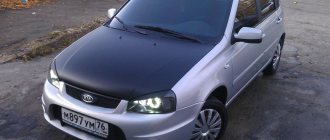
In 2013, the plant's conveyor belt was modernized to begin production of the next generation of cars. LADA Kalina 2 was produced in hatchback and station wagon bodies. It is characterized by a more modern appearance, better aerodynamics and increased comfort. Improved powertrain, suspension and gearbox are distinctive features of the vehicle compared to previous generation models. Both hatchbacks and station wagons were equipped with 1.6 liter engines with variable intake, the power of which varied between 87...106 hp. A manual or automatic transmission was installed.
The maximum configuration included the installation of anti-lock systems, stability control, air conditioning and navigation, a traction control module, an after-braking system, a passenger airbag, a touch screen, heated front seats, a rain sensor, etc.
The latest modification of the Kalina family is the Lada Kalina Cross. It is distinguished by increased ground clearance, a modified final drive ratio and a more aesthetic appearance, for example, due to decorative trims on the wheel arches and sills.
In 2022, production of Kalina family cars was discontinued.
Lada Kalina vs Lada Granta
So is there a difference between Kalina and Granta? Undoubtedly. This difference can be explained by the fact that AvtoVAZ engineers, when designing the Lada Granta, had the goal of introducing the best from Kalina into the new product, eliminating all the shortcomings, and making it cheaper. And so it happened, the basic Lada Granta car came off the assembly line with a price 50,000 rubles cheaper than its “colleague” Kalina.
The platform on which the new product is assembled has also been slightly improved. In the body frame, rigidity has been increased by as much as 12 percent.
The updated steering rack, which is equipped for the entire model range (except for the basic version), makes 3.1 turns to the stop, while in Kalina this parameter is 4.02 turns.
Granta's handling has been improved. To achieve this, it was decided to install more powerful anti-roll bars. The inclination of the front suspension strut is the same as that of the motorcycle fork - 2°25', the toe-in camber of the rear wheels is 1° (similar to the characteristics of the Mazda 3), positive toe-in is 10 minutes.
The Granta's headlight unit is made simpler than that of its partner. The new product uses H4 type lamps, when the Lada Kalina has more expensive H7 ones. In addition, in the new product the radiator grille and bumper are made as a single element, while in the Kalina model they are two separate elements, which adds to the cost of assembling the vehicle. At the same time, the new product contains a number of other structural changes, as a result of which the number of front end elements has been reduced.
The paintwork of the Lada Granta car is produced using modern equipment from Germany PPG Helios. The AvtoVAZ concern purchased it specifically for painting a new car. With the help of this equipment, the paintwork on a car protects it from corrosion with the ability to retain its original color for a long time.
As for the Lada Kalina, its main drawback is considered to be excessive noise from the power unit. As Granta users say, in the new car, even at high speeds, you can communicate in a low voice.
Disc backlight: how to do it yourself
A common modification of almost all domestic cars is the backlighting of the rims. To create it you will need the following elements:
- Mounting tape.
- Heat resistant adhesive.
- LED strip, approximately 65 cm per wheel.
- Power fastening ties.
- Twisted pair.
- Protective casing for installed wiring.
The features of the work carried out include the following points:
- The wiring is hidden in a protective casing. Twisted pair is used as wiring.
- The wiring is secured near the brake pipes using purchased ties.
- The diode strip can be fastened along the body of the structure. In order to prevent moisture from entering, insulation is carried out using a special heat-resistant adhesive.
- Power can be obtained from connector A6. The weight is taken from any nearby body bolt.
This modification looks very attractive. In this case, you should choose a diode strip with a certain shade, which will create an unusual and attractive effect. The above work recommendation applies to front wheels that have disc brakes. Problems may arise with the rear ones due to the installation of a drum structure.
Installation procedure
Despite the apparent simplicity, you should carefully read the procedure for installing the covers. The sequence of actions may differ depending on the body type - whether it is a sedan or a Lada Kalina hatchback. If you do not follow the rules, the installation process will take a long time, and purchased accessories can easily be damaged even before they take their place.
- At the first stage, you should lay out the covers and examine them for the strength of the seams and fastening straps. If necessary, it is better to immediately replace the fasteners with nylon ones.
- Before proceeding with installation, you should allow the covers to smooth out on a flat surface. This way you can get rid of unnecessary folds, and you won’t have to forcefully pull on the accessories.
- The process of putting on the covers will require dismantling all the seats. Also remove the headrests.
- Covers are put on, starting from the backs. At the same time, make sure that the edging or stitching takes its place, then the cover will not twist or wrinkle. The accessory stretched over the back is fixed under the seat with special hooks.
- The next step is to cover the seat cushion and headrest. Operations are carried out in the same sequence.
- Now you can install the chair in its place, securely fastening all the elements.
- A visual inspection is carried out to determine the presence of protruding parts of the covers and correct installation.
Eco-leather upholstery looks presentable
Removing the front seats can be just as difficult as putting on the covers. However, in this case, you only need to move the seats to their extreme positions on the skids in order to alternately unscrew 2 mounting bolts with a 10mm head on each side. The seat is dismantled along with the slide.
Installing rear seat covers is slightly different from the procedure described. It should be taken into account that both sedan and hatchback cars will have to dismantle all seat elements separately. First, the seat cushion is removed, then the split backrest, consisting of 2 parts.
To remove the sofa cushion, you will need a 10 mm socket to unscrew the 2 mounting bolts. The backrest fastening is easy to find by folding it back. 2 bolts are located on the sides under the decorative upholstery. Here you will need a 13mm socket.
Installing brake lights instead of reflectors
In order to increase driving safety, attention should be paid to the possibility of installing additional brake lights in place of the standard reflectors located in the rear bumper structure. On the Internet you can find a huge number of recommendations for carrying out such modifications.
For tuning you will need:
- The key is "8".
- A sharp small knife or other similar sharp object.
- Sandpaper.
- Files of various sizes.
- Glue.
- LED Strip Light.
- Soldering iron.
- Sealant.
- Wires for connecting to a power source.
The features of the work carried out include the following points:
- To remove the reflectors, it is not necessary to completely dismantle the rear bumper. This is due to the fact that the reflectors can be accessed through the lower part of the structure. An “8” nut is used as a fastening element.
- The next step is to completely disassemble the reflector itself. The reflector glass is secured using sealant, which can simply be carefully cut off with a knife. In order to obtain a high-quality design, the sealant is removed using sandpaper and files.
- A diode light is used as a light source. It is laid in increments of 3 LEDs per 5 cm. The tape can be secured using glue and double-sided tape.
- The wires are connected using a soldering iron. To check the quality of the resulting connection, a voltage of 12V should be supplied.
- At this stage, the structure is almost assembled, all that remains is to install the protective glass back and install the reflector with the light source in its place. To attach the protective glass, you can use the same sealant. The wires are routed from the diode strip through the rubber band that the body of the structure has. It is not recommended to install the reflector in its place until the sealant used has completely dried.
- Holes for wires are created in the bumper design. We insert the wires and install the modified reflectors in their place, fixing them.
- You can enter the wiring into the cabin through the hole near the left lamp. As a rule, a plug is located in this place. In some cases, in order to gain access to this plug, the shelf must be dismantled.
- In this case, we will connect the additional brake light to the wiring of the left lamp. In the located wiring bundle, the yellow cable touches the dimensions, the red power stops. It is important to carry out high-quality insulation of the connection in order to eliminate the possibility of the appearance of oxide and deterioration of the contact.
Insert: Important: If desired, you can connect the reflectors so that they can operate in two modes: dim dimensions, bright stops. Such an insignificant modification will almost immediately transform the car.
Which Lada models have a galvanized body?
It is unknown what percentage of parts are galvanized. Various figures periodically appear in the media, but they are not officially confirmed. The degree of galvanization of Lada cars from the media (list):
- VAZ 2110 - 30%;
- Lada 4×4 (Niva 2121 and 2131) - cataphoretic priming, no galvanized steel.
- Lada Kalina 1 - 52%;
- Lada Kalina 2 - everything is galvanized except the front and rear side members, roof and hood;
- Lada Priora - since August 2008, the body has been galvanized by 29%, and after 2009 by 100% (video);
- Lada Largus - photos of galvanized parts were posted by tourists who visited AvtoVAZ as part of excursions;
- Lada Vesta - for the first time, the outer layer of the body was galvanized (the roof of the sedan is not galvanized, the station wagon is completely galvanized), and the sills and bottom have anti-gravel protection;
- XRAY - only the roof of the external panels is not galvanized, but this is normal practice for the global automotive industry. When testing the corrosion resistance of the body, the XRAY roof passed the test better than the Vesta roof.
Official information:
- Lada Largus - all external steel panels are galvanized on both sides - outside and inside.
- Lada Granta sedan: 32% of the weight of body parts is made of galvanized steel. Moreover, 75% of galvanized metal is hot-dip galvanized steel with 2-sided coating. Strong and durable anti-gravel coating on the bottom. Hidden body cavities are treated with anticorrosive. The muffler is made of stainless steel.
- LADA Granta liftback uses galvanized steel (bottom, mudguards, sides), high-strength steel (power frame of the body). Polyester primer with increased chip resistance, black bumper skirt edging
- Lada XRAY: double-sided galvanization of external body panels. Anticorrosive underbody and hidden body cavities.
Is it necessary to do anticorrosive protection on Lada Vesta and XRAY, AvtoVAZ answers.
According to other data:
- Until 1999, AvtoVAZ did not have galvanized bodies; only a regular anti-corrosion layer was applied;
- from 1999 to 2009, cold galvanizing began to be used (application of a zinc-containing coating), but only part of the joints (welding points, fastenings, stampings and other small parts) were processed;
- Since 2009, cold galvanizing began to extend to a wider list of parts (all joints and the most vulnerable parts of the body, sills, bottom, bottom of doors, etc.
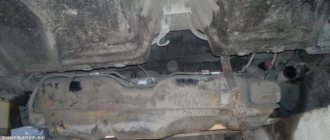
Protecting the body from dirt
We have already discussed the method of installing plastic lockers. Actually, by protecting the rear arches from dirt, the tuning can be completed. But some owners don’t stop there, continuing to improve the standard design by replacing mudguards. We are, of course, talking about front mudguards, which should stop dirt flying out from under the drive wheels. The standard rubber “barriers” mounted on the body of the “second Kalina” have a smaller area than was typical for cars of the first family. However, using mudguards of a larger area than those provided by the factory is not a solution to all problems. If you do this, dirt will begin to accumulate on the rubber surface, which will need to be cleaned very often.
Mudguards Kalina-1 and Kalina-2, comparison
If these arguments do not frighten you, read on. We look at how the “second Kalina” is being finalized today:
- It will be easy to install front mudguards from Lada Grants, produced by Petroplast. They are attached with 4 self-tapping screws. In theory, you can agree with the dealer to have the specified part installed immediately (upon purchase). And retail prices for Petroplast mudguards are the highest;
- The mount on the universal Elegant mudguards coincides with the VAZ mount at three points. The fourth screw will have to be screwed in by drilling a new hole, or try to hook onto the front locker. Here we were talking about the Elegant N1 model, available from spare parts sellers;
- On the universal mudguard “SRTC” the mount fits perfectly, but with the design everything is a little worse... However, the tuning option in question has already been implemented by many;
- Ultimately, you can use larger mudguards inherited from the “first Kalina”, but here you will have to work with a cutter (see photo above).
Conclusion: now you can buy either something universal, or, but at an inflated price (if not through a car dealer). Decide for yourself which is better. In addition to the four listed, there are probably other suitable options. We are waiting for your feedback about them in the comments to the review.
Tire pressure Kalina
This indicator plays an important role in car controllability. The grip of tires on the road depends on tire pressure.
The condition of the wheels is especially important when driving on wet, slippery or snowy roads. During vehicle operation, tire pressure may drop, so its value must be periodically checked with a pressure gauge.
If the indicator deviates from the standard values, the wheels should be inflated. It's not that difficult to do it yourself.
The pressure in the wheels installed on the front and rear axles is different.
The corresponding section of the instructions indicates what pressure in the Lada Kalina tires must be maintained: in the front - 2.2 bar, in the rear - 2.3 bar. This should be done if you are installing standard factory tires.
If the owner of the iron horse has equipped the car with tires with a wide profile, it is recommended to stick to the values of 2.4/2.5 (for front/rear tires). Narrow or low profile tires should be inflated a little less: 1.8…2/2…2.2 (front/rear) bar.
Operating a vehicle in different climatic conditions also affects the recommended level of tire pressure. For winter it should be 2/2.2 bar, for summer - 2.1...2.2/2.2...2.3 bar. This applies to standard tires.
Information about what pressure should be maintained can be found not only in the instructions for the vehicle, but also on the door pillar (on the plate).
The table below clearly demonstrates what pressure should be provided in the tires of the Lada Kalina station wagon and other modifications of this family, as well as other characteristics of the wheels of these cars.
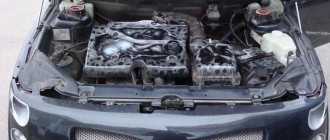
Tuning the Kalina engine
The working volume of the Kalina eight-valve engine is 1600 cm³. With it, it regularly produces the power stated in the instructions. But he categorically does not want to accelerate above 5 thousand rpm without modification. Here's what it consists of:
A direct-flow exhaust system is installed on the car. The direct-flow exhaust allows the engine to “breathe” more freely. This increases the number of revolutions by 10–15%.
Chip tuning is in progress. This procedure allows you to increase the speed characteristics of the engine by 8–10%, increase its throttle response and improve other parameters (which ones specifically depend on the firmware selected by the driver).
Zero resistance filters are being installed. The purpose of a zero resistance filter is to increase the amount of air entering the motor. As a result, the volume of the mixture burned in the chambers sharply increases. The cost of such a filter starts from 2 thousand rubles.
Installing zero resistance filters allows the Kalina engine to breathe more freely
The inlet receiver is installed. The intake receiver is installed in order to reduce the vacuum in the combustion chambers during the intake strokes, when the engine reaches high speeds. The price of the device is from 7 thousand rubles. Installing a receiver can increase the power of the Kalina engine by 10%. And fans of extreme tuning install large-capacity sports receivers on their cars. To install them, they have to bore the throttle body to 53mm. The installation of a sports receiver is always combined with the “sports” firmware of the car. If it is not there, you can forget about stable operation of the engine.
The crankshaft is being replaced. To supply more fuel mixture to the combustion chambers, the Kalina is equipped with a special camshaft, the cams of which have a slightly different shape and are capable of raising the valves a little higher than usual. This measure increases engine power by 25% and significantly increases its torque. But there is a minus: fuel consumption also increases significantly.
Refinement of valves. Lightweight T-valves are installed in the cylinder head and the valve seats are bored accordingly. The price of this operation reaches 12 thousand rubles (for 8-valve engines) and 32 thousand rubles (for 16-valve engines).
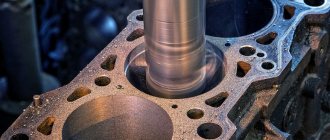
Cylinder boring. The goal is to increase engine capacity to 1.7 liters. Performed only by a qualified turner. The price of such a service is from 12 thousand rubles. After boring, the power of the 8-valve engine increases to 132 hp. s, and 16-valve - up to 170 liters. With.
Boring the Kalina cylinder head allows you to increase engine capacity by 8%
Turbocharged engine. To do this, a turbocharger is installed on the Kalina. Garrett compressors are held in high esteem by car enthusiasts. But this pleasure is not cheap; the cost of such turbines starts from 60 thousand rubles.
Price issue
A set of covers for both a sedan and a Lada Kalina hatchback costs at least 2.5 thousand rubles. But when purchasing, you should take into account not only the cost, but also customer reviews of a specific manufacturer, as well as the material’s ability to resist abrasion, form snags and folds, formatting, and the presence of separate elements for headrests and armrests.
The car interior will not look impressive without properly selected stylish covers. There is a large assortment of car seat coverings on sale, many photos in catalogs
But you should pay attention not only to the appearance, but also to the quality of the product
Selecting and installing seat covers for your car is not an easy task. This is due not only to the selection of the optimal material for the covers, but also to the quality of workmanship and the correct installation.