Checking the condition of the engine using the oil filler cap
Agree that when you come to inspect the car you like, you are unlikely to measure compression, oil pressure and timing chain tension on the spot. But checking in the service is not free, it takes time, and the owners (for obvious reasons) do not particularly like this procedure. However, you can roughly understand the condition of the piston without service, literally in the yard.
Verification procedure
Everything is elementary. Start the engine and unscrew the oil filler cap. And then there are possible options.
Option number one: nothing special happens.
And by placing a piece of paper on the oil filling hole, you can watch how it slightly sticks to it. This is a good sign. You can inspect the car further (you should prepare a list of items to check in advance). However, the probability of encountering such an idyllic picture on a middle-aged engine is approximately equal to the probability of encountering the crew of a flying saucer. But anything can happen, what if you are lucky?
Option number two: nothing special happens, but the leaf blows away.
It's already worse, but in general, it's expected. Now we place the lid itself on the neck. Just put it on the hole as tightly as possible. The lid twitches but does not fly off
. And this is the most likely outcome of events. In the absence of other negative factors (smoke or oil splashes), you can already put on a sad face and tell the seller that “the ventilation is all over, and maybe there’s no compression at all. "Remember this phrase - it will come in handy. Well, then - the classic auction and further inspection of the car with passion.
Option number three: something incomprehensible is happening.
Namely: smoke comes from the engine neck, or worse, oil splashes. The attached cover comes off even at idle. And here there is nothing more to talk about. You screw it back in, shake the seller’s hand and leave. No options.
And what is the result?
Those who carefully read my blog can already guess. For those who don’t read carefully, I recommend reading this article
, where I described in detail the essence of the VKG system. Therefore, I’ll simply state: firstly, a strong “blowing” from the neck indicates a clogged crankcase ventilation. This may be bad, but it can be solved independently (see below). But what’s worse is that this is a symptom of an active breakthrough of gases into the crankcase itself. From there they are already rushing out with all their might through any hole, which you can observe with the oil filler cap removed. Needless to say, in this case, replacing the piston rings and disassembling the engine is the best option for further developments. And the worst is banal capital. Moreover, you will only find out the price during the process. And you shouldn’t be surprised that it can easily amount to up to a third of the price of a car purchased “without looking”.
Below is a personal example of how to clean the ventilation system built into the valve cover.
Source
Purpose of the voltage regulator
If we consider the simplest closed circuit, which is placed in a time-varying magnetic field, then the induced emf in it is proportional to the rotation frequency of the electromagnet. Considering that a car engine operates at different frequencies, a device is needed to stabilize the output voltage. The role of this device is played by a voltage regulator located in the brush assembly.
The principle of operation of the regulator is that it connects or disconnects the excitation winding from the terminal of the diode bridge.
The current flowing through the rotor winding is able to regulate the magnetic flux, hence the output voltage. When it exceeds 14.2 V, the transistor closes the excitation circuit. When the voltage drops to 13.5 V, the circuit is unlocked again.
Principle of operation
The basis for obtaining electric current is the phenomenon of electromagnetic induction. It represents the occurrence of an induction current in a closed circuit under the condition of a change in the magnetic flux penetrating this circuit. There may be several ideas for implementing a generator set. It is enough to recall all the experiments on observing EMR. But rational and technical components impose their limitations. It is irrational to use a permanent magnet as a source of magnetic field, since it will be impossible to regulate the magnetic flux. By changing the current strength in the electromagnet, you can ultimately influence the output parameters of the induction current.
The rotor includes not only the windings of the electromagnet, but also the shaft with slip rings. Thanks to the sliding contact of graphite brushes with slip rings, the movable winding is excited. Current is supplied to the voltage regulator through one of two circuits. Initially, when the engine is turned off, the winding is powered by the battery. After starting the engine, the generator independently powers its electromagnet. When the rotor rotates, an alternating electric current is induced in the stator winding.
The operation of the generator is monitored by turning on the lamp on the instrument panel.
When the device is operating, the potential at the generator contact and at the output of the diode bridge is the same, therefore, current cannot flow through the lamp. If the light is on, this means low voltage at the diode connector, which indicates a faulty power source. The rectified current powers the on-board network and recharges the battery.
Replacement procedure
To change the generator on a Chevrolet Niva, you will need to follow a few fairly simple steps.
- First of all, you should take care of the safety of the work being carried out. To do this, you need to put the car in a repair place, turn off the engine and remove the terminals from the battery.
- The next step is to remove the wire from the contact bolt, which is located on the rear panel of the generator. You will also need to remove the block from the assembly that secures the brushes.
- After this, you should begin dismantling the alternator belt. The belt is tensioned using a special plate called a tensioner. You can adjust the tension using the fastening bolts; they need to be loosened. The plate is located in the area of the tension roller and is attached to the structure with three bolts. To unscrew them, you need to take an open-end wrench for two bolts, and use a wrench to loosen the third.
- Next, all that remains is to remove the belt and unscrew the generator mounting bolts. There are only two bolts - top and bottom, but they are massive, and you will need a wrench for a large diameter. If the bolts will not turn, you will need to hold them from behind.
When the bolts are unscrewed, all that remains is to dismantle the generator and begin installing a new one.
Little tricks for operating and repairing VAZ-2109, VAZ-2108:
| How to fix flying caps on a VAZ-2109 and VAZ-2108? Tips from craftsmen. When refueling, where should you put the cap from the fuel tank of a VAZ-2109, VAZ-2108? Why don’t the LEDs light up or blink in the daytime running lights? Where is it best to install a fragrance in the cabin of a VAZ-2109? VAZ-2109 and VAZ-2108, what to do if Is water dripping from the muffler? |
Car polishing. How to do it correctly? How to soundproof a VAZ-2109 with your own hands? We learn to drive a domestic “eight” or “nine”. Features of driving VAZ-2109Care and repair of seat covers for VAZ-2109Auto loan. Why take it? We save on gasoline Anti-corrosion treatment of the underbody of a VAZ-2109, VAZ-2108 car yourself. Repair. The rear wheel of the VAZ is stuck and does not spin. What to do and what is the reason? How and with what to remove rust from a car. Repair of VAZ-2109, VAZ-2108Replacing the hood cable of a VAZ 2109Opening the hood of a VAZ 2107Opening and closing the hood of a VAZ-2109How to open the hood of a VAZ 2105 and close it?
A) Belt break.
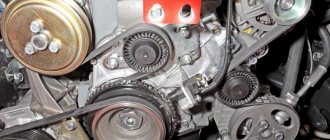
Carefully examine the presence of a belt on the water pump and generator pulleys. To return it to its destination, you will need socket wrenches 17 or 13, depending on the year of manufacture of the car, as well as a strong flat-head screwdriver.
Loosen the nuts securing the tension bar and slide it to the side towards the cylinder block.
Put a belt on your professionalism landing place.
After installation is complete, adjust the tension, controlling the deflection when pressing with a huge finger on the clearance of the belt between the generator and pump pulleys - 10-15 mm, pump and crankshaft - 12-17 mm. Failure to comply with this requirement may result in the belt slipping with subsequent damage and rupture.
Do-it-yourself device repair
Now let's talk about how a generator is repaired. The repair procedure can be performed at a service station or in a garage, of course, if you have an idea of what needs to be done.
Replacing the alternator belt
- First of all, the connector with the DPKV is dismantled, after which the screw that secures this regulator is unscrewed and removed.
- The nut that secures the device should be loosened slightly, but not completely unscrewed. The generator assembly can be moved towards the block, after which the strap on the displaced device can be removed without problems, since it will be loosened.
- Using a jack, which must be installed in advance on the side where the unit is located, you need to slightly raise the car by turning on first gear.
- Next, pull the strap itself so that it can move away from the pump shaft. Then spin the wheel until the tension point reaches the pulley.
- The next step in replacing the alternator belt will be to remove the belt from the other shafts.
- As for installing a new one, it should first be put on the shaft of the unit and the crankshaft, only after these steps can it be installed on the pump shaft.
- The wheel turns until the strap hits the pulley. Then the device is put in place, the strap is tightened, after which the assembly is fixed to the bracket using a nut. The final stage will be the installation of the DPKV in place (author - Ig K channel).
Replacing the tension roller
Repair of the Niva Chevrolet generator may involve replacing the tension roller. The main part of this element is the bearing, so if the strap is loose, then first of all it is necessary to check it. If the roller is in good condition, then the bearing will rotate quietly and there should be no jerking.
To replace an element, follow these steps:
- First, install a crowbar or other tool so that the clutch shaft is blocked. This will prevent the crankshaft from moving.
- Then the screw that secures the roller itself is loosened, and the tension on the strap is relieved.
- The axial screw is unscrewed, after which the roller can be removed.
- A working roller is installed and the strap tension is adjusted. After replacement, make sure the device is working properly.
Replacing the brush
Worn and new voltage regulators
- To replace these components, the regulator must be completely removed. Also, the “-” terminal is disconnected from the battery and the wiring coming from the generator unit is disconnected.
- Next, the block of wires is dismantled, from the tips of which the rubberized cap is removed - this component is intended for protection. After this, you need to unscrew the nut from the wires that secured them to the mechanism block.
- Then you need to disconnect the spring fasteners and remove the plastic casing, using a Phillips-head screwdriver to unscrew the regulator clamps.
- The regulator is dismantled along with the brushes, after which the wires need to be disconnected from this element.
- The brushes are changed, and further assembly of the structure is carried out in the reverse order. Brushes should be replaced if their length is less than 0.5 cm. If the length of the brushes is normal, and the generator device is not working correctly, it is necessary to diagnose the regulatory element, as well as the electrical circuit in the area from it to the brushes.
Dismantling the generator
- Replacing the generator begins with removing the device from the engine compartment. All wiring going to it is disconnected, and we must also not forget about disconnecting the battery. The protective plastic casing is removed.
- The nut securing the wires and the screw securing the assembly are unscrewed. The fastening in the form of a bolt is detached; it is located at the bottom of the structure, after which the strap is removed.
- When all the bolts are unscrewed, the mechanism can be removed from the bracket; a mounting spade may be needed for this.
- To install a new unit, all steps should be repeated in the reverse order. After the new generator is installed, it is necessary to diagnose the condition of the drive belt and also adjust the tension.
Generator connection
Replacing the generator is only half the battle. It is also important to connect it correctly to the circuit source. Before connecting, you need to complete the work on the front and rear panels of the unit, only after that you can connect the terminals to the battery.
The contacts must be clean during connection. If contamination is detected, it can be removed using special cleaners. Also, the terminals on the battery must be tightened, otherwise the oxidation process will begin on their surface.
If everything was done correctly, then when you start the engine, the light on the dashboard indicating a low battery charge should go out. However, experts recommend, just in case, checking the operation of the generator using a multimeter by measuring the voltage at the terminals.
Thus, in order to avoid any serious problems with the generator during the operation of the Chevrolet Niva, it is important to undergo a technical inspection on time and repair the components of this unit.
Installing a new generator
The algorithm for installing a new generator is practically no different from dismantling the old one, only all steps are performed in reverse order. So, the car owner will need:
- Screw the assembly to the engine by turning and fixing two bolts - upper and lower. At the same time, there is no need to tighten them too much, since then the belt still needs to be tensioned.
- Install a new V-ribbed repair on the pulleys. You need to put it on with a little effort and go around the pulleys in the following sequence: hydraulic pump pulley, roller, crankshaft pulley, power steering pulley, roller, generator pulley.
- Tension the belt by tightening the adjustment bolt and the special plate. It is important that the belt deflection in the upper free part does not exceed or be less than 15-16 mm.
Then all that remains is to tighten the three bolts of the bottom plate and check that the power source is secure.
How to find out if the generator is faulty
When operating a Niva Chevrolet, certain difficulties and malfunctions sometimes arise. During a trip or long-term use of a car, various problems arise, and one of them is the failure of the generator.
Diagnosing a breakdown is quite simple. There are several manipulations that can be used to determine the need for repairs:
- The corresponding light on the dashboard lights up, indicating that the battery is constantly discharged.
- The battery drains quickly when the engine is running.
- The brightness of the light decreases as the engine speed increases. In this case, it is necessary to replace the generator brushes.
All of the above signs indicate that the generator urgently needs to be replaced or repaired.