An economical option for replacing standard acoustics. Part 1.
When I saw the Lada Largus for the first time, I immediately decided to myself: I will have it.
The sound from the standard speakers began to irritate me. .(
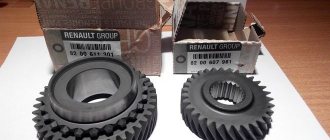
Less than a year has passed since the purchase of TRIFON, when the standard acoustics began to slowly “order to live for a long time”! .) Strumming, iron jingling, etc. began to appear. It all started with the front right speaker, later the rear left... And no matter what was expected, it was decided to change the standard speakers for something better than the standard ones. The budget for purchasing 2 sets of speakers was limited to $60. It was also decided to install speakers of standard size – 5.25″ (130mm). I turned to my friend. Described the situation. They inspected the speaker seats. The budget has been announced. And here it rushed. .) For the rear doors I was offered this set: Coaxial acoustics DLS Matador M125G .
Properties: Type: Coaxial AC Size: 130mm. (5.25″) Number of bands: 2 Rated power: 40 W. Maximum power: 60 W. Sensitivity: 90 dB (Decibel is a logarithmic unit of levels, attenuation and gain)
(W/m) Reproducible frequency spectrum: 60 – 20000 Hz
(unit of frequency of periodic processes in the International System of Units SI)
Impedance: 4 Ohms
HF (High Frequency)
-speaker
Dimensions: 16mm.
(0.63″) LF (low frequencies)
-speaker
Size: 130mm.
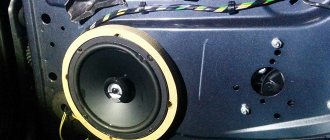
(5.25″) Installation depth: 52mm. Installation hole: 120mm. (4.7″) Integrated filter. I started replacing the standard acoustics. I started with the right rear door.
From above, I used a plastic spatula to pry off the standard protective mesh.
Released the top latch.
And carefully, pulling the protective mesh towards himself, he released it from the hooks of the other latches.
I unscrewed the 4 screws that secure the speaker in the basket. And he pulled out the speaker.
This “magic” is installed as standard acoustics.
As we see in the photo, the standard speakers are connected with a specific chip (Renault). And in order to connect speakers from a third-party manufacturer to the standard wiring, you need to purchase special adapters! But because: “Our hands are not for boredom. “. Well, the cost of these adapters is very steep, so I decided to create them myself. (Since I already took out one standard speaker, I made 4 adapters in advance.)
Again I needed the “nice thing” I recently acquired.
Crimped and insulated with heat shrink casing - 4 adapters.
Let's continue. I disconnected (took out) the connector from the standard speaker and took the wires out of the chip.
And further. If you don’t have an acoustics wiring diagram at hand. For ease of definition, so as not to guess where the “+” is here and where the “-“ is here.
I connect and isolate the adapters.
And at the same time I wrapped a plastic chip with electrical tape. So as not to lose it in the garage, well. But what if. .)
Another incident happened with the speaker system being installed. Due to the slightly wide petals (with which the speaker fits into the recesses of the cup and is attached to it with screws), they fit quite tightly into the regular places. And so that the diffusers do not destroy them when they are dismantled. I slightly bent the petals.
Now I connected it to the adapter. Inserted it into the cup and secured it with screws.
I'm installing a standard mesh on the space! That's it, with replacing the speaker in the right rear door - Finished.
Now I'm moving to the back left door. I do everything completely the same way. ,)
With the replacement of acoustics in the rear doors - FINISHED.
We move on to replacing the acoustics in the front doors.
For the front doors I was offered the following set: Component acoustics Kicx PDN-5.2
Properties:
Type: Component speaker Size: 130mm. (5.25″) Number of bands: 2 Rated power: 70 W. Maximum power: 140 W. Sensitivity: 91 dB (Decibel is a logarithmic unit of levels, attenuation and gain)
(W/m) Reproducible frequency spectrum: 70 – 24000 Hz
(unit of frequency of periodic processes in the International System of Units of Units)
Impedance: 4 Ohms
Crossover Crossover: Outdoor Crossover Frequency: 5 kHz Crossover Slope: 12 dB (Decibel is a logarithmic unit of levels, attenuation and gain)
/octave Tweeter material: Silk
LF (low frequencies)
-speaker
Dimensions: 130mm.
Diffuser material: Cellulose with moisture-proof coating Suspension material: Butyl rubber Magnet weight: 284g. Installation depth: 53mm. The installation was created in the same way as installing acoustics in the rear doors. I started the installation from the front left door.
And through the right front door.
Replacement of standard door acoustics with these kits – Completed.
Source: largusladaclub.ru
see also
Comments 21
I’ll give you a Ural Hammer 165, they play great with the standard radio, I installed 4 speakers at a price of 3600, it seems like it was a bargain
That's why I switched from BMW to Largus
There is another option but it will be more expensive: sell the Largus and buy a BMW
Hello fellow countryman! Well what can I say, definitely change it. We definitely install component ones in the front doors. When buying, it is advisable to pay attention to the sensitivity of the speakers. It should be at least 91 db. It’s better if you find 93 db, but now this is rare, all the current shitty acoustics are geared towards amplifiers and the sensitivity leaves much to be desired, 89 db is edge in modern times (a tribute to the current shitty fashion). What would I recommend for the front of size 13? Herzi Dsk (I have them in front now. They’re 6 years old - they sound great) I wanted to install DLS_ki, but I can’t find them in the daytime right now, and the price tag they have space. You can try to install Pioneers in the rear door, but their sensitivity is not so great, but this is the best of all the current dermis that can work in the 13 range in terms of producing, albeit remotely, some low frequencies. But as for the standard head, I would change it. I now have a Jivisi 125_I regular receiver without CD, but with a very good set of functionality in terms of sound settings. The best feature in it is the possibility of channel settings. Regular sound is output to the front, and the rear switches to subwoofer mode. What do we have in this option? And this is what we have. The rear speakers work only in low frequency mode, the front ones in medium and high frequency mode. The sound image turns out to be quite normal, in other words, we have a three-way speaker on the left and on the right side of the car. It was not without reason that it was the Pioneers who suggested it as the rear ones, since in six years there were three sets of rear speakers already in this mode, and these have been holding on for the third year already. Well, that’s it in a nutshell (this is my option for today in a car if you take size 13.) And yet, there is a nuance with the front doors, the depth of the new speakers is limited and, if my memory serves me right, is only 51 mm. Further, if the glass lower it, the magnets can reach it - this is something to take into account when purchasing; be sure to measure the seating depth. In the rear doors, place it there until they reach the metal, there everything is fine with the seating depth and nothing interferes!
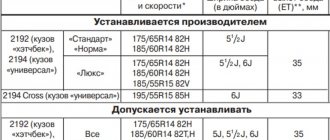
Speaker size in largus
How can you upgrade a mediocre Lada Largus station wagon to a top version for little money?
LADA > Largus
Largus is a good car. There is no candidate for it in the class of available seven-seater cars. But after the March price increase, they began to ask a lot of money for it: a seven-seater version (there is also a 5-seater) with an 84-power engine is priced at 549,000 rubles. And this is the original implementation of “Norm” - no luggage rails, no “music”...
Stop! There is nothing? Well it will be! Shouldn't we get some shoes? And it will cost even less than what dealers charge for such functions. It is important that with such fine-tuning you do not need to have special knowledge and cunning equipment. The main thing is to find spare parts that you can install on the machine yourself.
And what else?
You can insert a luggage rack behind the second row of seats (4,000 rubles), install sound insulation under the hood (1,300 rubles) and almost everything else. Using the multi-step tuning method, you will evenly bring the machine to its normal state - for the applicable means.
When I saw the Lada Largus for the first time, I immediately decided to myself: I will have it.
The sound from the standard speakers began to irritate me. .(
Less than a year has passed since the purchase of TRIFON, when the standard acoustics began to slowly “order to live for a long time”! .) Strumming, iron jingling, etc. began to appear. It all started with the front right speaker, later the rear left... And no matter what was expected, it was decided to change the standard speakers for something better than the standard ones. The budget for purchasing 2 sets of speakers was limited to $60. It was also decided to install speakers of standard size - 5.25″ (130mm). I turned to my friend. Described the situation. They inspected the speaker seats. The budget has been announced. And here it rushed. .) For the rear doors I was offered this set: Coaxial acoustics DLS Matador M125G .
Properties: Type: Coaxial AC Size: 130mm. (5.25″) Number of bands: 2 Rated power: 40 W. Maximum power: 60 W. Sensitivity: 90 dB (Decibel is a logarithmic unit of levels, attenuation and gain)
(W/m) Reproducible frequency spectrum: 60 - 20000 Hz
(unit of frequency of periodic processes in the International System of Units SI)
Impedance: 4 Ohms
HF (High Frequency)
-speaker
Dimensions: 16mm.
(0.63″) LF (low frequencies)
-speaker
Size: 130mm.
(5.25″) Installation depth: 52mm. Installation hole: 120mm. (4.7″) Integrated filter. I started replacing the standard acoustics. I started with the right rear door.
From above, I used a plastic spatula to pry off the standard protective mesh.
Released the top latch.
6). Select your car's speakerphone from the list of detected Bluetooth devices
After the phone has detected the hands-free system of your car, on the screen of your device you should find in the list of detected equipment available for connection, the “Hands Free” system or the like. system.
In our example, the phone detected the Hands Free system of the Toyota Camry. After this, in our example, we had to click on the “Hands Free” inscription to begin the process of connecting the phone to the car.
Once you select the device you want to connect on the phone screen (or after the infotainment system detects your phone), you must enter a password (PIN) on your phone to pair the two devices.
As a rule, all cars equipped with a speakerphone or a system for listening to music from wireless devices are supplied directly with a password generation system for pairing the car with a phone.
If your car is equipped with an infotainment system screen, then. after these devices find each other, the word “password” should be displayed on the screen of your car, which you must type on your mobile phone to finally pair (connect) the devices.
If your car is not equipped with a screen, but has a hands-free option, then refer to the vehicle manual, which should indicate what password you need to enter to connect the phone to the car.
For example, many car models often use simple passwords that are already set to , “1111”, etc.
You can also set (create) such a password manually if you search for devices directly from your phone.
How to install
Some cars come from the factory with a 1 DIN car radio with a CD player. Basic versions are equipped only with audio preparation; instead of the head unit, a plastic plug is mounted.
To install the radio on Largus with your own hands, you need:
- After removing the plug, place guide slides with locks in the device panel.
- Secure the mounting assembly using the tabs located around the perimeter of the part. Bending is done with a screwdriver; the installed shaft is not required to vibrate or make third-party sounds.
- Connect the ISO connectors located on the standard wiring to the head unit.
- Connect the antenna plug to the socket on the radio. If the sizes and shapes of connectors and plugs do not match, appropriate adapters are used.
- Insert the audio device into the shaft and push it until it clicks, indicating that the latches engage.
- Install a decorative frame around the radio panel.
Some owners install 2 DIN size radios on their Lada Largus. To place the head unit, it is necessary to change the front plastic trim on the device panel, since it is unrealistic to carefully modify an unusual one.
The original panel is attached to latches, which are removed manually or with a plastic screwdriver inserted into the gap between the parts.
The front panel with an expanded window requires improvement - it is necessary to install control keys for additional equipment on it, borrowed from the Renault Logan sedan; unique elements from Largus cannot be placed. This is due to the fact that the panel is designed for oval-shaped keys, which were never used on Largus.
The mounting sockets are immediately modified for installation of mounting clips.
In the device panel, you need to remove the horizontal jumpers located near the socket of the standard radio and climate control controls. Dismantling is done with an alloy hacksaw and wire cutters, the remaining parts are cut off with a construction knife. All manipulations are carried out with caution, as there is a risk of damage to the standard electronic wiring. Then you need to install the center console in the space to assess the contact density of the parts.
Since the unique wiring has cables with colored insulation that does not comply with the ISO standard, it will be necessary to compare the purposes of each element on the car and the radio. An adapter is used for connection; wire switching is allowed by twisting the required cables. It is recommended to reinforce the joints with tin-lead solder or an iron connecting sleeve. The connection point is sealed at the top with a heat-shrinkable tube, which provides protection from moisture and short circuits.
Update process
Now you can connect the media to the radio in your car.
- Before starting the procedure, be sure to turn on the ignition. Otherwise, the radio will automatically turn off and the firmware process will be interrupted, which may lead to device failure.
- When reading information on the media, the radio will determine that the contents on the drive are material for flashing. After analyzing the information, the device will offer to update the software. You should select "Yes" to refuse to click "No".
- Confirm the information by clicking the “OK” button.
How to connect a radio
Connecting the head unit depends on the modification of the car. When installing the radio, you need to tightly snap the ISO plugs in place, and then install the antenna connector in the space.
If the product is equipped with a wired remote control, it is placed on the control column or the front part of the device panel. The wire is laid inside the panel along the standard lines of the electronic harnesses.
With 2 speakers
The scheme with 2 loudspeakers is used only on cargo vans; the loudspeakers are located in the doors under plastic panels.
The radio is ready for use immediately after connecting to the standard connectors. The owner of the car can install additional speakers in the cabin by laying separate speaker wires to them.
With 4 speakers
On passenger versions, 4 speakers are used, which improves the sound quality in the cabin. The wiring has a separate harness leading to the speakers in the rear doors.
The connection does not require any additional modifications to the vehicle's wiring.
No speakers
The layout without speakers is found on the basic configuration. The car has connectors for connecting the radio and front speakers, as well as an antenna output. After switching the radio, you need to disassemble the door trims, which will allow you to mount the speakers in their standard places.
Replacing the standard MMC Kalina 2 Lux
First, I ordered an adapter frame for 2DIN from Alamar and, in addition, some small things, like an overlay for the rear bumper:. Then I ordered the radio from DNS: www. Here is a good review of this shaitan machine: club. And in February, all this disgrace was already in hand, but there was no warm garage... I had to contact through friends and the warm box was paid for. By this time, I already suspected that not everything was so simple... The thing is.
Let's figure out how to install navigation in the standard radio of the Lada Granta. I would immediately like to talk about the electronic connection of the radio. Now, when installing a radio, there is no need to run wires to power the radio and for the speakers; all this is included in the standard audio preparation of the car. How to connect a radio in a car, installation instructions.
Connection diagram
The procedure for connecting the car radio may vary slightly due to the modification of the machine. The audio device sometimes comes with a remote control. It is installed on the control column or the front part of the dashboard. The cable is laid along the length of the electrical harness lines.
The exact wiring diagram may vary due to the number of speakers. Therefore, it is better to understand the following information:
- With 2 columns. Two loudspeakers are used only on trucks. Speakers are most often located in doors under plastic panels. After installation, the radio can be immediately used for its intended purpose. All you have to do is connect it to the sockets. You can install other speakers in the cabin. Then it will be useful to lay a separate speaker cable.
- With 4 speakers. In passenger versions, a device with 2 pairs of speakers is more often found. The wiring contains a special harness that is routed to the rear door speakers. Connection does not require any modifications to the car wiring.
- There are no speakers. The diagram is appropriate for the main configuration. The car has connectors for connecting the device and front speakers. Additionally there is an antenna output. When the car radio is connected, you need to disassemble the door trim. This step will help you get the speakers in place.
The speakers must be fixed at industrial points. You can use wood adapter rings. After installing the parts, the removed elements must be returned to their original space.
Are you the driver of the car?! Then you can take this simple test and find out. Go to test »
Device installation
Some Lada Largus cars are initially equipped with a standard 1DIN device and a small disc player. Basic models are equipped with audio only. It is a mounted plastic plug.
To install the Largus car radio with your own hands you need:
- remove the plastic blank and place special slides with fasteners in the dashboard;
- fix the mounting unit with tabs located around the perimeter;
- Unbend the latch using a screwdriver so that the installed shaft does not vibrate;
- connect the ISO connectors located on the standard wires to the radio;
- connect the antenna socket to the device socket, and if the sizes and shapes of the sockets do not match, take suitable adapters;
- install the car radio in the seating space and push it in until the latches engage, as indicated by the corresponding click;
- take care of the decorative frame placed around the device panel.
Dismantling is best done with a hacksaw and pliers. If excess elements remain, they are removed with a knife. Actions need to be created carefully. Otherwise, you can destroy the standard wiring.
At the end, mount the main console to evaluate the contact density of the parts.
Knowing how to install a radio in Largus, you can perform all the necessary manipulations without the help of others. It’s easy to find on the Internet a huge number of videos explaining what the Lada Largus acoustics and its installation are.
Sound via bluetooth
A standard car radio in combination with dynamic speakers “reads” music programs equally well, “digesting” any genre without much difficulty. The manufacturer has addressed radio lovers with a powerful antenna device that allows them to pick up a signal of even minimal power. The radio allows you to memorize 6 stations in each frequency range.
Renault Sandero DIY repair
Renault Sandero wiper blades
Compare Renault Captur and Hyundai Creta
Listening to music is available via CD drives or flash devices. Also for the same purposes, switching using Bluetooth is possible.
Recognized formats:
- "CD" and "MP3";
- "AAC" and "WMA", as well as "WAV".
With a wireless connection, it is possible to rewind not only between music programs, but also directly within a track.
The display clearly displays the charge level indication (if “Bluetooth”), as well as the “RDS” line. There is a Russified font in “IDTag”.
Other methods of connecting to this device are the “Jack” and “USB” sockets.
Useful tips
Instead of a 1 DIN device, you can install 2 DIN on the Lada Largus. To position it, you need to update the front trim on the dashboard. It is not allowed to improve an unusual one. It won't look neat. In the panel, remove the jumpers located near the radio connector and climate control controls.
The front panel with a wide window will need some work. It is necessary to install control keys for additional equipment. They are borrowed from Renault Logan. Elements from Largus cannot be placed. The panel is initially designed for oval keys.
The unique wiring has colored insulation. It is not ISO compliant, which is why it is useful to compare the functions of the parts on the machine and on the device.
An adapter is used for switching. You can connect wires by twisting the cables. The junction point should be reinforced with tin and lead solder. Another good option is an iron sleeve. It is better to close the connection space at the top with heat shrink tube. It protects against moisture, preventing short circuits.
Source: omagnitolah.ru
How to turn on and listen to music in a car via Bluetooth?
Listening to music from your phone in the car via Bluetooth is a real pleasure. To do this, just turn on music playback on your phone; some machines additionally allow you to control tracks from the screen or by voice. You can also use downloaded files from your playlist.
For me, however, it is more convenient to launch an online service, for example Yandex Music or Apple Music. When the question of how to connect an iPhone to a car via Bluetooth has been resolved, then Apple Music is the best option. The program is paid, but provides access to a huge library of music and has a user-friendly interface.
Another high-quality service is Yandex Music. The application is paid, but if you use a browser, you can listen to music for free. There is a nuance: on iPhone in Yandex Music, tracks do not switch automatically, which is very inconvenient.
- But you can also use other services, there are more than enough of them: VK music, YouTube music, and so on. If you connect an Android phone >
Now you know how to connect your smartphone to your car wirelessly. When my phone does not connect to the radio via Bluetooth, simply following these instructions helps. I hope you find it useful too!
Speaker size in Largus
Video on the topic of the size of the standard speakers of the Lada Largus - click. Do you want to learn how to repair a car yourself? Then watch the free lesson. How to repair a car with your own hands at home. We will help you with repairs and repair the car yourself. We know how to return a car with minimal investment. I have attached a video summary.
Category: Auto repair {instructions}
Laughter on topic: - Why does everyone call you Lightning? - Do you see this aggressive scar on your neck? - Yes. - I got it when I was buttoning up my down jacket.
Published by Administrator: at the request of Andokid
Review from a car owner: Consumption of about 6 liters per 100 is unsurpassed
| Manufacturer: | Renault SAS Boulogne |
| Vendor code: | 7700424534 |
| Title: | Speaker LADA Largus standard 7700424534 |
| Department: | VAZ |
Pickup from a warehouse in Yekaterinburg
Payment (issue of money for some obligation)
upon receipt:
- Cash
- Transfer to card
- By bank card
- By invoice (for organizations with VAT)
Fundamentally. Before receiving the product, please check its availability by phone or place an order on our website.
Delivery by courier in Yekaterinburg and nearby towns
- Payment (issue of money for any obligation)
in cash upon receipt of the product - The cost of delivery within the city and nearby towns is 100-250 rubles
- Free delivery throughout Yekaterinburg for orders over 10,000 rubles.
- Please check with the RusAvto manager for delivery times and costs.
For small orders and delivery costs, see the Delivery section.
| Small order | Cost of delivery | Free delivery from | |
| Ekaterinburg | 1000 | 150 | 6000 |
| Upper Pyshma | 3000 | 200 | 10000 |
| Berezovsky | 3000 | 200 | 10000 |
| Aramil | 3000 | 200 | 10000 |
| Revda | 5000 | 400 | 17000 |
| Pervouralsk | 5000 | 400 | 17000 |
| Polevskoy | 7000 | 500 | 26000 |
| Sysert | 7000 | 500 | 26000 |
| Novouralsk | 10000 | 600 | 34000 |
| Nevyansk | 12000 | 700 | 37000 |
| *does not apply to large spare parts and special products. cost | |||
Delivery by Russian Post
- Prepayment 30% of the product price (Cashless payment on invoice)
- The balance of the amount is cash on delivery upon receipt of your product at the post office.
- Delivery services are paid by the recipient according to the current tariffs of Russian Post.
Why do we ask for partial payment in advance before shipping? In our practice, there have been cases when a product sent by cash on delivery remained for a long time in the recipient’s post office and was not picked up. We were required to pay for storage and bear additional costs for the return shipment of the unclaimed product to our warehouse.
Adapter for speakers for Lada Largus (also 1st generation of B0 platform cars until 2014). Allows you to connect speakers without cutting off the original chips.
Manufacturer: 4 Car Media. See also below for other ISO format adapters. Known under article numbers ZRS AG-2 and GS-604
Installing 16 speakers in Largus
After reading a bunch of articles on installing 16 speakers in Largus doors, weighing all the pros and cons, I decided not to bother and take the path of least resistance. Friends gave me a hint that 16 speakers will fit into their standard places, without any cutting or modifications. Simply remove the standard screens from the doors, attach the speakers and fasten them with screws. They also recommended not to bother with vibrations in the doors, because... On Logans the effect is not particularly noticeable. I decided to test it, to do a little farming, the main condition for me was to return the door panels to stock condition after dismantling the speakers. Speakers Power Acoustik XP2K-60C
I connected the speakers through a calcell pop 2×150 amplifier, which was rolling around idle in the back after the unsuccessful installation of the subwoofer.
The difference between 13 speakers and 16, and what’s more, through an amplifier cannot be expressed in words. For this reason, you can even close your eyes to these large collective farm nets.
After dismantling 16 speakers, 13 speakers are relaxed back into their original places, and the marks from the screws are covered with standard meshes. And the casing remains intact and unharmed. Good luck to everyone on the roads.
Luxury configurations Grants and Kalinas2 come with standard music: mafon and speakers in the front doors. In Ladas, as in all other cars, the manufacturer installs very ordinary speakers, this simplifies the installation of music on the assembly line and does not greatly increase the cost of the car.
Ladas provide for the installation of 13 cm speakers in the front doors, and there is also a successful opportunity to install 13 cm speakers in the rear doors. For this purpose, special spacers and decorative meshes are useful.
Almost all music lovers do not like the playing quality of standard 13 cm speakers; they get the most high-quality and huge-sized speakers.
The most popular size of car midbass speakers is 16 cm speakers (16.5 cm or 6.5 inches). 16 cm speakers can be Coaxial, when midbass and tweeter (tweeter, tweeter) are connected on one speaker, or be part of the highest quality component (2- or 3-component) system with a crossover (complete passive crossover or external active crossover or completely channel-by-channel amplification).
How to install 16 cm speakers if the factory provides for installation of only 13 cm speakers?
This issue is perfectly solved by Spacers for installing 16 cm speakers in Lada Granta, Lada Kalina 2, Datsun. The spacers were originally designed to accommodate 16cm speakers WITHOUT cutting the alloy. They completely follow the entire curvature of the door alloy and fit tightly to the plastic door trim, filling the available space. No other spacers can provide this.
When installing 16 speakers through spacers, there is no need to use front door nets, since grill nets are used, which are supplied with 16 cm speakers. The speaker is installed on the surface of the door trim so that the sound goes 100% into the cabin, and does not remain somewhere inside between the metal door panel and the plastic upholstery.
Gluing the doors with sound insulation will have a very positive effect on the sound quality in your car. Even the most ordinary, narrowest soundproofing of doors will give a very large beneficial effect.
Transmitters
The last method is the use of all kinds of transmitters, or, simply put, transmitters. There are a large number of their types and below we will consider only a couple of them.
FM transmitter for mobile phones.
An interesting representative of such devices is the FM transmitter. The essence of its work is very simple - it receives data from the phone, converts it into FM waves, and the car radio receives it.
In reality, everything looks like this: a transmitter is a small device that plugs into the 3.5 mm jack of a phone.
The player on the smartphone is turned on, and a wave is installed on the transmitter for data transmission.
All that remains is to turn on the radio on the car player and find the selected FM wave so that music from the phone can be heard from the car speakers.
An interesting fact is that some mobile phone models were equipped with built-in FM transmitters, but they are few.
This connection is convenient because no special wires are needed, except for the cord for recharging the transmitter. It can work with any radio without any additional outputs (USB, AUX), the main thing is that it is equipped with a radio receiver.
The disadvantages of the transmitter include poor sound quality (radio interference can be heard), especially if the device is cheap. In this case, music control is carried out only from the smartphone.
There are also regular FM transmitters (modulators) with which you can directly listen to music on a USB storage device.
They are often confused with the devices described above.
Bluetooth transmitter.
Another type of such device is a Bluetooth transmitter.
To connect it, you will need an AUX output on the radio, since the transmitter is connected to it. And then everything is simple, the player is turned on on the smartphone and the music is transferred to the Bluetooth headset, which is the transmitter.
Some models of such devices even allow negotiations; for this purpose, they are equipped with microphones. But since their reception quality is usually poor, it is not recommended to use transmitters for conversations.
The radio does not read the flash drive, reasons and solutions to the problem
Bluetooth devices have higher sound transmission than FM transmitters, but they also drain your phone's battery faster. In addition, music can be controlled only from the phone, and the radio must be equipped with an AUX output.
To prevent your phone from running out of charge, you can purchase a special tee for the cigarette lighter with a connector for recharging the phone.
Installation of 16 cm speakers can be divided into 3 steps:
1. Preliminary. Purchasing sound insulation, checking the availability of standard acoustic wires or purchasing new acoustic wires, preparing tools (find a jigsaw, check the battery charge level with a screwdriver, purchase a set of tools for removing door trim, purchase solvent and rags).
2. Installation. Using the Tool Set, remove the door trim. We apply the speaker grill grids to the standard speaker installation locations (round timber on the upholstery) and mark the INNER size - the mounting diameter of your speaker. We cut out space for the speaker. Sound insulation of the door and door trim: degrease with a solvent, glue the sound insulation (it is better to cut it into pieces: stripes or squares for easier gluing) pieces tightly butt, it is better NOT to leave gaps. If there are no acoustic wires in the door, we stretch the wires.
We take the spacer and try it on the door. She must stand up and not move. Using a screwdriver, fasten the screws (included) to the door frame. As we see the hole for 13 cm, the speaker slightly DOES NOT coincide with the center of the spacer - this is normal (now you realize how “excellent” the standard speakers play).
We install the door trims back.
We screw the speaker, not forgetting to connect the acoustic wires to it. Installation is complete.
3. Turn on the mafon and listen to the latest 16 cm speakers play.
If you are installing not coaxial (as in our case), but component acoustics, then you will need additional stands for tweeters (for installing high-frequency tweeters). You must first pull the acoustic wires from the mafon to the crossovers (which are conveniently hidden under the dashboard), and from the crossover a pair of wires goes to the midbass and a pair of wires to the tweeters, which are already built into the racks for the tweeters. And you will get a good sound in the square.
Prices
How much does a Bluetooth AUX adapter for a car cost? These are inexpensive gadgets, so every driver can afford them. The price depends on the model, brand and purpose. Adapters cost an average of 500 rubles, but there are cheaper and more expensive devices. For example, diagnostic ones are not budget ones. Their cost can exceed two thousand rubles.
It is a wireless technology that allows the creation of wireless, secure local area networks, making it ideal for short-range connections between devices such as a phone and an infotainment system, or between a phone and a Bluetooth hands-free system found in cars.
The process of creating a network connecting a phone to a car is called “pairing” or “pairing” (since the network consists of only one pair of devices). Although one Bluetooth device can theoretically be connected to several other systems and gadgets, each connection is secure and unique to one specific pair of devices.
In order to successfully pair a cell phone with a car's infotainment system, both devices must be Bluetooth compatible.
Most car entertainment systems are equipped with Bluetooth wireless technology, which is compatible with most mobile phones on the market.
This allows the driver to create a wireless communication channel in the car, which provides hands-free operation with which you can receive and send calls from a mobile phone without taking your hands off the steering wheel. Also, connecting a phone to a car allows the driver to receive and send messages, listen to his favorite music from the phone on the car’s audio system, and even access the Internet using mobile Internet from the car’s screen.