Features of injection systems
The injection system operates thanks to a sensor system and a control unit. All signals are input to the microprocessor unit, which regulates the operation of the actuators. The following sensors are responsible for the correct operation of the engine:
- Crankshaft positions.
- Camshaft positions (not on all versions).
- Intake manifold pressure.
- Lambda probe.
- Speed.
- Mass air flow.
- Throttle position.
And the main role is played by the VAZ-2110 crankshaft sensor (8 valves or 16), since the moment of injection and supply of high voltage to the spark plug electrodes depends on it. The design has a temperature sensor, but it has virtually no effect on operation. It is necessary to control the engine temperature and send a signal to the dial indicator (or to the on-board computer). But it will be indispensable if it is necessary to implement automatic switching of fuel types (from gasoline to gas and back).
Features of testing on other cars
As for other cars, for example, VAZ-2109 with an injection engine, VAZ-2112 and VAZ-2114, their check is carried out identically to the VAZ-2110 car.
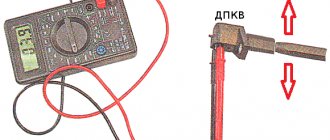
It is noteworthy that for VAZs, when checking the resistance of the crankshaft sensor coil, an additional check can be carried out.
But to do this, the multimeter must be switched to voltmeter mode with a measurement limit of 200 mV.
Then connect the probes to the DPKV terminals and pass them with any metal object, for example, a screwdriver, at a short distance from the core.
If the sensor is working properly, it will react to metal, the multimeter will show voltage surges on the display. The absence of these bursts will indicate a faulty element.
As for a car like the Reno Logan, the difference from the VAZ in this car comes down to slightly different readings of the resistance of the sensor coil when measured with an ohmmeter.
A working Logan DPKV has a normal resistance of 200-270 Ohms.
For Daewoo Lanos, the coil resistance should be in the range of 500-600 Ohms.
But on the ZMZ-406 engine, installed on Volga and Gazelle cars, the normal coil resistance is in the range of 850-900 Ohms.
Algorithm of operation of the injection system
The microprocessor has several inputs and outputs. The inputs receive signals from all sensors. But first, these signals are converted and, if necessary, amplified. The microcontroller is programmed to work with sensors and actuators. Programs (firmware) can provide various engine characteristics.
You can achieve an increase in power (gasoline consumption will increase) or a decrease in consumption (power will suffer). But most motorists prefer programs that provide work with average parameters. In this case, the signal from the VAZ-2110 crankshaft position sensor does not change; only the reaction of the actuators to changes in input data is adjusted.
How to independently replace the crankshaft sensor on a VAZ 2112 car
Required materials and tools:
- key to “10”;
- head, knob;
- rags;
- additional lighting as needed;
- new DPKV;
- flat head screwdriver.
- We place the car on the inspection channel, secure the wheels with wheel chocks, and squeeze the parking brake;
- from the end of the engine, in the area where the oil pump is located, use a screwdriver to pry up the block with terminals, remove it, and move it to the side;
- Unscrew the screw (to “10”) - the clamp from the sensor;
- remove the controller;
- We carry out troubleshooting of the seat, wipe it, clean it from residual dust and dirt;
- insert a new controller;
- screw it in and assemble the structure in reverse order.
DIY replacement completed.
Recommendations for servicing the controller
- strictly comply with the car manufacturer's regulations;
- do not violate the terms of technical inspection;
- buy and install mainly original parts;
- Carry out installation work yourself if you have sufficient experience.
The average service life of the DPKV is 70,000 km or more.
A little about the crankshaft
The crankshaft is the most important element of any internal combustion engine. It is driven by the starter (at the moment of starting) and the pistons (in operating mode). From it, torque is transmitted to the gearbox, gas distribution system, and auxiliary mechanisms. And in order for fuel injection to be carried out in a timely manner, a spark to form at the right moment, a VAZ-2110 crankshaft sensor is needed.
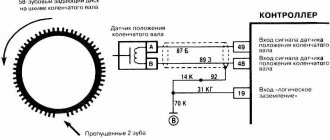
It monitors the position of the pulley and transmits a signal to the electronic control unit. The pulley has teeth, the distance between them is the same. But in one place there is a gap - two teeth are missing. The position sensor reacts to the approach of metal. When an empty area passes near the sensor, a signal is generated - the control unit is notified that one revolution of the crankshaft has occurred.
Reasons for failure of the DPKV
In order to ensure the longest possible operation of the new part after replacing the sensor, you need to know about the reasons that most often cause failure of the DPKV.
This category of vehicle states and operating modes includes:
- Mechanical damage.
- Dirt, sand or metal shavings get inside.
- DPKV breakage due to crankshaft teeth.
- Short circuits in the car's electrical wiring.
In addition to the reasons listed, the sensor may not work due to manufacturing defects or errors during repair and installation operations.
What happens if the sensor breaks?
If the VAZ-2110 crankshaft sensor fails, symptoms characteristic of its failure will appear. If the device breaks down completely, the engine will stop immediately, since the following processes will not be performed:
- Complete absence of signals to the ignition module. Sparking does not occur when the crankshaft is cranked by the starter.
- The flow of gasoline into the ramp completely disappears or slows down.
- The control unit fails - it stops producing signals necessary for the normal functioning of the engine.
Sometimes the active surface of the sensor simply becomes clogged. In this case, it is enough to clean the dirt. But if the cause of the breakdown lies in the device itself, then you only need to change it completely.
Procedure for replacing the crankshaft sensor on a 16-valve engine
If your car has at least one of the listed symptoms, you should remove this sensor as follows:
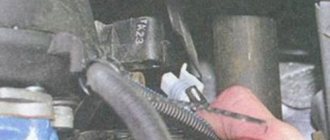
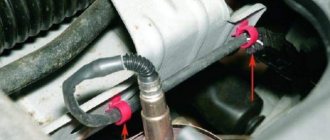
- First of all, turn off the ignition and look for the sensor.
The sensor is marked with a red marker.
Disconnect the block carefully so as not to break off the fasteners.
If there is corrosion, replace the unscrewed bolt with a new one.
The sensor has been removed and you can begin inspecting it.
Buy a new sensor only after the old one has been tested for functionality.
Main symptoms of breakdowns
But if the device has not completely failed, but is only showing signs of breakdown, you will see it immediately. A light will light up on the instrument panel to indicate engine errors.
This will be accompanied by the following signs:
- Unstable idle.
- Reduced traction characteristics of the vehicle.
- Spontaneous change in engine speed.
- Difficulty starting the engine.
- The presence of pops in the intake manifold.
If such symptoms are present, you need to replace the VAZ-2110 crankshaft position sensor. It is located near the oil pump cover, next to the generator drive pulley.
Dismantling and installation
So, you have determined that the DPKV has failed. Therefore, there is nothing left to do but replace it. To do this you will have to dismantle the old device.
- Turn off the ignition and open the hood. Securely secure it to avoid unpleasant blows to the back or head.
- Remove any dirt from around the sensor so that it can be removed and visually inspected.
- Disconnect the wiring block from the corresponding connector.
- Using a 10 mm wrench, you can easily remove the crankshaft sensor mount.
- Remove the damaged device.
- At the same time, be sure to check the generator drive timing pulley. It is not uncommon for damage to appear on it, due to which the device cannot operate correctly. These teeth cause error codes to appear on the on-board computer.
- If there are no defects and nothing prevents the installation of a new device, begin assembly.
- If necessary, clean the installation site of the DPKV.
- Place the new measuring device in the socket and tighten the mounting bolt. In this case, do not exceed a tightening torque of more than 12 N m.
- Be sure to use the adjusting washer, which is already supplied by responsible sensor manufacturers.
- Using a special feeler gauge, make sure that there is a gap of 1 millimeter between the pulley and the DPKV core.
- The gap error can be no more than 0.41 millimeters in the upward direction. Under no circumstances should the gap be less than the required 1 mm.
Price issue
As we have already noted, VAZ 2114 owners are not often faced with the need to change the DPKV. But always be prepared for such troubles.
You don’t have to spend a lot of money purchasing a new sensor. The price depends on the store and region where car parts are sold. On average, a recreation center costs about 200-400 rubles.
Replacement at a service station is still a cost around the cost of several sensors. Therefore, think about who exactly will do the work - you or the car service specialists.
Based on the types of repairs that a car enthusiast is able to perform on his own, one can judge his qualifications and experience in operating a car. If for the owner of a 9th VAZ series car, replacing the crankshaft oil seal of a VAZ 2109 does not present any difficulties, then we are dealing with a trained car owner who will not contact a car service center for every trivial breakdown.
When and why is the VAZ 2109 crankshaft oil seal replaced?
Replacing the crankshaft oil seal is a rather complicated procedure, but quite doable even in an ordinary garage that does not have special devices and professional tools.
Sensor diagnostic methods
Regardless of how you check the device, you will have to remove it completely. To do this, you need to make marks on the crankcase so that later the new sensor can be installed correctly. The device is unscrewed using the key to “10”. When installing, be sure to maintain a gap between the active part of the sensor and the sync disk - it should be from 0.6 to 1.5 mm.
First, perform a visual inspection of the device - if it has mechanical damage, scratches, or dents, it is recommended to replace it. But if there are no external signs of damage, you will have to carry out diagnostics with an ohmmeter or voltmeter. Of course, if a diagnostic scanner is available, it will show you a crankshaft position sensor error. But only an error can appear when the wiring is broken.
DPKV location - design features
Typically this sensor is located near the alternator belt drive pulley. On this pulley there is usually a gear ring made around the circumference, the so-called synchronization disk. It is to the rotation of this disk that the sensor responds.
It is worth noting that in order to accurately obtain data on the rotation of the crankshaft, the DCPV is located at a certain distance from the disk.
For a correctly installed device, the distance between its core and the top of any tooth should be 0.6-1.5 mm.
The location of the DKPV is not the most convenient, but it is quite possible to get to it.
Cars use several different DPKVs in design and operating principles:
- induction (one of the most common);
- sensor using the Hall effect;
- Optic.
We won’t talk about the design and operation features of each of them for now; let’s move straight to the malfunctions.
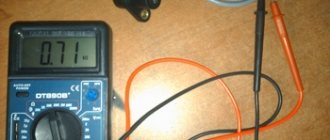
How to check a sensor with an ohmmeter
In this way you measure the winding of the device. To do this, switch the multimeter to resistance measurement mode and carry out diagnostics. Sensor manufacturers set a certain range of resistance values - 550-750 Ohms.
Therefore, if you go beyond this range, you can talk about a breakdown of the sensor. But it should be noted that sensor manufacturers allow a slight deviation from the lower and upper limits. But for a small value - no more than 10%.
Important points
Drivers note that not all sensors that have a suitable mounting size are suitable for working on a VAZ 2110. You can only replace the sensor with an original one, after first checking the part for functionality. A resistance test must be carried out before installation on a car; according to statistics, 1–3% of VAZ sensors have manufacturing defects.
The equipment can be considered operational only after a preliminary manual check with an ohmmeter. Things to consider.
- Be sure to mark the pulley when reinstalling the part. The ideal option would be to check with a scanner that the sensor is installed correctly. Any displacement of the crankshaft will lead to disruption of the fuel supply phases.
- Observe the sensor pinout. Select equipment with suitable terminal tolerances.
- Tighten the fastening bolt to a torque of 8–12 nm, do not overtighten.
- Leave a gap between the controller and the transfer disk.
Replacing the control device takes a few minutes; the work can be easily done in the garage. If you systematically remove oil stains from the tank, clean the engine compartment from dirt, and monitor the condition of the wiring, the DPKV will fulfill the service life declared by the manufacturer - 5–7 years.
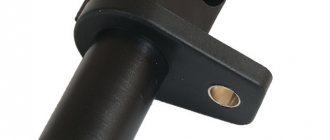
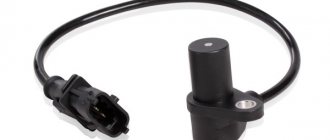
Design and functions of DPKV
This vehicle unit allows you to adjust the fuel injection system of your vehicle. In addition, the DPKV is responsible for the synchronization of the functioning of each of the fuel injectors and the entire ignition system of the car. The crankshaft position sensor device has the following elements:
- Sample of a nylon frame;
- Steel magnetic cores;
- Winding kit for which thin copper wire is used;
- Wiring insulation (usually resin or enamel is used).
The main purpose of this position sensor is to create synchronized operation in the ignition system and when operating a set of fuel injectors. If this spare part malfunctions, unstable operation occurs during fuel supply. Additionally, your engine may suddenly stop running at full speed, causing wear on the valves and cylinders.
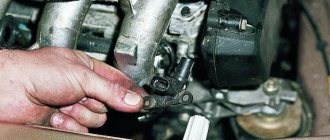
Repair and replacement
- As with all cases of replacing sensors, it is necessary to de-energize the car by disconnecting the negative terminal from the battery.
- Next, you should disconnect all wires from the sensor.
- The sensor is held by a single bolt, which is not so easy to reach, but it must be unscrewed.
- Next you need to remove the sensor from the mount.
Reassemble in reverse order
It is important not to damage the sensor during installation, so you should not lubricate or paint it. Next, you need to check the functionality of the new sensor
The easiest way to check is to check with a multimeter. Everyone has this device in their garage, and if not, then it is sold in any auto store. The new sensor should not fail, so there must be sufficient voltage on it for it to function correctly. To summarize, we can talk about prices. This sensor can be found on any site, in any store and in any condition. The price varies from a couple of hundred to five thousand rubles, which is quite cheap for a device involved in engine control. Therefore, at the slightest malfunction, I advise you to immediately begin replacing the DCPV.
How does the fuel system receive the signal from the sensor?
While the sensor is operating, the on-board computer (microcontroller inside the car) determines the specific position of the piston at a certain moment of its operation in each of the cylinders. To regulate operation using a sensor, the process is built according to the following plan:
- The crankshaft has a special gear in which 2 teeth are specially omitted.
- When the crankshaft moves, all the teeth pass next to the DPKV sensor, greatly distorting the state of its magnetic field.
- As a result, pulses are generated in the inductance coil of this device, which are sent to the on-board computer database. In this case, the missing 2 teeth are the starting or zero point, thanks to which the computer determines the initial position of the shaft.
- Next, the computer inside the car counts the number of pulses sent by the device and determines the position of the crankshaft in each period of time.
- After this, the return signal is sent by the computer to the sensor responsible for triggering the fuel injector, which already supplies fuel to the ignition system.
Thus, if the DPKV works correctly, the car will operate at the highest performance, while consuming a minimum of fuel.
Advice: the electrical diagram on the VAZ-2110 will easily help you find out the cause of the sensor malfunction. It shows the location and combination of all elements of the car.
Tips and tricks
In the process of performing diagnostic and repair work, an inexperienced technician may make serious mistakes that will negatively affect both the performance of the part itself and other devices and assemblies of the machine. To protect yourself from such troubles, it is recommended to adhere to the following recommendations:
- When performing repair work, you should stop smoking. When removing the sensor, a certain amount of lubricating fluid may appear, which is a highly flammable substance.
- When measuring resistance, the multimeter must be switched to the appropriate operating mode. Some modes that can be used to determine this parameter of an electrical circuit are also not suitable. For example, when the toggle switch is set to a resistance measurement range of up to 200 Ohms, the nominal value of DPKV (500–700 Ohms) will be outside its limits, which will lead to false positive results in determining the malfunction of this part.
- If the DPKV fails due to severe contamination, then the new part may also not last very long. To significantly increase the service life of the DPKV, it is recommended to eliminate oil leaks, which can cover all parts within a short period of time. This film, like a magnet, attracts dust and dirt.
- You should only purchase a new part from a reputable dealer. Failure of the DPKV due to manufacturing defects is a fairly common reason if the sensor is purchased on specialized markets. An indirect sign of a low-quality spare part is its cost. Typically, counterfeit spare parts are sold 2-3 times cheaper compared to original products.
- When replacing a sensor, the wires must be properly connected to it. If this is not done, the connector may become separated from the contacts when driving on a bumpy road, which will lead to the cessation of impulses from the DPKV to the vehicle's ECU.
How to check the crankshaft sensor of a VAZ 2112 is described in detail in this article. If you fix the breakdown strictly according to the instructions, then even an inexperienced person can handle this work. If you have doubts about your own abilities, you should not risk the “health” of the car. The work of replacing the DPKV is carried out by many specialized service stations, is relatively inexpensive and does not require significant time expenditure.
Where is the crankshaft position sensor located?
This component is located in a bracket, which is installed in the central area of the pulley on the generator drive. As a rule, on most modern cars it is not installed end-to-end, but with a gap of 1-1.5 mm near the structure of the toothed pulley itself.
For ease of disconnecting and adjusting the DPKV, a 50-70 cm wire is connected to it, which has the necessary connectors for keys. To align and adjust the position, you only need to adjust the washer secured above the seat of the element itself. Adjusting the washer can be done either by you yourself or by specialists at a car service center - in any case, it will allow you to avoid early breakdown of the engine cylinders and significantly reduce fuel consumption.
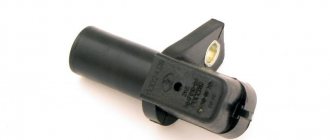
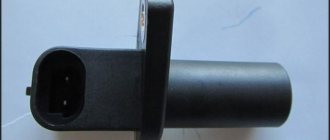
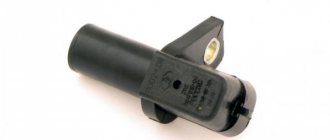
Crankshaft position sensor
Crankshaft position sensor location
If a malfunction occurs in the crankshaft sensor, the vehicle’s on-board computer is unable to set a number of characteristics necessary for the operation of the ignition system:
- Calculate the amount of fuel required for injection;
- Determine the right moment for injection;
- Change the angle of rotation of the camshaft;
- Determine whether ignition has occurred or not (relevant for gasoline engines).
Advice: problems with ignition affect the operation of all systems of the car. Often, after the fuel system, the steering rack on the VAZ-2114 begins to break down.
Where is?
To determine where the crankshaft position sensor is located on a VAZ car, it is enough to understand how it functions. It is not difficult. This device reads the teeth of the crankshaft pulley passing near its core, creating alternating current pulses, and then sends them to the electronic unit. This means that this shaft sensor can only be located near the generator pulley. It is secured with a bolt in a special bracket. A fairly long wire with a connector is connected to the sensor.
DPKV location
According to the standard, a VAZ 2112 with a 16-valve engine is equipped with an induction shaft position sensor, consisting of a special magnetized core and winding. He monitors the passage of sixty disc teeth past the core, which are placed at intervals of 6 degrees. The point is that 2 cloves in a row are missing, resulting in a small gap. When a depression passes past the device, a special impulse is created in it, transmitted through the ECU wire.
The VAZ control device calculates the crankshaft speed and sends special signals to the injectors. It is necessary to ensure that the gap between the magnetized core and the teeth is within 1±0.2 millimeters. If you need to check and likely replace it due to a malfunction, it is not difficult to find the crankshaft position sensor - it is attached to the oil pump cover. Replacing and checking this device is simple and even a novice motorist can do it. And naturally, there is no point in going to the service station for this. This is a waste of money and time. Replacing this device yourself will take less time than replacing a wheel.
Main symptoms of DPKV malfunction
The main signs of problems with the crankshaft position sensor:
- The process of “detonating” the engine (a characteristic knocking sound appears when the hydraulic compensators are operating) during a greater load on the car, when driving onto high mountain surfaces at low speeds.
- The engine runs unstably - a sharp drop in rpm at idle is followed by an equally sharp increase. Also, your car may simply stall when idling, both while driving on the highway or when stopped for a while, for example, at a traffic light.
- The engine does not gain speed, although it is running at full power.
- The motor power periodically drops and rises in the absence of any external factors influencing this process.
- The aerodynamic characteristics of the car are significantly reduced.
- Problems arise when starting the engine (it stalls quickly or does not start at all).
- The spark disappears when the system is ignited - it either does not appear or may be completely absent.
If you find at least 3 of the above symptoms, then the problem lies in the crankshaft position sensor.
Tip: the indicated list of faults may also indicate the occurrence of other problems during engine operation. For example, sudden changes in engine power and a decrease in speed may indicate a blockage in the fuel pump itself. That is why before repairs it is necessary to diagnose not only the engine, but also the same wheels. You can see what pressure indicators should be according to the standards in the tire pressure table.
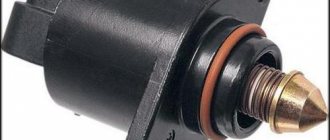
Idle speed control
Where is the oil pressure sensor on a Kamaz
? As in engines with a carburetor, an injection engine keeps idle speed with the throttle valve fully closed. This is possible only under one condition - if the design of the throttle provides for a bypass channel, and it must have a variable throughput. To do this, a conical valve was installed in the bypass air channel of the throttle body, regulating the air supply when the throttle valve is closed, and called it IAC, idle air regulator. It consists of a conical valve, a stem and a stepper motor. Depending on which winding the impulse is applied to, the motor rotates in one direction or the other, thereby changing the throughput of the bypass air channel. The idle either rises or falls as a result of the movement of the cone valve. The idle speed sensor on the VAZ 2115 has catalog number 1148300 02.
How to check
The most common failure of the IAC is a break in the windings of the stepper motor. To check the windings, you need a multimeter turned on in resistance measurement mode. The resistance value between contacts A-B and C-D is within 45-80 Ohms. Otherwise, the regulator requires replacement. There should be infinite resistance between pins AD and B-C. This means that the windings do not short circuit each other. If there is resistance at these contacts, the sensor is replaced. Rated supply voltage is from 7.4 to 14.1 V.
How can I check the serviceability of the DPKV?
Nowadays, the most popular are 3 methods, which are carried out quickly and provide information about the performance of the sensor with high accuracy.
Diagnostics of the crankshaft position sensor with an ohmmeter
When measuring the resistance of a winding set on a sensor, you can use a special device - an ohmmeter (or in other words, a multimeter). When checking, the device should show a value in the range of 550-750 Ohms.
Testing process - the resistance of the coil in the inductive sensor is measured. If the coil on the sensor is damaged, then first of all the damage will be reflected in the resistance value. That is why, at the beginning of the diagnosis, the required range is set and the correct operation of the element is checked using probes.
This type of check is basic and most elementary, but it cannot give 100% confidence in the serviceability of the spare part.
Oscillogram of DPKV VAZ
An oscilloscope is used to accurately diagnose the operation of the DPKV. By connecting the oscilloscope probes, an oscillogram of the DPKV operation will be displayed on the monitor screen, on which you can clearly distinguish the point where the teeth skipped and measure the signal value in volts based on the maximum amplitude of the 58 teeth located between the skip points.
Video: checking the crankshaft position sensor
So what kind of Sensor is this? Now let's try to figure it out.
The crankshaft position sensor (CPS) provides the ECU (electronic engine control unit) with information about the angular position of the crankshaft and the moment the pistons of the 1st and 4th cylinders pass TDC. If the sensor malfunctions, problems with engine operation occur. Let's consider the appointment, testing and replacement of DPKV.
What does the crankshaft sensor do?
DPKV synchronizes the phases of fuel injection and pulse supply to ignite the combustible mixture in the combustion chamber. In other words, based on its readings, the controller determines when and into which cylinder the fuel mixture should be supplied.
The sensor is of the inductive type and reacts to the passage of the teeth of the drive disk on the generator drive pulley near its core. The teeth are located on the disk at 6° intervals. To synchronize with TDC, two teeth out of 60 are cut off, forming a cavity. When a depression passes by the sensor, a so-called “reference” synchronization pulse is generated in it.
Signs of a faulty crankshaft sensor.
A completely faulty DPKV will not allow the engine to start. In other cases, sensor malfunctions can be identified by: - poor engine starting; — unstable operation of the motor; — reduction in engine power; — detonation with increasing load.
Where is the crankshaft sensor located?
It is installed on the oil pump cover.
Replacing the crankshaft position sensor VAZ 2110
To remove the crankshaft position sensor you will need a 10mm wrench. Procedure: Turn off the ignition and disconnect the sensor connector. Unscrew the sensor mounting bolt using a 10mm wrench. Remove the DPKV from the oil pump cover bracket.
Installation is carried out in reverse order. DPKV catalog number: 2112-3847010.
How to check the crankshaft position sensor with your own hands.
Checking the crankshaft position sensor comes down to checking the resistance of the windings. If the readings of the device (ohmmeter) differ from 550-570 Ohms, then the crankshaft sensor is faulty. If the crankshaft position sensor error does not disappear, then you should clean the sensor from dirt and check the integrity of the wire and the quality of the connections in the circuit. The crankshaft position sensor cannot be repaired.
Good luck to everyone on the roads!
Comprehensive check for Opel Vectra B
Now let's take another car and use it to consider the last of the verification methods - comprehensive.
This test is much better than with a conventional multimeter, but in terms of accuracy it is not as accurate as an oscilloscope.
The problem car will now be the Opel Vectra B. We leave the symptoms the same.
The initial work is also no different from the VAZ-2110: the sensor is removed, inspected, thoroughly washed, and only after that you can start checking the condition.
But for a comprehensive check you will need more equipment:
- Multimeter;
- Megaohmmeter;
- Device for measuring inductance.
It is better to take all measurements in a heated room so that the readings are correct.
First, the coil resistance is measured, as described above. Resistance readings must be within the range specified in the technical documentation.
The next check is to measure the winding inductance, for which a device is used to measure it. A working DPKV inductance should be in the range of 200-400 mH.
The devices are pictured below.
The insulation resistance is also checked with a megohmmeter. When a voltage of 500 V is applied, the resistance value of the sensor should be no more than 20 MΩ.
Based on these measurements, it is determined whether the DPKV is working or requires replacement.
Photos of the devices are below.
Checking with an oscilloscope
An oscilloscope will help show the true cause of the sensor malfunction
In order to get a complete picture of the sensors, it is best to use an oscilloscope. It can show faults that caused the engine to malfunction. For example, a sensor may work correctly, but due to the runout of the synchronization disk, its readings will change, which will inevitably affect the throttle response of the internal combustion engine. Using an oscilloscope in this case is the only way to find out the real cause of the malfunction, since it shows the change in voltage over time. There is no need to remove the sensor from the vehicle for this check.
Oscilloscopes come in different designs, so they connect differently. By following the instructions for use, you can use exactly your model.
As a rule, the negative input has a crocodile clip for connecting to the ground of the car, and the positive input is made in the form of a needle so that you can connect to the wire by piercing the insulation
To connect the device correctly, it is important to know where the required wire is located in the harness. Using the oscillogram, you can make an accurate verdict on the state of the vehicle’s synchronization system
Antifreeze temperature sensor
To measure the exact temperature of antifreeze and control engine temperature conditions, the VAZ 2115 system has a DTOZH
Serves to control the temperature conditions of the engine, measures the actual temperature of the antifreeze. The coolant temperature sensor is a simple thermistor, that is, an element that changes resistance synchronously with the temperature of the antifreeze. The thermistor operates according to a negative coefficient algorithm; the higher the temperature, the lower the output resistance.
How to check
The coolant temperature sensor can be checked using a conventional tester, any device for measuring temperature up to 100-130 degrees, or a container of water. The multimeter is switched to resistance measurement mode, connected to the DTOZh terminals, and the sensor itself is immersed in a vessel with water. The vessel is heated, while the nominal resistance at 5 degrees should be within 7280 Ohms, at 20 degrees the coolant temperature sensor should produce 3520 Ohms, 40 degrees corresponds to 1458 Ohms, and at the boiling temperature the readings should not be higher than 90-100 Ohms. If the device readings do not correspond to the nominal value, the VAZ 2115 temperature sensor is replaced.