- The device and its main features
- About important characteristics
- Installation and removal process
- Some maintenance tips
- Video instruction
Do-it-yourself repair of a VAZ 2108 gearbox depends on which device is installed in the car - 5th or 4th gear. From a design point of view, this part is connected to the differential, the main gear. It is better to purchase a repair kit for transmission repair so that all the tools and materials are at hand.
The device and its main features
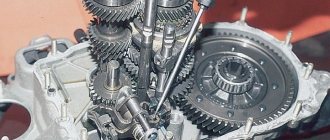
All elements of the VAZ 2108 four-speed gearbox:
1 – gearbox housing; 2 – filler and control hole plug; 3 – drain plug; 4 – adjusting ring; 5 – left front wheel drive; 6 – driven gear of the 1st gear of the secondary shaft; 7 – synchronizer clutch for 1st and 2nd gears with reverse gear; 8 – driven gear of the second gear of the secondary shaft; 9 – retaining ring; 10 – persistent half ring; 11 – driven gear of the third gear of the secondary shaft; 12 – synchronizer clutch hub for 3rd and 4th gears; 13 – driven gear of the 4th gear of the secondary shaft; 14 – needle bearing of the secondary shaft gears; 15 – thrust washer of the 4th gear gear; 16 – ball bearing of the secondary shaft; 17 – rear cover of the gearbox; 18 – ball bearing of the input shaft; 19 – breather; 20 – synchronizer blocking ring; 21 – sliding clutch for synchronizer of 3rd and 4th gears; 22 – retainer block; 23 – input shaft; 24 – locking ball; 25 – fork of the sliding clutch for the synchronizer of 3rd and 4th gears; 26 – roller bearing of the input shaft; 27 – clutch release fork lever; 28 – clutch release fork bushing; 29 – clutch housing; 30 – clutch release fork; 31 – clutch release bearing; 32 – roller bearing of the secondary shaft; 33 – secondary shaft; 34 – driven gear of the main gear; 35 – tapered roller bearing of the differential; 36 – differential box; 37 – satellite; 38 – locking ring of the side gear; 39 – semi-axial gear; 40 – speedometer drive gear; 41 – drive of the right front wheel; 42 – speedometer drive; 43 – satellite axis; 44 – retaining ring of the satellite axis; 45 – protective cover for the gear shift drive hinge.
Removing the VAZ 2109 gearbox
First of all, you need to remove the mudguard and engine crankcase protection (if installed).
drain the oil from the box, remove the drive nuts and wheels. If removal takes place in a pit, it is necessary to jack up and hang the front part of the car on trestles or other reliable stands. Be sure to disconnect the battery terminals. The next order is:
– remove the clutch cable
About important characteristics
Through drive 41 and 5, located on the front wheels, torque from this product is transmitted to the drive wheels. Disassembling the gearbox is carried out in different ways, depending on the design of the part.
For example, the main malfunctions of the four-stage option may involve working with the following parts:
- Drive design that helps change gears.
- Differential.
- The most important detail of the transfer.
- The reverse gear has its own intermediate gear, it is located on a separate axis.
- Two synchronizers.
- No design can do without secondary and primary shafts.
- Carter 1.
An aluminum-based alloy is always used to make the crankcase. This must also be taken into account if gearbox noise elimination is required. The back cover helps hide everything. A breather is pressed into its socket. The bearing housings are located at the rear. There are also two holes that are closed with plugs. The secrets of repair are to work correctly with each of the elements.
The primary shaft is located in the crankcase and is mounted on two bearings. This shaft itself is made in the form of gears and reverse gears, a gear block.
Replacing a gearbox bearing requires interaction with such devices.
Reverse speed repairs must take into account that the secondary shaft and the gear on the main gear create a single composition. It rotates in the space between the roller and ball bearings. The gears responsible for 4,3, 2 and 1 gears can be found on the belts of the secondary shaft, on needle-type bearings. A detailed repair manual will also tell you that the splines on which the hubs are attached to the 12 synchronizers are cut using 2 small-sized belts.
All elements of the secondary shaft:
1 – nut; 2 – ball bearing; 3 – thrust washer; 4 – bearing sleeve; 5 – needle bearing; 6 – 4th gear gear; 7 – bearing spacer ring; 8 – synchronizer blocking ring; 9 – sliding clutch for synchronizer of 3rd and 4th gears; 10 – sliding coupling hub; 11 – third gear gear; 12 – retaining ring; 13 – thrust half-rings of the secondary shaft; 14 – 2nd gear gear; 15 – sliding clutch for synchronizer of 1st and 2nd gears with reverse gear; 16 – retaining ring of the synchronizer hub; 17 – hub of the sliding clutch for the synchronizer of 1st and 2nd gears; 18 – synchronizer spring; 19 – cracker; 20 – retainer; 21 – 1st gear gear; 22 – roller bearing; 23* – thrust washer; 24* – bearing sleeve; 25* – 5th gear gear; 26* – sliding clutch hub; 27* – sliding clutch for 5th gear synchronizer; 28* – thrust plate.
From 23 to 28 the parts of the VAZ 2108 five-speed gearbox are marked.
Each gear must have two teeth:
- Straight-toothed.
- Helical.
Crown designs with oblique teeth provide constant traction for the gears on the input shaft. When the gear is engaged, a connection occurs between the synchronizing clutches and the rims, which have straight teeth. This is also part of such a design as the gear selection mechanism at the gearbox.
Repairing the backstage affects other parts. The gears switch silently to each other thanks to the work of the synchronizer. On the primary and secondary shafts, the angular speeds for the gears are constantly equalized to achieve the desired result. The primary and secondary shafts themselves contain several elements. Each transmission repair diagram contains references to them.
- Each gear has a ring gear.
- The latch operates on springs.
- Three crackers with balls.
- Two Rings responsible for blocking.
- Part of the coupling that can slide.
- A hub mounted on the splines of the secondary shaft.
Where can I get my gearbox repaired? You can do it in your own garage - it’s a fairly simple job. Different types of synchronizers may be found in different gears, but they are not very different from each other.
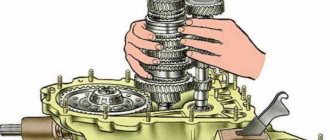
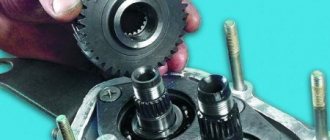
The process of installing the first gear driven gear.
Where to buy a used box for a Zhiguli?
Any vehicle unit, the gearbox, is no exception, has its own safety margin and amount of working resources. At the end of the latter, it is time to think about replacing the transmission unit. Today, several options are available to solve the problem. The simplest and first thing that comes to a car owner’s mind is buying a new box. But enthusiasm in this regard often dries up after a short monitoring of prices for these units. A new box requires a serious investment. Is there a way to save money?
Let's go to the secondary market
Logic dictates that spare parts can be found cheaper on the secondary market. And indeed it is. to buy a used manual transmission or gearbox for a VAZ 21099, the price of which is determined by its condition. A large number of offers are found on the Internet. Conventionally, the secondary market can be divided into three sectors:
- private;
- garage;
- professional.
The first two provide for the implementation of transmission units either by the Zhiguli owners themselves or by individual craftsmen. Such offers can attract the buyer's attention based on financial criteria. But if you are looking for a product for the request “ gearbox for VAZ 2108, 2109, 21099, price, used 5-mortar ”, do not rush to choose based on cost. Assess all the risks and benefits of each proposal.
In the professional sector, it is also easy to find out how much a gearbox costs for a VAZ 2108, 2109, 21099; the price varies depending on the current safety factor of the unit. Refurbished components are offered for sale, fully ready for use. The choice in favor of such a box can be considered rational. Unlike private owners, professionals provide a guarantee on used units.
Choosing a service provider
If you need a used gearbox for a VAZ 21093, the price of which is reasonable and the quality is high, contact our workshop. We will also select transmission units for nines and ninety-nines.
All units offered for sale have been restored by our craftsmen. When performing major repairs, original VAZ spare parts were used. Complex troubleshooting is carried out using a special tool. The techniques used allow us to guarantee the quality of the overhaul.
By purchasing a transmission for your car from us, you are guaranteed to receive a working, efficient transmission unit with a significant margin of safety. Additionally, we offer unit replacement services at a special price. Our auto mechanics will promptly dismantle the original box and install the unit after major repairs. You will have to spend very little time getting your car back on the track.
Used boxes for VAZs are almost always available in our workshop. This allows you to optimize the replacement process and simplify the ordering of units. Do you want to purchase a used box to replace one that is worn out or damaged in an accident? Contact us by phone, mail, or come directly to the workshop to discuss the details of the transaction!
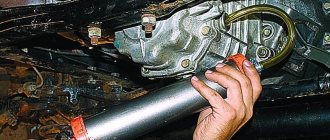
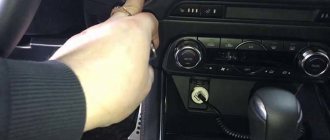
Installation and removal process
After studying the device, car owners are wondering how to remove the gearbox on a VAZ 2108. Installing and dismantling the gearbox should not cause difficulties if you follow the steps.
- The car is installed on an inspection ditch or a lift. The engine hood must be raised. This position is fixed.
- Self-repair of the gearbox requires that you carefully examine the engine and its internal compartment.
- The battery and other wires should not be together either. The same applies to the top dead center sensor, relay on the traction type starter.
- Next, the speedometer drive housing is disconnected from the cable of the same drive. The design of the VAZ 2108 gearbox is such that to solve this problem it is necessary to unscrew the union nut.
- It is necessary to make sure that the wire with ground and the location of the clutch housing are separate.
- The sensor indicating the dead top point must be installed separately from the crankcase responsible for the clutch.
- The cable should no longer be connected to the fork that disengages the clutch.
- The next step: unscrewing the part of the structure where the top bolts and nuts are located. The bracket for lifting the power unit should be located on the left side of the stud responsible for fastening it to the intake manifold.
- Repairing the secondary shaft of the gearbox involves installing a cross member with serial number 67. 7820. 9514 on the gutters. The crossbar is hooked onto a special bracket. The bracket itself is usually installed on a stud in the intake manifold. Any type of power unit is hung in the form of a hoist if there is no crossbar.
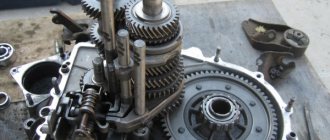
Details of a disassembled gearbox from a VAZ 2108.
Maintenance of the gearbox involves work related to removal, which is carried out in the lower part of the car.
- The repair of the gearbox cushion and other parts begins by removing the lower cover of the clutch housing and the engine mudguard.
- When overhauling the VAZ 21083 gearbox, it is necessary to completely drain the oil that may be inside the gearbox.
- Disconnecting the wires is mandatory for the light switch responsible for reverse.
- After this, when tuning the VAZ gearbox, you can loosen the clamp. The rod is disconnected from the gear selection rod hinge.
- The mount has a stud nut. She also turns away.
- Replacing the transmission requires that the ball joints at the control arm be completely disconnected.
- Defective gearbox means that you will need to knock out one hinge from the side gear. To do this, you can buy a special lift 67. 7801. 9524. Or use a special hammer, it will help damage the hinge inside, or rather its body, passing through the block part. Taking a technological mandrel or plug, you can understand that the semi-axial gear is easily fixed to the structure. The box repair book will become an indispensable assistant.
- At the next stage, the second hinge is completely knocked out. If you study the transmission repair instructions, you will understand that this step cannot be avoided.
- The wheel drive shafts are moved to the side. The six-speed gearbox is assembled in the reverse order.
How to reduce play in the gearshift lever on a VAZ 2109
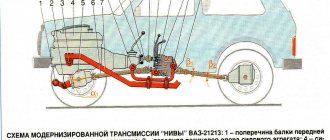
If you are the owner of a front-wheel drive VAZ car (2108, 2109, 21099, 2110), then you probably paid attention to the increased free play of the gear lever, which feels like a loose gearshift handle and leads to unclear engagement when selecting gears.
We can say that this is a disease of these models, which lies in the standard gearbox of the gearshift lever. You can eliminate this drawback and modify the gear shift mechanism in the simplest way by replacing the standard gearbox driveshaft with a similar part from the Lada Kalina. By the way, you can do this modification yourself. For this modification, we need the gearbox driveshaft itself from the VAZ 1118 Kalina; we purchase it complete with a boot, because The standard boot of the VAZ 2109 will not fit in size.
Transmission cardan from Kalina
Comparison of VAZ 2109 and Lada Kalina gearbox hinges We will also need 10 and 13 keys, a hammer, a slotted screwdriver and an assistant, which will be useful at the final stage of work when adjusting the position of the gearshift lever.
We will carry out the work in a pit or overpass.
Loosen the clamp on the gearshift drive rod using 13mm wrenches, and remove the hinge from the rod.
1 — fixing bolt (10); 2 — clamp bolt (at 13); 3 — standard VAZ 2109 gear selection joint; 4 — boot Then we remove or bend the corner of the boot, and using a 10mm wrench, unscrew the locking bolt on the cardan and knock it off the shaft with gentle blows of a hammer. This bolt is very reluctant to turn off, since it is mounted on a thread lock to avoid spontaneous unscrewing due to vibration. At this stage, you can also replace the gear selector shaft oil seal if oil leaks are noticed from under the old one.
When the old part is dismantled, you can begin installing the new one. Having first put on the boot, we place the cardan on the gear selection rod (the one that comes from the box). In this case, the fixing bolt must, when screwed in, fall into a special recess under it on the rod. Then tighten the bolt and pull the boot onto the cardan. It is highly advisable to coat the bolt thread with thread locker so that it does not unscrew due to vibration.
Then we put the gearbox shift drive rod on the cardan rod, but do not tighten the clamp yet. Perhaps someone will have to shorten the rod of the Kalinovsky cardan by about 1.5 cm, since it is longer than the standard one.
Now you need to adjust the position of the lever. To do this, we involve an assistant who sits in the driver’s seat and moves the gearshift knob to the optimal position for adjustment. Typically the lever is centered and moved slightly to the right. In this position of the lever, we tighten the clamp while the assistant holds the lever in this position.
Now all that remains is to check the correct operation of the gear shift lever, and if something is not satisfactory, carry out the adjustment again.
In most cases, the feeling from such a modification is as if the box had been replaced: the lever does not dangle, the free play is minimal. But even more positive changes are noticeable on the go. Now the choice of gears occurs more comfortably and clearly, almost like in foreign cars!
Some maintenance tips
Before carrying out a major overhaul of the VAZ gearbox, it is necessary to completely clean the parts inside. Use a brush or scraper to remove all deposits. A strong jet of air is suitable for washing and blowing. The gaps of the gearbox gear are also completely cleaned.
Repairing a gearbox transmission is not as difficult as it might seem. And transmission breakdowns are not as terrible as you might think at first glance. It is enough to carefully study the transmission repair manual in order to perform all the necessary work at home.