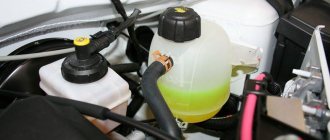
Sometimes a car enthusiast may notice that wet spots of fuel appear near the gas tank flap, and they can occur both when the tank is full and when the level of fuel in it is low. In the vast majority of cases, the VAZ 2114 separator, which has failed, is to blame for this. Today we will talk about what it is, where it is installed and how to replace it with a new one.
Separator VAZ 2114
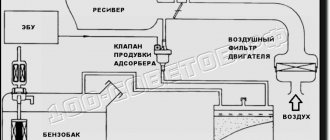
Features of the 2111 (1.5i) engine power system
Location of elements of the 2111 (1.5i) engine power supply system in the engine compartment:
1 – receiver; 2 – vacuum supply hose to the fuel pressure regulator; 3 – throttle unit; 4 – fuel rail; 5 – fuel pressure regulator; 6 – air supply hose to the throttle valve; 7 – adsorber; 8 – air filter; 9, 10 and 11 – hoses of the crankcase ventilation system; 12 – throttle valve drive cable; 13 – diagnostic fitting
Fuel pump
combined with the fuel level indicator sensor into a single unit -
a fuel module
(often called an electric fuel pump). The pressure pump delivers fuel from the tank through the fuel filter to the fuel rail.
Engine Fuel Module 2111 (1.5i):
1 – fuel level indicator sensor; 2 – connecting block; 3 – inlet pipe; 4 – outlet (discharge) pipe; 5 – module cover; 6 – module cover guide; 7 – electric fuel pump in a plastic casing; 8 – intake chamber
Fuel rail for engine 2111 (1.5i) complete with injectors:
1 – diagnostic fitting; 2 – fuel rail; 3 – fuel supply pipe to the fuel rail; 4 – fuel pressure regulator; 5 – tube for draining (draining) fuel into the tank; 6, 7, 8 and 9 – nozzles
Fuel pressure control
installed on the fuel rail. Excess fuel is returned to the tank through the fuel return line.
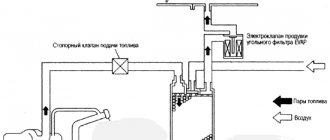
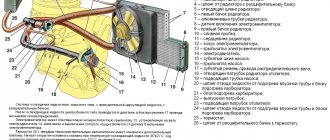
Engine power supply system diagram 2111 (1.5i):
1 – nozzle; 2 – fuel rail; 3 – diagnostic fitting; 4 – adsorber; 5 – check valve; 6 – throttle unit; 7 – gravity valve; 8 – safety (two-way) valve; 9 – separator; 10 – filler pipe; 11 – fuel filter; 12 – fuel drain line; 13 – fuel line hose connecting the outlet pipe of the fuel module to the fuel filter; 14 – fuel module; 15 – fuel tank; 16 – fuel line connecting the fuel filter to the fuel rail; 17 – fuel pressure regulator
Welcome to VAZ.EE+ Extended Edition
Since May 2013, our portal has expanded the thematic sections of the forum for the exchange of experience: subforums Americans, Koreans, Germans, French, Japanese have been added, due to the increase in the fleets of our visitors.
In addition to changing the style, our Chat, Mail, Entertainment and photo/video sections, Literature have become built-in and do not require separate registration. In addition, there are other useful and pleasant innovations that you can all familiarize yourself with when visiting the portal.
You can contact the administration with questions and suggestions in a special section of the forum or through the feedback form.
- literature Articles
- Library
- Jokes
- Cars
- Gallery
- Automobile
- Help
- Search
- Users
- Reputation
- Forum home
- Experience exchange
- Body
- print version
- Download/Print theme
- Display Modes
- Switch to: Tree-like
- Standard
- Switch to: Linear
Cleaning the crankcase ventilation system on VAZ 2108, VAZ 2109, VAZ 21099
Welcome! Today, cleaning the crankcase ventilation system plays a very important role for your car. Therefore, we have prepared an article especially for you, from which you will learn for yourself how to properly clean the crankcase ventilation system on carburetor cars of the Samara family.
Note! Before starting the replacement, be sure to stock up on kerosene, a clean rag, tools and a container in which to clean the system parts!
Summary:
When should you clean the crankcase ventilation system? Like any other system, the ventilation system has a cleaning frequency, it is as follows:
• The crankcase ventilation system must be cleaned every 60,000 thousand kilometers.
• Or if the system becomes clogged, which will be accompanied by an increase in pressure in the engine crankcase. Due to increased pressure in the system, the car’s engine will become oily, that is, oil will begin to flow through the oil seals and various types of engine gaskets, thereby polluting it.
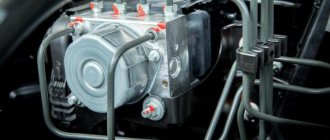
Operating principle of the adsorber
Many people mistakenly believe that when the engine starts, voltage is immediately applied to the canister valve and it opens, purging the canister. I even saw “manuals” and “training videos” about this. In fact, the purge valve is controlled by the ECU using special algorithms based on readings from temperature, air flow, etc. sensors.
The greater the engine air consumption, the longer the duration of the ECU control pulses and the more intense the purging.
It is impulses, and not just the supply of voltage! Therefore, there is such a thing as “adsorber purge duty cycle,” which ranges from 0% to 100%. Here is the duty cycle of the canister purge in the Chevrolet Explorer diagnostic program
During the entire trip, this is only the first signal from the ECU to purge, equal to only 6%. So this is a complex and important process in engine operation.
Here is the duty cycle of the canister purge in the Chevrolet Explorer diagnostic program. During the entire trip, this is only the first signal from the ECU to purge, equal to only 6%
So this is a complex and important process in the operation of the engine.
inspection of the separator and replacement of check valves - logbook Lada 2114 gReyMouse 2005 on DRIVE2
It’s already warmer outside and due to the above-zero temperatures, the old problem has returned, namely the smell of gasoline and the constantly wet separator.
but in order to ensure its integrity and carry out a visual inspection, you need to remove the bumper.
Let's start removing the bumper
unscrew these bolts to pull off the bumper on clips along with the stiffener, I didn’t have clips)))) PS forgot to take a photo, two more bolts are located at the bottom of the bumper almost in the middle
unscrew the protection approximately to the middle of the wing so that there is more opportunity to bend it
Now let's move on to the side mounts
for convenience it is better to jack it up
and here is the mount itself, unscrew it on both sides and the bumper is removed! You can’t do without WD-40, but it didn’t help in this case either, the bolts broke (((
such perfect cleanliness awaits you under the gas tank flap))))) The culprits who caused it all to start are marked in red. the separator turned out to be intact...
this is basically the end result, I changed some presses, valves that were clogged, changed them to regular ones
On the left is my valve, only there is something metallic rattling inside, and on the right what should it be)))))
I bought new mounts for the bumper, 2a check valves and a clamp
Result of the work: after two days of driving, everything is dry near the neck! Thanks to everyone who finished reading, I hope this post is useful to someone! Good luck to everyone and avoid any breakdowns!
never remove the bumper like this)))))
Issue price: 250 ₽
Canister valve. How to check it
The principle of checking on most cars is the same, but we will look at the example of the Chevrolet Lacetti.
Problems with the canister purge valve can be divided into several main points:
- impulses do not arrive to the valve
- Valve coil failure
- valve stuck open
- valve jamming in closed position
It is very easy to check the pulses, wiring and valve winding with the Chevrolet Explorer program, in the “mechanism control - canister purge valve test” tab. When you click on the “ON” button in the program diagram, we will see the following signals
This means that the ECU is giving a command to the valve. At the same time, the sound of clicks will emanate from the valve in time with these signals, which, in turn, means that the pulses reach the valve and the winding is intact, since the valve is activated.
By the way, if you don’t have a diagnostic adapter yet, then I advise you to definitely read the diagnostics section and purchase an adapter.
The electrical part is OK. We checked this. But to be sure that the valve is not physically jammed, it can be removed and checked. It is very easy to dismantle and it takes me no more than 30 seconds.
Two tubes and a block with two wires are connected to the valve. The valve itself is not even screwed on, but simply inserted into its working place.
In the photo one tube has already been removed.
To remove the valve, just pull off the two tubes marked with a green and a red arrow (the red one has already been removed, and the green one is hard to see from this angle). The tubes are removed simply and easily without any clamps.
Then press the metal lock and unfasten the wire block (shown by the yellow arrow)
After this, press on the fitting shown by the red arrow and the valve will come out of its seat.
The valve is normally closed, that is, without voltage applied it does not allow air to pass through. You need to check this in any available way - with a rubber bulb, an inflatable ball, etc.
I had on hand a syringe and a piece of vacuum tube left over after replacing the absolute pressure sensor tubes.
When moving the syringe piston, resistance should be felt, and the piston itself tends to return to its original position, which means sealing the valve. When removing the tube from the syringe, a characteristic puff should be heard. This means that the adsorber valve is closed hermetically.
All that remains is to check the opening of the valve. To do this, we take two wires with such mini-mothers
And connect it to the adsorber valve connector. You can carefully and simply use a wire without a tip.
Move the syringe plunger and connect the wires to the battery. When connected, you should hear that same zilch sound, which means that the valve has opened and released pressure.
It happens that the valve does not open. Then just replace it with a good one.
That's all the simple methods on how to check the adsorber valve.
Peace and smooth roads to everyone!!!
I like 41+
Members who liked this post:
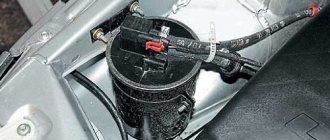
Separator design
The VAZ 2114 gasoline vapor separator is a small, completely sealed tank made of metal or impact-resistant plastic. It is installed in the right rear part of the car on a special bracket. Using a hose system, it is connected to the gas tank (from where vapors flow through drain pipes) and to a two-way valve. The total volume of this device is 7 liters.
Location of the separator VAZ 2114
Once in this tank, the vapors accumulate in it and, due to increased concentration and cooling, condense. Drops of condensation settle on the walls and bottom, after which they gradually flow back into the gas tank. The same vapors that did not have time to condense flow towards the two-way valve. From its name it is easy to guess that it works in both directions at once - “for the intake” of atmospheric air into the tank and “for the release” of fuel vapors outside.
Despite the obvious simplicity of the fuel ventilation system and the minimum of parts located in it, it still breaks down, leading to rather unpleasant consequences.
So, signs of a vapor separator failure may include:
- smell of fuel inside the cabin;
- the smell of fuel near the car (and a lot of time has passed since refueling);
- gasoline stains near the neck of the tank;
- drops of fuel on the ground after a long stay.
Having noticed these signs, we can conclude that the VAZ 2114 gas tank separator is cracked or leaky and is no longer doing its job.
Comments • 61
You can't really see anything
Good day, Vladislav Chikov, please tell me why the adsorber stinks of gasoline? I installed a new one, and it still stinks, especially when there are 5-7 liters of gasoline left in the tank. Help out!
Nothing is visible or clear, you suck as a blogger.
Just now I noticed from the gasoline drips, almost a year ago one muddle on a Kamaz was driven in with tow hooks and the right brake light needs to be replaced, as well as on the trunk. Today I noticed drips and a crack, I will then change almost the entire set, and removing the bumper is not a difficult process, as well as disassembling everything in principle, some are simply too lazy to do this, so they send it to services, where handymen often work.
Can water get into the tank through it when it rains?
I have a black valve on the absorber
IS IT DANGEROUS TO DRIVE WITH A BURST AS IS? OR WITHOUT IT?
What if there is leakage around the filler cap? (I changed the cap) even when the gas is at least “the light is on”?!
Did you not have a curtain on the neck of the fuel pipe or was it already unscrewed/removed beforehand?
I am very grateful to you for your detailed analysis and comments, it was necessary to change the platform and rubber (gasket) under the neck of the gas tank on a VAZ 2115, no one knew and did this work. In the end, my friend and I, with the help of your video, changed everything, additionally checked the safety valve, clamps and everything else. Thank you
Explained everything perfectly. Apparently VAZ cars have a couple of places with problems with the smell of gasoline. It’s either in the area of the filler neck. The separator bursts at the seam. Or there’s a problem with the fuel pump. It’s located under the back seat. The eternal problem is the small studs. The edges are always licked off. The nuts don’t hold. The studs break .The benz comes out and starts to stink.
Or could there be a large overrun due to a crack?
Bitch. replaced the cracked separator. there are no leaks. There is a hose on the left nipple of the separator, nothing is put on the right nipple. but the slight smell of gasoline can still be felt (((((
Or maybe their separator prevents the car from starting in warm weather? The car is parked in the sun the first time it does not start, I open the gas tank cap and everything starts to start normally
Thank you! There was also a smell of gasoline, I went and looked and the separator actually burst!
Periodically smells of gasoline when driving when the tank is not full. I didn’t even suspect that there was such crap in our nines and fours. I bought a new tank. I thought that it was rusty on top, as usually happens. I was puzzled by this video. I'll have to sort out my whole ass because of this barrel.
Well done! He sees very useful things; Everything is explained clearly
Most of what was shown on the screen was not clear. Please shoot normally.
explanations on the screen without commas - you won’t understand what you mean!
I just have this hose dangling and gasoline flows from it to the separator, if it is plugged what will happen?
BB, crap store, a lot of substandard and expensive cabbage
I wonder what moronic designer came up with the idea to put it there. Half the car needs to be dismantled because of this moron! Bought. I'll go change it. I'm afraid that there won't be enough supplies of Russian swearing.
@Dmitry Tsykhmistrov You’ll see a cretin in the mirror!
I didn’t notice that the floor of the car can be disassembled, literally, the bumper is held on by 6 bolts, if you remove it completely, it’s even easier in the pit. Look into foreign cars and you will see your idiotic decisions.
Is it plastic or what? I have an iron one and the valve is located on the adsorber under the hood. Do you know how to check the gravity valve for functionality? If so, tell me.
Hi, if there is a big crack on the separator, can water get into the tank through it??
HELLO. WHAT IF YOU THROW OUT THE SEPARATOR AT ALL? WHAT CAN HAPPEN? INSTALL COVER WITH VALVE.
For the Trolls..Have you ever changed the gas tank on a 14K? I advise you to immediately change what is described here, and you will be happy.
Vasily Ivanov, well, the only troll here so far is you.
I was too lazy to remove the bumper...and change the valves and separator, and this is the result! I'll plug the gas tank with a rag and get some damn spare parts... the stupid guy gets fucked twice!
I replaced the gas tank on 14k due to a crack.. a week later the separator died.. I’ll look into it..
Please tell me the VAZ 2110 produced in 2005 has a separator. Thank you
Iskan Sher yes there is, under the left rear fender
My cover is spinning, I bought a new one, the same crap, what should I do?
how to change the safety valve without removing the bumper? on a VAZ 2108 (1988 carburetor)? I have pressure building up in the tank. I recognize it by the smell from the central nozzles of the stove. presses out pressure after the check valve from the carburetor.
I removed the separator but did not see any cracks! created pressure in it and no bubbles under water! but the smell never goes away! Under the hood everything is fine, everything is clamped, everything is dry! what could be wrong please tell me
but there are also times when the VAZ is happy for a long time even without investment - this is also a fact.
Yes, don’t even talk about it, you don’t have time to get to one thing, so other troubles come up. Now the car somehow started to wobble and the traction felt worse, it’s not to the point of sepor now.
I don’t know exactly, maybe change everything, I changed everything, even that didn’t help)))AvtoVAZ))
When you fill in a lot of gasoline, at least 25-30 liters, there is always a terrible stench of gasoline, then when the tank is empty to at least 15-18 liters, everything returns to normal, the stench disappears, Vladislav, do you think it’s the separator?
+Timur Tavkeshev hoses, clamps, valves, adsorber, look at everything. I had everything new, but in the heat with the window open, it still smelled of gasoline, I couldn’t overcome it, I think the seals in the gas tank area when you open the window create a vacuum and through them it pulls into the cabin. - This is nine.
there may be a smell due to the fact that there is no hose from the separator to the valve, which also does not exist, as well as a gravity one)*.
What a great story you say =) The last phrase also sounded good))
PPT on my 4 car there is no valve at all near the neck.
I have such crap on the spot. No valves, no hose.
The same. I looked through everything. There are no valves of any kind.
+Ivan Ivanov and me)) and there is no gravity valve either. and there is no second hose on the separator
why does it (separator) burst in injection
+ Anatoly Kulik because the valve gets clogged, and a vacuum is created in the separator and compresses it
Hi Vlad, I have a couple of questions about the 1.8t engine, help me out! How can I correspond with you?
Vlad, such a thing, it’s worth a new turbine, a flame arrester, a new bypass and the 75th timing marks are all in place. but the trouble is, she doesn’t want to pull from the bottom, not from the top. the boost reaches 0.7 but there is zero pickup and at the peak of the boost the shocks are not strong. It costs HBO-4 and it drives equally badly
@Denis Konovalov hello, here or in contact.
What do i do ? Many smart people advised to remove the separator, now gasoline is thrown out of the Artsorber valve when driving like a volcano. They say they remove it and it drives normally, but I don’t understand what’s wrong
Thanks for the advice, I thought so too, I bought another one and am going to install it the other day using your video. I hope everything works out
@Omarov Ruslan put the separator in place and all the valves, you can buy a metal one, it’s stronger.
When I worked at a service station, we didn’t change the nuts; on foreign cars, the original ones cost a lot of money. We had cans of old grease, like the kind from CV joints that had already served its purpose. Before throwing the CV joint into scrap, we scooped out the grease into a jar and brought unnecessary toothbrushes from home. And lubricating the threads before assembly is a nice thing, it doesn’t stick, doesn’t rust, and then everything can be unscrewed with pistols easily and simply. Any grease and their mixture will work, the main thing is to observe the tightening torque)))
@Vadim Orel yes, that’s true, I also preserve it after assembly, but not the thread, but the entire bolt and nut after tightening, so that they don’t rust, especially under the bottom, with a lubricant that is not afraid of water.
Withdrawal procedure
- The first step is to remove the rear bumper.
Use a screwdriver to loosen the clamp securing the tube to the filler pipe.- Remove the tube from the pipe.
- Now you need to loosen the clamp on the filler neck hose.
- Using a 10mm wrench, unscrew the 2 nuts securing the filler pipe to the body and cut the clamp securing the plastic tube to the filler pipe.
- Remove the hose from the filler pipe.
- Unscrew and remove the filler cap.
- We take out the filler tube from the shield.
- Using a 10mm wrench, unscrew the bolt securing the separator shield.
- We take out the bracket from under the shield.
- Then you need to fold back the right luggage compartment trim.
- Using a 10mm wrench, unscrew the nut of the stud securing the separator shield.
- We take the pin out of the hole and take out the separator from the body niche.
- loosen the two clamps and disconnect the two tubes from the separator and remove the separator.
- Reinstall the separator in reverse order.
see also
- Selecting a fan for ventilation
- Breezer supply ventilation
- Kitchen with ventilation box in the corner design
- Ventilation and heating center
- Ventilation blows in the opposite direction
- Design of a ventilation system for an apartment in an apartment building
- Electric motor for ventilation
- Ventilation without heat loss
- Dimmer for ventilation
- Safety goggles with indirect ventilation
- An anemometer is a device for measuring ventilation performance
How to clean the crankcase ventilation system on a VAZ 2108-VAZ 21099?
Preparing for cleaning:
1) First, remove the air filter housing from the car. (Instructions for removing the housing can be found in the article: “Replacing the air filter housing”)
2) Next, move to the hose that is located on the cylinder head cover. Having approached the hose, unclench and then disconnect the plastic wire holder indicated by the blue arrow. Then use a screwdriver to loosen the clamp; the red arrow points to the tightening screw.
3) Now unscrew the central nut that secures the accelerator drive bracket, and then unscrew the two side nuts securing the cylinder head cover itself.
Note! When the nut securing the central bracket is unscrewed, remove the bracket from the block head and, as a result, leave it hanging on the accelerator drive cable!
4) Finally, remove the cylinder head cover.
Cleaning the crankcase ventilation system:
1) First, unscrew two bolts, one of which is short and long (Number 2), and the other is long (Number 1). The bolts are located inside the cover, and they secure the oil separator.
Note! There are washers underneath both bolts, so be careful not to lose them!
2) Then remove the oil separator housing from the inside of the cover.
3) Next, remove the mesh package from the head cover.
Note! When the oil separator housing, the mesh package and the cylinder head itself are removed, rinse them thoroughly with kerosene!
4) When the screens are washed, install them in their place and then turn them so that they are all level in the oil separator cover and so that on one side they rest against the protrusions (Photo under number 1), and on the other side so that space is left for the bolt securing the oil separator housing (Photo number 2).
Note! After the screens are installed as required, install the oil separator housing in place and tighten one short bolt and the other long bolt securing it!
5) And upon completion of the operation, check the condition of the head cover gasket. If the gasket is deformed or severely compressed, then replace it with a new one.
Note! When all cleaning operations are completed, install all previously removed parts in the reverse order of removal!
Features of the engine power system 11183 (1.6i)
Receiver
engine 11183 (1.6i) is made of plastic.
Engine Intake Module 11183 (1.6i):
1 – flange with an o-ring for fastening the throttle pipe; 2 – receiver with o-rings for connection to the inlet pipeline
Engine Fuel Module 11183 (1.6i):
1 – inlet pipe (for supplying fuel to the pressure regulator); 2 – outlet (discharge) pipe; 3 – module cover; 4 – fuel level indicator sensor; 5 – intake chamber; 6 – module cover guide
Fuel pump
combined with a fuel level indicator sensor and a fuel pressure regulator into a single unit -
a fuel module
(often called an electric fuel pump). Fuel from the pump (through the outlet pipe of the fuel module) enters the fuel filter. Purified gasoline is again supplied through the fuel line and through a tee to the inlet pipe of the fuel module, and then supplied to the fuel rail.
Engine fuel pressure regulator 11183 (1.6i):
1 – hole for dumping excess fuel; 2, 4 – sealing rings; 3 – holes for supplying fuel to the regulator; 5 – body; 6 – terminal for connecting the regulator to ground
Fuel rail for engine 11183 (1.6i) complete with injectors:
1 – diagnostic fitting; 2 – fuel rail; 3 – fitting for connecting to the fuel line; 4, 5, 6 and 7 – nozzles