"Nine" and the door lock device
Theoretically, the lock mechanism can be divided into 3 parts: a handle with a cylinder and a button, the main mechanism, and the inner door handle. All nodes and connections between them are shown in the diagram.
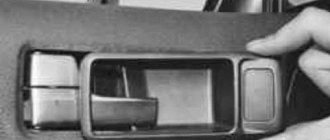
The node labeled “2” looks like this.
4 rods fit to it, that is, to this node. Two of them are connected to the external handle, and in order to dismantle it, the rods are disconnected.
If there is no electrical wiring inside the door, you do not need to disconnect the battery before performing repairs.
In other cases, that is, when power windows or locks are installed, the battery must be disconnected. To do this, as many people know, it is enough to remove the “negative” terminal. This means that before repairing locks, the hood is opened first, not the doors. Anyone who violates such a requirement will, at best, have to change burnt fuses.
Replacing the door lock cylinder
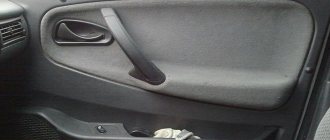
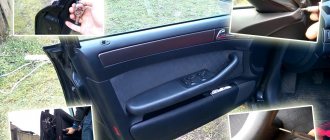
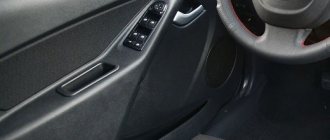
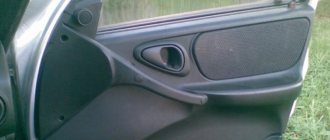
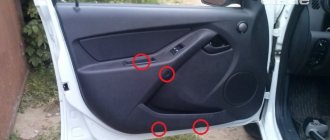
To gain access to the locking mechanism, you need to remove the trim. On the “Nine” it is quite simple to remove it - the casing is held in place by plastic pistons. These pistons are located around the perimeter; they are simply pressed out and, if necessary, replaced with new ones.
First, as is easy to understand, you need to dismantle three elements: the side handle, the window lifter handle, the socket of the inner handle of the lock. The “dog” must be pulled up, but it is better to remove the seal that protects the glass during the dismantling of the casing.
Removing and disassembling the door handle
When the door trim is missing, you can freely disconnect the two rods that go from the door handle to the lock. The following shows exactly what elements we are talking about.
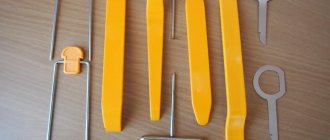
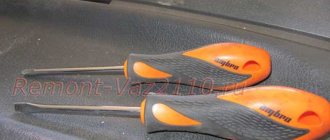
By squeezing the plastic tab with a screwdriver, the rod is disengaged. We will assume that all of the above actions have been completed. Then, you can move on to the next stage.
The outer handle is attached to the metal using two nuts. One of them is located under the trim, the second is on the back side of the door. Both nuts need to be unscrewed.
After dismantling the specified unit, it will be easy to remove the cylinder. This is done like this:
- Push out the pin holding the outer plastic cap;
- Dismantle the mounting spring (see figure);
- By installing the key and turning it, the cylinder is pulled out.
The appearance of the spring holding the cylinder and the handle together is shown below.
It is important to know that the knot itself, called the “larva,” needs careful handling.
Experience shows that it will be easy to lose the metal pins that ensure secrecy. The cylinder is secured inside the handle body and the pins remain in place. But if you pull the cylinder out, each pin is “free.”
Posts 1 to 20 of 43
1 Topic from Orlov 2008-12-05 18:46:34
- Orlov
- User
- Offline
- Registered: 2008-11-11
- Messages: 161
- Reputation: [ 0 | 0 ]
Topic: Reliable fastening of door cards
Guys, in winter I want to take care of the car interior. I tried to remove these cards, they can be removed, but even with new latches they don’t fit back in properly, not all the fasteners snap into place, some die right away before they even snap back into place. Question, has anyone improved this mount?
2 Reply from Rus-yaz 2008-12-05 19:08:09
- Rus-yaz
- User
- Offline
- Registered: 2008-11-08
- Messages: 447
- Reputation: [ 0 | 0 ]
Re: Reliable fastening of door cards
Personally, I have 3 black screws on each card in inconspicuous places, except for one!
3 Reply from Toha 2008-12-05 22:43:35
- tokha
- User
- Offline
- Registered: 2008-11-15
- Messages: 77
- Reputation: [ 0 | 0 ]
Re: Reliable fastening of door cards
Guys, in winter I want to take care of the car interior. I tried to remove these cards, they can be removed, but even with new latches they don’t fit back in properly, not all the fasteners snap into place, some die right away before they even snap back into place. Question, has anyone improved this mount?
I have more self-tapping screws, but they are closed with special plugs, they don’t look bad
4 Reply from Gamlet 2008-12-05 23:58:06
- Hamlet
- User
- Offline
- Registered: 2008-11-09
- Messages: 771
- Reputation: [ 0 | 0 ]
Re: Reliable fastening of door cards
looks terrible) it’s better to buy normal caps that don’t crack
5 Reply from dr-tim 2008-12-06 02:26:28
- dr-tim
- Moderator
- Offline
- Registered: 2008-11-07
- Messages: 877
- Reputation: [ 0 | 0 ]
Re: Reliable fastening of door cards
The pistons are bullshit.. I have 10 screws with 100mm. When actively listening to music, the pistons simply fall out over time + build-up from podiums and speakers. Vibrations due to the card not being tightly attached to the door are not good for sound quality.
6 Reply from XPum827 2008-12-06 04:51:40
- XPum827
- User
- Offline
- Registered: 2008-11-08
- Messages: 934
- Reputation: [ 1 | 0 ]
Re: Reliable fastening of door cards
I installed a mom-and-pop type piston and a special plug for the chisels with a self-tapping screw assembly.
There are photos, but the quality is not very good.
7 Reply from Tonic 2008-12-06 04:53:15
- Tonic
- User
- Offline
- Registered: 2008-11-12
- Messages: 34
- Reputation: [ 0 | 0 ]
Re: Reliable fastening of door cards
when I was sorting out a door from a BMW E-39, I discovered that the bugs from its door trim are very similar in size to eighths, but different in design, in short, maybe they will fit and will hold the trim better. It’s just that you can’t get to BMW officials to buy and check bedbugs.
8 Reply from alexeykamf 2008-12-06 05:30:49
- alexeykamf
- User
- Offline
- Registered: 2008-11-09
- Messages: 1,679
- Reputation: [ 0 | 0 ]
Re: Reliable fastening of door cards
Yesterday I removed all the door trims, today I went to get screws. Pistons are sold in full!
9 Reply from XPum827 2008-12-06 09:09:07
- XPum827
- User
- Offline
- Registered: 2008-11-08
- Messages: 934
- Reputation: [ 1 | 0 ]
Re: Reliable fastening of door cards
In general, the problem, by and large, is not in the pistons themselves, but in the map (skin) of the door, or rather its geometry, is not made accurately, and it changes over time.
And even if you use very good pistons, over time they weaken due to shaking and begin to “climb out”, hence additional creaking and rattling.
10 Reply from Valinog 2008-12-06 09:16:44
- Valinog
- User
- Offline
- Registered: 2008-11-12
- Messages: 885
- Reputation: [ 0 | 0 ]
Re: Reliable fastening of door cards
and the new door trims are absolutely amazing. You took it off once, you can’t put it on a second time. these brackets for the pistons just stupidly fall off the trim.
11 Reply from dr-tim 2008-12-06 10:00:40
- dr-tim
- Moderator
- Offline
- Registered: 2008-11-07
- Messages: 877
- Reputation: [ 0 | 0 ]
Re: Reliable fastening of door cards
when I was sorting out a door from a BMW E-39, I discovered that the bugs from its door trim are very similar in size to eighths, but different in design, in short, maybe they will fit and will hold the trim better. It’s just that you can’t get to BMW officials to buy and check bedbugs.
I think such caps will cost about 30-50 rubles apiece. not economically profitable.
12 Reply from Grigr 2008-12-06 14:20:31
- Grigr
- User
- Offline
- Registered: 2008-11-23
- Messages: 59
- Reputation: [ 0 | 0 ]
Detailed instructions for repairing the lock
> Let's consider what needs to be done if the door of a VAZ 2108 2109 21099 does not open. For example, let's take the fact that the front door on the driver's side does not open. The door does not open from the outside. That is, you press the handle tongue, it falls through, but the door does not open. Possible reasons: — The door key is broken. The key is made of silumin, so if the lock freezes, as often happens in winter, pressing on it with great force can break it. To replace a key, it is not necessary to buy the entire handle; special repair kits for VAZ 2108 2109 21099 door handles are sold. As a rule, a repair kit consists of two keys and handle key leads. The key on the reverse side has two protrusions. Only one protrusion pushes the leash when you press the key; the second protrusion must be bitten off. — The leash that pushes the key is broken. Same story: silumin, frost, pressed a little harder and the leash broke.
Where to begin
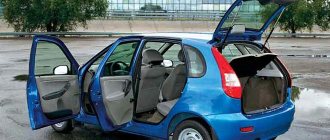
Starting with the doors is a good option; the work will take a minimum of time, will not require much effort and will give you the opportunity to practice:
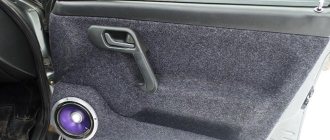
- If you do the job well, you can reduce the noise level inside the cabin by 20-30 percent.
- The soundproofing door no longer allows sounds from outside to pass through and improves the sound of acoustics from the inside.
- In addition, the doors will begin to close much softer, unnecessary noise, rattling and vibration will disappear
- A big advantage of sound insulation for doors is the ability to significantly improve the sound quality of speakers installed inside the door trim
Soundproofing stages
Before we get started, let's first consider all the steps:
Schemes of different degrees of sound insulation of doors
- The first step is gluing vibration insulation, it is necessary to eliminate possible rattling when closing and opening doors, photo above
- If you plan to install good acoustics, this will improve the sound quality and remove unnecessary noise and overtones.
- The second stage is sound insulation on top of the vibration insulation; this stage of work allows you to prevent extraneous sounds from entering the cabin from outside.
- The third stage is the treatment of rubbing parts with anti-squeak (the purpose is clear in itself), here it is necessary to pay attention to decorative and other elements of the interior that are capable of squeaking (for example, upholstery and fixing clips, dashboard elements)
- When you complete all the steps in sequence, you will have a door that is soundproof, acoustic and without squeaks.
Door opening method
If the VAZ-2109 door does not open from any side, then the cause of the breakdown is difficult to determine, since there is absolutely no access to the lock mechanism.
A somewhat simplified version of the breakdown occurs when the door does not slam shut completely and gets stuck in that position. Then it is possible to reach the latch from the outside with a sharp object.
To open a jammed door, you must first perform the following steps:
When simple means do not produce results, the door will have to be opened from inside the cabin, which will require removing its trim.
In practice, this is not easy to do, because the casing is pressed by the sash and it is difficult to pull it out without damage. But there is still no other way out: it is better to damage the inner panel than to mutilate the door itself.
How to open and repair a jammed door of a VAZ 2109?
The question of how to open a jammed door of a VAZ-2109 arises among motorists quite rarely. Many of them do not encounter such a problem during the entire life of the car. The reason is that the locking mechanisms on the doors of the VAZ of the “ninth” family are quite reliable and rarely fail. But sometimes they also malfunction, causing the door to jam and making it difficult to open. There are several ways to do this without resorting to extreme measures in the form of an angle grinder, so that you can then fix the problem without consequences.
Troubleshooting
If a key or silumin rod breaks, you should not immediately buy a new block with a handle. On sale you can find special repair kits for VAZ 2108-099 door handles, which contain these parts in 2 copies.
This way you will save money and easily change the key yourself by removing the handle using the following sequence of actions:
- Remove the decorative panel.
- Disconnect the rod connecting it to the locking device from the handle mechanism.
- With the glass fully up, unscrew the 2 fastenings of the handle to the door card.
- Remove the handle, replace the parts and put it back.
If the rod is disconnected, then you need to remove the inner lining and put it in place, as described above. Using the moment when the facing panel is removed, check what caused the disconnection of this rod so that history does not repeat itself when the door is slammed.
Malfunctions of the locking mechanism can only be eliminated by removing it. In a situation where the device has a lot of wear, as happens on the driver and front passenger doors, it is recommended to replace the lock with a new one.
After installing it in place, adjustment will be required to ensure precise alignment of the locking parts. To adjust, the lock will have to be fixed in different positions, achieving the optimal one.