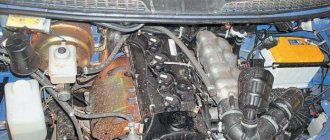
High-voltage ignition wires of the VAZ 2114 are part of the ignition system, through which an electrical impulse is transmitted from the module to the spark plugs. When the current hits the spark plugs, the fuel mixture ignites in the combustion cylinders, which gives rise to a new stroke of the engine.
The design of the GDP, unlike conventional wires, is quite complex. In addition to the conductive core (which is made of copper) and protective insulation, they have metal tips and plastic protective caps.
Metal tips act as contacts; they fit into the sockets on the spark plugs and the ignition module. The durability of the GDP directly depends on how well the tips are made. When purchasing, be sure to check the strength of their attachment to the wire.
What to pay attention to
Of particular importance when purchasing is information showing the brands of motors to which this product is suitable. On machines in which high-voltage pulses are generated at a minimum energy value, cables with high distributed resistance cannot be installed. Failure to comply with this rule reduces the power of the spark, and as a result, partial ignition of the fuel occurs.
Using a tool such as a tester, you can easily determine the resistance level of cables. An exception is the high voltage wire for cars, which has a special wrap, due to variable resistance values in the engine.
The material used to make the insulating layer is selected depending on the required characteristics. The correspondence between the voltage level of the car’s ignition system and the selected products is also taken into account. The operating and repair instructions for any vehicle indicate the maximum voltage value that the cables must withstand without compromising the integrity of the insulation. The best option would be a cable supplemented with caps and insulation made of materials not subject to temperature influences (for example, silicone). In addition, it will reduce the likelihood of current leakage due to the fact that it does not absorb liquid.
Briefly about the essence of how spark plugs work
A spark plug is an ignition element designed to create a spark that ignites the combustible mixture under the cylinder piston . Their number is determined by the number of cylinders in the internal combustion engine block.
Spark plug
They are a nickel body with a ceramic insulator, inside of which there is a contact rod. Their synchronous operation is achieved by replacing the entire set, that is, 4 pieces. It is advisable that they be of the same brand and manufacturer.
General tips for connecting high-voltage wires.
Laying wires. Do not try to connect the wires in a bundle. Disassemble the wiring harnesses, release the wires from the plastic holders. Connect the high-voltage leads to the corresponding cylinder spark plugs. Lay the wires so that they do not rub against each other, engine parts, or hoses. Avoid sharp bends and tension on the wires. After connecting all the wires, secure them into the bundle with special comb holders included in the delivery kit.
The procedure for connecting I/O wires to a VAZ carburetor (2108, 2109, 21099)
The central wire from the distributor cover always goes to the ignition coil (bobbin).
The outlet of the distributor cover, which faces towards the front of the car, is connected to the first cylinder.
The outlet of the distributor cap, looking down, is connected to the third cylinder.
The outlet of the distributor cap, looking rearward, is connected to the fourth cylinder.
The outlet of the distributor cap, looking up, is connected to the second cylinder.
The procedure for connecting high-voltage wires to a VAZ Classic, Niva with a carburetor and distributor.
Central wire from the ignition coil (bobbin)
Injection VAZ produced before 2004 with an old-style ignition module (4-pin low-voltage connector)
Injection VAZ produced after 2004 with a new ignition coil (3-pin low-voltage connector)
As with the old-style ignition modules, the new coils are also marked with pins corresponding to the cylinders. But the connection order is different from the order on the old-style ignition module. Be careful.
On VAZ 2105, 2107 cars a contact (battery) ignition system is installed. Contact, since the operation of the entire system is based on the opening and closing of the breaker contacts in the distributor. Unlike a similar contact ignition system for cars 2101-2106, the VAZ 2105, 2107 uses switching of low voltage wires through a mounting fuse block.
Elements of contact ignition system
1. Generator
Provides an electric current of a certain voltage to the ignition system when the engine is running.
2. Battery
Supplies the generator with electric current and starts the engine.
3. Fuse and relay mounting block
Switches low voltage wires of the ignition system.
4. Ignition coil
Distributor breaker R-125V or 30.3706. The breaker mechanically opens the low voltage (12V) current circuit, which signals the ignition coil to generate high voltage current.
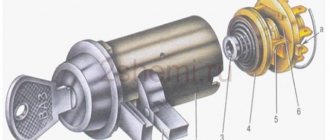
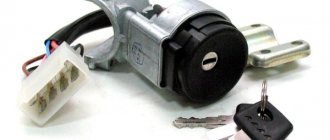
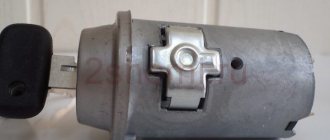
6. Ignition switch
The ignition lock (switch) closes the electrical circuit of the ignition system, thereby allowing low voltage current to flow from the generator to the coil.
7. High-voltage wires (armored wires)
They transmit high voltage electric current from the distributor to the spark plugs.
8. Spark plugs
They produce an electric spark at the onset of the compression stroke in a specific engine cylinder.
9. Capacitor.
The capacitor enhances the spark and prevents contacts from burning.
Notes and additions
High-voltage wires of VAZ cars are one of the most important elements in the ignition system. It is the wires that transmit high electrical voltage from the module to the spark plug.
Failure of the wires affects not only the formation of a spark, but also the operation of the entire power plant. This article will talk about how to correctly select and independently replace high-voltage wires on a VAZ car.
Below we discuss the procedure for connecting wires to the ignition module, as well as examples of the highest quality and best wires that can be purchased in terms of price and quality.
Features of choosing VVPZ for VAZ 2114
When choosing a GDP for a VAZ, it is necessary to take into account two key factors - their resistance and breakdown voltage. The lower the resistance, the better the electrical impulse will be transmitted, and the magnitude of the maximum breakdown voltage determines how resistant the high-voltage wires on the VAZ 2114 will be to breakdowns.
The resistance value of products from different manufacturers differs from each other. As an example, we give you the resistance of the most popular types of GDP:
| Manufacturer | Resistance on cylinder No. 1 (kOhm) | Resistance on cylinder No. 2 | Resistance on cylinder No. 3 | Resistance on cylinder No. 4 | Breakdown voltage (kV) |
| Tesla | 3.27 | 4.16 | 5.02 | 6.26 | 50 |
| Cezar | 3.1 | 3.53 | 4.23 | 5.34 | 50 |
| Finwhale | 1.95 | 2.18 | 2.6 | 3.42 | 50 |
| Ween | 6.17 | 6.57 | 7.52 | 9.89 | 35 |
| Slon | 4.24 | 4.74 | 5.19 | 7.6 | 50 |
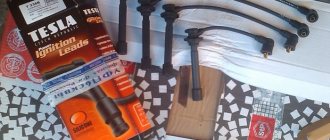
Expert opinion: The products of the Czech company Tesla receive the largest number of positive reviews from the owners of the fourteenth. Their wires have optimal resistance and high breakdown voltage, and at the same time they are truly made to last - they do not tan or crack.
The cost of the Tesla GDP set is about 500 rubles, Cezar – 450 rubles, Ween – 270 rubles, Finwhale – 600 rubles, Slon – 500 rubles.
Oxygen sensor
Determines whether oxygen remains in the exhaust gases. Before taking measurements, also inspect it - it may be damaged and a multimeter will not be needed at all. Then the element just needs to be replaced.
If everything is in order, measure the voltage and resistance as with the ABS sensor. The algorithm is the same. Start the car and watch the device. After start-up, the numbers 0.1-02 volts will appear on the screen. When the car warms up, the device will show up to 0.9 volts. If you didn’t notice that the indicator has changed, the sensor is most likely faulty.
If the voltage test is successful, find out the resistance readings. The norm ranges from 10 to 40 ohms.
Causes and symptoms of malfunction of high-voltage ignition wires
Without checking the high voltage ignition wires, certain problems may arise. The engine will begin to “triple”, its power will drop significantly. In addition, the vehicle's starting system may fail. This malfunction requires immediate elimination, otherwise the entire ignition system may fail, and due to malfunctions in the engine, malfunctions will occur in the mechanical components of the machine.
1. Possible causes of malfunction
Most often, a check shows that the problem lies in the natural wear and tear of the high-voltage ignition wiring. Since it is very close to the engine, it experiences a significant temperature difference, which in winter can exceed 100 degrees Celsius during the day. The quality of the wire insulation decreases over time, cracks appear through which vapors of antifreeze and washer fluid, road reagents, oils and ordinary moisture get inside. If the depth of the crack in the insulation reaches the core, a breakdown of the high-voltage pulse to ground is possible. In this case, the ignition current does not reach the spark plugs.
Often, as a result of the test, it turns out that there was a mechanical impact on the wire. As a rule, this occurs at the junction of the conductor with the contacts of the spark plugs and ignition coils. When installing high-voltage wiring, it is important to install it correctly with the obligatory use of polyester vinyl crimp clamps to protect it from excessive mechanical stress.
Finally, the test may show that high-voltage electrical equipment has been damaged due to exceeding the voltage limit. This can happen when the ignition coil breaks down in the primary winding.
2. Signs of malfunction
A possible malfunction of high-voltage wiring can manifest itself with the following symptoms:
- starting the engine is difficult, especially in rainy weather;
- the engine periodically “troubles” while driving, this is also observed when idling and during a “cold” start;
- strong interference appeared in the radio receiver and amplifier, and in other amplification equipment;
- fuel consumption has increased noticeably;
- the wires changed color, breakdowns and leaks appeared in the form of dark spots.
High-voltage wires - replacement of Lada Kalina (VAZ 1118, 117, 1119)
To perform the test, you will need a multimeter.
Advice
In order not to confuse the terminals on the ignition coil (ignition module), it is more convenient to change the high-voltage wires one at a time.
Execution Sequence
1. Prepare the car for the operation.
2. Disconnect the high-voltage wires from the spark plugs.
3. Disconnect the ends of the high-voltage wires from the ignition coil (module).
4. Using a multimeter (and ohmmeter mode) measure the resistance of the wires.
5. For serviceable wires, the resistance (depending on the length) should be in the range of 3.5-10.0 kOhm.
High-voltage wires should be replaced as a set.
6. We connect the wires to the spark plugs and the ignition coil in accordance with the cylinder serial numbers marked on the wires and on the ignition coil.
It is necessary to connect the wires to the ignition coil only in accordance with the serial number of the cylinder. The wire insulation is marked with the serial number of the cylinder.
HOW OFTEN SHOULD I CHANGE GDP?
According to the recommendations of Avto-VAZ, replacement of high-voltage wires of the VAZ 2114 should be done every 30 thousand kilometers. In practice, motorists rarely comply with these replacement deadlines, since if the wires do not have any mechanical damage, they can travel about 100-150 thousand km.
When the service life is exceeded, the internal resistance of the GDP increases, which negatively affects the transmission of the electrical impulse. This leads to problems with ignition and acceleration dynamics, since when the supply of current to the spark plugs is delayed, the normal engine operating cycle is disrupted.
Change the wires every 25-30 thousand km and everything will be fine
How to check current leakage on a used car with a multimeter
The check includes:
- Turn off the engine, remove the key. Close the doors, but open the windows - the battery will not work continuously, and the car may be locked with a central lock.
- Make sure that the additional lighting and radio are turned off.
- Remove the negative terminal from the battery.
- Place one probe between the negative terminal and the negative terminal of the battery - the device will show the leakage current value.
The normal value is 15-70 mA. If the numbers are higher and you and the seller have time, try to find the reason. To do this, also connect a multimeter, then start removing the relays and fuses one by one.
The readings have returned to normal - you have found the cause of the current leak. Perhaps further repair or replacement of a part, or even the entire wiring, will be required. You can confidently ask the car seller for a discount or refuse the purchase altogether.
There may be several reasons for the leak. The following may be involved:
- battery;
- sensors;
- high voltage wires;
- generator.
Each element can be checked using a multimeter.
Sequence of actions to independently replace the ignition module on a Lada Grant
- We install wheel chocks on the rear row of wheels for safety purposes.
- Using a key set to “12”, unscrew the terminals from the battery. It is enough to turn off the negative power, but experts recommend both.
- In the center of the engine compartment we find the contact chip for the ignition module. It is held on by a special latch. We unclip it and take it out.
We detach the contact chip
- Disconnect the four high-voltage wires from the coil module. We hold it by the rubber base and remove it from its seat.
- By analogy, disconnect the remaining three wires.
Disconnecting the wires
- Unscrew the four screws with a Phillips-head screwdriver and remove the ignition module of the Lada Granta 8-valve. It is placed on a metal bracket.
Removing the ignition module
- We remove the module.
Afterwards we carry out troubleshooting, diagnostics, and inspect the seat. We install the new module and assemble the mechanism in the reverse order.
Replacing the ignition module on the Lada Grant is completed.
Which is better?
SOATE devices manufactured in Stary Oskol have proven themselves to be the most reliable ignition modules.
Module structure
The module consists of two ignition coils and two high-voltage switch switches.
Inside the module there is a board with radio components and ignition coils filled with compound.
The coil generates a high voltage pulse, and it is a simple transformer with two windings, primary (induction voltage about 500 V) and secondary (induction voltage at least 20 kV). All this is assembled in a single housing, on which there is a connector for signal wires (from the engine control unit) and four terminals for high-voltage wires.
Schematic diagram of the module.
The module operates on the principle of an idle spark - it distributes sparks in pairs to cylinders 1-4 and 2-3 according to impulses transmitted from the ECU.
Installing an electronic BSZ instead of a contact one
Today it is very rare to find a “seven” with contact ignition. With the arrival on sale of switches, distributors and coils for electronic spark generation systems, owners of classics began to massively re-equip their cars.
What is included in the BSZ kit
The process of converting a contact system into an electronic one is quite simple, and also inexpensive. The cost of an electronic ignition kit for a VAZ 2107 is about 2,500 rubles. It includes:
- transistor switch type 3620.3734 with connector;
- coil 27.3705;
- contactless distributor type 38.3706;
- connecting wires.
In addition, you will need spark plugs (preferably new ones) with a gap of 0.7–0.8 mm and a set of high voltage wires. Coil type B-117A (used in a contactless system) is not suitable for electronic ignition. Its characteristics do not correspond to those of other equipment in the circuit.
Video: review of BSZ elements for “classics”
Required Tools
To complete the work you will need:
- 8, 10 and 13 mm wrenches;
- screwdriver with a Phillips blade;
- drill;
- spark plug key;
- 36 mm wrench or with a ratchet mechanism for turning the crankshaft;
- self-tapping screws;
- pliers.
- Disconnect the terminals from the battery. We remove the battery and put it aside.
- Remove the high voltage caps from the distributor cap and from the spark plugs.
- Using a special wrench, unscrew all the spark plugs. We screw new ones in their place.
- Using a drill, drill holes on the left mudguard or on the engine shield to mount the switch.
- We attach the switch to the car body using self-tapping screws.
- Remove the distributor cap.
- We rotate the crankshaft, placing a wrench on the nut securing its pulley, until the distributor runner is aimed at the spark plug of the first cylinder, and the mark on the pulley points to the middle ebb on the timing cover.
- Using a 13 mm wrench, loosen the distributor mounting nut.
- Remove the vacuum hose from the distributor and disconnect all wires.
- We remove the old distributor from its seat.
- Remove the cover from the new distributor.
- Trying it on in place of the old one, we rotate the slider by hand until it is directed towards the first cylinder.
- We install a new distributor, tighten the nut, but do not tighten it completely.
- We connect the wire connectors and the vacuum regulator hose to the new distributor.
- We dismantle the old ignition coil by unscrewing the nuts securing it with a 13 mm wrench. We disconnect all wires from it.
- We install the new coil in place.
- We connect the connector with the wiring harness to the switch.
- We clean the ends of the wires. We install the chain:
- We securely attach the black wire from the switch to ground using a self-tapping screw or screw;
- connect the red wire to terminal “K” on the coil. We also attach the brown wire from the tachometer here;
- connect the blue wire from the switch and the blue wire with a black stripe to the “+B” terminal on the coil.
- We install the distributor cover and secure it. We connect new high-voltage wires to the cover and spark plugs.
- Let's try to start the engine. If it works, then everything was done correctly. Otherwise, we check the ignition circuit and the reliability of the connection of its elements.
Features of the new model
The electrical wiring of the VAZ 2114 has a different design than its predecessor:
- Inside the car;
- In the engine compartment;
- In the rear of the body.
The new engines were equipped with a more powerful ignition system, as a result of which the wiring diagram of the VAZ 2114 to the injector had some peculiarities.
For example:
- A wiring harness was added to connect to the terminal of the ignition module, which supplied impulses to the spark plugs;
- A wiring harness has been added for connecting to the electronic switch;
- Wiring has been added to connect the adsorber valve to the injection system controller.
The wiring for the VAZ 2114 has undergone changes not only due to the addition of new electronic devices, but also due to the automaker's further plans to modernize the functionality of the car.
In particular:
- It is possible to connect heated exterior mirrors;
- It is possible to install heated front seats;
- It is possible to install front fog lights, etc.
Engine compartment
The first thing that owners of a carburetor power system pay attention to is the modified wiring diagram of the VAZ 2114 to the injector. To operate on a lean mixture, the vehicle is equipped with:
To operate on a lean mixture, the vehicle is equipped with:
- Forced fuel injection system directly into each cylinder;
- Installation of an increased power ignition system on the vehicle;
- Self-learning ECM - electronic engine control system.
To ignite a lean air-fuel mixture in the engine cylinders, it is necessary to provide a more powerful spark at the moment when the piston is at TDC (top dead center).
Additional information in the material.
This is realized by installing an ignition module, the operating principle of which is implemented:
- The generator produces alternating electric current;
- It is supplied to the ECU, which converts it to direct current;
- From the control unit, current is supplied to the windings of the ignition module coils;
- High voltage is generated in the secondary winding (according to the law of induction) of the coils;
- It is supplied to the spark plugs at the start of the ignition phase.
Vehicle interior
For the VAZ 2114 model, the automaker developed and installed a new dashboard, which differed from its predecessor:
- the absence of a glove compartment in the upper part - it was moved lower;
- new instrument panel;
- the advent of an on-board computer
The emergence of new electronic components has led to a change in the wiring diagram of the VAZ 2114 panel.
In particular:
- a wiring harness with a connector for the on-board computer was added;
- an outside air temperature sensor has appeared, installed in front of the radiator;
- The voltmeter relay appeared.
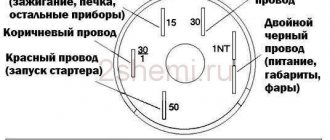
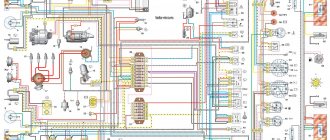
The diagram below shows:
- mounting block with terminal “A” to the power source and “B” to the external lighting switch;
- relay for turning on electric windows “K5”;
- switch for the right front door “2” and “5” for the left door;
- gearmotor of the right door “”3” and “4” - left door;
- ignition switch "6".
How to check high-voltage wires on a car with a multimeter
If you feel a loss of car power, see increased fuel consumption, the car shakes, and the idle speed fluctuates, it’s time to check the high-voltage wires. More precisely, measure the resistance in them. Remember the procedure:
- disconnect the wires from the machine or disconnect one wire on both sides;
- turn the device into ohmmeter mode and place the probes on both sides of the wire.
The normal resistance value is 6-10 kOhm. If the device shows less, down to zero, do not be alarmed. The multimeter numbers are influenced by many factors, for example:
- quality of wire insulation;
- length;
- presence of microdamages;
- wire type.
If your car's performance is outside the normal range, it is better to contact a car service center, where the resistance will be measured with professional and more accurate instruments.
BB: professional replacement
If you have decided to contact the service for the process of replacing high-voltage wiring, then it is, of course, a good thing, but not worth the money that will be asked of you. They can also confuse your brain on the topic of how often high-voltage wires need to be changed, with the logic that it is better to take care of prevention in advance than to get stuck on the highway. You won’t get stuck on the highway, the contact is not a sensor, even the last one doesn’t die right away. Replacement will cost from 1000 rubles. The advantage of service in this case will be the fact that they will look at the candles for you. And they will definitely be cleaned (they tend to become oily, which negatively affects the throughput for pulses through high-voltage wires).
How to check BB
Visual inspection
- All wires should be inspected for visible damage (scratches on insulation, severe bends, chips and cracks on contact caps, etc.)
- You also need to make sure that there are no breakdowns anywhere (that is, the wire does not short out anywhere and sparks do not jump anywhere). It is better to do this inspection in the dark, so you need to close the front door in the garage and turn off the lights.
- If the high-voltage wire is not broken and there are no breakdowns, you can try to use it to see if it is intact inside. One end of it is stripped and the “ground” is closed with it (that is, the wire is applied to the body of the car). We run the other end of the wire along other parts, contact caps, and joints. If there is damage in any area, a breakdown will occur (this procedure is also best carried out in the dark).
Checking with a multimeter
If a visual inspection fails to identify a fault, use a multimeter. It can be used to measure the resistance of each high-voltage wire.
- First, switch the multimeter to ohmmeter mode.
Multimeter set to ohmmeter mode - Then we disconnect the high-voltage wires from both the spark plugs and the contacts on the ignition coil.
High voltage wires disconnected from spark plug contacts and coil contacts - The electrodes of the multimeter are connected in turn to the contacts of each high-voltage wire. Then the resistance is assessed, which is shown by the multimeter.
This is interesting: Lar in Russian: a small test drive of LADA Largus
The resistance of the high-voltage wire is 4.8 kOhm, the wire is in good condition
In order to correctly evaluate the tester's readings, you should know exactly the resistance of the high-voltage wires of your car (this resistance is indicated on the packaging; alternatively, the resistance can be indicated directly on the insulation of each wire).
If the high-voltage wire is intact, the resistance shown by the multimeter varies in the range from 3.5 to 10 kOhm (what figure this will be depends on the brand of the wire, the material of the core and its length). If zero is visible on the multimeter, then this is a clear sign that the current-carrying wire is broken (although this may not be visible from the outside and the wire looks intact).
Wiring check
Checking high-voltage ignition wires begins with a simple diagnosis, because all of the above symptoms of problems may indicate a breakdown of other parts of the engine system or something else. For a simple check it is better to wait until dark. Then you need to expose a small section of the wire on one side and the other and close one end to the body of the car or battery, and the second is needed for maneuver: we move it along the wiring joints, plugs, and so on. When there is a hole there will be a spark immediately. The result is obvious - replacement is required. But this method is primary; it concerns direct current leakage, which is not always the reason for the non-operating state of high-voltage devices. In the case of voltage, such a number will not work.
To measure it, you need to know what resistance the high-voltage wires should have. After all, each wire from a specific manufacturer has its own resistance, technical characteristics and dimensions:
1) Tesla - 6 kOhm, it is often counterfeited, then you can squeeze out as much as 8 kOhm
2) Elephant - from 4 to 7 kOhm
3) ProSport tends to zero
4) Kargen - 0.9 kOhm
Checking high-voltage ignition wires with a multimeter
For measuring work, you need a simple multimeter, which we switch to ohmmeter mode. We measure one wire at a time, removing one by one from the cylinders from left to right and from the coil itself. The procedure is simple:
- make sure the car is turned off
- remove the end of the wire from the fastener on the cylinder
- remove the opposite end from the ignition coil mounting
- you need to connect both ends to the multimeter
- read the readings
- write them down so as not to forget
- We do this three more times with the remaining wires
Normal resistance is numbers in the range from 3.4 to 9.8 kOhm. Of course, all this depends on the manufacturer; this parameter is printed on the rubber skin of the wire. If you have a difference with the permissible value, which varies from 2 to 4 kOhm, this is normal. But no more! If more, then the wires are not suitable for driving, they need to be changed.
We always replace wires as a set! Even if one has fallen into disrepair, and the rest are in good technical condition.
That's basically it. Now you should replace the old wires with the purchased new ones.
The main task of high-voltage wires is to transmit a current pulse from the ignition coil to the spark plug.
Timely and guaranteed ignition of the fuel in the cylinder depends on the quality of current transmission, which entails normal, correct operation of the engine.
For various reasons, high-voltage (HV) wires may not conduct at all or conduct only a small part of the current pulse from the ignition to the spark plug.
The main reasons for the malfunction of explosive wires are the following:
- core rupture;
- current leakage (breakdown through insulation);
- resistance is higher than normal;
- poor contact with the spark plug;
- rupture of the conductor.
With faulty explosive wires, the engine runs intermittently and produces extraneous vibrations, because In some cylinder the combustion of the mixture occurs with a delay.
Replacing high-voltage wires of the ignition system
High-voltage wires of the engine ignition system are special design elements that ensure the transmission of high-voltage pulses from the ignition coil to the engine cylinder spark plugs. If the high-voltage wires are in good condition, if other elements of the ignition system work smoothly, a spark appears in the cylinders in a timely manner, and the engine starts and runs stably in any weather. If even one of the high-voltage wires is damaged and needs to be replaced, starting the power unit becomes problematic, and during operation the engine will, at a minimum, stall and stall at the most inopportune moment.
Features of the design of high-voltage wires and their possible malfunctions
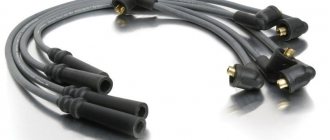
A standard high voltage wire consists of several elements. This is a conductor, a reliable layer of insulating coating, contacts and protective caps. In some cases, high voltage wires (armor wires, explosive wires, etc.) are equipped with resistors to suppress electromagnetic interference and other elements that make the design of the conductors more reliable and their operation more convenient. Depending on which particular element of the high-voltage wire has become unusable, the malfunctions of the transmission link of the ignition system also differ:
- if the insulating coating is destroyed, breakdown and leakage of currents occurs through the high-voltage wire, as a result, the voltage sufficient to form a spark and ignite the working mixture ceases to flow to the electrodes of the spark plugs;
- if a conductor becomes unusable, the resistance level of the conductor automatically increases (the consequences of this malfunction are almost the same as in the first case);
- If the contacts oxidize or break, then during engine operation short-term breaks in the electrical circuit occur, as a result of which the power unit begins to operate intermittently.
In all of the above cases, the high-voltage wires of the ignition system must be replaced, because it is impossible to repair them on your own or even by service specialists. This is simply not provided for by the design of high voltage wires.
BB: professional replacement
If you have decided to contact the service for the process of replacing high-voltage wiring, then it is, of course, a good thing, but not worth the money that will be asked of you. They can also confuse your brain on the topic of how often high-voltage wires need to be changed, with the logic that it is better to take care of prevention in advance than to get stuck on the highway. You won’t get stuck on the highway, the contact is not a sensor, even the last one doesn’t die right away. Replacement will cost from 1000 rubles. The advantage of service in this case will be the fact that they will look at the candles for you. And they will definitely be cleaned (they tend to become oily, which negatively affects the throughput for pulses through high-voltage wires).
What does P0301 mean?
P0301 (and other P030X codes such as P0302, P0303, etc.) are simpler than you might expect. Because the ECU has already determined which cylinder has the problem, saving you the diagnostic headache.
The last digit of the P030X code indicates the number of the misfired cylinder. P0302 is a misfire on cylinder 2, P0303 is on cylinder 3, and so on.
The P0300 code indicates a random misfire. This means that several cylinders are misfiring randomly. Codes P0300 through P0308 are called misfire codes.
If you have one of these errors, you need to fix the problem as quickly as possible. If you drive your vehicle in this condition, you will damage the catalytic converter.
Armored wires and their connections
Checking the ignition module on a VAZ 2114: a multimeter and test to help
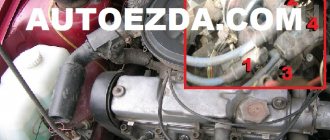
Having found out how the location of the VAZ 2114 cylinders affects their connection, it is worth talking about the high-voltage wires with which this is done.
These wires themselves are quite different from ordinary electrical wires - they have an increased layer of insulation, protective shielding, as well as metal connecting tips and protective caps made of heat-resistant plastic. The main purpose of these wires is to transmit a high-voltage pulse from the ignition unit to the cylinders (it is this pulse that allows the spark plugs to ignite the working mixture).
Armored wires VAZ 2114
The connection of armored wires should be made taking into account the ignition order of the VAZ 2114 injector and the numbering of the cylinders (this was mentioned above). For greater convenience, you should be guided by the numbering present on the ignition module - just connect socket number 1 to the corresponding cylinder, socket number 2 to cylinder number 2, etc. It is extremely difficult to make any mistake here.
How to check the ignition coil?
The ignition coil consists of two electric coils, which are controlled by the engine controller. It serves to convert low-voltage 12-volt voltage into high-voltage to produce a spark.
Typical unit malfunctions
The short circuit is a reliable unit with a long service life, but it can fail.
Signs of a short circuit fault:
- engine power decreases;
- failures at certain speeds;
- misfires;
- high fuel consumption;
- work with jerks at idle;
- coil overheating due to internal short circuit;
- The Check Engine light comes on.
Based on these signs, it is impossible to say for sure that the short circuit is faulty. Therefore, its diagnosis is necessary.
Signs of breakdown
A malfunction of the ignition coil, or rather the module, can be determined by several characteristic signs:
- When accelerating, the car seems to fall through, there is a sharp short-term loss of power;
- The overall engine power level drops;
- Unstable behavior of the car when idling;
- The engine is shaking, which indicates cylinder failure.
Before you begin repairing the module, make sure that the spark plugs on your VAZ 2114 do not need to be replaced. Perhaps they have lost their effectiveness, the contacts have become clogged, or simply the life cycle of this component has come to an end.
High-quality spark plugs for a VAZ 2114 car with an 8-valve injection engine are not expensive, so you will not experience serious financial losses. But the ignition system and engine will work more efficiently.
But if the problem is still in the module, it is recommended to check the contacts. Most often, the basis for failure of the ignition module is the lack of quality contact. Sometimes they oxidize, stick, and the mass breaks off. Even if a layer of dust appears on the cylinder, it can fail.
Buying new wires
In this section we will describe which high-voltage wires are best purchased for Kalina at a car dealership. Standard wires from universal parts from AvtoVAZ will cost approximately 500-600 rubles. Set includes 4 pieces. Components for Kalina from early years of production are cheaper - about 400 rubles. High-voltage wires Kalina 8 cells. 50-70 rubles cheaper. Wires from third-party manufacturers, including foreign ones, are available for sale. For example, wires of the “HUCO” brand are distinguished by an increased insulating layer and, accordingly, cost more - about a thousand rubles. A complete ignition wiring harness for a Kalina costs about five thousand rubles in online stores.
Among “Kalinovodov” “high-voltage” brands “SLON” are popular. These products are distinguished by their ductility, resistance to fractures and, in general, have a longer service life compared to factory components at a competitive price - about 700 rubles.
Checking the voltage at the terminal block of the wires
- Disconnect the block with wires from the ignition coil (on the H4M engine, to access the coils of cylinders 1 and 2, remove the intake pipe).
- Turn on the ignition and measure the voltage at terminal 3 of the wiring harness block (the numbering of the terminals is on the ignition coil).
- The voltage at the terminal must be at least 12 V. If it is less or absent, it means the battery is discharged, there is a fault in the power circuit, or the engine control unit (ECU) is faulty.
- Turn off the ignition.
How to check ignition coil resistance
- We set the switch on the multimeter to the 200 Ohm position and close the probes (the instrument error will be displayed on the screen, which will need to be subtracted from the readings during testing).
- We check the primary winding of the ignition coil by connecting the probes of the device to the contacts.
- The resistance between pins 1 and 3 should be close to zero (about 1 ohm).
- The resistance between pins 1-2 and 2-3 should be high (tend to infinity).
Before connecting high-voltage wires on Kalina purchased at a car dealership, you need to assess the current state of the car's wiring. For diagnostics, the car owner will need an analog or digital multimeter.
Before connecting the device, you need to inspect the wires for external defects. These include:
If no external damage is observed, you need to connect a multimeter. You need to check the resistance of the armor wire, so you need to switch the device to ohmmeter mode. After this, the armored wire is disconnected from the spark plug and ignition coil. The ends of the wire are connected to the contacts of the multimeter, after which the device will show the current resistance level.
Data on normal resistance values are applied to the insulating layer. For passenger cars, normal values are in the range of 4-10 kOhm. In this case, on one specific car, the data values for individual wires should not differ by more than 2.5-3 kOhm. If this threshold is exceeded, then there is a problem in the ignition system.
There are several ways to check the functionality of the wiring without using measuring instruments:
- Use of additional insulated wire. You need to strip both ends of the additional wire. Short one end to ground, and run the other bare end along the caps, joints and the entire contour of the wire being tested. If there is a defect, the tester wire will give a spark;
- You need to drive the car into an unlit box, open the hood, and start the engine. If there is a breakdown in the VP insulation, the damaged area will spark.
The easiest way is to take a working high-voltage wire and test it on each cylinder by elimination.
Firing order
The procedure for tightening the cylinder head of a VAZ 2109
The cylinders in a car do not work chaotically, because for stable operation of the engine and alternate execution of all four strokes, their strict synchronization is required.
So there is a special order of operation of the cylinders of the VAZ 2114, thanks to which each of them at one point in time performs any of 4 strokes, namely:
- Injection of a mixture of fuel and air that fills the entire volume of the cylinder.
- Compression of the working mixture due to the upward movement of the piston.
- The combustion of the working mixture and the expansion of the resulting gases pushes the piston in the opposite direction, thereby driving the connecting rod and crankshaft.
- The release of exhaust gases from the cylinder with their further discharge into the exhaust system.
It is worth noting that on cars of different brands and even models, the engine may have a different operating diagram, but the order of operation of the VAZ 2114 injector cylinders always looks like this: 1-3-4-2. According to this diagram, the high-voltage wires should be connected.
For greater convenience, the cylinders are numbered accordingly, starting from the front cover of the engine.
I installed explosive wires with zero resistance, how did the operation of the motor change?
Many people remember from Soviet cars that their high-voltage wires had a good copper core. However, they were replaced by fashionable wires with a graphite core and silicone insulation in several layers. Many people praised these wires - they don’t tan, they don’t penetrate the insulation, the radio works without interference, and so on.
But, as they say, “the new is the well-forgotten old.” The network began to actively promote the idea of installing high-voltage wires with zero resistance.
People began to write that there was less resistance, a better spark, the car was speeding, it didn’t even smell the fuel, it just looked at it, the engine rustled, the 10-ruble coin stood on its edge and didn’t fall.
Before describing the emotions of the replacement, I suggest a little physics. In order for a spark to appear on the spark plug, it is necessary to break the distance between the electrodes. Accordingly, it is necessary to store as much energy in the ignition coil as is necessary for breakdown and to maintain the spark burning.
The resistance of the gap between the electrodes is about 60,000 kOhm, the resistance of a normal explosive wire should be about 5 kOhm, the ignition module also has an internal resistance of about 6 kOhm (on the injector) and a resistor in the distributor (resistance about 6 kOhm), if we are talking about a carburetor, also an additional resistor may be in the spark plug - this is about 5 kOhm more. Against the background of 60,000 kOhm, an additional 5-10 kOhm will not play a big role in the operation of a working ignition system. What is more important in this matter is the state of the gap at the spark plugs; it should not be too large or too small.
Moreover, I found a long time ago a study of spark plugs with and without resistors, where the manufacturer experimentally proved that fuel consumption with such spark plugs is even less, but when operating at a voltage of less than 9 volts (let’s say the generator stopped working), these spark plugs began to work a little worse.
Personally, I noticed absolutely no difference, provided that the spark plugs were A17 DVRM (with an additional resistor). The car was absolutely in good working order - a good battery, a new starter, spark plugs were changed every 20 thousand.
There was no difference when starting in winter, in the heat, in snow, in rain, and there was also no difference in fuel consumption or engine power. At first it seemed that the engine was running smoother, but this was more of a placebo effect and nothing more.
I think it’s pointless to believe in some kind of miracle, but there is an advantage.
The main advantage of such wires is their reliability and durability compared to purchased options, where the resistance variation from new can often exceed the permissible values. But a new kit lasts for two years at best (why would a manufacturer sell eternal explosive wires in a situation where there are fewer and fewer cars with a common ignition unit), while for a foreign car the kit can cost far less than 800 rubles.
DIY wires — Lada 2114, 1.6 l., 2012 on DRIVE2
The drive is full of topics with measurements of the resistance of high-voltage wires, some reaching 6 kOhm. So, closer to the point. We will need old high-voltage wires, namely the tips from them, silicone wires from ZIL 130 or GAZ 53, they have a copper core and as we know, copper does not provide resistance. We disassemble the old wires, throw them away, cut pieces from new wires and crimp them. For me, the most difficult thing was removing the silicone protection of the tips.
On the left is a Lada original part, on the right is a Zil 130
PS1) A set of ZIL 130 wires costs 750 rubles, but it’s easily enough for 2 sets, you can sell it to someone) in total, new high-voltage wires cost 350 rubles instead of 1500 rubles 2) It feels like, honestly, I don’t know, it started up better, but not much at idle it began to dangle in around 880-900 rpm, before that 860-910 despite the fact that my car has an electric pedal (E-gas) 3) There is no interference for those who will now rub me in about resistors and interference, catch the sign. For those who are not very clear on the sign fumbles - ALL CANDLES NOW COMES WITH A BUILT-IN RESISTOR
Good luck everyone !
UPD: In general, guys, error 2135 started popping up from these wires, I had to buy other high-voltage wires, so I removed them!
www.drive2.ru