Warmth in the cabin in winter is the key to the health and well-being of the driver and passengers.
Due to the complexity of the heating system design, service station technicians recommend contacting service centers for diagnostics and subsequent repair of breakdowns.
If you decide to repair it yourself, then follow the instructions.
The design of the heating system of the Daewoo Nexia
To understand the reasons for the failure of the furnace, it is important to know its design characteristics, what elements it is made of and where its “Achilles heel” is located. It is also important to know the general structure of your vehicle's heating and air conditioning system.
Daewoo Nexia heating, ventilation and air conditioning systems - all in one unit. The latter is hidden behind the dashboard.
The block contains the following elements (see diagram below):
- Electric fan drive.
- Heat exchangers for heating and air conditioning.
- Two air ducts for supplying air to the windshield deflectors and the same number of air ducts for supplying air to the left and right deflectors.
- Upper central duct.
- Mechanisms, levers, pneumatic tubes for controlling air flow distribution, temperature control damper drive.
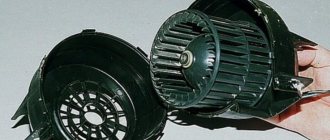
The fan drive is one of the main elements of the system, the characteristics of which are important to know (repair, replacement, etc.):
- Type - centrifugal.
- Voltage 12 V.
- Current strength - up to 20A.
- Blade height 68 mm.
- Impeller diameter 148 mm.
- Revolutions per minute - 3600.
Separately, it is worth mentioning the control panel, which contains:
- Knob for switching to operating modes 1, 2, 3, 4 fans.
- Buttons for turning on the air conditioner and air recirculation modes.
- Knobs for adjusting air temperature and air flow distribution.
Stove design defects and ways to eliminate them
Some experts believe that problems with the Daewoo Nexia stove are caused by design flaws of recognized engineers.
Whether this is true or not, we are not going to say, but here is what we found:
- The hot coolant supply hose is located at the bottom of the heater radiator, which already raises a question. In fact, in the heating system of any home, hot water is supplied from above, and as it cools, it pushes the rest of the water down. In our case, with low pressure from below (low engine speeds), hot antifreeze cannot push the already cooled antifreeze out of the radiator, and the latter, unlike the hot one, tries to go down. As a result, heat transfer slows down and the radiator does not heat up.
- Therefore, especially with strong airflow (the fan is on), the heater radiator does not have time to warm up to the normal temperature, which leads to the problem described.
Solution to the problem: swap the pipes, coordinate the supply of hot antifreeze and the outlet of cold from below. The situation will change dramatically.
Another design flaw is the presence of cracks through which cold air and low-quality plastic that folds into these cracks enter the cabin.
Those that are already structurally designed for heat removal.
Weak vacuum tube attachments: They are plastic and tend to break over time.
The water pump is not powerful enough to effectively pump antifreeze through the heater core. Many “Kulibins” install an additional electric pump on the outlet pipe, which increases the efficiency of the stove. We'll talk about this further.
Nexia
I just don’t know for reliability what is there and how it is with these particular ones. I saw the previous generation - the cars are reliable, a friend had one - no problems for several years. The only thing is that they complain about the bodies, but it takes 10 years and the roads are salty, that is, not in Astrakhan. And so - spare parts on every corner, the price of spare parts in some places is even lower than for the same Kalina. And the car itself with air conditioning, power steering, etc. very accessible. For some reason, the option with the new Nexia is more attractive to me than buying a used Japanese car for that money. Well, here the taste and color of markers are different, in short. In general, I have a goal, I still have the means
Principle of operation
Daewoo Nexia supply and exhaust ventilation system. The most effective heating of the passenger compartment occurs when the engine is warm.
There is an air intake in front of the car's windshield that, while driving, captures the air flow and directs it into the cabin through a system of drawers and vents.
The air movement pattern is shown below.
When stopped or when there is insufficient air pressure, the fan turns on.
The heating and ventilation system can operate independently of the air conditioning system. The air entering the cabin is heated by a heat exchanger (radiator).
The movement of the dampers directing the air flow is controlled by two actuators (vacuum cleaners) and a pipe system. The vacuum cleaner is designed with a rod that is attached to the shock absorber.
When changing the blowing modes on the control panel, a vacuum is created in a certain pipe, the rod is retracted, and the damper opens or closes.
In the absence of vacuum, the rod is retracted under the action of a spring. The shock absorbers are also spring loaded.
Causes of breakdowns
We list the main causes of switch failures:
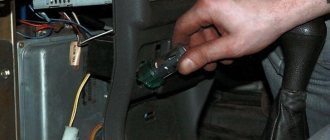
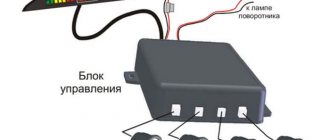
- The switch mounting is faulty. It can be found in the cabin under the dashboard on the passenger side.
- The vacuum hose came loose from the vacuum pump of the Nexia stove.
- The hose has come loose from the ventilation control unit. There are 5 such hoses in total (1 vacuum inlet from the vacuum accumulator, 3 outlets to the vacuum actuators, 1 outlet to the recirculation damper). To check, remove them by pulling them towards you. The hoses are secured with plastic clips. When changing different modes, the switch rods must move.
It is not very difficult to understand the causes of the breakdown and find the hoses.
The stove heats the air poorly
There could be several reasons for this, but first check to see if the heater is getting hot coolant.
Checking the functionality of the stove
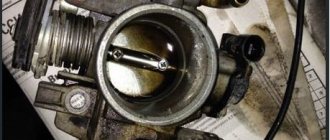
Turn on and warm up the engine. We turn on the speed mode - 2 or 3. We find two pipes (under the dashboard on the passenger side). On the right - it supplies warm antifreeze and enters the radiator from below. The one on the left is deviant, he shouldn't be as hot as the first one.
If the outlet is hot or cold, but the inlet is hot, then the radiator is clogged or there is an air lock.
Also activate the recirculation mode and make sure it is blowing hot air. In this mode it should warm up very quickly.
Airlock
A common situation after a coolant change or when the level is low. To diagnose a problem with a hot engine, feel the coolant pipes and find the cold area (relative to others).
you need to get the air out. One way is to raise the “nose” of the car so that the filler neck of the cooling system is much higher than the radiator of the stove (for example, drive it up a mountain, overpass) and let the engine idle for 5-10 minutes, periodically gasping to pump pumped antifreeze faster.
Low level of antifreeze in the system
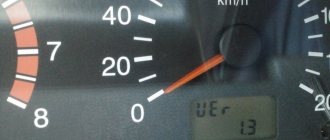
This is well determined when the stove heats well at high speeds and poorly at low speeds. At high speeds, the pump pumps enough antifreeze, but at low speeds, there is not enough coolant to heat the heater core.
The air temperature regulator damper is slightly open or fully open
The shock absorber is controlled by a cable that can stretch or jump out of the grooves. If you open it slightly, hot and cold air mixes and it becomes a little warmer.
To diagnose: Move the throttle lever, which is located in the knee area of the passenger sitting to the left of the driver. Make sure the cable is not strained or damaged and is in the correct position.
Also check the screw securing the cable cover; due to its loosening, the cover moves and there is play, which leads to incomplete closing of the damper. Slide the cover toward the interior and tighten the screw.
The heater core may also be partially or completely clogged. Read the next section for information on how to clean it.
Heater radiator
The first sign of a malfunctioning heater core is a leak from the element itself. If the heating system shows signs of leaking, it must be replaced, otherwise there will be no warm air in the cabin. It is worth understanding that replacing the stove radiator, according to factory technology, is carried out after removing the dashboard. But car enthusiasts have come up with a way in which they do not need to dismantle the tidy.
So, let's look at how to dismantle the stove radiator using minimal means:
- We drain the coolant from the system so that it does not flow into the cabin.
- From the engine compartment side, disconnect the outlet and inlet pipes.
- We remove the glove compartment.
- We rest against the heater radiator, which can only be removed from its seat.
If the procedure seems quite complicated, then you will have to dismantle the instrument panel and remove the radiator according to the factory diagram.
Blowing cold
If the stove does not work, that is, there is only cold air, then the reasons may be the following:
The damper lever (“Cold”, “Heat”) is in the wrong position
Check if you forgot to put it in the “Cold” position. If the damper is closed, the interior will be cold even with the fan on.
Heater core clogged
Rinse inside and outside (if necessary). To do this: drain 3 liters of coolant from the engine radiator (do not forget to tighten the cap on the expansion tank). Remove the hoses from the heater radiator and blow out the heater on both sides with air under a pressure of at least 3 atmospheres or rinse with clean water (first cold, then hot).
Also use a special auto chemist to flush the system or replace the entire assembly. Read here - how to flush the engine cooling system.
If the need arises to replace the lamps, here are their part numbers:
- Return line - position 96179610.
- Feed - article number 96148970.
The thermostat has failed
The heating system is designed to start working immediately after starting the engine (with the heater on). We started the car, turned on the heater, and as the engine warms up, heat will flow into the cabin.
Due to the fact that the thermostat valve is in a certain position, the antifreeze can constantly move in a large circle. The engine warm-up time increases, and the heater also turns on with a delay.
The solution is to replace the thermostat. The standard thermostat for Daewoo Nexia is 870C. Some are betting on 920C. This increases the time the coolant moves in a small circle, due to which the heater radiator will warm up better.
It’s better not to set the thermostat to 970C; the ECU will have to be reflashed.
The damper is stuck in the “Warm” position
In this case, the cable itself can pass without jamming. Remove the crankcase, which is located next to the engine (behind the radiator), and not to the side of the passenger compartment, and check how the shock absorber reacts when you try to move it using the lever.
If it is stuck and there is no time or opportunity to fix the problem, manually turn the shock absorber to the “Cool” position and secure it with a self-tapping screw. In the future, you will most likely have to change the extended cable.
Cabin filter clogged
Daewoo Nexia has a carbon cabin filter, which is highly hygroscopic.
When it is dirty, the moisture accumulated inside freezes at temperatures below zero, and the filter does not allow air to pass through. Replacing the item should help.
Checking the damper for hot and cold air
Warm up the engine and turn it off. We put the thermostat in the extreme left position (blue stripe), and then sharply move it to the extreme right position (short red stripe).
If the heater damper operates, you will hear a characteristic click (the damper is closed). If there is no cotton, check the “Cold”, “Hot” toggle switch. He must go to the end.
Otherwise, shorten the cable.
Tips for motorists
The most painful reason why the interior of a Daewoo Nexia car becomes uncomfortable in the cold season due to lack of heat is the damper with which the supply of cold or hot air is regulated. This is due to its design feature, which is that it stands in front of the heater radiator and must be raised upward to supply the entire flow of cold air to the radiator.
But if even a small play appears in the cable drive with which this damper is controlled, it will open slightly under its own weight, and through the resulting gap, even 1-2 mm in size, a sufficient amount of cold air enters, which will significantly lower the temperature of the warm air. air passing through the radiator core.
To solve this problem, it is necessary first of all to adjust the cable drive of this damper so that when the damper control handle is moved to the “warm” position, there is not a single millimeter of free play. If these actions do not lead to the desired result, then you will have to purchase a piece of rubber insulation for the entrance doors of the house and glue it to the edge of the damper, so that in the “warm” position of the damper control lever, this joint is well sealed.
Possible leakage of cold air into the interior of the Daewoo Nexia car is also possible due to the insufficiently tight fit of the heater radiator to the air duct body. This problem is eliminated by sealing these cracks with foam rubber.
Another problem leading to the failure of the interior heater of the Daewoo Nexia is the appearance of an air lock in the radiator of the “stove”. It is quite easy to check this assumption. To do this, you will have to open the hood of your car and, with the engine warmed up to operating temperature, feel with your hand the pipe supplying antifreeze to the heater radiator, and then do the same with the throttle valve heating pipe.
If it turns out that the heater core hose is significantly colder than the throttle valve hose, then we can say with confidence that there is an air lock in the heater core that is preventing the normal circulation of hot antifreeze through it. In this case, the air plug will have to be removed and the cause of air leaks into the engine cooling system will be sought.
2 comments
Good evening! I had a similar problem, they changed the pump and belts, after that the stove began to blow cold air... at 100, or rather at 3, they give the same diagnosis - the stove needs to be changed, and the problem arose due to poor quality antifreeze, allegedly due to - because they filled in old antifreeze, the radiator of the stove became clogged... The option with an air lock is rejected... Tell me who to believe and how to neutralize this problem? Thanks in advance
Anton, I agree with you that there may be an air lock. The easiest way to eliminate it is to drive onto the overpass with your face only, open the hood, go to the expansion tank and unscrew the cap (the engine is running). If the antifreeze starts to run out, add it immediately.
We recommend watching:
- Heating system VAZ 2114
- How to clean the stove on a VAZ 2114
- Scheme of the stove VAZ 2114 injector 8 valves
- Replacing a heating radiator in an apartment with your own hands
- Replacing pipes for a Priora stove without air conditioning
- VAZ 2114 stove faucet leaking
The stove does not work, 4 and other speeds do not turn on
In this case, the symptoms of a non-functioning stove are as follows:
- It's cold - we wrote about this above.
- The fan, or rather the electric motor, does not work.
- The fan turns on and off, the entire ventilation unit does not work.
- Problems in the control panel.
If there is a problem with the electric motor, the following may be possible:
- The fuse (F12 in the diagram) or the heater fan relay (K24 in the diagram below) has blown - replace the fuse and relay.
- Electricity does not reach the stove. There may be problems in the circuit before or in the unit itself, the fuse has blown, it may need to be removed.
- The electric motor is burnt out and the fan does not work at all 4 speeds. In this case, the air conditioner and circulation may not work.
Connection diagram.
Search for the problem:
- If the drive is very cold, you can temporarily run a separate wire directly from the ignition switch contact group through the fuse to the fan. In winter you will definitely drive a warm car, and in the spring you will understand everything.
- If only the 4th speed fan does not work, check the serviceability of the relay (the contacts may burn out) and replace it if necessary.
- If the first three speeds do not work, they are turned on through the resistor block R10 of the heater fan (diagram above), which is located in the air intake housing.
- If the fan periodically turns off and on, and this also happens to the entire ventilation system, pay attention to the ignition switch contact group (KG). Pin 15A powers the air conditioner and fan motor. Check the contacts in the ignition switch KG, replace if necessary. This solves the problem.
DIY diagnostics
If the fuse is intact, to check the operation of the fan you need to get to its power connector. The electric motor of the stove can be located either in the passenger compartment under the instrument panel, or in the engine compartment on the passenger compartment side behind the engine shield. You can find information about where the heater fan is located and how to get to it in your vehicle's owner's manual. There you will also find a circuit diagram for turning on the fan.
After studying the diagram, determine which pin of the connector suitable for the electric motor should receive “+” after turning on the first fan speed. Insert one of the control contacts into this pin, close the second contact to ground, turn on the ignition and turn the heater fan switch to any of the positions. If the control light comes on, then the problem is in the electric motor. If power does not arrive at the connector, you need to look for a break in the wiring in the circuit going to the heater switch.
Replacing brushes
To replace the brushes, you need to remove the impeller from the motor housing (usually held on by latches). If you were unable to find brushes from the auto parts catalog, unsolder the old brushes and select similar ones in size. If necessary, copper-graphite brushes can be filed with a file. To solder the brushes you will need a soldering iron, rosin and some solder. Before assembling the electric motor, clean the insides of wear debris from previous brushes.
If the fan, before it stopped turning on, made a squeak or excessive noise during operation, we recommend lubricating the bushings with lithol. Place a small amount of grease on the end of the bushing and heat it until it flows inside. If the fan operated silently, then lubricating the bushings is not recommended at all. The lubricant will trap dust, which over time will turn it into an abrasive paste.
We recommend watching a video that shows in some detail the process of troubleshooting the stove fan and replacing the brushes.
Only the last speed works or one of the speeds is missing
Fault in the additional resistor. The maximum rotation speed mode has what is called a direct connection, so we can conclude that the control circuit and the electric motor itself are working properly. A circuit with an additional resistor is used on most cars. But the rotation speed of the heater motor can also be controlled by a PWM signal.
Resistor check
You can check the additional resistor using a multimeter. To do this, just measure the resistance at the resistor terminals and compare the readings with the reference values for your car
Pay attention to the thermal fuse, which can burn out if there is a short circuit; there are also frequent cases of the element being unsoldered due to excessive heating of the resistor. You can find a similar resistor in a radio parts store.
The video below shows the process of servicing a non-removable stove motor. The only thing we cannot recommend is getting rid of the thermal fuse!
Automatic heater control does not work
The problem may be in the contacts of the electrical control circuit, the cabin air temperature sensor, the air damper position sensor, or in the electronic unit of the automatic heater control system (AHC).
Location of heater fuses
The electrical component is a common cause of failure of the Daewoo Nexia stove, so it is important to know where the fuses are located, which are responsible not only for its operation, but also for the operation of other systems (air conditioning and ventilation).
The unit itself is located in the lower left steering compartment and is divided into two parts: upper (front) and lower (rear).
Below are diagrams of the location of fuses and relays on both sides.
Afterword
Any motorist can not only figure out why the stove in the Daewoo Nexia does not heat up, but also correct the situation if the Nexia stove blows weakly or does not work in some directions of the hot air supply. The main thing is confidence in your abilities and strict adherence to the advice of professionals. Often the reason does not require an expensive visit to a car service center.
If you have an interesting experience in solving a problem with the stove in a Daewoo car, write to us! We will be happy to share your story and believe me, there will be many grateful readers! And don't forget to subscribe to our newsletter!
The Daewoo Nexia stove works, but does not direct air to the legs
If, when the stove is operating and the corresponding mode is activated on the panel, the air is not directed to the legs or its flow is very weak, first of all check the tightness of the casing.
We seal all the cracks
Again, the disadvantage of the design of the Daewoo Nexia heating system is that there are many cracks through which cold air passes or hot air does not go there; the code is needed due to the weak deflection of the plastic.
The image below shows that when there is a strong air flow, the plastic bends, cracks form, and hot air rises up instead of into the legs.
The problem is solved by eliminating empty spaces: using screws, gaskets and double-sided tape. Make sure there are no gaps.
Vacuum actuators are faulty
Next, pay attention to the vacuum actuators (there are two of them), with the help of which (using levers and a pipe system) three dampers for the direction of air flow are adjusted: blowing glass, legs, face.
Switching is done on the instrument panel.
The vacuum tubes may be faulty. To check this, take them apart. This is easy to do: pull them out of the holder and expand the rod that is attached to the valve. Disconnect the hose.
Then push the rod in and pinch the inlet with your finger. If the rod does not return to its original position, the vacuum cleaner is in good condition; if it returns, it is faulty (the diaphragm is torn) and must be replaced.
Properly connected connections are also important as each one plays a different role.
There are situations after purchasing a Daewoo Nexia on the secondary market, when, for example, a black tube gets confused with a black and orange stripe, and so on, which leads to an incorrect reaction of the shock absorbers (the “Legs” mode is on, but hits the face and vice versa).
Below is a diagram of the connections of the vacuum tubes and what function each of the injectors performs.
It is also important to know how the system works when one mode or another is activated.
Blowing on your feet:
- A vacuum is created in the tube with red stripes; the orange one is not used. The stem of the "Head" vacuum cleaner (see photo above) is dented, blocking air flow to the face.
- A vacuum is created in the tube with the blue stripe. The glass/legs vacuum cleaner rod is fully extended: 100% of the hot air goes to the legs and is blocked on the glass.
Hit to the face:
- The vacuum cleaner's stem, which is supposed to blow through the head, is fully extended while the vacuum cleaner is powered through a black tube with orange stripes and a tube with red stripes is not used.
- Vacuum tank "Glass/legs". The blue stripe port is not used. The rod is completely pushed out under the action of the spring - 100% of impacts on the glass.
Blows on the face and feet:
- A vacuum is created in tubes with orange and red stripes. The “HEAD” actuator rod is extended halfway. There is a uniform tightening of the face and legs.
- A vacuum is created in the tube with the blue stripe. Extended drive glass/leg. Only the legs were jumping.
Open the hood. Find the pneumatic chamber, which is located near the cabin filter, and check the condition of the two pipes:
- Black and white goes from the pneumatic chamber to the control unit (the vacuum is removed from it and can jump under the hood or into the connection area to the control panel).
- The clear yellow color is from the intake manifold.
Next, we check the fastening of the vacuum tubes; they often break - this is again a design flaw of the engineers.
If the shock absorbers open normally, the reaction force on the rods is moderate, and the load on the fasteners is acceptable so that they do not break.
But over time and with frequent use of blowing modes, the opposition of powerful shock absorber springs to the rod and support leads to the fact that the latter loses its rigidity and does not hold the vacuum cleaner. He's flying.
Also, for some reason, the damper may become jammed and difficult to move, or may not close completely (debris has gotten into it). In this situation, when the rod moves, the reaction force on it increases, and accordingly on the fastener.
In the best case, the vacuum cleaner will jump out of its normal position, but often the holder breaks, the rod tilts and cannot open the damper.
Therefore, many Daewoo Nexia owners improve the actuator mounting design by making it metal and securing it with bogs.
Below is a solution to the problem.
In the event that the mount begins to bend strongly when switching modes, some car owners get out of the situation by drilling an elliptical hole at the point where the shock absorber axis enters the rod in the direction of movement of the shock absorber. There is play on the rod, thereby reducing the load on the support itself and bending less.
Problem in the control unit
The vacuum tubes are connected to a special device in the control unit through which the vacuum is redirected.
If there is a hissing sound, the problem may be poor opening and closing of the shock absorbers.
You will have to remove the control unit (how to do this will be discussed later).
After removing the drive, you must remove the drive cover as shown below.
To do this, unscrew the screw - carefully, the lid is spring-loaded.
We also see an elastic one, which is offset relative to the axis: this is the “problem”. It must be clearly not in the center of the axis.
Carefully peel it off, apply glue and fix it again (there is a special groove that will not allow you to make mistakes during installation).
It is best to use glue that does not dry quickly. Glues like “Secondo”, “Superglue” and so on are not suitable in our case, since it is very important to center the rubber, and this is unlikely to happen right away. Incorrect fastening of the elastic band and replacement of the entire unit, since it is not sold separately. Or you will have to look for such a block to disassemble.
Diodization #2 — Engine compartment — Daewoo Nexia, 1.6 l., 2008 on DRIVE2
Good day to Drive2 residents! Not long ago, after reading one of the posts of the respected vit95, I asked myself, why can’t I do this? I can do everything, I just need time (hehe...) Because at night I’m tired of standing over the hood with a phone in my teeth... And here they are again on the table, diode strip (the most ordinary, white) and wires (just a little) , and naturally the best friend of a novice “electrician” (*sarcasm*) is a soldering iron
The plan was to hook it up to the limit switch and pass the wires through the switch, like with the trunk, but somehow it didn’t work out, so I only hooked it up to the limit switch for 10 minutes, and the material was ready. It's freezing outside, so we couldn't do without a hairdryer. Hop-hop, and the tape is in its place
Blue wires are beautiful
For reliability, I glued the tape with liquid nails (I think that’s what it’s called), and the wires to the hood so that they wouldn’t dangle. Due to the specific nature of the hood closure, the tape will not stay in place for long. Night came, the mafia woke up, the fun began
The result fully met expectations
Still, I glued the tape a little unevenly, but oh well, God be with it
Just an angel with a glowing halo
In general, the tape illuminates very well, when you open the hood it turns on automatically, when you close it the Paradox also turns off, but when you open the trunk, the hood lighting also lights up (O_O), but these are minor things. So I can confidently advise you to do the same, you won’t regret it
www.drive2.ru
Removing the control unit
To clear the checkbox, do the following:
- Remove the decorative panel around the entire control unit. Attached with clips in a circle. Gently pry up the perimeter with a thin screwdriver or credit card.
- Using a screwdriver, pry and disconnect the control unit from the top and bottom and pull it towards you half a centimeter.
- Disconnect the cable from the unit. It is located in the front passenger's left leg area. To do this you will need a Phillips screwdriver. We unscrew the screw and move the cable to the right.
- Disconnect the cable lock by unplugging the connector as shown below.
- We pull out the block even more and disconnect another block with the wires.
- We pull out the lock along with the cable, while the vacuum redistribution unit through the pipes may remain in place or you will have to turn it off by pressing two latches
- To remove the entire panel, remove the plastic tab on the back as shown below.
Now you can work with the unit itself: disassemble, repair or replace.
Adjusting the heater dampers
To adjust the stove fins:
- Remove the control unit completely.
- Go to the radiator.
- Without touching the wiring, unscrew the three radiator mounting bolts using ratchet 7 and slide it down.
- When you reach the flapper, rotate it all the way to different positions and check the clearances. If there are any, use a caulk or other method to get rid of them.
- Adjust the air cable by tightening or loosening it.
Modification of the stove to improve its efficiency
The essence of the overhaul is to minimize heat loss from antifreeze. To do this, we start the coolant according to a scheme that involves excluding the expansion tank from it. These return lines must be connected directly to the fill pipe. This is done through a tee.
Procedure:
- We cut off the return pipe at a distance of 5-6 cm from the expansion barrel (RB.
- From the RB side, connect the pipe using a bolt and a clamp.
- At a distance of 6-8 cm from the RB, we cut the inlet pipe, remove 4-5 cm and cut it again, thereby shortening it.
- We connect the freshly cut pipe to the tee on both sides and connect the return to the third.
The advantage of this design is that:
- Antifreeze starts up again with minimal temperature loss.
- No bubbles form in the expansion cylinder (many are to blame for the occurrence of air locks).
- It is easier to remove air from the system.
At the same time, the ability to monitor the coolant level is not lost, and the RB valve cover continues to perform its functions of monitoring pressure in the system.
Serious faults
Nexia is a pretty reliable car, but sooner or later its strength may disappear, for example, with a broken timing belt.
The Nexia may not start due to a broken belt, in which case prepare money for a major engine overhaul. Nexia may not start due to low compression in the cylinders. This happens with fairly long runs over 250 thousand kilometers. Also, a burnt valve can be the reason why you won’t start the car.
There is a method that will show you with 99 percent accuracy that your engine is already “tired” due to which the compression has decreased or one of the valves has burned out.
Unscrew the spark plugs and use a syringe to add 250 milliliters of engine oil to each cylinder. Screw the spark plugs back in and try to start the car. If everything works out, then the problem is the wear of the piston rings and a lot of wear in the cylinders.
If the method was not successful, then it seems that one of the valves has burned out.
An even more serious problem is that the engine was overheated. After overheating, the head moves to the side, which makes proper operation and starting difficult.