Print this article Font size 16
Many people replace the input shaft bearing themselves, without the help of specialists from a service station. To perform such work, you need to know the location of the element you are looking for and the signs of its malfunction. Plus we will tell you in detail how you can understand this bearing.
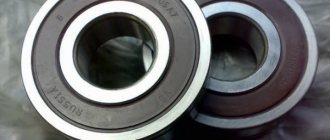
Element appearance
Location
Since we are talking about the VAZ 2114, we will first determine the location of the element.
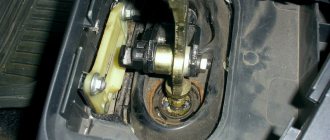
On the fourteenth, the primary bearing is located on the shaft behind the oil seal.
It is noticeable that on some boxes this bearing additionally plays the role of an oil seal, taking on the load together with the release bearing.
To get to the damaged gearbox component, you will have to remove the gearbox. Quick replacement of the VAZ gearbox input shaft bearing. When choosing a new element, be sure to check the advice from the operation department of your VAZ 2114 regarding the overall dimensions of the component.
REPLACING THE INPUT SHAFT SEAL
To replace the gearbox seals, especially the input shaft, the gearbox must be removed from the engine. Having removed the gearbox, carefully inspect the installation locations of the cuffs. And first of all, you need to dismantle the release bearing and remove its guide. Under it you will find the input shaft oil seal.
To remove the seals we need a flat-head screwdriver. By prying it from the inside, you can remove the cuff from its seat. The input shaft oil seal has dimensions 25x45x9. Catalog number 2110-2301043Р. It is better to install it with sealant. The outer race of the oil seal must first be degreased, and then a thin layer of sealant must be applied.
When installing, you must ensure that the inner race of the oil seal does not turn outward and the cuff spring does not jump out of its place. We install it in its place and carefully, using a pipe, lightly tapping, hammer the cuff into place. In this case, it is necessary to ensure that the plane of the input shaft oil seal lies exactly in relation to its seat.
Then we install the release bearing guide in place. It is secured with three bolts, which should be tightened evenly so that it fits into place without distortion.
Next, we immediately install the release bearing. When installing it, you must immediately put on the wire springs, which are placed on the legs of the release bearing and fix it in place.
Now it's time for the drive seals. There are two of these seals, the left one is red and the right one is black. They also differ in the direction of rotation. This direction is shown by arrows on the seal housing. These arrows are located on the inside of the oil seals, on the right oil seal the arrow points to the left, and on the left oil seal the arrow points to the right. This can also be determined by the oil removal notches applied to the inside of the cuff.
Signs of failure
All bearings, of which there are many in a car, have approximately the same signs of failure. But since you understand the location of the input shaft bearing , finding that problems appeared specifically with it will not be so difficult.
There are several corresponding signs of its failure.
Sign
Peculiarities
Howling when the clutch is released in a parking lot
The element has failed and needs to be replaced. The howling is usually caused by the formation of chips, cracks, or the destruction of 1-2 rollers
Whistle when driving
The bearing is partially damaged or there is no lubrication. In the absence of lubrication, the problem can only be found by dismantling and visual inspection. Replacing the bearing of the input shaft of the VAZ classic gearbox without disassembling the photo of the VAZ-2114 tuning. To solve the problem, sometimes it’s quite simple to lubricate the element and return it to its place
The clutch does not engage or does not disengage
Most likely the bearing is stuck. If the damage is severe, the input shaft
Knock in the area where the element is located
The bearing knocks only when the part is completely destroyed. If the replacement is not carried out in time, the bearing will be welded to the shaft, so you will also have to replace the shaft itself
If you notice the first signs of a malfunction of the input shaft bearing on your gearbox, you should immediately check the condition of the element and, if necessary, replace it.
How to replace the input shaft bearing of a VAZ 2115
How to get rid of bearing noise and what brand of bearing to install?
Don’t get into a working car, the car is fresh and there’s no point in getting into the box because of this, you can’t do anything better, but it can be worse.
I confirm the advice, don’t interfere, you can’t do better, but you’ll get screwed, and then you won’t be happy.
+1 to not halving the box because of this. Besides, perhaps it was a squeeze. So change the clutch and ride on.
And if it’s been making noise for 5 years, how long can you keep driving like this? It's been growling a little lately
Batman_1976
Before the car is sold, you can drive, but the clutch can growl.
It is better to fill in good oil and do it as early as possible. Ideally, after purchasing, drive 1000 km, if it’s not winter outside, and change it!
Does not help. Oil will not save you from chronic illness. If it is noisy, then only replacement will help. I had an experience when a car (8) went about 200 thousand without changing the gearbox oil and the bearing did not make any noise. Engine oil was added at the factory. And now the Castrol transmission has been noisy since new
Source
Dismantling the gearbox VAZ 2108-2114
Thank you very much for watching my videos, tell your friends, leave comments and subscribe.
To do the work yourself, follow the instructions.
- You can often come across advice about the need to completely disassemble the box to replace the bearing. But this is not necessary. It is possible to do without such complex manipulations.
- The box will have to be removed in any case, so familiarize yourself with this procedure.
- Before removing the gearbox, remove the negative terminal from the car battery.
- All the chips are removed from the box, the wire from the speedometer is turned out.
- Next, the trousers of the car exhaust system are dismantled.
- After which you can completely remove the box.
- The next step is to dismantle the bell. You can try to do without it, but then it will definitely constantly interfere with your work.
- Carefully clean the box of accumulated dirt.
- The bearing is secured using retaining rings. Replacing the bearing of the primary and secondary shaft on a VAZ gearbox. Replacing the VAZ 2109 input shaft bearing. To dismantle them, you will need a flat-head screwdriver.
- The rings pry open and loosen a little, after that there will be no more problems with removal.
- To make it more convenient, arm yourself with tweezers that can be used to remove the ring.
- Using a flat screwdriver, pry the bearing by the ring groove, and immediately move the input shaft a little forward.
- Insert a pry bar between the box and the bearing. It’s unlikely that you can do this without an assistant.
- You will use tools, while your friend will hold the pry bar.
- Your main task is to press out the bearing. To do this, clear, strong, but very careful blows are applied to the input shaft.
- In the process of striking, the shaft certainly rotates.
- This work will take you about 20 minutes. Replacing the input shaft bearing on a VAZ model VAZ 2114 involved dismantling the gearbox. But if you have a special puller at your disposal, you can speed up the work. Although working with a puller is really only comfortable in this case, if you decide to disassemble the box.
- Before installing a new input shaft bearing, be sure to lubricate the element with regular engine oil.
- Carefully press the component into place, driving it into place with careful, light blows with a hammer. It is better to use a pipe across the diameter or a stand.
- When pressing, apply blows to the inner race, in a circle, very moderately.
- Once the bearing is pressed in, make sure it is seated properly. Disassembly of the VAZ 2108-2114 gearbox, hum of the bearing of the input shaft of the VAZ-2112 gearbox, replacement. Scrolling should be measured, without obstacles.
- Assemble the box in reverse order and install it on the car.
Accommodation at the checkpoint
REMOVAL AND REPAIR
Almost any DIY repair of a VAZ 2114 gearbox - installing new bearings, clutch or gears - involves removing it. To do this, you will need screwdrivers, a set of wrenches, WD-40 and hanging equipment to lift the unit.
Read also: Bypass valve what is it
Let's figure out how to remove the gearbox of the fourteenth:
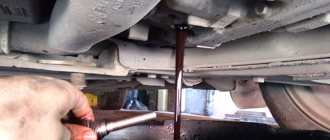
- We drive the car onto an overpass or into a garage with a pit. First of all, we disconnect and remove the battery, then drain the oil from the gearbox and remove the starter. To do this, you need to disconnect the power wires from it, remove the protective jacket, unscrew the two fixing nuts from the bottom (from the pit) and one from the top of the starter;
- Now you need to remove the connecting cable from the clutch release fork and remove it from the bracket on the gearbox;
- Disconnect the wiring to the speed sensor. The wire block is secured by a spring, which must be compressed to disconnect the connection;
- We climb under the fourteenth and disconnect the wiring from the reverse sensor;
- We tighten the bolts with which the jet thrust bracket is attached to the unit body;
- We remove jet thrust. To do this, you need to loosen the clamp connected to the rod and move it back, which will make it possible to remove it from the hinge;
- Now you need to dismantle the wheel drives: remove the left one completely, and simply unscrew the right one, move it to the side and hang it on the car body;
- We unscrew the bolts from the ball joint (left) that secure it to the steering knuckle;
- We dismantle the gearbox mount to the engine on the lower right side; to do this you need to remove the supporting brackets from the stud;
- Remove the clutch housing cover (it is secured with 3 bolts);
- Unscrew the bolt on the lower left gearbox mount;
- Unscrew the nuts that secure the left and rear engine mount;
- Now we remove the fixing bolts with which the gearbox is attached to the rear engine support. We dismantle the support itself;
- Using a screwdriver as a lever, insert it into the hole between the engine cylinder block and the clutch housing, and move the gearbox off the guides as far back as possible. The rear part of the box body should pass on top of the suspension extension, and the input shaft will be disconnected from the clutch, after which the unit can be removed from under the car.
Now you know how to remove the VAZ 2114 gearbox. Good luck with your driving without any breakdowns!
Review from a car owner named Abdullah: Engine, gearbox, visibility, high seating position, trunk, cost, battery
Category: Car repair
Vehicle characteristics: The vehicle dimensions are as follows: body length - 3729, width - 1100, height - 1209 mm. The wheelbase is 2550 mm. Ground clearance 174 mm. The car is equipped with a hybrid power unit. The 2-cylinder engine is equipped with a system that provides engine power output. There are 4 valves per cylinder. The diameter of one cylinder is 75 mm, the piston stroke is 77 mm. The engine crankshaft accelerates to 4000 rpm. Maximum torque is maintained up to 2000 rpm.
Posted by admin: at the request of Eremey
Original name: . . . . VAZ 2114. . ?? .
Release date: 02/30/2022
Laughter on topic: - Dad, tell me... wife this is for a long time... Father with a sigh: “For life, son!” So is she... even worse than school?
Hello everyone, The problem is the following. The bearings in the gearbox of the VAZ 2114 - car 2113 were noisy. I replaced two bearings on the 305th without removing the box, assembled everything in order. For a couple of days, literally 140-160 km per hour, I have to squeeze it out))) In general, the same problem again. You squeeze the clutch, silence, let go, it makes noise. Who can use any additives? Any advice? How many bearings are there in the VAZ 2114 gearbox?
- What is needed to replace the input shaft bearing of a VAZ car?
- When is it necessary to replace the input shaft?
- Causes of wear on the input shaft bearing
- How to replace a bearing
- Removing the gearbox
- Where is the bearing located and how to remove it
- Rules for installing a new input shaft bearing
Sooner or later, every car owner will have to face a problem when it is urgent to replace the gearbox input shaft bearing. And certain signs will indicate a bearing malfunction. It is about them, as well as about the causes of wear, and how to change a worn input shaft bearing that we will talk about today.
Read also: Mounting the front shock absorber Niva 2121
When is it necessary to replace the input shaft?
Certain signs of malfunction indicate that it is time to replace the secondary shaft bearing :
- Extraneous noise or whistling when the engine is running in neutral gear, which changes with increasing speed.
- The knock of the gearbox while the car is moving, and this knock is heard in any gear.
- Transmissions may turn on or off spontaneously.
- If the bearing is jammed, the clutch will not engage or disengage.
Causes of wear on the input shaft bearing
Bearing wear can be influenced by various factors:
- Poor initial bearing quality. When purchasing it, you should be picky in order to provide your car with a normal part.
- Driving style. When you drive too aggressively and tear the lever, the bearing will definitely not last long.
- Vehicle operating conditions. Garage storage and the absence of continuous overloads of the car can prolong the normal operation of all its components.
- Ignoring regular maintenance.
How to replace a bearing
It is possible to replace the old input shaft support bearing with a new one yourself without serious skills or special tools or devices. Replacing the bearing is done without disassembling the gearbox, but you still have to remove it.
Removing the gearbox
Removing the gearbox is best done in an inspection pit or on a lifting structure, and for this you will need the following tools: a set of wrenches, a screwdriver, and a pry bar. The process of removing the gearbox is as follows:
- Disconnect, or better yet, remove the battery.
- Engage neutral, disengage the handbrake, raise and remove the rear axle.
- Unscrew the bolts securing the cardan and the gearbox flange, and disconnect the cardan.
- Unscrew the bolts and remove the exhaust manifold exhaust pipe.
- Disconnect the oxygen sensor.
- Remove the starter.
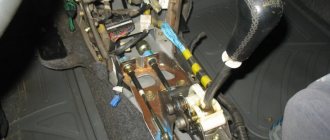
- Inside the car, remove the console and gear lever knob.
- Remove the gearbox protection.
- Unscrew the clamp that connects the catalyst and the exhaust pipe.
- Remove the clutch slave cylinder.
- Unscrew the speedometer cable, remove the boot, and the reverse speed sensor wire.
- Remove the driveshaft.
- Unscrew the traverse while holding the gearbox.
- Unscrew and pull out the gearbox.
Where is the bearing located and how to remove it
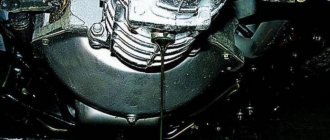
On VAZ cars, the bearing is located on the secondary shaft behind the oil seal. Remove the bell and retaining rings from the dismantled gearbox; there is no need to disassemble it further. To remove the bearing itself you need to:
1. Using a strong screwdriver (serious efforts will be required, therefore the screwdriver must be powerful so as not to break) hook the bearing by the ring groove.
2. Push the transmission input shaft forward, using the shaft bearing as support.
3. Slowly pull the bearing off the input shaft by tapping it with a hammer. The process of knocking out the bearing can take from five minutes to half an hour.
Rules for installing a new input shaft bearing
The new bearing is installed on the input shaft by pressing. It is pressed in using a light hammer. It is necessary to apply them carefully and evenly on the inner ring of the bearing, while pulling the input shaft forward. After replacing the input shaft bearing has been successfully completed, you need to reinstall the gearbox, and this is done in reverse order.
Subscribe to our feeds on social networks such as Facebook, Vkontakte, Instagram, Twitter and Telegram: all the most interesting automotive events collected in one place.
Many people replace the input shaft bearing themselves, without the help of specialists from a service station. To perform such work, you need to know the location of the element you are looking for and the signs of its malfunction. Plus we will tell you in detail how you can understand this bearing.
Element appearance
Lubrication issue
Many people do similar work without the help of others, and quite well. But their main mistake is that the bearing does not always need to be replaced. From time to time, just lubrication is enough.
- Check the bearing for dryness. Dismantling the VAZ 2108-2114 gearbox, replacing the bearing of the primary and secondary shaft with the VAZ gearbox. Quick replacement of the input shaft bearing of a VAZ gearbox, how to replace a VAZ-2114. Replacing the input shaft bearing on a VAZ 2114. Replacing the input shaft. The gearbox is removed. There is no lubricant on it, as well as visible damage, then all extraneous sounds can be caused specifically by a lack of lubricant;
- Treat the element with high quality lubricant. Regular motor oil is often used;
- Reinstall the old, greased bearing.
When do you need to change the gearbox input shaft bearing?
Replacing the input shaft bearing on a VAZ 2110
Surely, many car enthusiasts are asking the question “when do you need to change bearings?” In fact, there is no definite answer, since the resource of this mechanism directly depends on:
- bearing quality;
- vehicle operating conditions;
- driving style;
- regularity of technical inspection.
Typically, problems that occur due to a worn bearing are detected during the next technical inspection. Diagnostics of the gearbox can be carried out in specialized technical centers, and it becomes possible to evaluate the resource of the components of the unit that remains. The same applies to PV bearings. In certain situations, you can get by with simply lubricating the bearing. Such measures will help normalize operation and eliminate noise in the gearbox. When undergoing vehicle maintenance, experts strongly recommend doing a clutch diagnostic (see: Repairing the VAZ 2110 clutch - we do it ourselves).
Location
Since we are talking about the VAZ 2114, the first thing we will do is determine the location of the element.
On the fourteenth, the primary bearing is located on the shaft behind the oil seal.
It is noteworthy that on some gearboxes this bearing additionally plays the role of an oil seal, taking on the load together with the release bearing.
To get to the damaged transmission component, you will have to remove the transmission. When choosing a new element, be sure to check the recommendations from the instruction manual for your VAZ 2114 regarding the overall dimensions of the component.
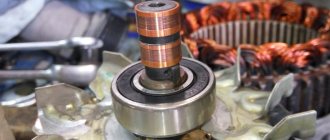
Which wheel bearing to choose for replacement
The front wheel bearing is of both domestic and foreign production. As they say, there will be something to find for such a car. But it’s better not to buy Chinese spare parts to replace the front wheel bearing on a VAZ 2114. They are inexpensive, but hence the quality is not very good, and you won’t go far with them.
Which wheel bearing to choose for replacement
It is better to pay attention to imported spare parts, especially from Europe. Although they are more expensive, their quality speaks for itself. When purchasing, be careful not to confuse them with Chinese counterfeits, there are many of them now.
It is also worth looking at domestic manufacturers, such as those from Vologda or Samara. Excellent quality at a reasonable price. They also include instructions for installing the bearing, which makes the task even easier.
How to buy original bearings
In order to distinguish an original bearing from a fake, look at the box; it must have proper presentation. The rotation of the bearing is tight, but the fake bearing rotates very easily, no effort is required. The inner holder of the original has all the necessary numbers and inscriptions. But on fakes they are located both inside and outside. The differences between them are minimal, there may be a different brightness of color on the bearing, or a slight difference in shape.
- Wheel bolt wrench;
- Two jacks;
- Car stands;
- Power wrench;
- Thirteen two head;
- Wheel chocks;
- Open-end wrench for ten, seventeen (2 pieces), nineteen;
- Ratchet driver;
- Socket head for eight, thirteen, fifteen, seventeen, nineteen;
- Head with E12 profile;
- Extension;
- Phillips and slotted screwdrivers;
- Penetrating lubricant;
- Hammer;
- Extension;
- Oil collection container;
- Lithium grease.
- Place wheel chocks and loosen the wheel nuts on the right and left. Thirty-two head nuts.
- Loosen the wheel bolts, jack up and remove the front wheels. After removing the wheels, place stands under the sills and lower the car on them.
- Loosen the fastening nut and remove the negative terminal of the battery.
- Remove the air filter housing. To remove, unscrew the two bolts securing the front panel, disconnect the power connector for the mass air flow sensor and loosen the clamp securing the pipe to the body. Next, remove the pipe fitting to the filter housing and then lift the housing and disconnect the air intake pipe. After completing the procedures described above, the case no longer holds anything, remove it. The mounting bolts are for a thirteen head, and the clamp is for a Phillips screwdriver.
Apply penetrating lubricant, loosen the clutch cable to the box and remove it from the bracket. In order to loosen you need two seventeen keys.
Remove the clutch cable from the fork and place it to the side.
Remove the small terminal from the starter and unscrew the nut securing the positive wire. Head nut for thirteen.
Unscrew the ignition coil bracket mounting bolt. Thirteen head bolt.
Unscrew the upper starter mounting nut. Fifteen head nut.
Unscrew the two upper bolts securing the box to the engine. Nineteen head bolts. The location of the first bolt is in the photo below, and the second bolt is located under the thermostat.
Signs of failure
All bearings, of which there are quite a few in a car, have approximately the same signs of failure. But since you know the location of the input shaft bearing, it will not be so difficult to determine that the problem arose with it.
There are several characteristic signs of its breakdown.
Sign
Peculiarities
Howling when the clutch is released in a parking lot
The element has failed and needs to be replaced. The howling is usually caused by the formation of chips, cracks, or the destruction of 1-2 rollers
Whistle when driving
The bearing is partially damaged or there is no lubrication. The problem in the absence of lubrication can only be determined by dismantling and visual inspection. To solve the problem, sometimes it is enough to simply lubricate the element and return it to its place
Clutch won't engage or disengage
Most likely the bearing is stuck. If the damage is serious, the input shaft may need to be replaced.
Knock in the area where the element is located
The bearing knocks only when the part is completely destroyed. If you do not replace it in time, the bearing will be welded to the shaft, so you will also have to replace the shaft itself
If you notice the first signs of a malfunction of the input shaft bearing on your gearbox, you should immediately check the condition of the element and, if necessary, replace it.
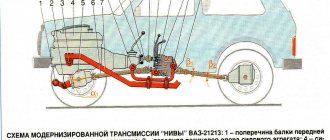
Transmission device diagram
The gearbox mechanism is a system of parts that has an independent structure and characteristic features determined by the model. Before you begin repairing the gearbox, you must familiarize yourself with the diagram of the transmission mechanism in the operating manual. The diagram contains the names of the parts and the structure of the relationship.
Transmission device: 1 - input shaft; 2 - secondary shaft; 3 — rod for shifting the third and fourth gears; 4 — fork for shifting third and fourth gears; 5 — differential; 6 — fork for switching first and second gears; 7 — fork rod for shifting first and second gears; 8 — gear shift rod; 9 — fifth gear shift fork rod; 10 — gear shift mechanism; 11 — reverse intermediate gear; 12 — clutch housing
Knowledge of the structure of the structure reduces the time spent on identifying mounting fasteners and dismantling components.
Dismantling
You will need help to complete the next steps. To press out the required part, you need to insert a pry bar between the bearing and the gearbox. One person should hold the pry bar and the other should strike the input shaft. The blows must be precise and strong, and in the process of applying them the shaft must be rotated. It may take more than a quarter of an hour to complete the job.
A special puller will allow you to avoid such a complex procedure. But in order to use this device, you will need to dismantle and completely disassemble the gearbox.