For ease of work, it is recommended to remove the radiator of the cooling system (see “Radiator - removal and installation”).
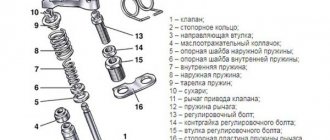
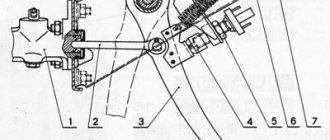
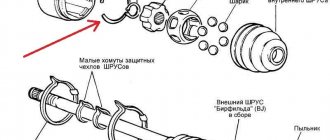
Parts of the gas distribution mechanism drive: 1 - crankshaft sprocket (2101-1005030); 2 — chain limit pin (2101-1006050); 3 — tensioner shoe (2101-100609010); 4 — chain tensioner (21011006060); 5 — camshaft sprocket (2101-1006020); 6 — chain damper (2101-1006100); 7 — sprocket drive of the roller of auxiliary units (2101-1006020); 8 - chain (2101-1006040)
1. We prepare the car for work (see “Preparing the car for maintenance and repair”).
2. Remove the cooling system fan impeller (see “Coolant pump - removal and installation”.
3. Remove the generator belt (see “Generator drive belt - tension adjustment and replacement”).
4. Remove the cylinder head cover (see “Cylinder head cover gasket - replacement”).
5. Align the mark on the camshaft sprocket with the protrusion on the bearing housing (see “Gap between valve levers and camshaft cams - adjustment”).
6. Remove the crankshaft pulley (see “Front crankshaft oil seal - replacement”).
7. Using a chisel, bend the petal of the lock washer on the camshaft sprocket mounting bolt and unscrew the bolt (see “Camshaft and valve levers - replacement”).
10 mm socket wrench
Using an extension, unscrew the three bolts securing the crankcase to the camshaft drive cover and loosen the two bolts adjacent to them.
9. Using the same tool, unscrew the three nuts and six bolts securing the camshaft drive cover to the cylinder block.
10. Tap the cover with a soft-faced hammer to better separate it from the gasket.
11. Remove the camshaft drive cover and the sealing gasket. If traces of the gasket remain on the surfaces of the cover or block, carefully remove them with a knife or other suitable tool.
12. We mark the relative position of the auxiliary roller drive sprocket relative to the cylinder block. This will avoid reinstalling the ignition distributor.
A are made on the crankshaft sprocket and cylinder block
, when combined, the pistons of the 1st and 4th cylinders are at top dead center (TDC).
13. Remove the sprocket and chain from the camshaft (see “Camshaft and valve levers - replacement”).
14. Remove the timing chain tensioner (see “Timing chain tensioner - replacement”).
15. Using a chisel, bend the petal of the lock washer on the bolt securing the auxiliary shaft drive sprocket.
17 mm socket wrench
Unscrew the sprocket mounting bolt. We remove the star.
17. 10 mm
unscrew the limiting pin and remove the timing chain.
When replacing a chain, it is recommended to replace the sprockets and tensioner shoe.
18. To remove the tensioner shoe using a 17 mm
unscrew the bolt securing the shoe.
19. Remove the bolt from the hole in the cylinder block and remove the tensioner shoe.
20. Using a puller, press the sprocket from the toe of the crankshaft.
21. Check the condition of the chain links. The rollers should not have chips, cracks or other mechanical damage.
1. Install the sprocket on the toe of the crankshaft.
2. Check the alignment of the marks on the cylinder block and the crankshaft sprocket.
3. Lubricate the new chain with engine oil and place it on the crankshaft sprocket.
4. Install the chain limit pin.
5. Install the sprocket with the chain on the auxiliary drive shaft according to the previously applied marks, tensioning the drive branch of the chain.
6. While holding the sprocket from rotating, without tightening it, tighten the fastening bolt.
7. We hook the chain with a wire hook and lift it to the camshaft.
8. We put the chain on the camshaft sprocket, and the sprocket on the shaft, ensuring that the marks match.
9. Without tightening, tighten the bolt securing the camshaft sprocket.
10. “Charge” the chain tensioner and, having installed it in its original place, “discharge” (see “Timing chain tensioner - replacement”).
11. Engage neutral gear and turn the crankshaft two or three turns, paying attention to the coincidence of the marks. Otherwise, repeat the installation of the chain.
12. If the marks coincide, engage first gear, tighten the sprocket mounting bolts and lock them by bending the petals of the lock washers.
13. Tighten the tensioner cap nut (see “Timing chain tensioner - replacement”).
14. Installation of all removed parts is carried out in reverse order.
VAZ 2107 TIMING CHAIN DRIVE - DESCRIPTION
The VAZ 2107 timing chain transmission has a long service life, but someday it’s time to replace it. The need for this arises as a result of stretching of the links, when the chain tensioner can no longer cope with the functions assigned to it. In addition, the parts responsible for the normal operation of the timing drive also wear out over time.
The main elements of the VAZ 2107 timing drive are a chain, a damper, a shoe, a tensioner and sprockets
SOOTHER
In the chain drive of the VAZ 2107 gas distribution mechanism, a damper is used to dampen jerks and vibrations of the chain. Without this part, as the vibration amplitude increases, the chain may fly off the gears or break completely. A chain transmission break is most likely at maximum crankshaft speed, which happens instantly. At the moment of a break, the intake and exhaust valves fail. After such damage, the engine will at best require a major overhaul.
The chain damper is designed to dampen vibrations of the chain drive during engine operation.
By its design, the damper is a plate made of high-carbon steel with two holes for fastening. Another element that is simultaneously responsible for calming and tensioning the chain is the shoe. Its rubbing surface is made of high-strength polymer material.
The tensioner shoe provides chain tension, eliminating sagging
TENSIONER
Based on the name, you can understand that the device is designed to prevent sagging of the timing chain while the engine is running. There are several types of such mechanisms:
- automatic;
- mechanical;
- hydraulic.
Automatic tensioners appeared not so long ago, but have already managed to show their positive and negative sides. The main advantage of the product is that there is no need to periodically adjust the chain tension, since the mechanism keeps it constantly taut. The disadvantages of the auto tensioner include quick failure, high cost, and poor tension, as evidenced by reviews from some car owners.
Hydraulic tensioners operate as a result of the action of oil under pressure, which is supplied from the engine lubrication system. This design does not require intervention from the driver in terms of adjusting the chain drive, but the mechanism can sometimes jam, which negates all its advantages.
The most common tensioner is mechanical. However, it has a significant drawback: the product becomes clogged with small particles, as a result of which the plunger jams and the mechanism is unable to perform its functions during tension adjustment.
The tensioner provides chain tension and allows for adjustments when needed.
CHAIN
The timing chain in the VAZ 2107 engine is designed to connect the crankshaft and camshaft: they have gears on which the chain is put. After starting the power unit, synchronous rotation of the indicated shafts is ensured through a chain transmission. If synchronization is disrupted for any reason, the timing mechanism malfunctions, resulting in the stable operation of the engine being disrupted. In such a situation, power failures, deterioration in dynamics, and increased fuel consumption are observed.
The timing chain in the VAZ 2107 engine is designed to connect the crankshaft and camshaft
As the vehicle is used, the chain stretches as high loads are placed on it. This indicates the need for periodic adjustment. Otherwise, the sagging will lead to the links on the gears jumping, which will disrupt the operation of the power unit. To prevent this from happening, the factory recommends adjusting the chain tension every 10 thousand km. mileage
BB wires
High-voltage wires, or, as they are also called, spark plug wires, are different from all others installed in the car. The purpose of these wires is to transmit and carry voltage passing through them to the spark plugs and protect other elements of the vehicle from electrical charge.
Spark plug wires provide connection to the ignition coil, distributor and spark plugs
Malfunctions
The appearance of problems with explosive wires is accompanied by the following characteristic signs:
- problematic engine starting due to insufficient voltage on the spark plugs;
- shots at start-up and vibrations during further operation of the engine;
- unstable operation at idle speed;
- periodic engine tripping;
- the appearance of interference during the operation of the radio, which changes when the engine speed changes;
- smell of ozone in the engine compartment.
The main reasons that lead to problems with wires are wear and aging of the insulation. The location of the wires near the engine leads to temperature changes, especially in winter, as a result of which the insulation gradually cracks, moisture, oil, dust, etc. get inside. When cracks reach the conductor, the explosive wire can be pierced to ground, and a spark to the spark plug simply it won't arrive. In addition, wires often fail at the junction of the central conductor and the contact connectors on the spark plugs or ignition coil. To avoid mechanical damage, the wires must be correctly laid and secured with special clamps.
One of the malfunctions of high-voltage wires is a break
How to check
First, you should visually inspect the cables for damage to the insulating layer (cracks, chips, melting)
Attention should also be paid to the contact elements: there should be no traces of oxidation or soot on them. Checking the central core of explosive wires can be done using a conventional digital multimeter
During diagnostics, a broken conductor is identified and the resistance is measured. The procedure consists of the following steps:
- Remove the spark plug wires.
Pull off the rubber caps with wires from the spark plugs
- We set the resistance measurement limit on the multimeter to 3–10 kOhm and connect the wires in series. If the current-carrying wire breaks, there will be no resistance. A working cable should show about 5 kOhm.
Serviceable spark plug wires should have a resistance of about 5 kOhm
I check the wires for damage and spark breakdown as follows: in the dark, I start the engine and open the hood. If a spark strikes ground, it will be clearly visible, especially in wet weather - a spark will jump. After this, the damaged wire can be easily identified. In addition, one day I was faced with a situation where the engine began to misfire. I started checking with the spark plugs, since the wires had been replaced recently, but further diagnostics led to a malfunction in the cable - on one of them there was no contact with the terminal itself connecting the conductor to the spark plug. After contact was restored, the engine started running smoothly.
Video: checking explosive wires
Which ones to put
When choosing and purchasing high-voltage wires, you should pay attention to their markings. There are many manufacturers of the elements in question, but it is better to give preference to the following:
- BERU;
- NGK;
- PARTS-MALL;
- AMD;
- Bremi;
- Tesla Technics.
Today a large selection of spark plug wires is offered, but it is better to give preference to well-known manufacturers
How to adjust the chain on a VAZ 2101-VAZ 2107?
1) First, loosen the chain tensioner nut.
Note! When unscrewing the nut, the tensioner shoe should move a little!
2) If the chain tensioner shoe does not move, then release the tensioner plunger, to do this: 1. Lightly hit the tensioner nut with a hammer.
3) Then turn the crankshaft bolt clockwise until it becomes difficult to turn. (Usually 1 or 1.5 turns is enough)
Note! For information on how to turn the crankshaft bolt, see the article, “Installing the piston of the fourth cylinder to the TDC position” (It is not necessary to set the marks!)
Installation: 1) Tighten the chain tensioner nut until it stops.
Important! 1) If you are not 100% sure that the timing chain on your car needs adjustment, then check the chain tension! (For information on how to check the chain tension on a car, see the article “Checking the chain tension on a VAZ 2101-VAZ 2107”). For newbies! Question: What does the chain tensioner shoe look like? Answer:
For newbies! Question: What does the chain tensioner shoe look like? Answer:
Additional video clip: After watching the video clip located just below, you will understand for yourself the principle of adjusting the timing chain, which is clearly perceived very simply. And the time it will take you to adjust will not be more than “10 minutes”. Enjoy your viewing:
source
There is a problem with the contacts in the distributor - they are burning!
February 20, 2013, 00:30 #1
VAZ-2107, late 80s, the contacts in the switch-distributor are constantly burning, they installed modern, “antique” ones, with and without a hole, remade Moskvich ones, etc., installed capacitors of various capacities, installed two condensers - the same result and the same thing - after 300 - 400 km the contacts burned out, the engine began to stall and, in the end, you have to stop and clean the contacts! On-board network voltage - the voltmeter needle is at the end of the green scale. Kotushki were installed in a variety of varieties - from modern to “made in the USSR” or “Hungary”.
Does anyone else have glitches like this? How to overcome them? Thank you for your attention. ZIL 5301 BychokZIS 101
ZIL 5301 BychokZIS 101
February 20, 2013, 01:42 #2 + 1
DrachOl, February 20, 2013, 00:30, #1
VAZ-2107, late 80s, the contacts in the switch-distributor are constantly burning, they installed modern, “antique” ones, with and without a hole, remade Moskvich ones, etc., installed capacitors of various capacities, installed two condensers - the same result and the same thing - after 300 - 400 km the contacts burned out, the engine began to stall and, in the end, you have to stop and clean the contacts! On-board network voltage - the voltmeter needle is at the end of the green scale. Kotushki were installed in a variety of varieties - from modern to “made in the USSR” or “Hungary”.
Does anyone else have glitches like this? How to overcome them? Thank you for your attention. There is only one solution: install electronic
There is only one solution: install electronic
Sold as a set of trampler + coil + switch price 1.5-2 thousand
February 21, 2013, 08:10 #3
I had it on a six, but the contacts burned out almost immediately, it was cured by replacing the ignition coil, but I think it was a matter of spare parts and the correct adjustment of the gaps.
February 21, 2013, 11:27 #4 + 1
DrachOl, February 20, 2013, 00:30, #1
VAZ-2107, late 80s, the contacts in the switch-distributor are constantly burning, they installed modern, “antique” ones, with and without a hole, remade Moskvich ones, etc., installed capacitors of various capacities, installed two condensers - the same result and the same thing - after 300 - 400 km the contacts burned out, the engine began to stall and, in the end, you have to stop and clean the contacts! On-board network voltage - the voltmeter needle is at the end of the green scale. Kotushki were installed in a variety of varieties - from modern to “made in the USSR” or “Hungary”.
Does anyone else have glitches like this? How to overcome them? Thank you for your attention. The contacts are burning - high interruption current due to: low consumer resistance (coil), current leakage in the wires, large capacitor capacity, increased gap
Something like this. Try to install a coil with a higher resistance, and radically use the advice of the OLEGator (see above)
The contacts are burning - high interruption current due to: low resistance of the consumer (coil), current leakage in the wires, large capacitor capacity, increased gap. Something like this. Try to install a coil with a higher resistance, and radically use the advice of the OLEGator (see above).
VAZ 2105 - replacing the camshaft drive chain
We replace the camshaft drive chain on a VAZ 2105 and other models from the “classic” series if it is not possible to restore the required degree of tension using the usual method using a tensioner. The verdict is clear - the chain has stretched beyond the permissible limits and needs to be replaced. The dismantling work on all types of classic engines is identical, so let’s look at the replacement process using the example of the most popular engine of the VAZ 2103 family. On an injection engine, the sequence of work is also identical with the only difference being that you will have to disconnect the block with wires from the crankshaft position sensor.
To carry out repair work, we prepare a standard set of tools, namely wrenches of different calibers from ten to seventeen, screwdrivers, pliers, etc. There is no need to drive the car into a pit for repairs. If you have everything you need, we begin the process, the sequence of actions of which is as follows:
- We remove the valve cover and, turning the crankshaft as it rotates, align the marks on the camshaft sprocket with the mark on the camshaft bearing cover housing.
- Next, using a flat-head screwdriver and a hammer, bend the tabs of the lock washer on the camshaft sprocket mounting bolt.
- Now we need to loosen the bolt. To do this, stop the car with the parking brake and engage any gear. We just loosen the bolt without completely unscrewing it.
- We remove the VAZ 2105 chain guide and the tensioner shoe. To remove all this equipment, we need to remove the front cover of the camshaft chain, unscrewing all the bolts securing it around the perimeter. A sealing gasket is installed between the cover and the block, which, regardless of its condition, must be replaced with a new one during subsequent assembly.
- Loosen and completely unscrew the chain stop pin.
- Next, we need to straighten the petals of the auxiliary sprocket lock washer. We use a flathead screwdriver with a long shaft and a hammer.
Unscrew the bolt securing the auxiliary device sprocket
To prevent the sprocket from turning, carefully fix it with a flat screwdriver by inserting the rod between the teeth and resting the screwdriver against the cylinder block. After the bolt is unscrewed, use a small mounting blade to pull the sprocket off the shaft.
- We completely unscrew the bolt securing the camshaft sprocket and, carefully lifting the chain, remove the sprocket from the shaft.
- We lower the chain down and remove it from the crankshaft sprocket, and install the camshaft sprocket itself in place, aligning the marks as they were.
After removing the old chain, you can begin installing the new one. The new chain is put on the auxiliary sprocket, after which the sprocket itself is installed in its place and secured with a fastening bolt (do not forget to install a new lock washer).
Prepare a long metal hook, use it to pick up the chain from above and pull it towards the camshaft sprocket. Place the chain on the sprocket. Secure the sprocket and bend the tabs of the lock washer.
All. At this point, the process of replacing the old camshaft drive chain of the VAZ 2105 can be considered complete. At the final stage, install the tensioner, tensioner shoe and chain guide and stop pin in the reverse order of removal. Check the tightness of all bolts securing system elements. Turn off the speed and parking brake and turn the crankshaft a few revolutions and check the alignment of the marks on the sprocket and the camshaft bearing cap. If the marks do not match, then it is necessary to throw the chain onto the link either forward or backward. If the installation was successful and the marks match, tighten the tensioner cap nut. Check and adjust the ignition if necessary. This completes the repair work.
ABOUT
RUSMASH LLC is a developer of innovative spare parts for VAZ, GAZ, UAZ cars, which has its own production base.
The company develops and produces auto parts with improved characteristics for standard components of domestic cars. The company has accumulated significant experience in the development and mass production of spare parts. Our own research and production base allows us not only to organize the production of complex parts, but also to solve issues of improving their performance characteristics and increasing their service life.
The main focus is on quality control at the production and release stages. Reliability, quality and innovation are the basis of the operating strategy of RUSMASH LLC.
Russia, 144007, Moscow region, Elektrostal, st. Stroitelny Lane, 6
+7 +7
View under the hood.
Engine VAZ 2106
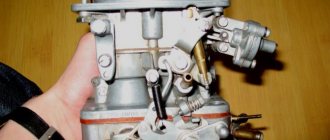
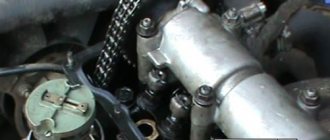
Remove the air filter housing from the carburetor. Unscrew the three 10mm and four 8mm nuts securing the housing to the carburetor.
Be careful not to drop anything into the carburetor, otherwise you will have to remove it, and maybe the intake manifold too. Because if, with the car running, they get under the intake valve, then you can go straight to repair the head.
Carburetor.
Remove the fuel line and distributor cap. Unscrew the eight nuts 10 securing the valve cover and remove the washers with the plates.
Throttle drive.
Remove the choke cable and throttle valve drive. Then remove the valve cover along with the gasket; it is also better to replace it.
Camshaft bed.
Remove the protection from below.
Protection.
Loosen the nut 19 securing the generator.
Generator mounting.
Unscrew the clamps on the pipes and remove the latter.
Loosen the clamp on the lower pipe of the pump and remove it with a slight movement of your hand.
Disconnect the power wires for the cooling fan and the temperature sensor on the radiator. We remove the radiator along with the pipes and thermostat.
Loosen the generator tensioner nut and use a pry bar to move it forward. Remove the generator belt.
Chain replacement
If the mileage of your VAZ 2107 is high enough, then the chain has probably already stretched naturally, and the pitch between the links has increased. In such a situation, replacing it is simply necessary, and you can do it yourself.
Prepare screwdrivers and wrenches in advance (a special wrench is needed for the crankshaft).
To simplify the work process, we recommend removing the VAZ 2107 radiator grille, the radiator itself (draining the liquid before doing this) and the cylinder head valve cover. Now turn the crankshaft pulley clockwise with a wrench until the mark on the camshaft gear matches its cast on the bearing housing and shaft cover.
After slightly loosening the generator, remove the V-belt, water pump pulley and camshaft chain tensioner
Please note that now it is necessary to engage fourth gear and also put the car on the handbrake. Then slightly unscrew the sprocket mount, having first bent its washer
What is a distributor
This is a device that allows you to correctly distribute high voltage across the spark plug electrodes. The design of the entire system consists of the following elements:
- Power source – battery and generator.
- Low voltage wiring.
- Ignition coil.
- Armored wires (designed to transmit high voltage).
- Distributor (distributor) with contact group or Hall sensor. The VAZ-2106 distributor cover is necessary for high voltage switching.
- Switch (in the case of a contactless system).
- Capacitor - necessary to get rid of the variable component in the circuit.
The VAZ-2106 distributor has a relatively simple design, but it requires timely maintenance and replacement of worn-out elements.
What is the cost of a new VAZ 2107 tensioner?
In order to change an automatic tensioner, on average you need 600-700 rubles. TZA (Togliatti Automotive Units Plant) produces the best, “native” tensioners for “classics”. The package (blue) has the packer's number as well as an authentication sticker with a protective layer. Under the layer there is a code, when entered, you will receive an SMS confirmation. Inside there must be an insert - a form with the name of the product, the date of manufacture, and the blue original seals of the quality control department.
The need to install marks on the timing mechanism may arise during the repair process or when the chain is severely stretched. If the marks do not match, the stable operation of the motor is disrupted due to a phase shift. In this case, an adjustment is required. The work is carried out with the following tools:
- Screwdriver Set;
- key for rotating the crankshaft;
- a set of keys.
To install the chain according to the marks, you will need a standard garage tool kit. We carry out the procedure according to the following instructions:
- We dismantle the air filter box and the valve cover with the seal by unscrewing the fasteners.
- Loosen the tensioner clamp, press the screwdriver against the shoe and tighten the nut.
- Using a 38 mm wrench or a crank, turn the crankshaft until the marks on its pulley and the timing cover match, and the mark on the camshaft sprocket should be located opposite the protrusion cast on the body.
- If any of the marks do not coincide, turn on the fourth speed and unbend the lock washer on the camshaft sprocket.
- We unscrew the bolt and remove the gear.
- Remove the chain from the sprocket and set the desired position (step 3).
After installing the marks, we perform reverse assembly. You can turn the crankshaft with a 38 mm spanner.
DETAILS: Headlights VAZ 2106 diameter - All about the car || Tuning headlights for VAZ 2106
To do this, the new element is clamped in a vice, but so that it does not damage the body.
Next, the tensioner is removed from the vice. Then, holding it by the mounting ears with your hand, you need to rest the plunger against a hard surface and press on it so that it goes into the body.
Afterwards, the “charged” tensioning mechanism is installed in place and secured with two nuts.
In order for the tensioner to operate and extract, you need to loosen the cap nut again, after which you will hear a click indicating that the plunger has come out and extracted.
If you decide to replace the standard tensioner with an automatic one, then the removal sequence does not differ from that described.
It is already on sale with the rod fully retracted into the body, and it is secured with a pin in this position.
Before removing the rod fixation, the tensioner must be installed on the car and secured with nuts.
And only after this, the locking pin is removed with pliers, after which the spring will push the rod out, and the pawl will not allow it to go back.
All that remains is to screw the bolt into the hole in the end to prevent the spring from falling out. This bolt must be included with the tensioning mechanism.
In general, the operation of replacing a timing chain tensioner, whether standard or automatic, is not difficult if only the tensioning element itself is changed.
You can read about how to get to the shoe if you decide to change it, as well as how to immediately replace the drive chain here.
When the timing chain tensioner has been checked, in particular if it needs to be replaced, you need to start installing a new one. But do not forget that before starting installation it is necessary to charge this mechanism. To do this, you will need to push the plunger mechanism all the way, and then, holding it in this position, tighten the nut on the cap.
After this, you need to install the tensioner housing and tighten the bolts. Do not forget that you need to install a new gasket if the old one fails. Using a special wrench size 38 for the ratchet, turn the engine crankshaft at rpm. In this case, the timing chain is tightened. You need to make one turn, then loosen the cap nut to release the tensioner. After this you need to tighten it again.
Fine tuning: weights and springs
The adjustment of the weights begins after this. This is already called fine adjustment of the distributor. In this case, the UZ is being adjusted, for which the proofreaders - TSNTR and VK - are directly responsible.
The first, centrifugal regulator contains two weights and two springs. When the distribution rotor rotates, the weights, under the influence of the CNTR forces, diverge to the sides. During this process, the shaft with cams or the shutter moves (if the ignition system is contactless). Thus, the contacts operate noticeably earlier.
Two springs act as counteraction to the CNTR force, on which the effective functioning of the entire ignition system depends. The springs themselves are different, and this is done this way for a reason.
- The first spring is longer, it is responsible for the moment the CNTR regulator, which carries out tension, comes into play. At the same time, this spring adjusts the right angle up to 1.2 thousand revolutions per minute, ensuring rigidity.
- The second spring is shorter, but it is much stiffer than the first. Corrects the breaking moment, ensuring free movement.
Experts insist that the second spring must be provided with free movement. However, some car enthusiasts believe that this results in unstable operation of the internal combustion engine at low speeds. It is supposedly regulated by the tension of this spring.
As for the VK or vacuum corrector, it contributes to the occurrence of advance only during the operation of the first chamber. In other words, when it comes to partial load on the power plant.
By itself, this advance regulator cannot create advance either at high speeds or under loads. This should be understood. And on XX, by the way, too.
Video below about the operation of weights on a distributor
Main elements of the timing chain tensioning system
The timing chain in the engine is supported not only by the three sprockets mentioned above. It is supported by several other important devices.
The timing chain tensioning system consists of several critical elements
Let's look at them in more detail.
Timing chain stop pin
The timing chain in the VAZ 2107 engine is supported by a complex tensioning system. One of the elements of this system is the limiting finger. This is a small cylindrical part screwed into the wall of the cylinder block. The pin is located next to the crankshaft sprocket. The purpose of the pin is as follows: if the timing chain tension suddenly weakens, the pin will prevent the chain from jumping off the crankshaft sprocket.
The design of the restrictive pin is extremely simple - it is a regular bolt with a head truncated on the sides
At the same time, the chain will begin to touch the limiter with a characteristic ringing sound, which will certainly attract the driver’s attention, since this sound will be heard even in the cabin. If the chain breaks, the limiter will not allow it to completely fly off the sprocket and break the nearby oil pump and timing shaft sprockets. If the timing chain is tensioned normally, it does not touch the limiting pin, since in this case there is a constant gap of about 1.5 cm between it and the pin
If the timing chain is tensioned normally, it does not touch the limiting pin, since in this case there is a constant gap of about 1.5 cm between it and the pin.
About timing chain tensioners
The purpose of the timing chain tensioner is easy to guess from its name. He must constantly tension the chain, preventing it from sagging. If the chain sags by even half a centimeter, it may fly off one of the sprockets (although this happens quite rarely, much more often there are situations when the chain remains on the sprocket, but at the same time jumps several teeth forward, as a result of which the uniformity of its tension is completely disrupted , and the sagging increases even more). At different times, different types of tensioners were installed on the VAZ 2107.
Mechanical tensioners
In a mechanical tensioner, the force required for the tension shoe to press on the chain is created by a conventional spring. It presses on the rod, it moves out of the body and presses on the shoe. And the shoe, in turn, puts pressure on the chain, constantly dampening its vibrations.
The main element of the mechanical tensioner is the plunger spring
The spring in such a tensioner is adjusted with a conventional plunger nut. If the driver needs to tighten the chain a little, he simply tightens the nut slightly, eliminating any slack.
Mechanical tensioners for VAZ 2107 are reliable and simple in design
Automatic tensioners
Automatic tensioners were installed on later models of the VAZ 2107. Unlike mechanical devices, the design of this tensioner includes a toothed bar with a ratchet.
The main element of the automatic timing chain tensioner is a toothed bar
The plunger spring presses on this bar, and the bar transmits this force to the shoe. The ratchet prevents the bar from returning to its original position. This keeps the timing chain tension constant.
Finding automatic tensioners for VAZ 2107 on sale has become increasingly difficult lately.
Hydraulic tensioners
These tensioners were installed in the latest VAZ 2107 models. The main difference between these devices is the principle of their operation. The force in the hydraulic tensioner is created not by a spring, but by oil pressure. It is supplied to the tensioner through a reinforced high-pressure hose.
Oil is supplied to the hydraulic tensioner through a special reinforced hose
Timing chain tensioner
The timing chain tensioner is another indispensable element of the tension system, without which uniform operation of the timing chain is impossible. The damper is a metal plate that is attached to the wall of the cylinder block.
The timing chain adjuster on the “seven” is a simple metal plate held on by two bolts
This plate is located opposite the tensioner, that is, the damper acts on the second half of the chain. Since the tensioner presses the chain very sharply, the opposite side of the chain inevitably begins to vibrate. To dampen this vibration, a damper is needed. The chain, touching the damper plate, loses some of its energy and the amplitude of its oscillations decreases significantly. Without the restraining effect of the guide, the chain will stretch much faster.
Symptoms of a problem
Many owners of the VAZ 2101, and even several newer models, know the situation when the car suddenly starts to feel feverish, the engine rattles and rumbles like a Cossack. At the same time, power is lost, and the car begins to consume gasoline like a sports car. Most often the reason is in the ignition. But before you start working with the distributor, you need to make sure the quality of the fuel. Sometimes this happens due to the use of bad gasoline. Try refueling at a different gas station.
Perhaps this will help and the problem will go away. Also, when the ignition is faulty, popping sounds (shots) are observed. It can hit both the carburetor and the muffler.
Do-it-yourself: Replaced sprockets and timing chain after 220 thousand km
Hi all! As you know, the car has already covered 200 thousand km, so I decided to do a mini-overhaul, almost completely replacing the timing mechanism myself. I decided not to touch the rocker with the camshaft for now and work on the chain with sprockets that have been there since the factory. Various sources write that the life of the chain is somewhere around 100-150 thousand, although even at 220 thousand it was tensioned well by the tensioner, and I didn’t notice much noise, perhaps due to timely maintenance and good oil. However, during diagnostics at the service center, the technician said that the valve timing angles had already dropped a little, so it was better to replace it. I decided to play it safe and replace it along with the stars, as is done wisely.
I bought a set of sprockets, a chain, a new stabilizer and shoe, a front cover gasket, a front crankshaft oil seal, nuts, sealant, etc. from a trusted store.
First, let's provide access to the front cover - remove the cooling fan, radiator, drain the antifreeze from it, and decorative grille.
Then the engine protection and mudguard to provide access to the three cover mounting bolts from below. We will be replacing the mudguard, as it was rotten through and through and the generator was flooding in the puddles.
Now we unscrew the crankshaft pulley nut (ratchet), we need a 36 wrench, or better yet a head, but we couldn’t find one, and the standard stamped wrench was bent and did not want to unscrew the nut.
I also had to weld pipes from it for a 40 key, long enough to rest against the right side member.
It was not possible to unscrew it manually; I had to tear it off with the starter, resting it on the spar.
Next, remove the PCV sensor, alternator belt, valve cover and set the timing marks on the crankshaft pulley and camshaft sprocket at TDC of the 4th cylinder. Oddly enough, they completely coincided.
Then we remove the crankshaft pulley and the front cover, dismantle the shoe, damper, limiter and gears with the chain. We make sure that the marks do not go astray.
When comparing the old and new parts on the stars, I didn’t see any special workmanship, except for polishing on the sides.
The chain is also intact on the outside. The shoe and damper have minimal wear, as they have already been replaced relatively recently.
However, the old chain turned out to be 4-5 mm longer than the new one, which, according to the same data from the Internet, is already above the tolerance of 4 mm and requires its replacement.
Before installing new parts on the new camshaft sprocket and crankshaft pulley, I used a center punch to make additional marks at 90 and 180 degrees for convenience during subsequent valve adjustments.
We put them in reverse order according to the marks and keys: first the shoe with the damper, then the upper sprocket with the chain, then the small sprocket and the middle one, check the marks again and tighten the chain.
We carefully double-check everything and lock the retaining rings.
During assembly, due to inattention, I placed the small crankshaft gear with the “skirt” outward instead of inward, which is why the crankshaft was blocked when tightening the ratchet nut - I had to remove the cover again and rearrange it.
The marks coincided exactly again, as if nothing had changed, hmm..
Seal the front cover seal and gasket with sealant.
Also, instead of the usual nuts with engravers, I tightened the front cover with nuts with a nylon ring, which means they have the ability to unscrew and leak oil).
Well, at the end I installed a new engine splash guard.
- Set of stars – 680 rub.
- Chain – 630r
- Calmizer – 70 rub.
- Shoe – 90 rub.
- Oil seal – 110 rub.
- Nuts, washers, gasket – 200 RUR
- Engine splash guard – 400 RUR
- Ratchet key – 150 RUR
It took a couple of days to do everything, although it could have been done in one. After replacing, I did not notice any major changes in the operation of the motor. After a couple of thousand, after grinding in the parts, you will need to tighten the chain again. But then you can sleep peacefully with another couple of hundred thousand mileage).
Simple or serrated?
A simple V-belt of a generator is “solid”, has a constant plane of contact with the pulleys and, perhaps therefore, is less susceptible to stretching. As some car enthusiasts say: “Once you tighten it and forget it.” In addition, a regular belt costs a little less.
Most mechanics, from their own experience working in a car service, advise choosing a timing belt for an alternator . It “clings” to the pulleys much better and is less susceptible to self-destruction when bent.
In any case, no matter which belt you choose, it is always advisable to have a spare in the trunk.
How to replace the timing chain on a VAZ 2101-VAZ 2107?
Removal: 1) First, remove the cylinder head cover. (For information on how to remove the cylinder head cover, read this article, point “1-10”)
2) Now turn the crank until the mark on the camshaft sprocket aligns with the mark on the housing.
Note! The mark on the crankshaft will also have to match the mark on the camshaft cover!
3) Next, bend the lock washer of the camshaft sprocket bolt.
4) Then engage fourth gear and put the car on the handbrake.
5) Next, loosen the camshaft sprocket bolt.
6) Then remove the chain guide from the engine. (For information on how to remove the chain guide, read “in this article”)
7) Then remove the chain tensioner shoe from the engine. (For information on how to remove the chain tensioner shoe, read “in this article”)
Next, bend back the lock washer, which is located on the bolt securing the auxiliary units sprocket.
9) Now unscrew the bolt itself that secures the accessory sprocket.
10) Then remove the accessory sprocket.
Note! After removing the sprocket, do not turn the drive shaft, because this may disrupt the initial ignition setting! (see photo at the very bottom of the article, in the “For Beginners!” section)
11) Next, completely unscrew the stop pin.
12) Next, completely unscrew the bolt that secures the camshaft sprocket.
13) Then lift the chain and remove the camshaft sprocket.
14) Then lower the chain deeply down, carefully removing it from all the sprockets.
Note! To remove the timing chain, you do not need to remove the crankshaft sprocket!
15) After all the operations performed, check whether the mark on the crankshaft sprocket matches the mark on the cylinder block.
Note! If the marks do not match, turn the crankshaft until they align!
Installation: 1) First put a new chain on the crankshaft sprocket.
2) Then put the chain on the sprocket of the auxiliary units.
3) Next, install the auxiliary units sprocket onto the drive shaft, while tightening the sprocket mounting bolt.
4) Next, hook the chain.
5) And then lift the chain up to the installation location of the camshaft sprocket.
6) Then put the chain on the camshaft sprocket, and only then install the sprocket in place.
7) Next, check that all marks match and tighten the timing chain. (How to check the coincidence of the marks, see the article: “Installing the piston of the fourth cylinder at TDC - Top Dead Center”) (And about how to tension the chain, read “in this article”)
Note! If you don’t understand how to tension the chain, then at the very bottom, watch the video on how to properly install the chain and how to tension it!
Then tighten the camshaft sprocket bolt.
9) Then install the chain guide in place in the reverse order of removing it.
10) Then reinstall the chain tensioner shoe in reverse order.
11) Next, install the stop pin in place.
12) Now put the gear in neutral and turn the crankshaft three turns in the direction of its rotation.
13) Check that all marks on the sprockets match.
Note! If the marks do not match, install the chain again and correct the situation!
14) If all the marks match, then: 1. Tighten the chain tensioner cap nut. 2. Shift into gear. 3. Tighten all sprocket bolts. 4. Install all remaining parts in the reverse order of removal.
Important! 1) When working in a ditch, place bricks under the wheels of the car to prevent the car from rolling away! 2) If you are unable to remove the auxiliary units sprocket, then try moving it using a mounting blade and then remove the sprocket!
For newbies! Question: Where is the accessory drive shaft located? Answer:
Additional video: If you don’t understand how to install a chain on a car, then watch a short video that explains everything in detail with the engine removed from the car.
Timing phases and when to set them according to marks
Valve timing refers to those moments at which the piston in the engine moves up and down over a certain interval. When irregularities in the valve timing occur, the pistons move incorrectly along the interval, resulting in uneven engine operation on the VAZ-2107.
If the driver notices that the car’s power decreases, fuel consumption increases, and engine interruptions occur, then it is necessary to resort to setting the valve timing according to marks. How to set marks on a VAZ 2107 carburetor and injector, we will learn from this material, since the design of the timing mechanism is identical.
How to set timing timing marks
The procedure involves performing the following manipulations:
- The VAZ 2107 needs to be placed on a hard surface, with chocks placed under the wheels and the hand brake pressed all the way. The gear shift lever must be set to neutral mode.
- The cover is removed from the cylinder head by first unscrewing all the fixing nuts to “10”. It is better to replace the gasket with a new one, even if the old one shows no signs of damage.
- Using a key set to “24”, you need to turn the crankshaft on a VAZ 2107 car. This is done in order to be able to align the marks on the moving and stationary parts of the mechanism. To carry out these actions, it is recommended to use good lighting or use a flashlight. The crankshaft rotates until the mark on the pump and generator drive belt pulley coincides with the long mark marked on the block.
- Combining these risks, the mark on the sprocket should eventually coincide with the ebb on the camshaft bed. If the mark ends up at the bottom, then you should rotate the crankshaft 360 degrees.
- If you can’t make sure the labels match, then proceed to the next steps, which are described below.
- The crankshaft is rotated until the marks on the star and the bed ebb align.
- Using the key at “13”, you need to loosen the tensioner. The 2 nuts securing the tensioner are unscrewed, after which this device is removed.
- The bolt that secures the sprocket to the camshaft is unscrewed. To do this you will need to use the key at “17”.
- The sprocket is removed, after which it must be rotated until the marks on the VAZ-2107 timing belt pulley coincide with the long mark on the block. The star fastening bolt does not need to be unscrewed, since after removing the tensioner the camshaft star rotates.
- We put a chain on the sprocket, if it was decided to unscrew it, and install it in place. Finally, the tensioner is installed, for which you should tighten it with 2 nuts to “10”. You can install the tensioner first, but later you will need to use a crowbar or pry bar to get the sprocket into place. Finally, screw the tensioner nut to “13”.
This relative arrangement of the parts allows the piston of the 4th cylinder to be positioned at top dead center TDC.
Construction and repair of a contactless distributor
The design of the distributor, operating in conjunction with the electronic ignition system, is identical to the design of a mechanical distributor. There is also a plate with a bearing, a slider, a centrifugal regulator and a vacuum corrector. Only instead of a contact group and a capacitor, a magnetic Hall sensor is installed plus a metal screen mounted on the shaft.
In a contactless distributor, the main role is played by a magnetic sensor that sends signals to the switch
How a contactless distributor works:
- The Hall sensor and permanent magnet are located on a movable platform, and a screen with slots rotates between them.
- When the screen blocks the magnet field, the sensor is inactive and the voltage at the terminals is zero.
- When the roller turns and passes through the slot, the magnetic field reaches the sensor surface. At the output of the element, a voltage appears that is transmitted to the electronic unit - the switch. The latter gives a signal to the coil, which produces a discharge that goes to the distributor slider.
In an electronic ignition system, spark generation is carried out by a switch and a coil; the distributor only determines the moment the discharge is applied to the spark plugs
The non-contact distributor is more reliable in operation - the Hall sensor and bearings become unusable much less often due to the lack of mechanical load. A sign of meter failure is the absence of a spark and complete failure of the ignition system. Replacement is easy - you need to disassemble the distributor, unscrew the 2 screws securing the sensor and pull the connecting connector out of the groove.
The magnetic sensor is attached with two screws to the bearing pad
Malfunctions of the remaining elements of the distributor are similar to the old contact version. Troubleshooting methods are described in detail in the previous sections.