02/26/2022 1,810 Electrical
Author: Victor
Immo on Lada Priora and other cars is an additional security feature that blocks the engine when an attempt is made to steal the car. You can disable the immobilizer on a Priora if it malfunctions, either with or without the help of a lineman, by reprogramming the ECM system device.
[Hide]
Characteristics of the immobilizer on Priora
Immo on VAZ cars is a device that activates the power unit locking system in the event of a car break-in. The presence of a lock allows you to start the engine only after recognizing the key installed in the lock.
Where is the immobilizer located in Lada Priora?
The location of the standard anti-theft device is indicated in the service documentation for the car. The bottom line is that the manufacturer AvtoVAZ can install the main control unit of the device in various places. Typically, the microprocessor module is mounted in a free compartment behind the car radio, slightly lower from the central part of the dashboard. The engine ECU is located next to the immobilizer control unit.
User Igor Bakhirev spoke about the location, as well as malfunctions in the operation of the internal combustion engine blocker in Lada Priora cars.
Operating principle
Briefly about the principle of operation of the device for activating the engine lock:
- An identified transponder is located in the main part of the ignition key.
- The pulse signal coming from the key is read through a ring antenna. The latter is made of a large number of turns of thin copper wire. This element is located around the ignition switch cylinder.
- As a result of reading, a pulse is sent to the control module. The latter compares the signal with the normalized one and gives a command to allow or prohibit the start of the internal combustion engine.
- The K-Lin interface is used to transmit commands. This allows you to connect the microprocessor module with the engine control unit, fuel pump, and ignition system.
The operation of the device is based on data exchange with the control module. The Priora model and the year of its manufacture do not matter. This node, receiving and reading information, gives permission or prohibits starting the power unit.
If the anti-theft agent does not recognize the tag, then when the power unit starts, the immobilizer will block its operation by opening the electrical circuit of the fuel pump. The ignition system will also turn off, due to which the starter mechanism will not be able to crank the crankshaft. An icon on the control panel of the car will light up, indicating problems in the operation of the blocker.
As a result of the fact that data exchange is carried out via the K-Line bus, problems and errors may occur in the operation of the immobilizer due to interference from mobile devices.
Auto electrician Sergei Zaitsev spoke in detail about the principle of operation of the internal combustion engine blocker, as well as its varieties and design.
Malfunctions and their elimination
One of the problems of APS Priora is the implementation of a data exchange mechanism between the immobilizer and the vehicle's ECM via a diagnostic line. In this case, malfunctions occur in the system - the immobilizer signal lights up on the instrument panel and the engine does not start.
The code in the immobilizer may go wrong:
- from connecting diagnostic equipment;
- from the appearance of induced currents from the cell phone transmitter,
- from voltage surges in the vehicle's on-board network.
- from zero charge in the battery.
In the latest Priora models, an emergency shutdown procedure for the anti-theft system has been implemented. It is necessary to activate this function and register a password in the ECU. Then, if an emergency situation occurs with the APS, you can, by manipulating the gas pedal according to the factory instructions, start the car, ignoring the immobilizer blocking.
- How to disable the immobilizer on Kalina
- Immobilizer Niva Chevrolet
- What kind of oil to pour into Priora
- Setting the time on the Starline A93 key fob
What to do if the immobilizer stops working?
If the device does not work, the lamp on the dashboard flashes and the ECU does not see the blocker, the cause of the malfunction may be oxidation of the contacts on the connector.
The problem is solved like this:
- The bolts installed under the steering column in the car's interior are loosening.
- Using flat pullers, the column protective casing is divided into two parts.
- Next, the plug should be disconnected from the immobilizer, but first you need to remove the connector from the guides. To do this, you need to apply a little pressure on the block. Then the car owner presses the opened latch and disconnects the connector. The second part of it will remain under the plastic lining of the panel.
- Using a screwdriver with a thin tip or a sewing coal with a large eye, clean the oxidized contact elements.
- To avoid such problems, the plug is treated with copper grease. Moreover, both pads are cleaned. Copper grease ensures high-quality conductivity and high anti-corrosion characteristics. The substance is applied using a screwdriver or needle.
- The two parts of the connector are then connected to each other. The correct operation of the immo is diagnosed. If the device is functioning, all components are assembled.
If cleaning does not help, then the immo problem may lie in the operation of the chip resistor.
To replace a part with your own hands, do the following:
- The locking device is being removed from the vehicle. To carry out the task, the side covers on the console inside the car are removed. The controller clamps are unscrewed, as well as the terminal clamps that are screwed to the microprocessor module.
- The control devices are disassembled for soldering a working resistor chip. To carry out the task, a PC is connected to the microprocessor module via a special cable. The program for reading the software is launched, the firmware file is saved into the computer memory. In particular, we are talking about FLASH and EEPROM. The chip resistor itself is soldered from the main board of the device.
- New firmware is installed in the control unit.
- A new resistor chip is soldered. Before connecting the power unit blocking control module, the immo is disabled. This will prevent its possible activation during installation. The module contacts are used to disconnect. First of all, the 12-output plug is disconnected.
- Conductors numbered 9 and 18 are disconnected from the block and shorted with each other. After this, the blocks are connected to the control unit, then the device is mounted in the installation location.
The Immobox channel talked about self-diagnosis of anti-theft locking devices in Priors and other cars.
For M-74, the process of turning off the immobilizer will look like this:
Disconnect the battery, disconnect the immobilizer control unit from the network. A harness with cables and a double switch is connected to the immobilizer. The circuit is connected to the battery and computer using a VAG-COM adapter. The first button of the switch is activated, it “gives the go-ahead” to change the code. The code is changed in the WinFlash program. First of all, in the settings you select the module type and the information transfer speed parameter. The second switch button is activated; it is responsible for communication between the computer and the immo control unit. The standard lock code is retained, and the Eeprom cell data is overwritten. The whole process takes a long time, but you need to wait for contact. Upon completion of the recording process, the control unit is connected back to the vehicle network, and the battery is started.
Instructions for activating the immobilizer
The process of activating the immobilizer on a Priora is carried out in a car with the door locks locked.
Activation is done like this:
- The training key is installed in the switch and the ignition is turned on. You must wait at least six seconds and then turn it off.
- When the actions are performed correctly, the indicator light blinks on the dashboard throughout the entire time it is turned on. If it goes out, then an error was made during the task. The immobilizer may be faulty or the time interval has been violated. The LED indicator on the device indicates that the switch is turned on correctly.
- During the period of time while the light is blinking, it is necessary to activate the ignition using the working key. The sound beepper will start beeping. If this does not happen, there was an error in the process.
- After playing three sound pulses, you must wait about six seconds. The beepper will then beep two more times. If they are absent, the blocking agent is diagnosed for malfunctions. The microprocessor module may have been trained using a different key.
- After two beeps, you need to turn off the ignition system. If the car owner plans to register not one, but several keys, then the activation procedure is repeated for each.
- If the indicator light on the instrument panel blinks, the control element is removed from the switch. Then the training key is installed in it again, and the ignition is activated. If there are no errors, the beeper will emit a triple beep, indicating that the blocker has been successfully activated. The ignition does not turn off, and after six seconds the beepper will again emit a double beep.
- The key in the lock turns counterclockwise. After turning off the ignition, you must wait six seconds, this will trigger the beepper. The indicator light on the instrument will blink more frequently. If an error was made during the process, all steps are repeated again.
- While the light on the control panel is flashing at a high frequency, the ignition is activated with the learning key. After 2-3 seconds. it needs to be turned off. After another five seconds, the indicator will stop blinking and the beeper will play a triple pulse.
- Then the ignition turns off and does not need to be activated for at least 10 seconds. The alarm will be activated, as well as the emergency indicator. This completes the training procedure.
During the implementation of a task, it may happen that the blocker and the control module lose synchronization in the execution of commands. In order to set it up, the ignition is activated using a trained key. The indicator on the instrument panel may indicate a malfunction and flash rapidly. Then the ignition will need to be turned off for ten seconds. When it is reactivated, the indicator light should not blink.
The immo package includes three keys, two of them are working, and the third is a training one. The first keys are black, and the remaining one is red. It is the latter that is used to activate the engine blocker if this procedure was not performed in the cabin.
The Avtodopka channel talked about independently turning on the power unit blocker on a Priora.
Video “How to reprogram a standard alarm with your own hands?”
Detailed instructions for reprogramming the standard alarm are given in the video below (the author of the video is the Priorovod channel).
- We study the main malfunctions of the immobilizer
- General check before troubleshooting
- Main signs of immobilizer malfunctions
- What are the types of immobilizer malfunctions?
- How to fix immobilizer faults
Imagine a modern car without a security system thought out to the smallest detail.
True, very difficult. Vehicles from the beginning of the last century immediately come to mind. But now you need to protect yourself as much as possible from intruders who are trying to steal your “pet,” even if it is in the garage. Perhaps one of the best and most thoughtful solutions to modern car security is an immobilizer. And although repairing this device, like every complex electronic device, is not easy, it is still more reliable with it. And remember that there are specialized agencies and service centers that will help you and carry out restoration. Alternatively, you can try to troubleshoot the immobilizer yourself by first studying the instructions for it in detail.
General check before troubleshooting
Before performing general troubleshooting on your vehicle's immobilizer, check the following and correct as necessary:
— if the battery is discharged, charge it completely, and then start looking for problems with the immobilizer itself;
- if the ignition key is not original, use one approved by the brand of your car, and then start working on the immobilizer;
— remove the key and look for problems with it only;
- remove additional electronic gadgets or parts that may interfere, and look for malfunctions in the immobilizer system.
Main signs of immobilizer malfunctions
The main signs of malfunctions that should not be ignored are the following:
— when turning the key, the starter does not respond;
- when you turn the key and hear the starter moving, but the engine is silent;
— the dashboard signals with a corresponding light and sound;
— the car does not respond to pressing the corresponding button on the key fob (unless, of course, the problem is due to dead batteries in it).
Everything listed above is the most common signs that the immobilizer requires specialist help: software restoration or firmware updating. If you ignore such signals of malfunctions or entrust the task to amateurs, then everything can develop into more serious problems.
What are the types of immobilizer malfunctions?
The following types of immobilizer malfunctions are distinguished:
1. A software malfunction, which implies the destruction of the program in the engine ECU, immobilizer, or key chip. This problem can be resolved. Restoring the program of the listed systems helps. The exception is the chip key, which sometimes has no duplicates.
2. A hardware malfunction in which microcircuits fail or problems occur in the wiring of any system component. In this case, the fault must be diagnosed and corrected.
How to fix immobilizer faults
The immobilizer is structurally designed in such a way that a problem that occurs with one of its units will disable the entire system of the device. But of all the faults, the most common ones can be identified.
Insufficient electrical contact between the receiver and the antenna
In this case, the immobilizer malfunctions extremely often.
There have been cases when it was possible to start the car only after the twentieth attempt. This problem occurs due to shaking, the antenna and receiver connectors are made poorly, the contacts are oxidized or dirt and grease have gotten on them.
In this case, the contact does not disappear immediately, but after a certain period of time, which depends on many factors. To fix this problem, you need to disconnect the receiver and antenna, turn off its power, then treat it with a special agent that eliminates contamination and oxidation. If necessary, it is better to tighten the antenna contacts.
Poor contact of one of the electrical wiring connectors
This problem also occurs if the antenna connectors are dirty. To eliminate it, dismantle all immobilizer wiring and check the condition of each wiring connector and blocks. Clean them with a special cleaner and tighten as necessary.
Disabling the immobilizer without a crawler yourself
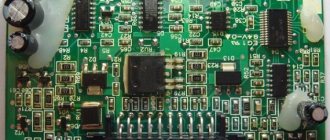
Depending on the unit model, reprogramming the ECM may require changing the installation diagram of the component elements. Such devices include M73 microprocessor modules from the manufacturer Avtel. Before performing the task, it is necessary to remove the microprocessor from the seat and connect the K-Lin adapter to it.
To remove the immo, you will need an adapter wiring harness; you will have to make it yourself.
When the transition harness is ready, perform the following steps:
- The OpenBox program is installed on a PC or laptop. The utility is freely available. After downloading it, the software is launched; at the first stage, the car owner needs to read the standard EEPROM firmware. Factory software information is stored separately. It may be required to perform modifications or if it is necessary to roll back to its original state.
- Then the HxD file editor is loaded. The downloaded firmware opens on the computer.
- At the beginning of the opened text, a line is added that consists of two FF characters. Changes to the firmware are saved.
- Then the edited file must be loaded into the memory of the microprocessor module. To perform this task, it is allowed to use ready-made versions of untrained firmware. They can be found in the public domain on the Internet.
- The microprocessor module is disconnected and the device is installed back.
If the car is equipped with a January 7.2 block, then to deactivate it, use the diagram shown in the photo in the gallery. It is assembled on the basis of the K-Lin adapter. A positive contact switch must be added to the circuit; it will be used as an ignition switch.
The Bureau of Technical Solutions channel talked about disabling the engine blocking device yourself.
After this, the following steps are performed:
- ChipLoader software is installed on a PC or laptop. The program version must be 1.97.7 or higher.
- The utility is launched and the required type of microprocessor is selected in the window that opens.
- Then you need to connect to the module; to do this, use the “Establish connection” option.
- Information is being read from the EEPROM board.
- In the program window, press the “Delete immo” button. As a result, the utility will automatically adjust the information written to the file.
- The program closes. The microprocessor module can be disconnected from the computer and installed back on the car.
In M74 models, the procedure for deactivating the blocker is performed differently:
- The battery is disconnected from the car; first, the clamp on the negative terminal must be loosened with a wrench.
- The connector is disconnected from the immobilizer control unit.
- A homemade harness is connected, which is made according to the diagram. It should use a double switch, since with its help the voltage can be supplied to the device in stages.
- The assembled circuit is connected to the battery via a VAG-COM cable.
- The first button on the switching device is activated. With its help, a pulse is sent that allows programming of the block. The WinFlashECU utility starts on the PC. In the settings window that opens, you must specify the type of microprocessor module, as well as the information transfer speed. It is recommended to select the last parameter as minimal.
- The second button is activated. Then a message will appear in the window that opens indicating that communication with the module has been established.
- The standard software of the control unit is saved. Then this file must be replaced with a new one. The total time to complete the task will take no more than a few minutes.
- When the firmware is completed, the program is disabled. The power and wiring must be disconnected from the device.
- Then the engine blocker control unit is again connected to the machine’s electrical network. When carrying out this task, it may be necessary to adapt the zero position of the throttle valve. To do this, start the engine and make a test drive. When the speed increases to four thousand per minute, the power unit brakes. In this case, second gear must be engaged.
Photo gallery
Connection card for M73 block using K-Lin adapter
Electrical diagram for connecting M72 models with a battery
According to this diagram, the M74 microprocessor unit is connected
Algorithm of actions
- Make sure there are no signs of damage to the key fob. Check the functionality of buttons and contacts.
- Check the power supply. If necessary, replace with a new one.
- Check the functionality of the central control unit. If the central unit breaks down or malfunctions, you will need to contact the service center installers to install new software.
- The device that detects impacts on the surface of the car may not work if the settings are incorrect.
- Drivers often encounter the opposite problem - the system reacts to the slightest contact with the body as a result of falling leaves, wind, rain, snow, etc. You will also need help with setup here.
Another common problem that the driver cannot cope with on his own is the loss of connection between the power supply and the electromagnetic contact. The contact ensures uninterrupted opening and closing of the prior doors. To determine the problem, you need a special device - a multimeter. Depending on the reasons that caused the malfunction, reinstallation of the software or replacement of parts is required.
Bypass immo using crawler
You can bypass the engine blocker by breaking the conductors. To complete the task, you will need to dismantle the protective cover on the steering column, which is secured with two self-tapping screws.
After this, the following is done:
- There are two thin cables going to the ignition switch; either of them (green or white insulation) must be cut.
- Then you need to connect a two-wire loop from the break point to the bypass module.
- This element is connected instead of an inductive loop. Then the chip is installed. It is installed in the standard key. The lineman is connected to the anti-theft installation.
If it is necessary to disable the security system, the loop contacts must be closed. The use of special Starline bypass modules is allowed. The device model VR-03 can function with any anti-theft systems.
Eventually
The immobilizer is a truly outdated device in principle, and it is disabled or bypassed. In return, you can install a reliable alarm system and “secrets”, which are more likely to protect the car from intruders, and not from its own owner. Modern anti-theft systems, of course, are “hackable with a glance,” but they give the owner an accurate idea that everything is fine with the car.
Good day to all!
There are those who are ardent supporters of disabling the standard immobilizer
and there are those who are satisfied with everything, and I still exist.
I
am the one who has a standard active immobilizer + alarm system + difficulties.
Actually, it’s not so much the complexity as the misunderstanding of how all “this” should work.
I purchased a car with one set of keys:
training from Priora and a key fob with an LCD screen for the alarm system.
Alarm KGB FX7
, everything is standard: autostart, feedback, turbo timer and other gadgets.
Autostart worked, the key started the car, but it wasn’t enough for me, I wanted a key with buttons ( working
). By the way, only the driver's door was unlocked by the alarm; then you had to open it and press the ESP unit to open the other three. Those. the ESP unit controls only three other doors.
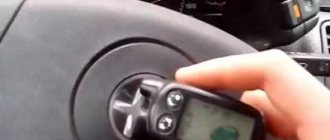
Video “The procedure for bypassing immo visually”
User Dmitriy Epishev showed how to disable the immobilizer on a Priora using the bypass method.
Do you have any questions? Specialists and readers of the AUTODVIG website will help you ask a question
Was this article helpful?
Thank you for your opinion!
The article was useful. Please share the information with your friends.
Yes (100.00%)
No
X
Please write what is wrong and leave recommendations on the article
Cancel reply
Rate this article: ( 3 votes, average: 5.00 out of 5)
Discuss the article:
Where is
In the LADA Priora car, the automatic anti-theft system (APS) is structurally built into the electrical package unit (comfort unit). Depending on the year of manufacture of the car, its location may be different. In early Priora models, it was located under the center console (beard), which is located in the middle of the dashboard. Under the electrical package unit in these models there was an electronic engine control system (ECM) or an electronic control unit (ECU).
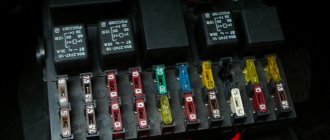
In subsequent modifications of the Lada Priora car, the comfort unit, in which the immobilizer is located, was placed on the left side of the mounting block by the designers. The latter contains relays and fuses. Due to the fact that the electrical package unit is fixed to the surface of the body, behind the mounting block, it is difficult to get to it.
According to factory technology, to dismantle the comfort unit, it is necessary to disassemble part of the instrument panel, which is long and difficult. But there is another way:
- Before performing any operations on the vehicle's electrical equipment, be sure to remove the contact terminal from the negative electrode of the battery. Remove the plastic panel from under the steering wheel by unlocking the mounting fasteners.
- The mounting block becomes visible, behind it the assembly with the immobilizer is screwed in a perpendicular position. Blindly, use your hands to approach the 3 wiring connectors of the electrical package unit and disconnect them.
- Using a bell wrench with a working head of 10, unscrew the 2 mounting bolts that hold the electrical package unit by touch. The bolts are not visible, they are located behind the fuse box.
- Carefully remove the assembly; it can only be removed in one position.
Two autostart connection schemes
Autostart is implemented in different ways in different equipment models. Typically, two wires coming from the “power” connector must be connected to the gap in the standard wiring connected to the starter (pin “50”):
Autostart and alarm Starline A91
What is indicated above is the first option, but not the only one. Before installing an alarm system on a VAZ, ask how autostart works in it. Perhaps an “alternative” version of the scheme is used:
Autostart, Tomahawk brand equipment
Here, as you can see, there are two different circuits connected at the “T” point.
If the scheme is implemented in the first way, most likely, the signaling system is designed like this: by turning the key to the “Start” position, the owner initiates the triggering of the crawler. If the second option is used, the latter cannot be true. Thus, all crawler modules that have 4 taps (2 for antenna and 2 for power supply) are not applicable in any way in the second case.
“Thin” wires – antenna terminals
The connection is made through a break in the standard wiring or using inductive coupling. Both options are discussed below.
Disabling the immobilizer, if it is activated, can only be done by replacing or reflashing the ECU. If you are not satisfied with this method, read on about installing the crawler.
One way alarms
These are the simplest of security systems.
Usually their functions roughly correspond to those performed by the standard Priora alarm system. Disabling one of the important lines of car control, turning on the central locking, sound alarm about an attempted burglary. Among the additional functions, some have a trunk opening and automatic closing of the door windows when closed. The range of key fobs of these systems usually does not exceed 50 meters. Important! These additional functions for Priora are initially included in the standard electrical package. Therefore, they should be installed and connected there, rather than running duplicate lines.