Diagnostics of Lada electric power steering without a scanner
Cars Lada Kalina, Granta and Priora can be equipped with electric power steering (EPS) from different manufacturers (for example, Kaluga or Makhachkala). If defects appear in its operation (failure, does not work, turns off, etc.), diagnostics should be performed using a special scanner. It is also possible to find the causes of failures without special equipment using a paper clip method.
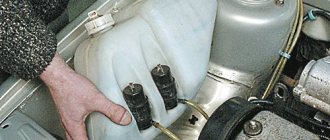
You need to remove the plastic casing of the control column (unscrew the fastening screws from the bottom) and get to the 8-pin dark connector.
It has the following pinout :
- Blue (ignition switch 12V);
- Brown-red (tachometer);
- Gray (vehicle speed);
- Pink-white (EMUR control lamp);
- Yellow-black (K-Line);
- Empty (L-line, no wire connected)
- Brown (mass)
- Empty.
To diagnose the EUR without a scanner, you must:
- Turn off the ignition;
- Close contacts No. 6 and No. 7 of this connector using a piece of wire or a paper clip (do not remove the connector);
- Turn on the ignition;
- Determine the fault code by the flashing of the electric power steering fault warning light on the instrument cluster.
Determining the EUR fault code by a flashing lamp:
- the duration of the initial pause is 2 seconds;
- long signal duration 2 seconds;
- short signal duration 0.5 sec;
- pause duration between signals is 0.5 seconds;
- Pause duration between codes 2 seconds
Electric power steering error codes:
11 System OK
12 No engine speed signal
Power steering stopped working on grant
Assembly/disassembly/soldering took 3 hours. Cash costs 0 rubles. In the video you can see that I forgot to disconnect.
Diagnostics of EUR (EMUR Electric power steering) VAZ using the “paperclip” method Kalina, Priora
The video editor on the phone decided that such video quality would be trampled)))) Another unpleasant discovery of Ringing.
13 Torque sensor fault
14 EMUR engine malfunction
15 Malfunction of the steering shaft position sensor
16 Malfunction of the EMUR engine rotor position sensor
17 Malfunction of the car's electrical system (below 10V or more than 18V)
18 Malfunction of the EMUR control unit
EUR fault codes when diagnosing with a special scanner:
C1012 Vehicle Speed Sensor Signal Circuit No Signal
C1013 Vehicle voltage is below the minimum threshold
C1014 Voltage at the ignition switch is below the minimum threshold
C1021 Torque sensor main terminal voltage
C1022 Torque sensor control pin voltage
C1023 Incorrect signal of the main and/or control output of the torque sensor
C1024 Torque sensor, no signal
C1031 Steering shaft position sensor, main signal circuit malfunction, or out of range
C1032 Steering shaft position sensor
Malfunctions of the electric power steering and how to understand that the power steering is broken
Electric power steering is designed to make driving life easier. It helps to turn the steering wheel in a parking lot without putting much effort; in modern cars it prevents accidents and makes driving easier. It is more reliable and better than the hydraulic booster, but it still breaks down, although less often. Let's look at the main malfunctions in the operation of the electric amplifier and how they manifest themselves in order to be prepared for repair costs.
Symptoms of EUR malfunction
The most obvious one is the warning light on the dashboard coming on. It's a steering wheel with an exclamation mark. This icon comes in two colors – yellow and red. In the first case, you can drive the car, but you need to pull out the fuse for the electric power steering to completely cut off the power. In the second case, driving is not recommended; the power steering mechanism may block the steering wheel or you will lose complete control of the steering wheel.
The second sign can be considered the appearance of “heaviness” on the steering wheel , like on a domestic “classic”. At the same time, the buzzing of the electric motor will not be heard from under the steering column in the case of Kalina and Priora. This failure is reinforced by a warning indicator on the dashboard.
Fuse blown . This is a clear sign of a serious malfunction in the electric amplifier. The cause may be problems in the electrical part - oxidized contacts, damaged wiring, short circuit. Failures in the mechanical part of the power steering can also lead to a blown fuse - jamming of the gearbox or destruction of the steering rack. This leads to increased load on the amplifier motor, and as a result, a large current flows through the fuse.
Increased car engine speed at idle can serve as an indirect sign of a breakdown of the electric power steering.
About qualified electric amplifier replacement
If there is a need to replace the mechanism when the ESD does not work, we recommend contacting experienced technicians. When the car is under warranty, the most rational measure would be to contact the dealer network to resolve the problem.
There are situations that do not allow you to resort to these two methods of eliminating an amplifier malfunction. Then the only solution will be to manually replace the mechanism that has become unusable.
Let us immediately make a reservation that the replacement process if the EUR does not work is characterized by sufficient complexity. To carry it out successfully, you will need experience and the possession of special tools. Unqualified replacement actions can aggravate the scale of the breakdown, which will entail a significant waste of money on more expensive repairs in service conditions.
Before the actual replacement procedure, we recommend that you carefully study the entire list of features and actions if the ESD does not work. Here you will need to delve into the connection diagram of the unit, which will avoid damage to the electrical components of the mechanism.
To remove the amplifier, partial disassembly of the front panel of the Lada Kalina is necessary. After this, the device itself must be disconnected from the entire list of supply wires. Sometimes owners repair the electric power steering, avoiding the need to replace it with a new unit. As a rule, after a complex of restoration work, standard devices work no worse than their new counterparts.
A common malfunction is the occurrence of a knock that clearly comes to the driver from under the panel or the amplifier turns off. This phenomenon may be accompanied by a characteristic squeak that occurs during rotational actions with the LADA Kalina steering wheel. This situation is usually solved by using a special lubricant. If such an action does not bring the expected result, then a more detailed diagnosis of the amplification mechanism will be required.
To install the electric power steering in the seat of the Lada Kalina, you will need to be attentive and patient. All cable connectors must be tightly seated, and the device itself must be firmly secured. Only after this can you proceed to the reassembly of the previously dismantled front panel components.
Do-it-yourself repair of Kalina's electric booster
Where to look for the reason
Electrical problems may occur due to oxidized connector contacts. The ingress of moisture and dirt impairs the conductivity of the contacts, and as a result, errors in the operation of the EUR.
Failures in the electronics may be due to loss of signal from the torque sensor. For example, on domestic cars the contacts are poorly soldered. Over time, they “go away”, and problems with the electric booster begin. It is enough to clean them and solder them well and the problem will disappear. If the speed sensor does not work, the EUR will generate an error and refuse to work.
Fuse . Even if it looks intact, you need to examine it carefully. There were cases when the amplifier turned off and generated error 1058 “Engine, phase windings shorted” (relevant for VAZ models) due to burnt fuse contacts. Cleaning the contact surfaces or replacing the fuse eliminated the malfunction of the electric amplifier.
The reason for the failure of the amplifier may be in the mechanical part. This applies to the gearbox and steering rack. The first one may jam due to water and dirt getting into the planetary gears or their physical destruction - read “Design and principle of operation of the electric power steering.”
Damage to the rack boots leads to water, dust and dirt getting inside. This destroys the rack from the inside, the bearings are damaged, and the steering mechanism jams. There were cases when the ridges were licked onto the slats, the “worm” of the shaft rotated, and the connection between the car’s wheels and the steering wheel was lost.
Adjusting the steering wheel position
As mentioned above, the washers matter how much the steering column will deviate up and down. They are installed between the bracket and the amplifier. The amount of deflection of the steering column depends on their thickness.
1. Steering mechanism design
2. Speed sensor
3. Installation package of parts
How to check the EUR yourself
To understand what is broken in the amplifier, you need to diagnose it. Not every car owner has a diagnostic scanner; some people like to repair the car themselves. In this case, you can determine the malfunction of the electric amplifier yourself using a paper clip. This option is suitable for Kalina and Priora cars.
"Paperclip" method
We disassemble the protective cover of the steering column and get to the amplifier control unit. We find a black block with six wires. It is necessary to close contacts 7 and 6 between each other - “ground” and “K-line”. If you look at the block from the side of the wires, then the countdown goes from right to left, from top to bottom. You need a brown wire - contact number 7 and an empty socket, not used - number 6 in a row.
Turn off the ignition, insert a paper clip into the contacts, make sure that it does not short-circuit the other wires. Turn on the ignition and count the number of flashes of the warning light on the dashboard. One long signal, and then several short ones, these are the ones that need to be counted. Let's look at the decoding of fault codes for Kalina's electric booster :
- One short one – the system is working;
- Two - No signals from the engine speed sensor;
- Three – The torque sensor is faulty;
- Four – Electric motor failure;
- Five – There is no signal from the steering shaft position sensor;
- Six – The rotor position sensor is faulty;
- Seven – Low voltage on-board network;
- Eight – EUR control unit;
- Nine – Vehicle speed sensor.
In practice, this method may not always show real breakdowns. In this method, the control unit checks itself, and it needs to be checked under load. There were cases when it generated false errors, and the fault was hidden in the electric power steering ECU.
Repair and installation
As we promised, in this article we will learn how to repair the electric power steering if it suddenly fails. Often a symptom of EUR failure is a characteristic cracking sound.
Video showing installation of electric power steering:
Another, no less common symptom is a yellow error light, which is a picture of an exclamation mark on the instrument panel.
The following parameters may be the causes of steering wheel malfunction:
- the speed sensor fails;
- a malfunction that is hidden in the EUR itself (thus, when the ignition is turned on, no self-monitoring occurs and the device automatically turns off so as not to interfere with the driver’s control of the vehicle).
To remove the EUR from the car, you will need to arm yourself with sockets 13 and 21, as well as a key 8. Removing this mechanism is quite simple. First you need to remove the steering wheel using a special hex key. We use it to dismantle the signal button, which on some cars is screwed on.
The steering wheel of some cars, particularly older models, has special holes on the sides. In addition, you will need to deal with the airbags. We disassemble the steering mechanism with a 13mm socket and a 27mm wrench.
If we are talking mainly about Soviet car models, on which electric power steering is often installed, then you need to disassemble the mechanism as follows:
- remove four M4 bolts;
- one self-tapping screw is turned out;
- the steering wheel cover is removed;
- Next, you will need to disconnect the three connectors of the steering column switch;
- we find the connection of the wires and pull it down;
- remove the steering column switch;
- Now you will need to disconnect the wires going to the ignition switch. Note. It is recommended that before disconnecting the wires, write down or sketch their location, or you can take a photograph;
- now we find two bolts securing the ignition switch and unscrew them;
- insert the key into the ignition switch and turn the position to neutral;
- we pull out the lock by pressing the stopper with a thin metal rod;
- At the bottom we find the bolt securing the steering shaft;
- turn it away;
- remove the steering column, lowering it down from the shaft;
- Now you will need to unscrew the two nuts securing the fuse box;
- take them off;
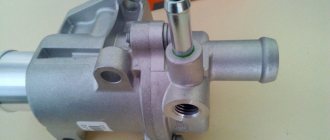
- now you need to go to the side of the engine compartment and remove the rubber plug (here it is - in the photo below);
Rubber plug - Now you need to extend the wiring harness from the EUR, if we are talking about installation;
- We connect the wires to the EUR (at the bottom of the photo we see the connectors where the wires need to be connected);
Connectors for connecting wires - the eight-terminal block will need to be connected to two gray wires;
- As for the white block, remove the red wire from here and connect the orange wire of the electric amplifier instead;
- then you need to connect the ground wire;
- We install the electric amplifier mounting plate in such a way that it is possible to thread the wiring harness into the hole;
- the plate will need to be tightened tightly at six points;
- Now you need to put the shaft with cardan shafts on the splines of the electric booster, and then connect the ground wire. Note. It must be remembered that the cardan forks have splines of different pitches and that is why the shaft cannot be installed in different positions;
- we dock the second end of the shaft together with the electric power steering - with the steering gear shaft;
- install the shaft (we do it in a way that will be convenient in a particular case);
- tighten the bolts and fastenings of the EUR;
- Now you will need to connect the terminal blocks;
- install a switch, preferably a three-lever one;
- we assemble the steering wheel and set up the switch;
- remove the steering wheel;
- install the ignition switch;
- We collect everything in reverse order.
How to protect the electric amplifier from damage
- We check the integrity of the steering rack boots;
- We try not to get into deep puddles, we cross water obstacles less often;
- We do not allow the power circuits to be overloaded by excessive force on the steering wheel. This happens when trying to get out of a rut when the wheel rests against the wall of the rut, when trying to turn a wheel that is pressed tightly against the curb or in the sand;
- We carefully drive onto the curb. A strong blow to a vertical obstacle at an angle can destroy the mechanical part of the power steering.
Add a comment Cancel reply
This site uses Akismet to reduce spam. Find out how your comment data is processed.
Installing new items
After removing both elements, you can begin installing new ones. For this:
- Screw the end onto the rod the same number of turns as the old one was screwed in. Thanks to this, you will be able to maintain more or less acceptable toe-in of the front wheels. You will get to the car service center without much tire wear.
- Tighten the nut securing the tip by hand. It is advisable to use new nuts for reliability.
- Reinstall the rod. First, tighten the bolt at the point where it is attached to the steering rack.
- Install the Kalina steering tip pin into the hole in the steering knuckle of the strut. You can hit with your hand from top to bottom so that your finger fits as tightly as possible. The use of a hammer is not recommended.
- Tighten the nut by hand.
After all these manipulations, you need to tighten the threaded connections. Bend the plate on the steering rack so that the bolt does not come out while driving. At this point, the replacement of the Kalina tie rod ends is completed, and you can begin operation. It is advisable to place a small amount of Litol-24 lubricant under the boot; this will help increase the service life of the elements.
What malfunctions threaten the EUR on Kalina and what are the ways to eliminate them?
Electric power steering is a component used to provide more comfortable driving. Not so long ago, domestically produced cars began to be equipped with EUR, in particular, in this article we will talk about Lada Kalinas. What malfunctions can occur with the Kalina EUR and what troubleshooting methods are there? Find answers to these and other questions below.
vendor code
Standard Electric power steering VAZ 1118 (Kalina), Granta, Datsun On-Do (Mi-Do), Priora 11186-3450008-02, 1117-3450008-02
Manufacturer: Autoelectronics, Kaluga, Russia
Price 20,500 rubles
Causes of EUR failure
Why does the electric power steering on the Lada Kalina not work, turns off and refuses to work, what are the signs of a steering wheel with power steering knocking, jamming, biting or squeaking? To repair the system yourself, you need to know how diagnostics are carried out and what causes precede the breakdown. Most often, the failure of the amplifier is caused by a breakdown of the unit itself and the amplifier fails. Problems of this type are resolved by thoroughly checking the system to identify the exact problem.
As practice shows, often the inoperability of the electric amplifier (failure) is associated with a breakdown of the speed controller.
- the steering wheel is jammed,
- jams
- becomes tight
- and others
Because the speed controller sensor ensures activation and deactivation of the electric power steering under different driving modes. The amplifier on Kalina works if the car is moving at low speed. When the speed begins to increase, the booster automatically turns off, allowing for safer machine control when driving at high speeds.
So, briefly about the reasons for the inoperability of the EUR:
- The speed controller has failed or the control unit does not receive or disappears a signal from it. In this case, the reason may lie in either a breakdown of the sensor, damaged wiring, or poor contact of the controller with the on-board network.
- The voltage in the vehicle's electrical network has decreased. The reasons can be different, ranging from a dead battery and an inoperative generator to the use of inappropriate electrical equipment in the car.
- The permissible crankshaft speed has been exceeded.
- Incorrect operation or failure of the control module. Depending on the cause, the control unit may need to be repaired; more detailed diagnostics need to be done.
List of online stores, addresses of companies providing services
| № | Name | Contacts, address |
| 1. | STO "A1-Motors" | Moscow, st. 1st Dubrovskaya, 13a, building 4, phone https://a1-motors.ru/ |
| 2. | Motel Varshavskiy – Spare parts store: Hyundai, LADA | Moscow (metro Annino), metro Annino, 32 km. MKAD (on the territory of Kashirsky Dvor 3). Phone, (495) 388-64-09 |
| 3. | "Expert-Auto" - Spare parts store: Renault, LADA | Moscow (metro station Tulskaya), Zagorodnoye shosse, 7A, telephone, |
| 4. | “Spare parts on wheels” – Spare parts store: Renault, LADA | Mytishchi, Volkovskoe highway, 13, phone: (985) 666-71-45, |
| 5. | Service station "Car service on Sedova" | m. Elizarovskaya, Sedova street, 11AB, box C |
Related link:
Tips for replacing the Granta liftback fuel filter with your own hands
Reviews of companies
- Vasily: six months ago I installed a servo drive on Grant at the A1-Motors service station. The guys did everything quickly and professionally. My recommendations.
- Ivan: after buying the Lada, I replaced the power steering with an electric steering system. I ordered the work from the service station “Auto Service on Sedova”. New equipment, many repair boxes, work professionally.
- Innokenty: comrades recommended installing an EUR. I bought it at the Motel Varshavsky parts store. Good quality, reasonable prices, bonuses when purchasing.
- Vladlen: I drove the power steering for two years and decided to switch to the electric power steering. They advised to buy from Expert-Auto. Six months have passed since installation, no complaints, my recommendations.
- Vyacheslav: I’m leaving my positive review about the auto parts store “Spare Parts on Wheels”. Professional advice, reasonable prices, friendly staff.
Diagnostics
To check the amplifier in a car, you need to remove the plastic trim on the steering column; to do this, unscrew the bolts securing it from the bottom.
Then you will need to get to the 8-pin plug, its pinout is as follows:
- The blue contact is connected to the ignition switch, this is 12 volt power;
- the red-brown contact is the connection cable to the tachometer;
- the gray contact goes to the car speed controller;
- white and pink wire - amplifier control indicator;
- black-yellow contact is a diagnostic line;
- the next contact is empty, the wire is not connected to it;
- brown contact is ground;
- empty.
More accurate results will be obtained by checking the amplifier using a scanner. But since such equipment can usually only be found at service stations, you can try to check the operation of the system with a paper clip.
To check you need to do the following:
- First the ignition is turned off.
- Then, using a paper clip, you need to close contacts numbered 6 and 7 of this plug, while the plug itself does not need to be removed.
- Next, the ignition must be turned on.
- After completing these steps, the EUR failure indicator located in the dashboard will begin to blink; by the number of blinks, you can determine whether the system is broken (the author of the video is Gosha Vakhromeev).
How to understand where to look for the cause by the blinking indicator icons:
- one long signal and one short signal - the electric amplifier is working;
- one long and two short - no engine speed signal;
- one long and three short - the torque controller is out of order or there is no power supply;
- one long and four short blinks—problems in the operation of the electric power steering motor;
- one long and five short - the steering shaft position controller has failed;
- one long and six short - the motor rotor position controller has failed;
- one long and seven short - problems with the electrical network - the voltage is either too high or very low;
- one long and eight short - the control module of the electric amplifier has failed;
- one long and nine short - the speed controller is broken.
Error codes
c1044 - incorrect sequence of the rotor position sensor (RPS)
c1621 - incorrect voltage 5V
c1622 - speed signal circuit failure
c1011 - car engine speed signal circuit, no signal - the signal from the idle sensor (or the standard tachometer through a voltage limiter) is divided by 4 and applied to the tachometer input,
c1022 - error, voltage of the main output of the torque sensor - it is possible that the shaft cover has rubbed the insulation and the middle, green wire shorts to ground
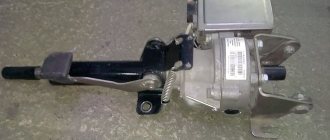
Dismantling and disassembling the electric amplifier
Before removing the amplifier, you need to remove all the steering column switches. Remove the steering rack cover and dismantle the devices, remembering to disconnect the connectors from the power supply.
How to remove the EUR with your own hands:
- After removing the switches, you will need to dismantle the lower cross member of the dashboard. To do this, you need to press the fasteners that secure the connector with wires, and then disconnect the wiring from the control module. Once these steps are completed, you can disconnect the connector from the switches.
- The system bracket is secured with nuts; you will need to unscrew them with a wrench.
- After this, the steering rack will need to be carefully lowered down. To do this, you will need to find the bolt that secures the driveshaft to the booster shaft. This bolt must be unscrewed, but when unscrewing, you will need to fix the nut, this will prevent it from turning. When the bolt is removed, the fastening will need to be loosened, after which the intermediate shaft will be carefully removed. At this stage, we recommend marking the position of the shaft and gears; you can use a marker for this. This step is very important because doing it will prevent possible installation problems in the future. If the marks on the shafts do not match, this may cause problems with the amplifier. When dismantling, be careful not to damage the wiring, as this will also lead to the inoperability of the ESD.
- When the unit is dismantled, it will need to be disassembled and the failed elements replaced. Further editing is done in reverse order (the author of the video is Murzik Bely).
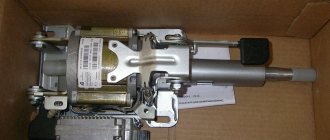
Installation instructions
This manual is intended for those who have minimal skills in working with tools and vehicle systems. It is made as accessible as possible to everyone. But if you doubt your skills and knowledge, it is better to contact a car service.
Required tools and materials
First of all, you will need the EUR itself. Please note its serial number. The last two digits indicate the type and place of production.
So, 00 is a geared amplifier, produced in Makhachkala and has received complaints from drivers. With the numbers 04 - Korean, installed on Grants and Kalinas, a good amplifier, can be found in stores, but there are few of them on sale. Well, 02 - Kaluga, gearless type, also has good reviews.
To connect, you will need common tools such as screwdrivers, wrenches, and an angle grinder.
Installation process
First, you will need to completely remove elements such as the airbag, steering wheel, switches, ignition switch, and finally the steering column along with the bracket and cardan.
Then do everything as follows:
- Taking the old bracket-plate, knock out the bolts from it. Then cut off about 30 mm from the top (where 2 bolts are welded and there are 3 holes).
- Try the plate on the EUR, if the holes do not match (most likely this will happen), drill them.
- Now you need to attach the gimbal to the amplifier.
- You need to put washers under the bracket at the point of attachment to the amplifier. They can be of different thicknesses and have a direct impact on future steering adjustments.
- Now you can attach the EUR. Insert the cardan onto the rack.
After all this you need to connect the wiring. Below is the connection diagram.
Wiring diagram
How to tighten the electric power steering rack?
The appearance of a knocking sound in the operation of the electric power steering is associated with the need to tighten the steering rack.
How to do it right:
- First you need to disconnect the battery; to do this, disconnect the terminals from it. Unscrew the battery mount; to do this, you need to unscrew two more nuts located at the edges. After this, the battery is removed and put aside.
- Then you need to lift the plastic stand, there are four more screws under it, they can also be unscrewed.
- Having done this, it is necessary to move this stand forward until the platform is disconnected from the air filter housing retainer pad. After this, the trim can be moved back, this will provide freer access to the rail itself.
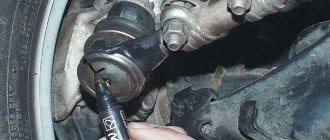
- At the next stage, you will need to crawl your hand under the rail. Directly below it, as shown in the photo, there is a rubberized cap; it will need to be removed, this will allow the key to access the adjusting nut.
- To perform adjustment work, you will need a special wrench to tighten the rack; without it, the adjustment procedure will not be possible. Using this wrench, you need to crawl under the car rail to install the tool in the required hole.
- When adjusting, be careful not to overtighten the rack. If its tightening is very strong, then when cornering the rack will bite, and this, in turn, may affect the safety of movement. The angle of adjustment is always different, it depends on how much the nut is loose, but usually when performing such work the nut is tightened by approximately 30 degrees. This should be enough to get everything right. After the adjustment is completed, it will be necessary to check that this task was performed correctly. That is, you will need to make sure that the steering wheel turns normally to any position all the way and there is no knocking. If the knock remains, then the adjustment continues.
Removal and installation
DIY steering rack diagnostics and repair
This is not such a complicated procedure as it might seem. And it even requires very few tools:
- Socket wrench for 8.
- A socket with a knob, or a 13mm socket wrench.
- Figured (phillips) screwdriver.
And nothing more than the ability to use them. This is provided that the steering wheel itself has already been removed, which is a different story.
Attention! Before starting the process, first of all, disconnect the battery! You can simply remove one terminal. Well, now forward
Remove the plastic covers from the steering column by unscrewing 2 screws and unfastening 2 fasteners. Using a screwdriver, unscrew the four bolts and separate the lower part of the lining. Now the lock and the “helicopter” - the turn switches and wipers - are in the way. First of all, pressing the antennae on the connectors, disconnect all the wires. Then, using a 8 key, loosen the clamp that attaches these devices, after which they will freely come off the shaft casing
Well, now go ahead. Remove the plastic covers from the steering column by unscrewing 2 screws and unfastening 2 fasteners. Using a screwdriver, unscrew the four bolts and separate the lower part of the lining. Now the lock and the “helicopter” - the turn switches and wipers - are in the way. First of all, pressing the antennae on the connectors, disconnect all the wires. Then, using a size 8 wrench, loosen the clamp that attaches these devices, after which they will freely come off the shaft casing.
Disconnect the two connectors from the ESD ECU. Remove the plastic cover from the special pin.
Do not unscrew the lower nuts completely, but turn them a few turns with a number 13 wrench. But pull out the coupling bolt of the intermediate shaft hinges completely, unscrewing its nut by 13. Well, there you go. Having unscrewed all the fastening nuts, you can remove the faulty Priora EUR. Using a 13 key, release the lower shaft of the device from the splined joint. OK it's all over Now. You can try to fix the malfunctions described above yourself, take it to a workshop, or simply install a new unit on your Priora, proceeding in the reverse order.
Useful video on general repair of Priora electric power steering:
One of the new products of the Russian automobile industry, the Lada Kalina, became the first domestic car equipped with EMURU - electromechanical power steering. How does Kalina electric power steering work? A separate large article will be devoted to the answer to this question. We will only note that as the speed the car picks up increases, the compensating torque of the electric power steering gradually decreases, and when it reaches 60 km/h it turns off automatically. At first, this part was not completely “finished” and had one dangerous property - it could turn off while the car was moving, regardless of its speed limit. It should be noted that today all these problems are a thing of the past. Let us add that the electric amplifier can be completely turned off by removing one of its fuses. True, the steering will become even “heavier” than on the “ten” or “fourteenth”.
The EMURU device operates from the vehicle’s on-board electrical network with a voltage of 10.8 to 15V.
Lada Granta Electric Power Steering Doesn't Work
Diagnostics of Lada steering wheel without a scanner
Lada Kalina, Grant and Priora cars can be equipped with power steering (EUR) from different manufacturers (for example, Kaluga or Makhachkala). If defects are detected in its operation (failed, does not work, turned off, etc.), a special scanner must diagnose. You can also find reasons for failures without special equipment using the paperclip method.
It is necessary to remove the plastic housing of the control column (unscrew the mounting screws from the bottom) and get to the 8-pin dark connector.
He has one clove :
- Blue (ignition switch 12V);
- Brown-red (tachometer);
- Gray (vehicle speed);
- Pink and white (EMUR indicator);
- Yellow-black (K-line);
- Empty (L-line, no wire connected)
- Brown (mass)
- Empty.
To perform EUR diagnostics without a scanner is required:
- Turn off the ignition;
- Cover pins 6 and 7 of this connector with a piece of wire or a paper clip (do not remove the connector);
- Turn on the ignition;
- Determine the fault code for the blinking steering wheel fault indicator on the instrument cluster.
How dangerously weird electric power steering is, especially VAZ ones - data from 2022
Power steering reduces the effort required by the driver to control the vehicle. This is a mandatory element for trucks, but it is not always installed on passenger cars. One of the varieties of this device is electric power steering (EPS), which makes driving as comfortable as possible. On the other hand, it often stops working correctly without any apparent reason.
Common causes of electrical amplifier failure and risks
Electric power steering stops functioning under certain circumstances for a variety of reasons:
- Due to increased humidity, the electric motor and fuse may fail, so it is important to prevent these negative factors from occurring.
- The voltage regulator should produce a voltage of 13.6-14.4 Volts when the generator is running. At lower values, the electronic power steering control unit will not work.
- Due to a blown fuse, which must be identified by checking the integrity of the internal thread and replaced if necessary.
- If the ECU fails, it can overheat under the influence of high temperatures from the radiator of the heating system.
- If the voltage in the on-board vehicle network is too low. This may be due to a weak battery or malfunctioning car charging system.
- Situations arise when the electric power steering turns off while the vehicle is moving. The cause of such phenomena is the failure of the motion sensor. As a result, the ECU does not receive the necessary information and does not turn on the device.
To correct the situation, you need to clean the outer surface. In addition, you should check the contacts and wiring. If such measures do not lead to the desired result, then you will need to replace the sensor itself, which can be purchased at an affordable price at a car store.
When stopping the operation of the power steering after starting the on-board computer with the ignition on, you need to pull out the fuse located to the left of the steering wheel. This will prevent the device from turning on unexpectedly while driving and causing an emergency. After this, it is best to immediately seek professional help from a car workshop.
Battery problems
Based on this, we can draw the first conclusions about the cause of the breakdown. A common cause of malfunction is low voltage in the on-board network. The fact is that for the amplifier to function, a supply voltage of 13.5V is required.
First of all, we test the battery, if everything is fine with it, then we’ll look into it further. The problem may have occurred when you removed the battery for charging. To make the electric booster work again, turn the wheels to the extreme position and back 5-6 times, very often this is enough to resume operation.
The main problems of VAZ EURs
This legendary Russian automobile manufacturer, together with the Aviaagregat enterprise from the city of Makhachkala, has developed an electric power steering for cars of the Lada Kalina and Priora family.
Of the first production samples, only half of the devices worked properly. However, approximately 35% of them did not want to join at all. The rest failed due to serious malfunctions, which often caused accidents.
Among the problems are:
- mechanical breakdowns of the rack;
- steering mechanism jamming;
- most often the gearbox fails, because of this, the power steering for the Lada Priora model began in Kaluga to be manufactured without a gearbox at all;
- Such products developed another problem in the form of spontaneous rotation of the steering wheel when driving at low speeds.
On the other hand, defects in such products most often appeared as a result of the peculiarities of off-road operation of the vehicle. Despite the improvement in quality, AvtoVAZ chose the South Korean company Mando as an alternative supplier of electric power steering. These products have proven themselves to be the highest quality of those installed on Lada models.
According to reviews from car enthusiasts, the ESD problem on VAZ cars most often manifests itself when turning. The steering wheel pulls in the opposite direction from the turn. It's very difficult to keep him.
According to the driver who was involved in the accident: on a sharp turn to the right, the steering wheel was torn out of his hands due to a failure of the electric amplifier. As a result, the car drove into the oncoming lane. He addressed his claims to the AvtoVAZ plant.
Thus, despite the apparent problems, the electric amplifier is a technological device that greatly facilitates driving. Its design, quality and reliability are improving every year.
Reviews
| 2. | Motel Varshavskiy – Spare parts store: Hyundai, LADA | Moscow (metro Annino), metro Annino, 32 km. MKAD (on the territory of Kashirsky Dvor 3). Telephone, |
| 3. | "Expert-Auto" - Spare parts store: Renault, LADA | Moscow (metro station Tulskaya), Zagorodnoye shosse, 7A, phone: (916) 838-00-62, |
| 4. | “Spare parts on wheels” – Spare parts store: Renault, LADA | Mytishchi, Volkovskoe highway, 13, phone, (968) 409-30-19 |
| 5. | Service station "Car service on Sedova" | m. Elizarovskaya, Sedova street, 11AB, box C |
| № | Positive |
| 1. | Ignat: six months ago I installed the servo drive myself. I bought a domestic one, it works properly, no complaints. |
| 2. | Vasily: my garage mates recommended buying a servo drive. We installed it ourselves last weekend. Control with minimal effort. My advice to motorists. |
| 3. | Kirill: I heard a lot of positive reviews about the servo drive, so I decided to install it. I've been actively using the car for over a year now and have no complaints. |
| 4. | Victor: I ordered the installation of the EUR at a service station, the guys handled it quickly and provided a one-year warranty. |
| Negative | |
| 1. | Gennady: I’m dissatisfied with the quality of manufacturing of the domestic servo drive. Three months after installation it had to be removed and repaired. |
| 2. | Slavik: the EUR I installed lasted six months, after which the bearing flew. |
| 3. | Sergey: I used the servo drive for six months, after which I returned the power steering. Broke too often. |
Conclusion