Grease accumulation in spark plug wells is a common problem on Priora cars. The reasons for this may vary. They largely depend on the car model and the design of its engine.
Any problems that arise in the car must be corrected immediately, otherwise a complication may arise, and then more expensive repairs will be required. So if you notice oil in the wells on your Priora car with 16 valves, then this situation cannot be ignored.
The appearance of oil in Priora spark plug wells: causes and solutions
Any problems in the car must be repaired immediately, otherwise a complication may follow and, as a result, complex and expensive repairs will be required (in most cases this is not an exaggeration, but a fact).
Some cars have a certain number of shortcomings that owners are prepared for when purchasing. For many motorists, oil in Priora spark plug wells has become a common occurrence, although the phenomenon does not occur so often. And therefore, owners of domestic cars are trying to solve this problem as soon as possible.
If you have the skills to restore a vehicle, you can carry out repairs yourself; no difficulties will arise during the execution.
Let's sum it up
In the first case, we spent about 4 hours and about one and a half thousand rubles to complete all the necessary work. Using the second method, you will spend no more than 1.5 hours on repairs, since the need to remove and reinstall the receiver and valve covers will be eliminated.
So, we found out why oil forms in spark plug wells and how to fix this problem with your own hands. Don't break!
It is necessary to understand the reason why the oil turned out to be in the spark plug well of the VAZ 2110 after the main thing has been clarified. The reason for this factor may vary, and it also depends to some extent on the types of engines. On a VAZ 2110, oil in spark plug wells can lead to unpleasant consequences.
Why does oil accumulate in the spark plug wells in Priora and what does this lead to?
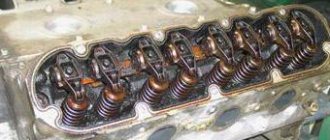
The problem is common in 1.6 liter engines. In early versions, there were rubber gaskets under the valve cover, while the updated ones use exclusively sealant to tightly fit the parts.
For a modern Priora, oil in the spark plug wells is formed as a result of the sealant drying out after long-term use of the car or when using a low-quality composition. Therefore, completely removing accumulated oil and old sealant will be the right solution to the problem.
This is the same case when the plant tried to reduce costs and simplify the design. However, they did not take into account one simple rule: “Kroilovo leads to Popadalovo.” This principle can be applied to all cases in life, and in relation to your car as well.
Oil can accumulate in the Priora well even in a completely new car, therefore, immediately after purchase it is worth checking the vehicle at a service station or in your own garage. Otherwise, a brand new car can present a very unpleasant surprise, and the reason for such a dirty trick lies solely in the sealant used.
There is a high probability that after release or a long period of inactivity of the car in the cabin, the low-quality composition will simply dry out. And as a result of test or first long trips, oil will accumulate in the wells. And in order to avoid expensive repairs on the purchased model, you should not miss the opportunity, but check the quality of the installed system.
If the oil remains in the spark plug well for quite a long time, the rubber insulator of the spark plugs will soften as a result. This will lead to a very serious problem - puncture of spark plugs, insufficient supply of specialized oil to the engine.
Naturally, such a phenomenon will cause unstable operation of the power unit, as well as subsequent more frequent diagnostics and replacement of spark plugs. Therefore, for Priora, oil in spark plug wells is considered, although a common problem, but quite acute. And as a result, it requires immediate permission, otherwise untimely repairs may be necessary when the car simply stalls on a country road.
Checking the hydraulic pusher
Next, you need to check the hydraulic pusher. How to do it? Everything is very simple - using a soft metal drift (or a simple screwdriver), just press on it and monitor its further condition. Ideally, the hydraulic pusher should be pressed with great force.
But if you used a minimum of force to do this, then most likely this device needs to be replaced. By the way, when diagnosing a hydraulic tappet, the camshaft cam must be directed towards the first with its back side.
What to do if oil has accumulated in the spark plug wells of the Priora?
Novice motorists are advised to contact a specialized service station for proper repairs.
If the owner wants to save on repairs and carry out them himself, then he will need to study the instructions in detail and follow them exactly. Since oil in spark plug wells is not only an unpleasant problem for Priora, but also a rather serious problem, it is necessary to begin solving it as early as possible.
Complete repairs are carried out according to the following scheme:
1. The intake manifold is removed.
2. The timing belt cover and the belt itself are removed.
3. The valve cover is removed.
4. The camshaft is removed and the old sealant is removed from all surfaces. Let us dwell on this point in more detail. The phrase “the old sealant is removed” does not mean that you can pick it off with a screwdriver or knife! Under no circumstances should you do this! There will be scratches and scratches on the metal, and you will never be able to achieve sealing of the parts.
They will snot oil and suck in air. The sealant can be removed with gasoline, acetone, and white spirit. Just wet the cloth and rub the surface until the part is clean.
5. The surface of the cover is coated with anaerobic sealant, and assembly is carried out in the reverse order.
Such a system is quite simple, but it also requires careful sealing of the joints between the well connections. Don’t forget about the wells themselves, because the elements quite often contain old composition on the walls. They are usually covered quite thoroughly with sealant and this should also be wiped off the surfaces.
All this will allow you to remove oil and sealant from the spark plug wells on the Priora and achieve optimal system condition and normal engine operation.
Old sealant must be washed off. If residues remain, they may interfere with the correct and high-quality sealing of the parts. As a result, the above operation will need to be repeated.
The cost of the work is minimal, since only one tube is enough to cover all surfaces. It is also important to consider that Priora oil accumulates in the well if it is not sealed correctly again, and as a result, you will need to lose personal time for another repair.
To process the connection of the wells, you need to use a special red sealant, which can be purchased at any automobile store or workshop. But when carrying out work, it is important to remember about the correct installation of the camshafts and all other parts.
Correct operation of the system will only be guaranteed if all removed elements are carefully assembled. If the work was carried out incorrectly, and more serious problems followed: breakdown, deterioration of the power unit, then it is recommended to contact a professional workshop to perform high-quality repairs.
For owners of models with a 1.5 liter engine, such a replacement is not suitable. Because you will need to purchase new gaskets and install them between the connecting parts. In particular, the cost of such repairs will be very insignificant. But it is worth remembering that the spark plug is pierced, and that the coil may simply fail later.
When making repairs, experts recommend using a heat-resistant sealant, as well as high-quality oil, which, in case of leakage, will corrode the insulation more slowly. It is also worth removing not only the old sealant, but also the deposits that have formed, because it also negatively affects the operation of the candles. The normal functioning of the car will be ensured only if its normal condition is maintained.
Source
Nuances when performing work
If you decide to resort to the second option, do not forget about the rules of operation and work with this puller, otherwise you will not be able to remove oil from the spark plug wells. What exactly are we talking about? Let's explain.
Firstly, the rubber band of the tool must be fully immersed in the spark plug well. Otherwise, it will gradually expand, and you will not be able to remove the glass.
Secondly, when removing the well, there is a possibility that the valve covers will move, which can subsequently block the key exit. But since the thickness of the glass wall is too small, the mentioned part can be easily removed using a long thin screwdriver.
Thirdly, when pulling out the spark plug wrench, you need to make sure that the old lower oil seal does not jump out of place.
Summary
The reasons for oil leakage into the spark plug wells of the sixteen-valve Lada Granta power plant is a loose connection of the valve cover to the camshaft bed and/or the camshaft cover to the cylinder head. A malfunction increases the level of fire danger and leads to failure of the ignition coil and spark plug.
Treating the joints of the mating parts of the cylinder head with an anaerobic sealant helps prevent leakage. To apply the sealing compound, it is necessary to dismantle the parts and prepare the surfaces. When reassembling, be sure to replace the receiver gaskets and use a torque wrench.
A fairly common phenomenon is the appearance of oil on the spark plugs, which negatively affects the operation of the engine, ranging from unstable starting to decreased dynamics, increased fuel consumption and a general decrease in the power of the power plant.
In addition, the waste of motor oil, which, as is known, is more expensive than gasoline and significantly hits the pockets of car enthusiasts, can increase quite significantly, plus the constant “triplication” of the engine and unstable idling cannot but stress the owner.
What are the reasons for the appearance of oil on candles? In this article, we will analyze the main ways oil gets into the engine combustion chamber and, as a result, onto the spark plugs.
Possible reasons for oily spark plugs:
1. Valve guides; 2. Valve seals; 3. Valves; 4. Piston rings; 5. Increased oil level in the engine crankcase; 6. Crankcase ventilation duct clogged.
1. When the inner surface of the guides wears out, a large gap appears between the valve stem and the guide sleeve, which allows oil from the cylinder head to enter the combustion chamber and onto the spark plugs.
Rarely, but there is also a situation when the guide sleeve comes out of the head body. This usually happens if the bushings have been replaced several times and instead of repair bushings (with an increased outer diameter), standard bushings were installed.
2. Valve seals can leak oil into the combustion chamber for several reasons.
• “Tanning” of the crimping part of the oil seals, which usually occurs when the engine overheats;
• The crimp spring has stretched or jumped off the oil seal body;
• The oil seal has risen from the body of the guide bushing;
• If the bushings are heavily worn, the valve works with pressure on one side, pressing the edge of the oil seal, which allows oil to get into the combustion chamber and onto the spark plugs. Therefore, there is no point in replacing valve seals if there is significant wear on the valve bushings or valve stems, since the seals will quickly fail. The valve guides must be replaced immediately.
Signs that the valve stem seals are worn are the presence of oil at the beginning of the spark plug thread near the spark plug ring, as well as a smoky exhaust when starting the engine, which disappears as the engine warms up.
3. Valves are also subject to wear, especially in this case the valve stems. When they wear out, a large gap appears between the guide and the valve stem, which also leads to oil leakage into the combustion chamber and onto the spark plugs. Replacement of valves and, as a rule, guide bushings is required.
4. When the piston rings, as well as the cylinder bore, wear out, oil is sucked into the combustion chamber, this is the so-called pumping effect. It is necessary to replace the rings, and possibly the pistons themselves when they are worn out. In such cases, cracked partitions under the rings on the piston are also possible.
Signs of piston ring wear are the presence of oil at the end of the spark plug threads and on the insulators themselves. It is necessary to check the compression in the engine cylinders with all spark plugs turned out.
5. An increased oil level can be caused by a banal overflow of oil during replacement, or when coolant gets into the engine sump. It is treated by draining excess oil, or by repairing the engine if antifreeze gets in.
6. When the crankcase ventilation is clogged, the pressure of the crankcase gases increases, which also causes excess oil to enter the combustion chamber, since the piston rings are unable to cope with the large amount of oil in the cylinder.
Engine detonation may also occur (often when using low-octane and low-quality gasoline), which during long-term operation sometimes ends with the fact that when the spark plug is removed, there are no electrodes or the insulator on it. If you are lucky, these parts of the spark plug will “fly out” into the muffler, otherwise, if they get between the seat and the valve plate, complex and expensive engine repairs will be required.
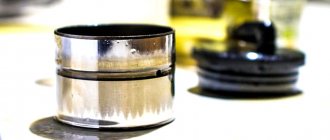
Replacing oil seals
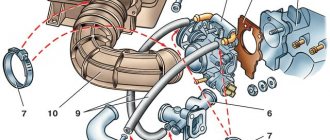
To replace the seals, it is necessary to remove the valve cover; the work on removing it is described above. The process of removing the wells must be carried out using two flat-head screwdrivers. At the top of the wells there is a protrusion into which screwdrivers rest on two opposite sides:
- Carefully press the screwdrivers with equal force at the same time and remove the glasses.
Warning: carefully remove the cups, do not allow the lower sealing ring to fall into the camshaft bearing housing.
Clean traces of sealant from the dismantled glasses, wipe with a rag the places of accumulated dirt around the circumference of the wells:
- Install the purchased oil seals inside the wells and lubricate them with engine oil.
- The installation of the well must be carried out with care.
The well is fixed with a collar, which, by design, is located at the upper ring of the bearing cover. Therefore, further work on its installation must be carried out using head No. 22:
- Place it along the edges of the well and press until it clicks.
- This will mean that the well is latched with a collar.
Oil seals in wells can be replaced without removing the valve covers. To do this, you need to make a puller with your own hands. Materials for its manufacture:
- hairpin 14 cm long;
- rubber hose with a diameter of 25 mm;
- two metal washers with the outer diameter of the spark plug well;
- sleeve;
- nuts in the amount of 3 pieces.
Put on the hairpin in the following order:
- puck,
- rubber hose,
- puck,
- bushing,
- nuts
The lower washer places emphasis on the tip of the stud, the upper washer is clamped with a sleeve:
- insert the manufactured puller into the well,
- tighten with the lower nut until the well can be removed with axial movement.
- apply a little force and the glass is removed.
Attention: the applied friction force allows you to remove the puller with the clamped spark plug well. Warning: it is necessary to take into account that the rubber strip of the puller inserted into the glass should not look beyond the edges of the spark plug well!
The same principle applies to installing new oil seals along with the cups:
- Before installation, they must be lubricated with engine oil.
Note: the elastic band of the puller should not protrude beyond the edges of the well, otherwise the screwed nut will crush its edges, which will not give the required effect.
Be careful when removing the spark plug well, do not allow the old lower oil seal to come off. Carrying out the work yourself will allow you to save financial resources in the amount of 1,500 rubles. This is the starting price for similar repairs in auto repair shops.
- The cost of oil seals is 100 rubles. for one set.
- The price of anaerobic sealant is about 700 rubles.
Repairs to remove the causes that lead to the appearance of oil in the spark plug well on a VAZ-2110 can begin after watching the video and carefully studying the photos, which indicate all the locations of the repair work. It is also necessary to familiarize yourself with the instructions for applying the necessary precautions.
Most likely, most drivers - both experienced and newbies - hardly think about the dangers of oil getting into spark plug wells. And completely in vain. The reasons for this phenomenon can be various factors. In many ways they depend on both the engine model and its type.
In any case, a prudent owner will most likely prefer not to rush headlong to the nearest service station, but to try to solve the problem on his own. So let's take a closer look at this.
What are the dangers of oil getting into spark plug wells?
A similar nuisance can happen quite often, especially on domestically produced cars with decent mileage. Let's look at how to solve the problem using the example of the Lada Priora, a domestically produced VAZ car, not without some shortcomings.
Possible consequences?
The main reason for the appearance of oil in spark plug wells is wear of the gaskets. What could be its consequences for the health of your car? In fact, to be honest, such a flaw in operation cannot lead to anything particularly military, according to experienced repairers. That is, you can travel with such a problem, but not for too long. This is not the same specified lubricant getting on the cylinder head (cylinder head).
One of the possible consequences is when the rubber insulator of wires (high voltage) softens, which can also cause a breakdown of the electrical circuit. However, the fact that the breakdown is insignificant should not mean that it is left to chance (many people like to drive until everything closes and begins to fall off). And if you notice that there is grease in the spark plug well, the gaskets of this unit need to be changed as quickly as possible. This way the problem will be eliminated and the issue will be resolved.
Also noticed by masters
, that in this situation it is necessary to change the candles themselves quite often. Their resource is significantly reduced (several times, according to experience). And if you don’t want to unscrew and install new ones with enviable consistency, then you definitely need to do the appropriate repair work.
Repair
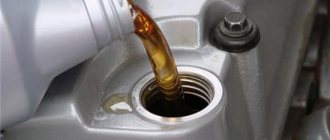
How to handle the change of these parts correctly? First, for a successful procedure, you need to prepare the appropriate parts and tools. We will need: a pair of valve cover gaskets, 10 seals, engine cleaner, 4 oil seals for wells. Having collected the above, you can begin. It is better to carry out the process in a closed, heated and illuminated room, or, as a last resort, in a place protected from wind and dust (because dust can get into unprotected areas of the unit, creating additional problems).
We carry out the work in several stages:
- Remove the valve cover and also the receiver. We close all possible holes in the collector so that unnecessary parts, objects and dust do not get into the assembly itself;
- We dismount the ignition and hose;
- Unscrew the bracket bolt on the injector (key 10). Then – the screws on the block cover (15 pieces). Remove the cover;
- Next, you can check the hydraulic pusher. This is done quite simply: using a screwdriver. You need to press (it should press with good force). Otherwise, the mechanism is changed. When performing such diagnostics yourself, carefully ensure that the camshaft cam is directed with the back side;
- Afterwards it is necessary to dismantle the spark plug wells. This procedure is done using an appropriate puller. It must be inserted into the spark plug well, the nut is tightened and the mechanism is quite easily dismantled;
- Next, remove the old O-rings and install new ones in their place;
- We put everything back together in reverse order. Remember that before assembly, the head must be thoroughly cleaned of dirt and the bearing housing must be thoroughly cleaned of old sealant and oil. The shaft cams must be lubricated with fresh lubricant. Before installing the housing, we apply sealant to the places where it was before dismantling.
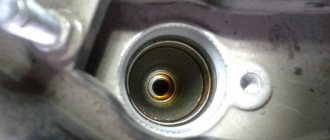
Grease accumulation in spark plug wells is a common problem on Priora cars. The reasons for this may vary. They largely depend on the car model and the design of its engine.
Any problems that arise in the car must be corrected immediately, otherwise a complication may arise, and then more expensive repairs will be required. So if you notice oil in the wells on your Priora car with 16 valves, then this situation cannot be ignored.
The problem of lubricant accumulation in spark plug wells is especially common in engines with a volume of 1.6 liters. In older versions, rubber gaskets were located under the valve cover. New versions use only sealant to ensure good contact between the parts.
In a modern Priora car, oil appears in the spark plug wells due to the sealant drying out after using the car for a long time or when using a low-quality compound. So simply removing the grease and used sealant will not fix the problem.
This is exactly the case when the manufacturer decided to simplify the design in order to reduce costs. But this resulted in new problems for car owners.
In Priora, oil can collect in wells even in a completely new car. So, immediately after purchasing a new car, it would be a good idea to check it at a service station or at least yourself. Otherwise, your new car may cause you troubles, the cause of which will be hidden in the used sealant.
There is a big risk that due to the long period of idle time of the car in the cabin, the low-quality composition will simply dry out. So, after the first trips, oil will begin to accumulate in the wells, which may subsequently lead to the need for expensive repairs.
Due to the prolonged presence of oil in the spark plug well, the spark plug insulator will begin to soften. This can result in a huge problem - puncture of spark plugs, poor supply of lubricant to the engine.
As a result of this phenomenon, the power unit will begin to operate unstably, in addition, the spark plugs will have to be replaced much more often. Therefore, the presence of lubricant in the Priora spark plug wells is a very acute problem that requires an immediate solution.
Causes of the problem
The appearance of oil on the spark plugs is accompanied by engine vibration during the first time after starting, as well as a bluish tint of the exhaust gases. When the engine warms up, these symptoms disappear. With such a problem, the power unit will consume more lubricant; these symptoms indicate incorrect temperature in the engine cylinders. The appearance of oily soot indicates that the heating value SZ is too high.
The problem may be due to wear on the oil seals, piston rings or valve liners. The pistons or cylinders could be worn out; if the crankcase ventilation system is clogged, excess lubricant will enter the combustion chamber.
The layer of soot on the SZ may vary depending on the degree of neglect of the power unit. Usually the problem lies in the valve stem seals, if carbon deposits appear on the top of the threads, and if at the bottom or on the electrode, then the piston rings are to blame. Such problems are accompanied by a decrease in engine power, an increase in gasoline consumption, difficult starting, and unstable engine idle speed.
If there is a layer of lubricant on the SZ with the remains of unburned fuel, this indicates the inoperability of the cylinder as a result of wear of the valve or the partition between the rings. In this case, the internal combustion engine will constantly triple, and gasoline consumption may double.
Sometimes it happens that a dismantled SZ has neither an electrode nor an insulator - this is a consequence:
- regular engine operation with detonation;
- use of low quality fuel;
- factory defects;
- incorrect ignition setting.
If this is the case, then the “best” option for the car owner would be if the remains of the insulator and electrode get into the exhaust system without getting stuck or remaining between the seat and the valve. Otherwise, you will have to carry out repairs or completely replace the cylinder head. To accurately identify the cause of the problem, it is necessary to measure the compression in the engine cylinders. If the situation is not advanced, perhaps decoking the piston rings will solve the problem; sometimes it is advisable to clean the crankcase ventilation system. In the worst case scenario, the engine will have to be overhauled.
What can prevent a spark from forming?
This question can be formulated differently - what causes a spark plug to malfunction?
- Heat cone clogged. Prolonged unsuccessful cold starting of the engine leads to the accumulation of oil and carbon in this area. After the car has been parked for a long time, attempts to start it cause it to stall, but after warming up, the symptoms disappear. The diagnosis here is clear - insufficient spark plug temperature or presence of oil in the cylinder. “Cold” spark plug, wear of bushings and rings, increased oil consumption - you need to pay attention to this when checking.
- Coking of the space between the body and the thermal cone. Oil combustion products form a coke layer. The reason is incorrect functioning of the carburetor or injector, faulty sensors (for example, oxygen), problems with the throttle drive, or clogged air filters. Burnout of the electrodes leads to expansion of the gap. The danger lies in the increased risk of breakdown in different places and premature ignition of the fuel mixture.
- Destruction of the spark plug - melting of the electrodes, cracking and destruction of the insulation and cone. This is a consequence of prolonged driving on a lean mixture, with increased loads. Overheating of the cylinder chamber leads to “burning” of the exhaust valves. The reasons may be: too high heat rating of the spark plug (“hot” variety), too much ignition timing, poor fuel quality and a lean fuel mixture. Residual glow ignition may occur when, even after shutting down, the engine does not turn off for some time. The spark plug is overheated, it needs to be changed (select “cold”).
- Leakage of gases through a leaky seal. There is a risk of breakdown of the tip and contamination of the outer surface of the insulator. The appearance of a reddish coating is explained by the use of gasoline with a high content of lead and manganese (added to increase the octane level). This significantly reduces sparking. Prolonged use of such fuel will lead to the formation of a deposit on the outer surface that conducts electric current. Current passes through it more easily than through electrodes. As a result, the candle stops functioning.
- The appearance of oil and gasoline droplets on the spark plugs. A common reason for this is a problem with the injector (it leaks). In winter, gasoline vapors do not evaporate, settling on the candles. There is a treatment - remove them, clean them with alcohol and dry them.
How to fix the problem?
To ensure normal operation of the motor, there are several options to avoid the problem. Let's look at each of them.
Cleaning the crankcase ventilation system
The procedure is demonstrated using the example of a Lada Granta car:
- It is necessary to loosen the clamp and disconnect the crankcase ventilation system pipe from the air supply line. Disconnect the second end of the pipe from the fitting located on the cylinder head cover; the hose can then be removed. Carry out the dismantling of the small branch pipe in the same way; to do this, you need to disconnect it from the cylinder head and the fitting of the injection module. At this stage, you need to disconnect the supply pipe of the ventilation system, disconnecting it from the BC and cylinder head fittings.
- All pipes must be washed with kerosene or fuel, then blown with air and dried. It would be a good idea to clean the fitting holes.
- Remove the cylinder head cover.
- Unscrew the screws securing the oil separator device on the inside of the cylinder head cover and remove the washers. The oil separator housing must be removed.
- Then all the screens are removed from the cylinder head and must be washed with kerosene along with the cylinder head cover and the oil separating element.
- All system components are assembled in reverse order.
Engine decarbonization
For candles that are filled with oil, there are not many options for solving the problem. You can try to decarbonize the power unit, which is done as follows:
- High-voltage cables are dismantled and all protective equipment is removed. At this stage, it is advisable to remember their location. After this, unscrew the high-voltage cables from the reels.
- The consumables are drained from the motor and the drain plug is put in place. A special decarbonizing agent must be poured into the engine. The best option would be to decarbonize all cylinders of the internal combustion engine.
- After this, the SZ must be slightly tightened, this will prevent the evaporation of the product. So the car should be left for 6-12 hours, depending on what is written in the instructions for use of the cleaner. After waiting the appropriate time, unscrew the lock, but do it carefully, otherwise the cleaner, along with carbon residues, may splash throughout the engine compartment.
- Afterwards, the drain plug is unscrewed and all consumables are drained along with the remaining carbon deposits. You can pour oil into the engine and spin it on the starter for 10 seconds; this must be done without installed SZ and a connected coil. Such actions will prevent water hammer when starting the internal combustion engine. When you are sure that there is no more carbon deposits in the cylinders, the SZ must be screwed into place.
More detailed instructions
Below we will look in detail at how to eliminate oil in the spark plug wells of the 2112 VAZ and other car models of the Volzhsky Automobile Plant.
So where do you start? First, remove the plastic engine cover and receiver. All holes that are in the intake manifold are closed with covers (we need this in order to prevent foreign objects from entering the part). Next, the ignition module is dismantled, as well as the crankcase ventilation hose from the cylinder block cover pipe. Then, using a 10mm wrench, unscrew the bolt of the injector wiring harness connector bracket. Using a size 8 spanner, unscrew the 15 mounting screws on the cylinder block cover (also called the valve cover). After this, the block cover itself is removed from the machine.
Communities › Chevrolet Club › Blog › Oil on spark plug threads
I apologize if anyone is tired of it, but still another symptom is carving candles in oil. And most importantly, the spark plugs on top are absolutely dry. But it doesn’t seem like 0.5 liters of oil per 200 km goes there. Where is it from? Well, here’s an example of over-gassing (if it’s water flying out)
Comments 37
There is no oil in your cylinders! There is oil in your spark plug wells. When unscrewing the spark plugs, it flows down the threads. Like this!
the same garbage, one spark plug is dry, the other three threads are in oil, the level is from replacement to replacement, I change the oil every 8 thousand, I checked the wells dry with a clean rag, there is no blue smoke
Eh. So think about it... either the Masor is being eaten and the caps are splashed there, or Shell oil is caught G
I pour Castrol oil, the hydraulics started to tap, the master advised me to pour Elf 10W40 when changing the timing belt because he says the engine is not new and the oil is supposedly good, mileage is 172 thousand
I want to try 5v40 zik or lukoil lux. Tomorrow I’ll go to a hundred. They'll measure the compression and tell you to check for leaks, and then I'll decide to change the oil or remove the head. On the forums they write that the oil on the threads of the spark plugs is the caps, but damn, 2.3 liters have already been added, there could be rings, but the electrodes of the spark plugs are fine. condition... a riddle
The corrugation that goes from the crankcase to the air filter is absolutely dry and without oil
Well, let’s say... how long are you going to keep adding? Miracles don’t happen, the rings need to be changed because the biggest waste is precisely because of them, it simply doesn’t have time for the suction, and in principle, not much gets through the corrugation, in six months I accumulate two or three tablespoons with a volume of 3.5 liters , which, according to his passport, is entitled to a consumption of 1 liter per 5000.
Useful tips
As you can see, replacing the sealant under the valve cover is not difficult. The main requirements are thorough cleaning of the old layer and proper application of fresh sealant to the surface.
The applied layer must be uniform, interruption is not allowed. It should also be taken into account that the joints between the joints of the spark plug wells must be treated with sealant, having first removed the old sealant from there.
If only one engine needs to be repaired, a tube of heat-resistant sealant is sufficient. You can also read about choosing the best engine sealant in our separate article.
It should be noted that the use of sealant if the valve cover on a particular internal combustion engine is installed through a rubber gasket is undesirable. In this case, you need to purchase a new high-quality gasket, after which the mating surfaces are checked. Next, a new valve cover gasket is installed, after which the valve cover is tightened, taking into account the order and torque of the fasteners.
Cleaning
If the spark plugs are dirty, then it is not at all necessary to immediately replace them with new elements of the ignition system, igniting the fuel mixture in the combustion chamber of the VAZ 2110. Regular cleaning will quickly remove the dirt and return the spark plugs to their previous functionality.
There are several common cleaning methods that can be used at service stations and in garages with your own hands.
Regardless of the chosen method, we recommend that you follow the general principles of operation when cleaning the elements of the ignition system.
- Protect the coating of the spark plugs from abrasion; do not use rough sandpaper or other similar abrasives.
- Do not expose the candle to high temperatures. It is not worth heating them over a fire for the purpose of cleaning. Some people do this for some reason.
- Check the spark plug for resistance using a megometer. If the second scale does not show + infinity, then the spark plug will have to be changed. Cleaning is useless. With a value of 1000 it is also better not to try to resuscitate the element.
Now let's talk directly about cleaning methods.
Cleaning before and after
The formation of carbon deposits and flooding will require not only removing and drying the spark plugs, but also thoroughly cleaning them.
- One popular method is to remove carbon deposits with a fine-bristled wire brush;
- Another option is treatment with kerosene, which removes carbon deposits quite effectively;
- Another method involves the use of sandblasting. The effectiveness of this approach is short-term, so you will soon have to remove the candles again and clean them;
- Many people have also gotten used to using chemical converters. To do this, candles are placed in a solution, allowed to sit for about an hour, after which they are cleaned with matches, toothpicks to remove carbon deposits, washed with water and dried;
- In order not to buy specialized products, you can use acetone using the same cleaning principle;
- Our grandfathers cleaned candles with vinegar. To do this, you will need to dip them in vinegar for an hour, then add literally 5 drops of electrolyte;
- There is an ultrasonic cleaning method, but this requires specialized equipment.
Article on the topic: Ignition relay VAZ 2109
If you do not get the desired result, you will have to change the candles. But first they need to be selected.
Gap
When performing a preventive check of spark plugs or while searching for the causes of an unstable engine, it is recommended to check the gap between the electrodes.
- If the gap is larger than normal, the spark will form more than usual, the mixture will begin to ignite more strongly, and the flow rate will be more stable. In this case, failures in the operation of the motor may occur.
- If the gap is smaller than required, the spark will begin to appear earlier than required. The small spark energy is not capable of effectively igniting the fuel mixture. This increases fuel consumption, but reduces engine power and worsens dynamics.
The gap between the electrodes on the injection VAZ 2110, according to the manufacturer’s recommendations, ranges from 1 to 1.13 millimeters.
Gap measurement
Setting the gap
The first step is to check whether the gap really deviates from the norm, and then take appropriate action. So, let's begin.
- Get to the spark plugs, having first disconnected the high-voltage wires from them.
- Use a feeler gauge to measure the distance between the two electrodes of your spark plugs. Special probes are sold that look like a folding knife.
- Take a feeler gauge whose blade is exactly 1 mm thick.
- Insert the probe into the gap between the electrodes.
- Normally the blade should go in with a slight pinch, but you don't have to use much force to get it in.
- If the blade is too loose, then the gap is too high. You will need to lightly press the upper electrode against the lower one until the required distance is formed.
- If the blade is difficult to fit into the gap, then it was smaller than required. In this situation, you will have to do the opposite, bend the electrode slightly.
Adjusting the distance
When increasing or decreasing the gap, do not apply too much force, otherwise you risk breaking the element. In this situation, there is nothing left to do but change the spark plug.
Choice
The choice of candles today is quite extensive. But we’ll talk about which ones are used for the VAZ 2110 and what can currently be considered the best choice for your car.
Candles differ from each other mainly in the material from which the electrodes are made.
| Candle type | Peculiarities |
| Copper | These are classic spark plugs for VAZ, installed by the factory. The operating life is up to 50 thousand kilometers. Some of them are coated with yttrium alloy to increase the reliability of the electrode. |
| Platinum | They are characterized by increased resistance to temperature fluctuations and corrosion, which has a positive effect on the service life of the elements. Such elements are capable of operating up to 90 thousand kilometers |
| Iridium | The characteristics are in many ways close to platinum candles; today they are considered the most durable and high-quality. Safety margin - about 90-100 thousand kilometers |
The service life may increase or decrease depending on the care, conditions of use of the vehicle, and the quality of the fuel being poured.
Platinum candle