Where is the DTOZH of the VAZ 2123 engine?
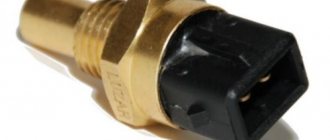
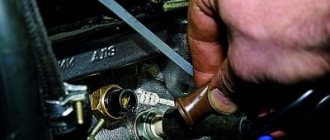
The coolant temperature sensor is an electrical resistor with a built-in thermometer. The device is called a thermistor. The principle of operation is simple: when the temperature changes, the resistance changes, which affects the executive part of the system. To measure the thermistor, use a multimeter set to resistance. DTOZH is installed in a small hole in the cylinder head. It is inserted into the front pipe of the water jacket. In the picture below you can see where this sensor is located.
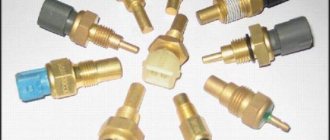
Reference. The cost of a new device on a Chevrolet Niva (VAZ-2123) is 140–150 rubles. In catalogs it is noted under article numbers 2112-3851010, 1000019405.
Cost of sensors
Chevrolet Niva temperature sensors, although they are not consumables that require periodic replacement, still have a very low price. This is due to the simplicity of the design and the absence of the use of expensive materials or technologies in manufacturing. More detailed prices for meters are given in the table below.
Table - Cost of Chevrolet Niva temperature sensors
| Sensor | Price |
| DUTOZH | 250-350 |
| DTOZH | 230-300 |
| Outdoor temperature sensor | 170-340 |
Errors
During operation, the machine gradually wears out. The owner notices various signs, but does not always determine the cause. Temperature sensor problems are usually caused by:
- breakdown of the engine temperature indicator on the dashboard;
- refrigerant leak from a part;
- inaccurate fan startup or failure to start for various reasons.
The appearance of these factors is a reason to check the DTOZH for performance.
Attention! If you ignore the malfunctions, the following problems may occur:
1. Failure of the internal combustion engine control unit due to an incorrect signal that the sensor transmits to the computer. In hot weather, the control system may not turn on the fan, which will lead to boiling. 2. The malfunction also disrupts engine performance and driving dynamics.
Replacement
To remove and install the coolant temperature sensor, you will need the following tools:
- wrenches 10 and 19;
- screwdriver;
- multimeter
The withdrawal process is as follows:
- Remove the terminals from the battery.
- To increase the available space, remove the air filter.
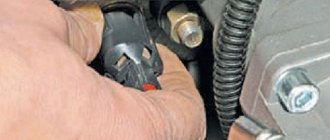
- Using a screwdriver, press out the block mount, which is made of plastic. Disconnect the wiring harness from the DTOZH.
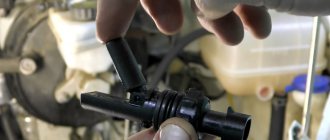
- Unscrew the sensor and remove it from the system.
Installation is performed in reverse order.
Guide to checking and replacing the sensor
How to check the throttle position sensor, fan activation, air flow and other controllers on a Niva Chevy? What are their signs of malfunction and how to replace them if necessary? We suggest that you familiarize yourself with the purpose and replacement of devices in detail.
DTOZH
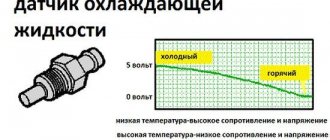
The coolant temperature controller is also considered an engine temperature sensor. This device is a resistor whose resistance value changes in accordance with the temperature of the consumable. If you are wondering where the DTOZH is located, it is located on the coolant exhaust line, directly on the cylinder head. If the air temperature outside is negative, the resistance of the sensor will be increased - at 40 degrees below zero this figure will be about 100 kOhm. When the motor warms up to operating temperature, the resistance will drop to 177 Ohms.
When the device fails, the dashboard will display incorrect readings regarding engine temperature. For example, the pointer needle may not rise at all, sometimes it stops in the middle of the scale.
To diagnose and replace the DTOZh, follow these steps:
- To begin, prepare a thermometer that can operate at high temperatures, a multimeter for testing, and a container of liquid that you will heat on the stove.
- Remove the sensor itself from the socket, having first disconnected the connector and placed a container under the location, since some of the antifreeze may come out during removal. Disconnect the connector and unscrew the device; temporarily install a plug in its place.
- Place the sensor in a container with water prepared in advance, only lower the part of the controller that was screwed into the cylinder head into the liquid. Measure the resistance and turn on the kitchen burner to heat the water.
- As the temperature increases, the resistance will drop. Measure this parameter several times at different temperatures, then compare the obtained data with the normalized ones indicated in the table in the service book. If the data is very different, replace the device with a new one.
Detonation
A knock sensor is used to detect vibrations or shocks present in the operation of a car engine. This device is mounted on the top of the block head, and the device is based on a special piezo plate used as a sensitive component. If the sensor detects detonation while the car’s engine is running, then special pulses begin to form at its output, which will increase with the increase in detonation. In accordance with these signals, the engine control unit automatically adjusts the ignition until the number of detonation flashes is reduced to a minimum.
If the controller breaks down, the engine will detonate, especially when the speed increases in a lower gear. If you check the ignition, you will find that everything is set correctly and there is no need to adjust the timing.
Replacement is simple:
- The power cable is disconnected from the regulator in the engine compartment.
- The device is removed from the landing site.
- A new controller is being installed.
Phase
camshaft position (camshaft position) or phase controller is a device used to determine the position of the camshaft. This controller ensures correct fuel injection into the injectors, so its operation is very important for the car. The DPRV is located in the front of the cylinder head and if it fails, you can not only change it, but also try to clean it. Failures may be indicated by symptoms such as difficulty starting the engine, increased fuel consumption, and decreased vehicle dynamics.
- Open the hood and disconnect the terminal from the battery.
- Using a 10mm wrench, unscrew the bolt securing the device.
- Remove the controller from its place and install a new one or clean the old sensor.
- Replace the bolt and tighten it, also reinstall the battery terminal.
Photo gallery “Changing DPRV”
Speeds
As the name suggests, the speed controller is used to determine the speed of the SUV. Various symptoms can indicate its breakdown, for example, a non-working sensor needle on the speedometer, its movement with jerks.
The sensor is located directly on the gearbox; you can check it using a tester:
- First, the controller is removed from its location; to do this, the car must be driven into a pit and the battery must be disconnected. The device is installed on the back cover of the transfer case; before removing, clean the controller from dirt.
- Disconnect the connector circuits connected to the device by pressing the plastic connector. Using a wrench, you need to unscrew the device and remove it.
- After this, you need to connect the positive probe of the tester to the pulse contact of the controller. Its negative contact should be connected to the Niva body.
- Then a tube should be installed on the controller shaft so that the sensor can be rotated.
- Then the tester must be configured to measure a small DC voltage.
- Start rotating the mechanism shaft. If during rotation the tester display shows the value of the induced voltage, and as the speed increases, this parameter increases, this indicates that the device is fully operational and does not need to be replaced (by REMONTYCA).
DPKV
The crankshaft sensor in Niva Chevy cars is a device that belongs to the inductive type and is responsible for injection. It is used to ensure synchronization of the operation of the regulator with the top dead center of cylinders 1 and 4. The device is located on the timing cover.
If the device fails, the driver will be faced with the problem of starting the power unit:
- To replace, locate the regulator and disconnect the cables connected to it.
- Remove the device from the seat by unscrewing it.
- Install the new controller and secure it. Check how the motor began to function.
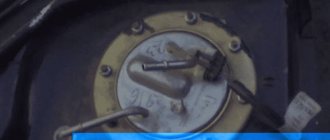
Fuel level
The fuel level sensor is used to measure the volume of remaining fuel in the tank and display the corresponding parameters on the control panel in the cabin. This sensor is installed in the fuel pump, so to replace it the pump will have to be dismantled.
To check, you will need a tester; when diagnosing, you should be guided by the following parameters:
- if the gas tank is empty, then the resistance parameter will be about 250 Ohms (an error of 12 Ohms is allowed up or down);
- with a half-filled gas tank, the resistance will be approximately 66 Ohms (a deviation of 6 Ohms is possible);
- if the tank is full, then the resistance value will be 20 ohms (with a possible error of 3 ohms).
To change or check the device, do the following:
- First you need to remove the back seat. Once you do this, you will be able to see the hatch being secured with black Velcro. Use a slotted screwdriver to pry it up and pull it up.
- Then you need to relieve the pressure in the fuel system. Alternatively, the car can be left standing for several hours (minimum 4), this will lead to a decrease in pressure, or you can turn off the fuse that controls the operation of the fuel pump. Remove it while the engine is running and wait until the engine stops.
- After this, you need to disconnect the terminal from the fuel tank hatch and remove the orange fastener. You also need to remove the fasteners on the fuel pipes. Place a rag under them, as there will be some fuel left in them, and then pull the pipes up. Also remove the retaining ring - to do this, you need to rest against it with a chisel or screwdriver and tap with a hammer.
- After removing the ring, the fuel pump is removed, but you need to be careful not to damage the float. After removal, remove the brown connector and pull it down, after which you also need to remove the small black plug.
- To remove the sensor itself, pry it off with a flat-tip screwdriver and pull it down along the guides. Install the new controller and reassemble in reverse order. When the installation procedure is completed, connect all hoses and do not forget to replace the safety device. When the ignition is turned on, the pump should hum.
Photo gallery “Independent replacement of FLS”
TPDZ
TPS is a potentiometer equipped with three contacts. One of them is power, the second is grounding, that is, ground, and the third is connected to the output signal of the control module. The main unit controls the output voltage of the TPS, and in accordance with the received signals, it adjusts the flow of fuel. If this regulator breaks down, the control unit will not be able to correctly detect the throttle opening angle.
To change the controller, you need to do the following:
- First you need to find the sensor - it is located directly on the throttle assembly located on the receiver.
- A wiring harness is connected to the controller; the connector must be disconnected.
- The regulator is secured in the seat using two mounting bolts, each of which will need to be unscrewed.
- After this, the sensor can be easily removed from its installation location. A foam rubber gasket is installed directly into the groove itself, located on the throttle side. It cannot be lost; during subsequent installation, the regulator ring must be put back in place.
Lambda probe
The oxygen controller or lambda probe is mounted on the receiving line of the exhaust gas system. These gases, as is known, also contain oxygen, to which the sensor itself reacts, forming a potential difference at the output. If the fuel mixture used by the engine is too lean, the level of oxygen in the gases will be increased. If it becomes too rich, then there will not be enough oxygen in the air-fuel mixture. Failures of the oxygen controller can be indicated by increased gas consumption, a drop in power, as well as vehicle dynamics.
You can replace the device at home:
- Locate the regulator on the exhaust gas inlet hose.
- Disconnect the wire connected to it and remove the regulator from the installation location.
- Install a new one in its place and securely fix the sensor. After this, you need to check how a car’s internal combustion engine works with a new sensor (the video was shot by Vova Ashikhmin).
Mass air flow sensor
The mass air flow sensor or flow meter is used to ensure that the combustion mixture has the correct proportion of air. If the regulator breaks down, this is fraught with problems such as a drop in power and an increase in fuel consumption, as well as floating speed. The mass air flow sensor is mounted immediately after the air filter element housing, directly in front of the throttle.
The device changes like this:
- First you need to disconnect the negative terminal from the battery. The connected connector should also be disconnected from the flow meter; to do this, you will need to squeeze the fastener on both sides.
- Then you will need to unscrew the clamping screw of the injector inlet hose. Having done this, one end of the hose is removed, this will prevent it from interfering with the dismantling of the device.
- After this, using a socket wrench, you need to unscrew the two screws that secure the flow meter.
- After completing these steps, you can easily remove the controller from its seat next to the filter. As for assembly and replacement, it is carried out similarly in the reverse order.
Checking the temperature sensor from Chevy Niva
To check the functionality of the sensor you will need:
- thermometer, preferably electronic;
- multimeter;
- Electric kettle;
- water.
Diagnostics looks like this:
- Place the thermometer in a kettle filled with water.
- Take the temperature and write it down.
- Connect the DTOZH to a multimeter.
- Record the resulting resistance and turn on the kettle.
- Record the multimeter readings as it heats up. Every 5 degrees is enough.
- Check the table for normal readings.
Table 1. Normal resistance values of DTOZH depending on temperature.
Coolant temperature sensor
This sensor is necessary to determine the temperature of the coolant. Based on its readings, the electronic engine control unit adjusts the fuel mixture depending on the fluid temperature. For example, if the coolant temperature is low, then for normal operation of the internal combustion engine, more fuel is needed to warm up the engine and vice versa. The sensor’s operation as a fuel mixture corrector can be seen by increased speeds when the car warms up.
Its second function is to turn on the fan when critical coolant temperatures are reached. When the antifreeze reaches a critical temperature, the resistance of the sensor changes and it starts the cooling fan, which cools the internal combustion engine.
Design
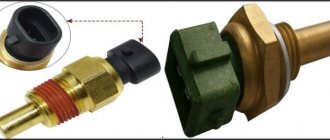
The picture below shows a cross-section of the sensor.
Location
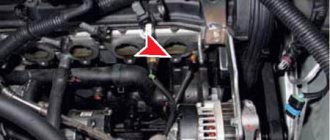
This sensor is located in front of the thermostat and has a special threaded ebb into which it is screwed. You can see the sensor by looking under the throttle valve and the intake corrugation.
Symptoms of a problem
When the coolant temperature sensor fails, the following symptoms of a malfunction appear on the car:
- The cooling fan does not turn on or turns on but very early;
- There are no increased engine warm-up speeds;
- The engine does not start well in cold weather;
- In hot weather, the engine does not start;
Common errors and symptoms of malfunction
The temperature sensor operating system is considered reliable due to its simple design. However, during the process of using a car, almost every part wears out.
In the case of DTOZH, the following malfunctions are possible:
- Violation of graduation. Such an error leads to an unplanned change in resistance. Characterized by malfunctions in the operating system of the electronic control unit.
- Wiring oxidation. Occurs due to sudden temperature changes.
- Failure of additional DTOZh sensors.
Symptoms indicating malfunction include the following:
- while driving, the engine speed drops - it may stop at idle;
- the car warms up over a longer period of time than before;
- during operation, the engine often goes beyond the prescribed temperature range;
- fuel consumption increases significantly;
- black smoke comes out of the exhaust pipe;
- the driver loses control of the car.
Although the DTOZH rarely fails, there must be a reason for the breakdown. Most often this happens due to low-quality antifreeze or engine oil. The consequence of such factors is damage to the sensor surface. So buy quality supplies. It could also be due to a manufacturing defect.
Attention! Do not purchase a temperature control device from a flea market or other cheap auto parts markets.
How to check
To carry out the verification procedure you will need the following tools:
- wrench 19;
- multimeter;
- a container for draining the remaining coolant (any bucket or basin not used for food purposes will do);
- kettle (electric) for boiling water;
- thermometer (electronic only);
- separate container for boiling water (small size).
Sequencing:
- First, dismantle the sensor. Disconnect all the chips with wiring from it and, using a 19mm wrench, unscrew it from the place where the part is located.
- Pour cold water into the electric kettle. Immerse the working part of the DTOZH there along with the prepared thermometer.
- Connect a multimeter to the cooling sensor. It will measure and show resistance.
- Plug in the kettle. Observe changes in the indicators: as the temperature of the liquid increases, the resistance should drop. Moreover, the indicators in each temperature regime are certain.
| The ratio of optimal indicators for proper operation | |
| Temperature | Sensor resistance on a multimeter |
| +15 | 4450 Ohm. |
| +40 | 1459 Ohm. |
| +100 | 177 Ohm. |
If the indicators deviate from the norm, then the temperature control device is faulty and must be replaced.
You can check it in another way. It is especially relevant if there is no thermometer available. Subsequence:
- Put the water in the kettle to warm up. Make sure that the indicator starts to move towards +100°C.
- Immerse the DTOZH in the liquid with a multimeter.
- Take a measurement.
The resistance in this case should be equal to 177 (minor decreases or increases are acceptable). Other indicators will indicate malfunction of the device being tested.
Temperature sensor (for dashboard)
The purpose of this sensor is to take readings about the temperature of the coolant in the engine. It has one contact that transmits resistance readings to the car's dashboard, converting it into degrees on the temperature indicator scale.
The functions of this sensor are only to measure temperature for the dashboard.
Design
The picture below shows a temperature sensor.
Location
This sensor is located in the cylinder head housing and is installed using a threaded connection between the spark plugs.
Symptoms of a problem
There can only be one failure of this sensor, this is the absence of indications on the dashboard about the engine coolant temperature values.
Replacing the outside air temperature sensor
The ambient temperature sensor is replaced according to the sequence presented below.
- Disconnect the negative terminal of the battery by de-energizing the network.
- Remove the front bumper for ease of work.
- Squeeze the three blades of the lock.
- By carefully pulling the meter, remove the sensor from the mounting hole of the bracket.
- Press the pad lock.
- Disconnect the meter terminal block.
- Press the pad lock.
- Disconnect the meter terminal block.
Replacement
Replacing sensors does not require a lot of tools or knowledge of automotive mechanics.
There are two replacement methods: with coolant drain and without drain. Let's consider the second option.
Work must be performed with a cold engine to avoid burning your hands!
- We find the necessary sensor that needs to be replaced;
- Remove the connector from the sensor.
- We prepare a new sensor and install it in place;
- Everything must be done quickly in order to lose as little coolant as possible;
After replacement, you need to check the antifreeze level and top up if necessary.
Temperature sensor for Niva Chevrolet
The Niva Chevrolet temperature sensor is a car element that is quite cheap, but its breakdown can significantly affect the owner’s budget and even contribute to engine failure. Since all its work is to control the cooling system, displaying and monitoring the engine temperature will allow you to monitor the technical condition of the car.
The coolant temperature sensor allows the driver to constantly monitor the temperature and control engine cooling. The fuel consumption of the car and the correct starting of the engine depend on how well the temperature sensor on the Chevrolet Niva works.
The engine temperature sensor is in direct contact with the antifreeze and sends the received data directly to the electronic control unit. Thanks to the data received, the electronic control unit adjusts the ignition settings and the preparation of the fuel mixture. And most importantly, they adjust the operation of the fans at different powers, depending on the data received. A small but important part in a car that regulates the operation of the engine.
Chevrolet Niva coolant temperature sensor: where is it located and how to replace it? | Niva Repair
No comments The coolant temperature sensor is used to monitor the temperature in the internal combustion engine. Long-term operation leads to heating of the motor, which is compensated by a special liquid. The temperature received from the sensor is used to regulate the further operation of the cooling system elements.
Where is the DTOZH of a VAZ engine? The coolant temperature sensor is an electric resistor with a built-in thermometer. It performs the function of a conventional thermometer, displaying data on the liquid crystal screen of the instrument panel.
Location of temperature sensors The sensor for indicating the coolant temperature is screwed directly into the hole in the cylinder head. It can be seen if you look at the power plant from the left side.
When all the tools are at hand, you can begin dismantling: Find the engine sensor and disconnect the connector with the wire. Next, we unscrew it - a nineteen key is ideal for this.
The next step is to lift the block from its mounting socket. After these operations, we need to prepare a container with water that can be heated.
You need to place the removed sensor there and check it. If the motor device is working properly, then when it heats up, the resistance will drop to zero, and when it cools down, it will increase. A wiring harness is connected to the controller; the connector must be disconnected.
Engine management system Niva Chevrolet
The regulator is secured in the seat using two mounting bolts, each of which will need to be unscrewed.
After this, the sensor can be easily removed from its installation location. A foam rubber gasket is installed directly into the groove itself, located on the throttle side. It cannot be lost; during subsequent installation, the regulator ring must be put back in place.
Removing and installing the Chevrolet Niva coolant temperature sensor
Lambda probe The oxygen controller or lambda probe is mounted on the receiving line of the exhaust gas system. These gases, as is known, also contain oxygen, to which the sensor itself reacts, forming a potential difference at the output.
If the fuel mixture used by the engine is too lean, the level of oxygen in the gases will be increased. If it becomes too rich, then there will not be enough oxygen in the air-fuel mixture. You can replace the device at home: Find the regulator on the intake hose of the exhaust gas system. Disconnect the wire connected to it and remove the regulator from the installation location. Install a new one in its place and securely fix the sensor.
MAF The mass air flow sensor or flow meter is used to provide the combustible mixture with the correct proportion of air. If the regulator breaks down, this is fraught with problems such as a drop in power and an increase in fuel consumption, as well as floating speed. The mass air flow sensor is mounted immediately after the air filter element housing, directly in front of the throttle.
When the damper is closed, this parameter is less than 0. The controller itself monitors the voltage indicator, and the fuel supply is adjusted in accordance with the data received. In this case, a lot depends on the position of the damper. TPS does not need adjustment or where the engine temperature sensor is located, since the regulator perceives idle speed as the zero mark.
Fuel level Here everything is more than. The FLS is installed in the gas tank and thanks to it the driver always knows exactly how much fuel is in it and when to refuel. The fuel level sensor transmits a pulse to a sensor located on the vehicle's dashboard.
Temperature sensor Chevrolet Niva
Lambda probe New and old oxygen devices The oxygen sensor is mounted on the receiving line of the exhaust gas system.
The oxygen itself, which is contained in these gases, reacts with the regulator, thereby creating a potential difference at the output.
With a lean mixture, the oxygen content in the gases will be high. For a working sensor it should be 0.55-0.75 kOhm. Install the sensor in the reverse order of removal.
Using a screwdriver or your finger, press out the plastic latch securing the wiring harness block and disconnect the block from the sensor. Loosen the sensor. Unscrew it from the hole in the pipe along with the sealing ring. Check the resistance of the Chevrolet Niva where the engine temperature sensor is located. Removing and installing the Chevrolet Niva throttle position sensor The sensor is installed on the throttle assembly and connected to the throttle axis.
To replace you will need a screwdriver. Move the throttle valve from the fully closed position to the fully open position. For a working sensor, the resistance should change uniformly within the range of 2.7-8.2 kOhm. To replace a faulty sensor, remove the two screws securing the throttle assembly. Remove the sensor.
Please note: Install the new sensor in the reverse order of removal. Removal and Niva Chevrolet where the engine temperature sensor of the mass air flow sensor is located Niva Chevrolet The sensor is installed on the outlet pipe of the air filter.
To replace the Niva Chevrolet air flow meter you will need: Disconnect the wiring harness block from the Niva Chevrolet where the engine temperature sensor is located Loosen the clamp securing the left side of the air supply pipe to the sensor and disconnect it from the sensor Unscrew the two bolts securing the sensor to the air filter cover and remove the sensor together with sealing ring.
Removing and installing a knock sensor Niva Chevrolet The knock sensor is installed on the right side of the engine cylinder block in its upper part, in the area of the second and third cylinders.
To replace the Chevrolet Niva knock sensor you will need: To facilitate access to the sensor, unscrew the bolt of the lower fastening of the front strut of the intake pipe and move the strut to the side Press the spring clamp of the wiring harness block Disconnect the block from the sensor Unscrew the bolt securing the sensor to the cylinder block and remove the sensor Attach to Autotester sensor terminals connected in voltage measurement mode.
Tap the sensor body against a solid, massive object, such as a hammer.
How to check the temperature sensor
In order to check the DTOZH, you need a multimeter and you need to ring its contacts for breaks. As the temperature increases, the reading on the multimeter should become smaller. If the reading number was in the same place, this means that the DTOZH is faulty.
Checking the DTOZH can be done using an electric kettle. First you need to take out the DT and disconnect it from all the wires. After this, pour cool water into the kettle. Dip the diesel fuel in water and look at the multimeter readings, then connect the kettle to the mains and set it to boil, while constantly monitoring the multimeter readings.
Where is the temperature sensor located, how to remove it
It is almost impossible to visually find the sensor because it is hidden due to many other parts. It is located in the pipe, which goes into the cylinder block.
In order to remove the DTOZH, you need to let the engine cool. Replacement of the temperature sensor is carried out only on a cold engine. First you need to disconnect the battery. On the Niva, to the left of the battery there is a decorative casing that must be removed. After this, it is worth draining the cooling liquid and, as you found the plastic latch, which is located behind the protective casing, disconnect the block from the sensor. This can be done manually, or you can use auxiliary devices such as a screwdriver. After this, take a wrench with a 19mm head and unscrew the DTOZH, remove it together with the sealing ring.
For Niva 21214, the cost of the sensor varies from 200 to 400 rubles. DTOZH is not very expensive, but sometimes it can lead to significant problems, including engine failure. Therefore, it is recommended to periodically check the sensor, look for any leaks, and also constantly monitor the engine temperature. The cost of DTOZH is not significant, so it is better to protect yourself from big problems.
Features of replacing sensors with your own hands
Each of the sensors has its own dismantling features. To get the job done right, familiarize yourself with all of them. This will help you perform disassembly efficiently and without errors. At the same time, dismantling is not difficult, so any car enthusiast can handle it at will.
Temperature indicator sensor
To carry out the procedure, perform the following sequence of actions:
- Disconnect the wire from the battery (in the area of the minus terminal).
- Remove the decorative and protective engine cover. This will free up access to dismantle the device. Otherwise it will be very difficult to get to it.
- Disconnect the wires attached to it.
- Loosen the temperature indicator device. Unscrew it with a 21 key from the protective cylinder.
Disassembly is complete. Replace in reverse order. If this condition is not met, other vehicle malfunctions may occur.