How to replace
The algorithm for replacing the heater resistor is as follows: 1. It is necessary to remove the negative terminal from the battery; 2. Remove the lining, then the windshield frame trim, remove the upholstery for sound insulation; 3. It is also better to remove the vacuum booster for ease of repair; 4. Disconnect the block with wires located on the resistor; 5. In order not to accidentally replace a device that is still in good working order (after all, the reason may not be in it), it is worth checking it with an ohmmeter, connecting it to the contacts one by one. If there are significant differences from normal readings, then it is necessary to change; 6. To remove a faulty heater resistor, simply unscrew the screw and remove the damaged part; 7. Install the new one in reverse order. Please also note that the block with wires can only be connected in one position.
If only fourth speed works
In cases where the motor refuses to work at the first, second and third speeds, but turns perfectly at the fourth, the same resistor with three isolated windings is to blame. If you can’t buy it, you can try to restore it yourself. True, only in the case when the thermal fuse has blown, naturally, no one will rewind the windings, the game is not worth the candle.
Fan resistor
You can remove and check the resistor without dismantling the engine. It's done like this :
- Use a Phillips screwdriver with a short blade to unscrew the rightmost screws securing the glove compartment.
Unscrew the rightmost screws securing the glove compartment.
Move the glove compartment aside to get to the resistor.
We remove the contact block.
Unscrew the screw securing the resistor.
Built-in fuse
To replace the built-in thermal fuse, any type KSD-160 or RY01-165 is suitable . They work up to a temperature of 150-165 degrees . To solder a new resistor, be sure to use low-melting solder so as not to overheat the part, and during soldering, hold it with thick pliers for better heat dissipation. Good luck to everyone and a comfortable temperature in the cabin!
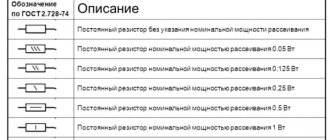
Power dissipation
In addition to resistance, the resistor has another important parameter - power dissipation.
Any resistor acts as a kind of limiter and, due to its resistance, conducts only a certain voltage and current through itself. At the same time, the excess that it did not miss does not accumulate in itself, but converts it into thermal energy and dissipates it.
Therefore, resistors are designated by power dissipation.
The discrepancy between this element and its dissipation power will lead to its overheating and destruction. Power dissipation is measured in Watts.
The power dissipation can be determined both by the voltage passing through it and by the current strength.
As for voltage, the formula for calculation looks like this:
P= U2/R
Where:
What to do if the car's heater fan stops turning on?
- P – power;
- U – voltage in the circuit;
- R is the resistance of the resistor.
To calculate the current strength, the formula looks like this:
P= I2*R
Where:
- P – power;
- I is the current passing through the resistor;
- R – resistance.
An important condition when choosing a resistor for this parameter is that its power dissipation should be twice as large as that obtained in the calculations.
For example, we have a current of 0.1 A and a resistor resistance of 100 Ohms.
Based on the formula, we obtain a dissipation power of 1 Watt (0.12 * 100 = 1), but for normal operation of the element we select a resistor with a dissipation power of 2 Watts.
Note that all manufactured resistors have a strictly defined power dissipation value, which makes their selection easier.
In addition, you can even visually determine what power dissipation the resistor has. Everything is simple here, the larger the element, the higher the value.
The procedure for repairing a VAZ 2110 stove resistor with photographs
Here we looked at resistors - one of the most common elements in any electrical circuit of a car. After all, they allow you to control the basic parameters of electrical energy by influencing just one of its characteristics.
Finally, we note that during calculations it is necessary to monitor the dimension of the parameters. That is, use only amperes, volts and ohms, and if it is indicated that the current is 20 mA, then you should convert this value into amperes, obtaining a value of 0.02 A for calculations.
Do-it-yourself replacement of a VAZ-2110 heater resistor
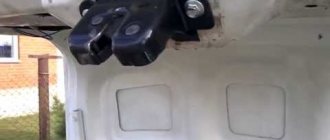
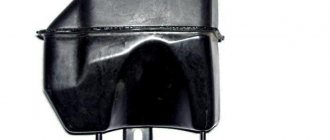
In order to replace the resistor, it is important to understand where exactly it is located. The part is located on the right side of the stove behind the vacuum booster
The first step before starting work is to disconnect the battery from the power supply; to do this, remove the negative wire from the terminal.
Further work is carried out inside the car. Initially, it is necessary to dismantle the windshield trim and trim. After this, the soundproofing padding on the right side of the machine panel is removed. To gain good access to the converter, the vacuum booster must be removed.
An additional heater resistor came into view. Next, you should disconnect the block with wiring from the contacts of the converter. Remember exactly how it is connected so that you can reassemble it correctly when you are finished. The block can only be connected in one position.
Before you start replacing the product, you need to check its operation using an ohmmeter. There is no need to remove it to check the functionality of the part. Connect the contacts of the converter and ohmmeter in series, first on the first spiral, then on the second. If the resistance values differ significantly from the optimal value for the correct operation of the device, then the product must be replaced.
Replacing a faulty resistance block
Because Apart from the body design, there are no differences in the mechanisms and main units between the VAZ 2110, 2111 and 2112; the instructions for replacing the heater rheostat are universal. You can repair a problem with the operation of the stove yourself if you have a couple of screwdrivers and several spanners.
The step-by-step process for replacing the rheostat looks like this:
- Open the hood and unscrew the wipers.
- Next, remove the plastic trim under the windshield (“jabot”).
- Remove the chip with wires from the rheostat and remove it from its seat.
Important! Before starting work, you should make sure that the cause of the problem lies in the resistor. The test is easy: get to the part and connect the multimeter to the power wires, then turn on the ignition. Another sign of a problem is that the stove operates only in the 4th position.
Also, as a recommendation, we note that at the time of disassembling the plastic lining, you can clean the stove cavity. When driving in the autumn, dry leaves and dirt often get into the stove, which makes it difficult for the fan to rotate.
Functions and purpose of the resistor
A resistor is often used in many vehicle electrical circuits. Its main function is the control and distribution of the supplied current to the element of its consumption, in this case to the car’s stove.
In cars, the source of current is the battery, which generates the necessary electrical charge for the functioning of all electrical elements of the vehicle. The resistor, in turn, transforms the current into the required voltage limits for the uninterrupted operation of a particular part. If the current converter becomes unusable, then more voltage will be supplied to the stove than is required for its operation, and the interior heating system will not work. Also, high voltage can cause burnout of heater parts that operate on current.
Solving problems with an unregulated heater temperature switch VAZ-2110
Reasons for rheostat failure
Despite the simplicity of the design of the heating system in VAZ cars of the “tenth” family, resistor malfunctions often occur. Let's consider several main reasons for the breakdown of this part:
- short circuit in the circuit (more precisely, low resistance of the windings in the fan motor);
- tight movement of the stove impeller caused by contamination and lack of lubrication on the mechanisms. The jamming of the stove causes the resistor to burn out;
- Constant operation of the stove in the first position. It is worth periodically running the heater at high speeds.
Also, the cause of a resistor malfunction may lie in the poor quality of the part. It is enough to install the factory version, and the problem will go away.
As a recommendation, we note that for normal operation of the heating system, it is necessary to periodically service the stove, change the cabin filter and prevent dirt and dry leaves from getting into the stove.
Repair and restoration of the stove damper
The deformed heater damper of the VAZ-2110 cannot be repaired; it only needs to be replaced. In this case, it is better to purchase a replacement metal part that is not so susceptible to temperature effects.
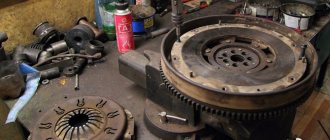
Whatever heater is installed on the VAZ-2110, to carry out repair work, the heater must be completely disassembled. In this case, the process of dismantling and disassembling depends on the design of the stove.
A positive aspect of the heater design on the VAZ - 2101 is its location - to get to it and the dampers you can from the engine compartment and you don’t have to remove the front panel.
Disassembling an old-style stove
For example, let's look at how to disassemble an old-style heater:
- Remove the terminal from the battery.
- We remove the windshield wipers, the seal, remove the air intake near the windshield (“jabot”) from the car, in the process you will need to disconnect the windshield washer nozzle tubes.
- We dismantle the insulation that separates the stove body from the engine compartment.
- We remove the gear motor.
- We divide the housing of the stove and air filter into two halves. To do this, unscrew the coupling bolts around the perimeter of the housings and remove the mounting brackets.
- Disconnect the fan power wires.
- Remove the outer half of the air filter and heater housing (along with the fan).
- We dismantle the inner part of the fan housing.
After this you will have access to the dampers. If you are only planning to repair or replace the heater dampers, there is no need to drain the antifreeze, since the heater radiator will remain in place and will not be removed.
Before removing the dampers, carefully inspect and remember their position and the way they are engaged. Further actions depend on the nature of the damage. Deformed damper parts cannot be repaired and only need to be replaced. As for damaged rods and levers, try to repair them or simply replace them. The damaged seal is replaced.
When assembling the stove, pay special attention to the engagement of the dampers. Do it as it was before disassembly, otherwise the dampers will not work correctly, which will affect the performance of the heater
Disassembly and repair of a new type heater
The new model stoves are disassembled differently:
- disconnect the battery terminal, drain the antifreeze;
- dismantle the frill and insulation;
- disconnect the power wires of the fan and micromotor gearbox;
- unscrew the fasteners that secure the stove body to the body;
- disconnect the coolant supply pipes to the heater radiator;
- We remove the heater from the car along with the filter housing.
Differences in design
The VAZ 2110 was equipped with stoves of the so-called new or old model. Both systems, including those on the VAZ, which has an injector instead of a carburetor, are not particularly different in design.
So, the immediate differences:
- The main difference between the new stove and the old one is in the design of the heater radiator. Therefore, if you are repairing a heating system and decide to install a new model instead of an old radiator, then take into account some nuances;
- In addition, the SAUO controller is also not exactly like that. 4 or 5 position controllers manufactured before the fall of 2003 have already been discontinued and are not suitable for new heater models;
- The micro-gearboxes are also different, starting from release in September 2003. They differ in resistors (shaft position sensors), so you need to check whether the resistor in the MMR model that you purchased is interchangeable.
How to install a new stove
VAZ 2110 (10th family)
The standard ten stove is noticeably inferior to the new type stove: both in power and in ease of use. The process of installing a new stove is described in detail below. The result is more advanced heating in every sense.
New sample stove
It has a radiator n/o installed accordingly
Modernization of the cooling system “Kalinovsky style”!!
Maybe the rest of you should skip this point.
But since the steam outlet seems out of place for us now, we take it out and install this one instead
The one that was in the stove was replaced by agreement with the new one
Then we stomp to disassemble the car, remove the toad, wipers, Shumka, and we get this picture
Next we need to remove the left half of the stove (if you look at it from the face), here it awaits us
In the form of a bolt twisted from the interior, three more such ambushes await us when removing the right half of the stove, numbered 1, 2 and 3
2
3
For those who want to preserve the old stove in its entirety, there are two options, both hemorrhoids:
1. Remove the panel and then calmly unscrew these bolts from the interior.
2. Use a screwdriver to bend the mustache of the mortgages
Since I didn’t bother with the integrity of the stove, I just broke it off, and as a result we get this look
Next, we’ll halve the new heater to insert it, insert it and try it on, we see that it needs fastening to the body where there isn’t one, we mark the place where the fastener should be
We take a drill, drill, insert the embed, the fastening is ready
These holes shouldn't exist
Since I was not ready for this, I had to get out of it using improvised means:
From the body of an old stove
And glue it here
We find material to plug the other two holes, plug them (adhesive tape on top just in case)
We install the stove, look at the wiring connections
The wiring to the engine comes in one block
The old one sits on ground at one end, the other (+) goes through the block to the automatic control system, the output was bitten off from the engine of the old stove and the terminals were soldered to the new one (it’s better to buy the block in advance)
Extend the short wires to the resistance block that regulates the speed of the rotator
On the old stove the fuse module was three-pin, and on the new one it was 4-pin.
Accordingly, there are only three wires
It is necessary to throw another wire into the cabin to the SAUO, but for the system to work correctly, you need to move the white-red end to a free place, and put a new one in its place, this can be done either in the SAUO block, or in the stove block, I changed it near the stove there better access
To conduct a wire you need the wire itself and two mothers
Insert into the block
We stomp into the cabin, remove the self-propelled guns
We take out the 6-pin block from it
We insert our wire into the free socket
Insert the block into the automatic control system
Who has an old self-propelled gun system to fix the glitch with the damper, you need to swap the red and brown wires on the 13-terminal block, pins 2 and 8 (view from the face of the connector)
and there is no need to run a fourth wire.
Thanks for the information Kachan
We connect and secure the stove
We connect the terminal blocks to the damper
We fasten the stove near the right wing with pre-purchased fasteners
I didn’t have this, I made a homemade one from it. cap fasteners 8ki
We fasten in other places, on top is the one we made a little earlier
And two more fastening points at the bottom, on the studs with which the Shumka is attached
Let's go check the operation of the engine, check the dampers and make sure everything is working.
Next we connect the pipes, install the frill, Shumka, wipers and fill in antifreeze
As a result of the replacement, the following were damaged:
- The old frill crumbled to dust when removed;
- Shumka mounting stud — unscrewed together with the nut almost effortlessly (replaced with a self-tapping screw);
- Well, the old stove itself - may it rest in peace!
It has become noticeably warmer in the cabin, all speeds of the turntable are working
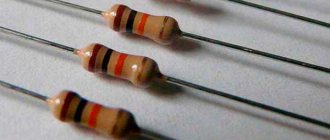
Types of resistors, their features
Of the resistors described above that are used in the design of a car, two types can be noted - load, they are also constant and variable. In general, these are two main types that have fairly wide application in various fields.
Of course, there is a whole range of different resistors that differ in their design features. For example, thermistors, in which the resistance changes with temperature, or photoresistors, which change their parameters depending on the illumination. But we will not touch on them for now, but will consider only the two types indicated.
Fixed resistors are so called because the resistance they create is constant.
For example, if it is indicated that the main parameter of a given element is 30 Ohms, then it provides the resistance of exactly this value and it is impossible to change it.
In variable resistors, the resistance can be changed, manually. An example of this is the already mentioned control of the electric motor of the heating system.
Variable resistors also include trimmers.
In such resistors, you can also change the parameter manually, but its adjustment is not performed at any time, as is done in a variable one, but only when it is necessary to reconfigure the operation of the entire circuit in which it is included for a long period.
Trimmers are not used in vehicles, although they can often be found in household appliances.
Cooling system
So, the load resistor is used in the car’s cooling system, or more precisely, in the radiator fan power circuit.
It is worth noting that previously this electrical element was not used in this circuit, and everything worked very simply - when a certain coolant temperature was reached, the temperature sensor closed the contacts of the fan power circuit, and it started working.
The use of a resistor made it possible to make the fan motor operate in two or even three modes.
The process of supplying power to the fan has changed somewhat. Relays have also been added to the system, and in modern cars the electronic control unit is already responsible for turning on the fan.
That is, the electronic unit analyzes the temperature readings of the sensor and sends a signal to the relay.
Depending on the temperature, the relay directs electricity through a specific circuit. If the coolant temperature is slightly exceeded, but it is already required to be reduced, and a signal from the ECU is received, the relay directs electricity through a load resistor, which creates resistance, and the fan begins to rotate at low speed.
If the temperature continues to rise and reaches a critical point, the relay will redirect the electricity through another circuit - bypassing the resistor, directly to the fan, which will ensure its operation at full power, with a high rotation speed.
This is a dual-mode fan operation circuit, which is ensured by the presence of a load resistor in the circuit. Moreover, it is simplified to make it more understandable.
In a car with three-mode fan operation, the principle remains the same, but it already uses two resistors - one is responsible for low fan speeds, the second for medium ones.
The third mode is emergency, in which the fan rotates at maximum speed, and is ensured by supplying power directly to it.
Lighting
Recently, resistors have begun to be used in conjunction with LED lamps. This type of lamps has increasingly begun to be used on cars.
But not all cars yet come from the factory equipped with LED lighting devices, but it is quite possible to buy them separately and install them instead of standard incandescent lamps for the same turn signals or brake lights, and many do so.
But here a problem arises that requires the use of resistors.
The fact is that the electricity consumption of these lamps is very small, which is why the electronic unit regards the operation of the LEDs as a malfunction of the standard lamp.
To correct the situation, resistors are used to create a load on the wiring lines that power those lighting fixtures in which LED lamps are installed.
As a result, the ECU perceives the resistance of the element as the work of an incandescent lamp, so no error code occurs.
It is interesting that when using such decoys, the main advantage of LED lamps - low energy consumption - is reduced to zero, and they have only one advantage over conventional incandescent lamps - a long service life.
How to check the serviceability of the SAUO controller
To check the automatic control system, you will need a multimeter to measure the voltage on the pink and brown wires (turn on the ignition and turn the temperature knob). Depending on which controller is installed on the car, the voltage changes differently. On cars before 2001, a heater control controller 1303.3854 was installed; its voltage in the “min” position decreases after 13 ± 5 seconds, and is constantly supplied to o. Thus, when the output voltage of the ACS unit does not change, it is not working. On cars after 2003, block 1323.3854 and stove 2111-8101012 were installed.
When the controller malfunctions, the dampers may not work, but in order to diagnose other causes of the malfunction of the VAZ 2110-12 heater, you will have to disassemble the heater.
What kind of malfunctions can there be?
If the engine is working properly, but the cooling fan is not working, then this condition of the ventilation and heating system may be caused by a simple wiring break. In this case, a thorough visual inspection is carried out while simultaneously testing the electrical circuit with a tester.
Sometimes a malfunction of the cooling and heating system manifests itself in the constant rotation of the fan motor at maximum speed. Despite the apparent insignificance of such a breakdown, it can lead to an excessive increase in temperature in the cabin.
In addition, operating the stove in this mode produces the maximum noise level, which also creates discomfort. The reason for this “behavior” of the ventilation and heating system may be a malfunction of the additional resistor. Replacing this element allows you to completely eliminate the damage.