Hello. Chassis repair is perhaps the most common work that a car owner has to do, or more accurately, “our” car owner has to do. These constant knocks and squeaks seem impossible to completely “defeat”, and after one is put in order, another goes out of order. In general, this is not strange, given the state of the roads in Russia. Constant loads and driving on uneven roads have the most unfavorable effect on the chassis. In principle, it would probably be wrong to blame the roads alone; part of the problem certainly lies with the designers of AvtoVAZ, who, despite problems with the roads, continue to produce cars with flimsy suspension and chassis. Well, enough of the ranting, I think, we need to get to work.
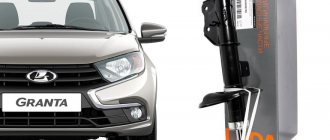
Today, dear readers of VAZ Repair, you will learn how to replace the support bearings on a Lada Granta, and not just replace them, but replace them without removing the struts. I wonder how? Then continue reading.
I’ll say right away that before replacing the support bearings, you need to make sure that they are really faulty. Read about how to check support bearings here.
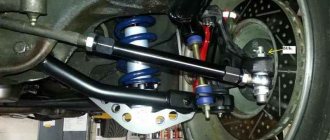
Those who have ever encountered the need to replace support bearings know that to perform this work it is necessary to remove the struts along with the springs, which certainly complicates the task. However, as you know, laziness sometimes works wonders; in addition to being the “engine of progress”, it also often allows you to make your life easier. This photo report will clearly demonstrate to you how to replace the support bearings without removing the strut and you will be able to see that sometimes laziness can work wonders :-). Joke!
To work you must have:
- Set of keys: “13, 14, 17, 22”;
- Hexagon (to fix the rod from twisting);
- Two jacks or supports for the car;
- Special spring ties;
- Actually, the support bearings themselves.
Replacing support bearings on a Lada Granta without removing struts - step-by-step instructions
- We hang the wheel, then remove it.
- We unscrew the bolt securing the stabilizer strut, and then remove it so that it does not limit the travel of the strut.
- Next, take the hexagon and, holding the strut rod with it, loosen the fastening nut.
- We install the jack under the ball pin, and jack the rack, thereby removing the load from the second jack. At the same time, the stand will begin to “play” a little.
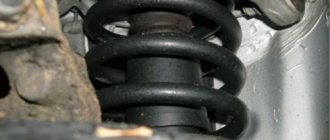
- We take the spring ties and attach them to the coils. We tighten the spring quite a bit, and then lower the jack installed under the ball. After these manipulations, the stand should go down.
- Now you need to unscrew the support bearing and rod; to do this, lower the rod down and pull out the “support” through the resulting void.
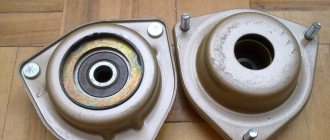
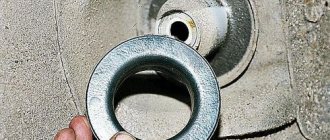
- We clean the rubber band and support cup from dirt. If you are going to install SS-20 supports, then the lower cup will not be useful to you.
Further assembly is carried out in reverse order. I recommend lubricating the bolts and nuts with “graphite” or at least working off, and after completing all the work, do not forget to tighten everything properly. We put the wheel in place and do the same with the second “support”, after which you can safely check the work. As you can see, in order to replace the support bearing on a Lada Granta, it is not at all necessary to completely dismantle the shock absorber struts.
That’s all I have, I hope this “life hack” will be very useful to someone and will significantly “make life easier.”
Guide to assembling new parts into a suspension element
At the very beginning, you need to put a bump stop on the suspension rod, which comes with the boot.
If you are going to install new springs, then initially they need to be tightened in the same way as the old ones. After the springs are tightened, we put them in place. In this case, you need to make sure that the spring falls into a special recess.
Having installed the spring, you need to prepare the support with the bearing. To do this, insert a bearing into the support.
A special flange is installed on top of the bearing and a rubber seal is installed on top of the flange.
We mount the assembled element onto the suspension rod and tighten the fixing nut.
When tightening the nut, you should control the rod so that it does not turn. It should turn out that the upper coil of the springs fits completely onto the sealing rubber. Thus, the front suspension of the Lada Kalina is assembled.
After completing the assembly, the tie elements should be removed from the spring. It is important to find the marking arrows on the spacer that indicate the direction of movement of the machine. Now we insert the entire stand assembly into the glass. After three bolts fall into the holes, screw the nuts on top. Next comes the most painstaking process of getting the strut into the steering knuckle. After that, we twist everything and tighten it to the end. Replacing Kalina front struts is not a very difficult process if you do everything correctly and in the right sequence. When you take on the suspension bulkhead from the second side, everything will work out much faster. And finally, after completion of work with the replacement of front suspension elements, it is necessary to carry out a procedure to regulate the alignment. This procedure will be carried out very quickly and efficiently in a car service center. Doing this yourself without skills is quite difficult and can only make things worse. It is best to go to a car service immediately after completing work on replacing the suspension elements. If you delay this, you will most likely have to change the tires as well. Tire wear is not the worst thing, but since all corners are broken when reinstalling the suspension strut, you can get into an accident when turning.
Replacing the front wheel bearing without removing the strut, attempt 1
2) I will carry out all the work on site, so you MUST place a safety stop under the car. I used a removed wheel and a couple of wooden blocks as a stop.
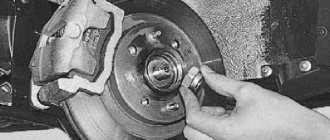
At the same time, I decided to check how the jack was holding - that is, I left a distance of about a centimeter to the safety stop. 3) Unscrew the hub nut. I took the beard and, driving it into the groove in the shank of the CV joint, opened it with a hammer.
4) Now we have reached a difficult moment. To unscrew the nut, you need a 30mm wrench and a lever (a pipe at least 1 meter long). But that's not the problem. The tightening torque of the nut is very high (I can’t give the numbers). In order for the applied force to be used to unscrew the nut, and not to turn the hub, you can put a wheel on the hub with the decorative cap removed. Lower the car from the jack and then unscrew the nut. But even with the car lowered and the anti-roll stop, the wheel can slip on the floor (I had this happen.) Therefore, I use a device to fix the hub from turning. It is a faceplate (like a classic one) with fittings welded to it.
5) I put the clamp on the hub so that when the nut is unscrewed, it rests with a hook against the brake caliper bracket, resisting rotation. And tighten a couple (or all) of the wheel bolts.
6) I take a 30 socket wrench (I have a piece of pipe welded to it), put a lever on the shank - a pipe and unscrew the nut.
7) Now that the nut is unscrewed and the clamp does not need a bracket for the stop, I take an extended 17 socket, an extension and unscrew the two bolts that secure the caliper bracket.
 By inserting a stronger screwdriver between the back of the brake pad and the inside of the brake caliper, we push in the piston of the brake cylinder (We use the screwdriver as a lever) so that it does not interfere with removing the caliper from the brake disc.
9) unfasten the brake hose from the mounting to the rack. (I warn you right away, be sure to return the hose to its place after assembly, otherwise when you turn the steering wheel, the hose will rub against the wheel and become worn out)
What tools are needed to replace
- Socket wrench with curved handle.
- Special head for disassembling racks.
Select a head after consulting with a consultant, all tools are different
- Long head (candle).
- Special key for the rod.
- The usual kit is a ratchet with a set of heads to match the size of the fastener.
- Torque wrench.
- Tie for strut springs.
Replacing the bearings without removing the strut is possible. | Topic author: Victor
I want to change the support bearings on a VAZ 2110, people say that you don’t even need to remove the strut and the camber doesn’t go astray, who has experience.
Ruslan Without removing it - no, but removing the strut along with the steering knuckle is possible, and the alignment will remain unchanged.
Gregory experience EE)
Arthur Dim sucks at climbing, quickly remove the stand. In order not to do the camber, I remove the entire assembly, only unscrew the calipers and the steering rod.
Pavel Well, you should ask people how this is done.
Polina What's the problem?
Zinaida You don't have to do the alignment even if you remove the strut. The main thing is not to unscrew anything unnecessary.
Kirill, you can’t, you’ll have to remove the entire stand.
Lyudmila, the main thing is not to unscrew the steering tips, compress the spring with zip ties, push the shock absorber down and move the strut towards you a little and the support will be removed - difficult but POSSIBLE
Replacing the front shock absorber strut support: VAZ 2110.
6 Jul 2015 — 6 min. — Added by user Carville: production of auto parts and accessories TRIALLI strut support was used in the video. When replacing the support, you will need to remove the shock absorber strut. . Replacement .
How to open a Kia Spectra without a key video in Russian
How does a heated steering wheel work on a BMW 760 Long 2004
How to change a lamp in a Ford Focus 2 headlight
How to change the support bearing on a VAZ 2109 without removing the strut: comments
I absolutely agree with you. This is a good idea. Ready to support you.
As a specialist, I can help. I specifically registered to participate in the discussion.
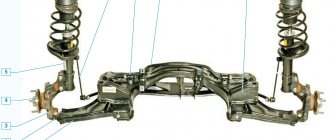
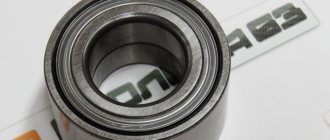
In any passenger car, regardless of design, the suspension must provide a smooth ride, good handling, each element of the chassis plays its role, and there are no unnecessary spare parts. The support bearing is a part of the front suspension, without which it is impossible to imagine a front-wheel drive car; if it were not there, the steering wheel would turn very tightly, with a terrible squeak, and it would be impossible to drive the car.
Why do you need a support bearing?
The question of why a support bearing is needed is asked by many novice car enthusiasts, but before you figure it out, you need to understand how shock absorber struts work and are installed. Shock absorbers in a car are designed to ensure a smooth ride, smooth out shocks and vibrations when driving on uneven roads, bumps and potholes. On front-wheel drive cars, the struts are attached to the body at the top, to the so-called “glasses”, and at the bottom they are connected to the steering knuckles. The support bearing (PU) is often called the upper shock absorber support; this generally simple device plays a very important role in the suspension of the car, and if it is faulty, it will become difficult to drive the car. It is necessary to monitor the condition of the supports and replace them in a timely manner - we must not forget that traffic safety depends on them.
A typical OP consists of three parts:
- an upper metal plate with fasteners (most often these are three studs);
- lower base;
- directly to the bearing itself.
The lower and upper plates are rigidly connected to each other, the bearing itself is usually pressed into the body of the support, and the design options for the OP can be different; each automaker uses its own design solutions. With the help of a support, the shock absorber strut is fixed to the body; due to the OP, the shock absorber rotates smoothly relative to the body, with no play.
What types of support bearings are there?
The upper shock absorber mounts on different car models can differ significantly in design and mounting;
- with two or three studs;
- with threads in the body of the cup for screwing in bolts.
To dampen oscillations and vibration, shock absorber cups often have a rubberized surface or separate elastic elements, and the bearing itself can be pressed out and replaced.
What other support bearings are there? There are car models on which the upper support is not attached to the body “glass” with studs or nuts; the shock absorber is held in place by the upper steel plate. A wide metal washer is secured here with a nut screwed onto the shock absorber rod; to ensure a soft connection, a rubber spacer is placed under the plate (a similar design is found on the Chery Amulet car).
In some designs, the upper support consists of several parts; they may contain separate upper and lower cups, rubber buffers, and the bearing itself. When assembling the shock absorber strut, all parts are installed in a certain order; they must not be mixed up.
Types
Roller bearings can also be of several types according to their design. Based on it, one can judge durability and endurance:
- With integrated rings, both outer and inner. The design features of this type are the presence of mounting holes directly in the cage. Consequently, no additional clamping strips or plates are required for its installation. Another advantage of these bearings is that they are equipped with spacers between the rings, which allows you to avoid any adjustments.
- With separate outer rings that allow rotation of the inner ones. In them, the outer ring can be removed separately, and the inner ring is connected to the body. This type is used where unreliability and precision of movements are required. Checking them is quite simple because when they fail, they are often destroyed and create a characteristic sound when turning.
- With detachable inner rings to ensure rotation of the outer ring. It is used in the same place as the previous model.
- Single-divided. The principle is the same as the previous ones. You can check this type in the same ways as described above.
Front shock absorber support bearing faults
Like any parts in a car, OPs wear out and break over time; these suspension elements have their own service life. For each car model, the shock absorber supports have their own service life; on average, parts can last from 50 to 100 thousand kilometers without replacement. But for various reasons, support bearings can fail prematurely; the main causes of failure are:
- driving a car on bad roads;
- poorly performed repairs (for example, during installation the nuts were not fully tightened);
- low quality of spare parts or defects, most often non-original parts are of poor quality;
- destruction of the OP as a result of an impact (when hitting an obstacle or due to an accident);
- ingress of dirt and moisture onto the parts of the “support”; on many car models these parts are not protected in any way.
To make sure that the upper support is faulty, it is necessary to carry out diagnostics; in general, checking the support bearing is not difficult, but it is better to diagnose the suspension together.
How to restore an old bearing and support
When the opportunity arises to save a thousand or two on the purchase of spare parts, folk art has no boundaries. Once upon a time this was really justified, since spare parts were delivered to order, and it was long and expensive.
Now there is a choice for every taste and budget, and parts are often sold within an hour's availability.
However, sometimes selective replacement of parts in a support is justified even now. The car can be rare and exotic, and the entire set can be unreasonably expensive. Then it is quite possible to disassemble the removed support assembly, inspect it more thoroughly and replace only the truly worn parts.
Most often, it is enough to replace only the bearing. Many companies allow this; the bearing has its own catalog number and can be purchased separately. Or choose the appropriate size, this is also possible.
As a result, the restored support will serve for a long time and is no worse than a new one.
Source
How to check the serviceability of the front strut support
The OP check is performed when the car is parked on a level surface; there is no need to hang the wheels. Diagnosis is carried out as follows:
- one of the inspection participants in the front rocks the car up and down;
- another person performs a visual inspection to see if there are any gaps.
Additionally, you can turn the steering wheel and observe the behavior of the shock absorbers, put your hand on the upper support while rotating the steering wheel or rocking the car - if there is play, you will feel it with your hand; clicks and squeaks may also be heard. Another diagnostic option is to grab the top cup protruding above the glass and try to rock it from side to side, in this case the play will also be noticeable.
Basic faults
When a support bearing fails, a knock resembling dull blows appears in the front part of the car in the area of the pillars. Most often, such symptoms are observed when driving over uneven surfaces.
A knock indicates that the bearing has ceased to cope with its duties due to a violation of its integrity. This is caused by the destruction of its structure due to:
- exceeding the recommended resource;
- excessive dynamic loads;
- dirt and moisture getting inside the bearing.
However, knocking in the area of the racks may have other causes. To check the bearings and make sure that they are the ones knocking, lift the hood of the car, remove the cover of the supposed “glass”, and place your palm on the upper shock absorber support.
Rock the car up and down. If at the same time you hear the same knock and feel the corresponding vibration with your hand, immediately replace the bearing.
Support bearing cost
The upper support of the front strut is a relatively inexpensive part; the cost of a spare part depends on the car model, brand, design features; it is no secret that car shops can sell the same spare parts at different prices. The approximate price of a shock absorber bearing is from 150 to 2200 rubles; for prestigious foreign cars, parts usually cost significantly more; you can buy cheaper ones from non-original production. As you can see, the range in prices for these spare parts is quite large; the most expensive bearings are sold for cars:
- Mazda 3;
- Toyota 4Runner/ Avensis;
- Nissan Juke;
- Honda CR-V;
- Mercedes W204;
- Lexus RX300;
- BMW X6.
At a very affordable price you can purchase support bearings for such car models as:
- Chevrolet Lacetti;
- Daewoo Matiz;
- Honda Fit;
- Nissan Almera;
- Chery Amulet;
- Hyundai Accent.
Support bearings for Chinese and Korean cars are generally inexpensive; spare parts for brands such as BMW, Audi, Lexus, and many purely American cars are almost always more expensive.
Replacing the support bearing
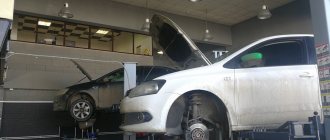
Changing a support bearing is not very difficult, and almost every driver can do the job if he has the necessary tools and at least a little plumbing experience. It is more convenient to replace the OP in a pit or a car lift, but it is also possible to carry out repairs on a flat area, for example, in a garage or on the street near the house.
What kind of keys are required for repairs depends on the specific car model; in addition to combination and ring keys, sockets with collars, hexagons and sprockets are often used. To change the support bearing, it will be necessary to remove and disassemble the shock absorber strut, so in any case you will need:
- hammer;
- screwdrivers;
- pliers;
- mount;
- set of spring ties;
- remover of ball joints (steering rods).
Cars such as Mitsubishi, Renault or Chevrolet often require keys of non-standard sizes - 16, 18, 21 and 23.
What supports to put on Kalina
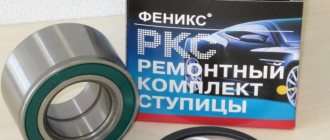
The choice depends on you and your budget. Today, manufacturers offer us a large selection of support bearings from 300 rubles to 3000 rubles. Which ones to install is up to you to decide. You can purchase factory supports, or you can choose an option from another manufacturer. The most popular supports are:
- Rack support FENOX price from 500 rub.
- Rack support Balakovo price from 350 rub.
- Rack support TRACK price from 800 rub.
- Rack support BZAK price from 600 rub.
- ASOMI supports, Tolyatti price from 3000 set
- Supports SS-20 Togliatti price from 3500 rubles set
Some car enthusiasts, for the so-called suspension tuning, install ASOMI or SS20 supports.
How to change the support bearing on a VAZ-2115 car
To replace the OP without a lift, the car will have to be jacked up; before starting work, stops should be placed under the rear wheels. Next we perform the following steps:
- unscrew the hub nut, for this purpose you will need a 30mm head with a wrench or pry bar (depending on the design of the head);
- remove the front wheel on the side where the bearing will be replaced, hang the car on a jack, and install a stand under the threshold to secure it (you can use a wooden block);
- Having pulled out the cotter pin with pliers, unscrew the nut holding the steering tip, using a puller, disconnect the tip from the shock absorber strut;
- unscrew the two caliper bracket bolts (13 wrench), if necessary, hold the caliper guide with the “17” wrench;
- move the caliper to the side on the brake hose;
- disconnect the ball joint (two bolts) from the steering knuckle, move the assembly with the axle toward you, freeing the hub from the CV joint splines;
- from above, under the hood, tighten the three nuts of the upper support (13 wrench);
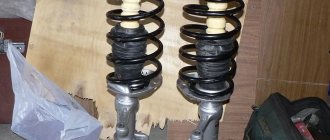
- Having removed the rack assembly, use zip ties to compress the spring evenly on both sides;
- Having fixed the shock absorber rod in a stationary position with a special wrench, use a 22 mm head to unscrew the nut that holds the entire structure, including the support bearing;
- Next, remove the old bearing from the rod, install a new bearing without removing the couplers, tighten the nut to 22 until it stops;
- loosen and remove the ties and assemble.
Some car owners recommend using a gas wrench instead of a special wrench to hold the shock absorber rod, but this is not recommended; you can scratch the mirror surface, and then the shock absorber will leak.
Since many VAZ models have an identical suspension design, exactly the same as on the VAZ-2115, replacement is carried out on cars 2108-09-099, 2110-11-12, 2113-14. Due to the fact that with this sequence of operations the steering knuckle is not disconnected from the shock absorber strut, wheel alignment is not necessary after repair.
When to change
The service life of standard bearings for the VAZ 2110 is 100 thousand km, but given the state of our roads, it is better not to take risks and change the bearings after no more than 50 thousand km or 2-3 years of operation, especially if they are no longer factory.
Also, support bearings must be immediately replaced when their malfunction is diagnosed. Otherwise, in addition to the body, the supports themselves and the shock absorber struts will suffer.
It is recommended to replace two support bearings at once.
The cheapest support for the “ten” costs about 300 rubles . A good alternative to the original bearing models are products from other manufacturers, such as SS-20, ASOMI, TRACK or FENOX ( up to 800 rubles per piece ). They may have a modified design designed to meet certain consumer requirements.
You can also buy the entire upper support assembly. This will cost approximately 1200-3000 rubles per unit .
The cost of replacing one prop at a service station is about 500 rubles.
It is not necessary to overpay for the work of replacing support bearings. Having the necessary tools at hand, you can do this yourself.
Tools and tools:
- wheel wrench;
- car jack;
- a special puller for steering tips (as a last resort, a hammer and a small pry bar);
- wrenches 9, 13, 19;
- pliers;
- two spring ties.
Work order
- Park the machine on level ground. Jack up the body on the desired side. Remove the corresponding wheel.
- Unscrew the nut securing the steering tip (pliers) and unscrew it (19mm wrench).
- Using a special tip puller, press out the pin. If you don’t have such a tool, knock out the finger by carefully tapping it with a hammer from below and prying it up with a small pry bar from above. Be careful not to damage the threads on the finger.
- Unscrew the two nuts securing the lower part of the strut in the steering knuckle (19mm wrench). If you cannot unscrew them, treat the connections with anti-rust liquid.
- Under the hood there are three nuts securing the upper support to the body. Unscrew them (key 13).
- Remove the entire shock absorber.
- Using two spring ties, tighten the spring enough to relieve the load on the support.
- Unscrew the nut of the central fastening of the support to the rack (wrenches 9 and 22). Remove the support and disassemble it.
- Replace the support bearing in it with a new one.
- Carry out work on assembling the rack and installing it to the body and suspension in the reverse order. Replacing the second bearing is carried out in the same way.
Some Tips for Replacing the Front Shock Absorber Upper Mount
- When disassembling, the hub nut should be loosened before you remove the wheel; if the car is already suspended on a jack, it will not be easy to move it.
- If you do not have a ball joint and tie rod remover, the steering tip can be knocked out by hitting the joint joint with a heavy hammer, the blows must be sharp and precise. Even if the tip seriously “boils” in the connection, after several attempts it will still come off.
- To make it more convenient to disassemble the shock absorber strut after removal, you can immediately (while the shock absorber is still on the car) loosen the shock absorber rod nut.
- To make the nuts and bolts easier to turn off during the next repair, it is recommended to treat the fasteners and threads with graphite lubricant during assembly.
- When removing the shock absorber assembly with the hub and steering knuckle, it is a good idea to check the condition of all suspension parts on this side of the wheel. Such diagnostics will save your money and time, because it is often discovered that along with a defective support bearing, for example, a shock absorber is also faulty, or the outer CV joint has a large amount of play.
- You need to compress the spring with ties gradually, squeezing the coils little by little on one side and the other. The spring is compressed until the upper support begins to rotate freely; too much compression of the coils is not required, and in general it is unsafe.
In general, replacing the support bearings on the front struts is quite simple; to make a replacement, you don’t have to go to a car service center; you can do the work yourself.
Tuning and repair of VAZ 2110
I think everyone understands that with roads like ours, the chassis often requires repairs. Quite often after winter, when the snow has melted and the holes are not yet visible due to puddles, shock absorbers and support bearings often get damaged. Because of such situations, it is necessary to repair this component of the VAZ 2110 chassis. It is better to carry out repairs in a timely manner, since in the first stages it will result in you spending less money than if you cause a breakdown and it will lead to a more disastrous result.
This article will provide information so that you can replace the VAZ 2110 support bearings with your own hands. Moreover, we will do this in such a way that we do not have to adjust the wheel alignment. That is, we will not touch the camber bolts.