Everyone has often seen how a car seemed to “fall” on one of the wheels, which unnaturally turned out and got stuck in the wheel arch. It was the hub that collapsed, and the wheel actually “disconnected” from the car. It happens that the wheel “jams” throughout its entire travel, then it comes off the car at full speed, and, having a large mass and torque, rolls for a long time, causing serious damage. The malfunction of this mechanism is also to blame.
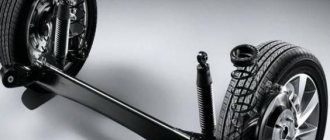
The hub is the mechanism that connects the wheel and the axle. More precisely, it connects the fixed parts of the suspension and the moving ones. This is why hubs tend to experience heavy loads when moving.
The most important thing is that the hub will never completely collapse immediately on a VAZ 2107, with the exception of strong shock loads. This happens when driving at speed into a hole or onto a steep rock. After this, the hub begins to get very hot and gradually collapses. Most often, the front suspension is destroyed in this way.
For example, a hub cap protects the hub nut from sand and corrosion. And if you lose it, problems will come faster.
The front hub fails more often than the rear one, since it is the front wheels that are more mobile and are characterized by angular acceleration. When a front hub breaks, it causes more serious accidents than a rear hub because losing the front wheel is more dangerous. The car becomes uncontrollable.
Bearing condition diagnostics
Often, a faulty front wheel bearing manifests itself in the form of noise when the car is moving. You can verify the serviceability (or verify the malfunction) of the wheel bearings as follows:
- Place the car on a level surface, raise the handbrake lever;
- install wheel chocks;
- raise the car by hanging the front wheel;
- install a stop under the lower ball;
- install a safety support under the body;
- lower the jack;
- shake the wheel with your hands, holding the top and bottom;
- spin the wheel.
If play is felt while the wheel is rocking, adjusting the bearing tightening can help. But usually, if a hum, grinding noise, knocking, or play in the bearing occurs, it is necessary to replace the VAZ 2107 wheel bearing.
Rear hub
The rear hub of the VAZ 2107 differs from the front hub both in design and purpose. There are no steering knuckles or additional suspension arms attached to the rear hub.
The rear hub of the "seven" is not as massive as the front
Because the main task of this hub is to ensure uniform rotation of the wheel, and that’s all. It does not require a huge margin of strength and resistance to mechanical loads, since it does not participate in turning the wheels, like the front hub.
The rear hub is simpler than the front, as it does not experience huge loads
The rear hub is equipped with a rolling bearing, which is covered with a special cap. On the other hand, a dirt-proof inner ring is installed in the hub to prevent clogging of the bearing. This entire structure is put on the rear axle shaft of the “seven” and secured with a 30 wheel nut.
Adjusting the wheel bearing on a VAZ 2107
If the bearing is slightly worn, you can tighten the adjusting nut and eliminate the play. To do this you will need a jack, a wrench, pliers, a hammer and a screwdriver.
You can correctly tighten the front wheel bearing of a VAZ 2107 as follows:
- lift the car with a jack, hanging the wheel;
- Use a screwdriver and hammer to remove the protective plug from the hub bearing;
- tighten the adjusting nut so that the wheel stops rotating by hand;
- gradually loosen the nut until the wheel rotates freely, but does not play;
- bend the side of the nut with a chisel or screwdriver so that it cannot unscrew spontaneously;
- put the protective plug in place;
- lower and remove the jack.
If play and noise cannot be eliminated in this way, the bearing must be replaced.
What reasons lead to hub failure?
- dashing ride over potholes and bumps. This is typical for lovers of the VAZ 2107: everyone wants to “wipe their nose” on the Lexuses lazily diving into holes on a country road. And trimming the “puzoter” is generally a real pleasure.
- serious overload: an attempt to pick up “all the potatoes” from the dacha can result in a serious accident.
- driving style, which is called “aggressive” - with sudden changes in acceleration.
- If the hub cap is lost, corrosion and wear will occur faster.
Replacing a VAZ 2107 wheel bearing
- lift the car on a lift or “hang” the wheel using a jack;
- Unscrew the wheel mounting bolts;
- remove the wheel;
- unscrew the caliper mounting bolts;
- remove the brake caliper;
- pry up the protective cap of the hub with a screwdriver and remove it (sometimes you need to use a hammer for this);
- straighten the dented side of the hub nut, which prevents it from unscrewing spontaneously;
- unscrew and remove the washer nut;
- remove the hub from the car;
- pull out the bearing cage;
- remove the ring separating the outer and inner hub bearings;
- knock out the bearing races from the seat using an extension and a hammer;
- thoroughly clean the bearing installation area from old grease and dirt using rags and kerosene;
- press in the outer and inner bearing races
- thoroughly lubricate the internal separator;
- insert the internal separator;
- fill the inter-bearing space with lubricant by approximately 40%;
- insert the spacer ring;
- press in a new oil seal;
- install the hub on the axle;
- lubricate the external separator;
- insert external separator;
- install the external separator in place;
- put the washer in place and tighten the hub nut until it stops;
- achieve free rotation of the hub in the absence of play by smoothly unscrewing the nut;
- bend the side of the nut with a chisel or screwdriver, thereby preventing it from unscrewing;
- Reinstall the brake caliper and tighten the mounting nuts;
- install the protective cap;
- put the wheel in place and tighten the wheel bolts;
- lower the car.
Bearing Failure Determination
Some recommendations will help you make sure that you need to replace the wheel bearing on your VAZ 2107:
- The easiest way to determine the need to replace the hub unit is to grab the front wheel and wiggle it in different planes. If you feel the presence of play, then it’s time for a more detailed diagnosis and most likely replacing the bearings.
- The front wheels of the car should be hung on a jack, while being sure to take precautions: pull the handbrake, install shoes and additional stands under the car. Grasp the top and bottom of the front wheel with your hands and then make movements. It is important to wobble the wheel, and not the car as a whole. Thus, you can accurately determine whether the product in question needs to be replaced.
- Another way to determine the need for replacement is to listen for humming, knocking, and grinding noises in the wheel as it rotates.
Having decided that you really need to replace the VAZ 2107 wheel bearing, you need to purchase new products and begin the replacement workflow.
Replacement features
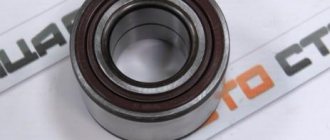
The front hub of the VAZ 2107 car has a pair of roller bearings, one of which is called internal, and the second external. The manufacturer recommends replacing these products in pairs, on both front wheels of the car. We will find out further what the replacement of the parts in question is.
Initially, it is necessary to tear off the nuts securing the front wheel of the VAZ 2107 car. After this, install the jack and jack up the front part of the car. At the same time, do not forget to install shoes under the wheels, as well as a special safety stop to prevent the jack from falling.
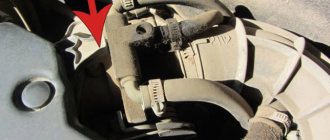
- Removing the caliper. Changing the front wheel bearing is much more difficult than replacing the rear one, but it can be done even with no experience. First of all, the 2 bolts that secure the caliper are uncoiled, after which they are unscrewed. It is not necessary to disconnect the brake hose; it is enough to tie up the removed caliper so that it does not interfere with further work.
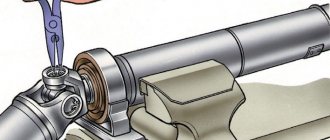
- Removing the outer product. The cap is removed using a screwdriver, behind which there is a hub nut. The nut must be unscrewed, for which you will need to use a chisel and a hammer. Behind the nut there is a lock washer that must be removed. Now you can pull out the outer bearing.
- Removing the hub. To remove the hub, you need to pull it towards you. It is removed along with the brake disc. To disconnect the disk itself after removal, unscrew the two “12” bolts. The brake disc is removed to make replacement easier, but it is not necessary to disconnect it.
- Removing the inner bearing. Using a screwdriver, you need to pry off the oil seal located on the inside and covering the inner bearing, then pick it out and pull out the split spacer ring. The ring may not stand, so we focus on the situation. After this, the inner bearing can be removed.
- Next, the old clips are removed using a special puller or an ordinary steel tube of suitable diameter. The next stage of replacement involves cleaning the inside of the hub from old grease, after which you can begin assembly.
Sign of a faulty VAZ classic wheel bearing.
A faulty bearing usually produces extraneous sounds in the form of a hum or grinding sound, and the wheel can also hang on such a bearing due to wear or due to a poorly tightened wheel nut.
To diagnose a bearing, it is enough to hang the wheels (or each separately) and rock the wheel in different directions. If there is play when rocking in all planes (wheel rotation left and right and tilt up and down), the wheel bearing may need to be replaced. But the backlash can also be due to tired silent blocks or ball bearings. To exclude a suspension malfunction, you need a second person who will check whether the wheel wobbles together with the steering knuckle or walks separately from it. If the wheel moves separately from the steering knuckle, then the wheel bearing is definitely faulty (in this case, tightening the wheel nut may briefly save the situation).
A sign of a malfunction may also be extraneous sounds when the wheel rotates (usually a hum, sometimes a grinding sound) or its uneven rotation.
You can also determine a faulty bearing by an excessively heated wheel (for example, if the front right wheel disc is much warmer than the front left one). But you can’t compare the temperature of the rear and front wheels because... They have brakes of different designs.
And so, let’s summarize everything we’ve read. The wheel bearing is replaced if:
- The wheel dangles separately from the steering knuckle.
- A hum and grinding noise is heard when the wheel rotates.
- The wheel does not spin evenly.
- The wheel rim gets very hot.
How can I disassemble the hub and check the condition of the bearing?
- The hub cap is removed, then using a 27mm (socket) wrench, the hub nut is unscrewed, the washer with the outer roller bearing separator and the inner ring are removed, then to remove the hub, you need to pull it towards you and remove it from the steering knuckle axle, along with the brake disc :
- Now, using variable size pliers or a slotted screwdriver, remove the oil seal from the hub, then you can remove the inner roller bearing cage, without the outer ring.
- After this, we carefully clean the old grease from the hub cavity, wipe it, it is better to moisten a rag with white spirit.
- Then, using the same straight-slotted screwdriver, you need to pry the slotted sleeve and remove it. Then we take a socket wrench with a head of sufficient depth - 7 mm, and turn out the guide pins.
- Now you can remove the brake disc and spacer. After this, firmly install the hub in a bench vise and, using light and precise blows with a hammer on a drift, “punch” the outer ring of the inner bearing around the perimeter and press it out.
After this, having turned the hub, we also press it out, but the outer bearing ring:
Thus, you can make sure whether the bearings or hub housing need to be replaced, and evaluate the quality of the lubricant.
When assembling the hub, all seats are washed, new lubricant is applied, and the bearing rings are also pressed in, clamped in a vice. After all bearings are properly installed, the clearances in the bearings should be adjusted.
Front wheel bearings for VAZ 2107 sizes.
The table shows the dimensions for the front wheel bearings of a VAZ classic car.
| Installation location | Bearing type | Size, mm | Quantity |
| Front wheel hub (outer support) | Roller, conical, single row | 19,5*45,3*15,5 | 2 |
| Front wheel hub (inner support) | Roller, conical, single row | 26*57,2*17,5 | 2 |
Replacement features
The front hub of the VAZ 2107 car has a pair of roller bearings, one of which is called internal, and the second external. The manufacturer recommends replacing these products in pairs, on both front wheels of the car. We will find out further what the replacement of the parts in question is.
Algorithm for replacing a faulty bearing
The work is performed in almost the same sequence. As for many other VAZ models (classics):
The vehicle is fixed;
The caliper is removed (it is possible without disconnecting the brake hoses);
Use a bayonet screwdriver to pry up the protective cap that covers the hub nut, remove it;
Unscrew this nut, remove the separator and washer, dismantle the hub along with the brake disc;
Remove the ring placed between the outer and inner bearings;
Using a suitable size drift and hammer, knock out the clips.
Now you can proceed to installing a new bearing and assembling the hub. The operations are performed in reverse order.
Before starting assembly, it is imperative to remove dirt and old lubricant residues and wash the parts (using special cleaning fluids).
The outer races are removed from the new bearings in a vice. Internal ones, using special spacers (for example, an old clip), are pressed into place.
Installing new bearings
The inner bearing cage is lubricated and installed in place. Then, the spacer ring. Next, the oil seal is pressed in (be careful not to damage it during installation).
The brake disc is put on and secured with studs.
The assembled unit is put in place. Then the separator of the second bearing (external) is lubricated and installed, the washer is inserted, and the nut is tightened until it stops.
The wheel is put on and the nut is unscrewed until slight play occurs. Then it is locked in this position.
We put new grease into the previously cleaned cap and put it in its original place.
How to replace a wheel bearing on a VAZ 2106, 2107?
We determined that it was the wheel bearing that was faulty, bought a new one and are preparing the tools for the job:
- Hammer
- Pliers
- Socket wrench set
- Impact screwdriver (that you can hit without breaking)
- Mandrel for pressing in new bearing races
- Head 27 with a large collar (for the hub nut)
Removing the wheel bearing.
First of all, remove the cap covering the hub nut. Next, we align the rolled edges of the hub nut and unscrew it.
Replacing the axle bearing
The axle shaft is an integral part of the rear axle of the VAZ 2107. The axle shaft itself practically does not break, but the bearing by which it is attached to the axle housing sometimes fails. Its purpose is to rotate the axle shaft smoothly and evenly while the car is moving. Signs of bearing failure are the same as those of the hub elements. If problems occur, it is necessary to dismantle the axle shaft and replace the faulty part.
Bearing removal
Before starting work, you need to prepare the following list of tools:
- set of socket wrenches with a crank;
- hammer;
- flat screwdriver;
- chisel;
- grinder;
- new axle bearing with retaining ring.
To replace, follow these steps:
- Raise the rear wheel using a jack, then remove it, not forgetting to install stops under the front wheels.
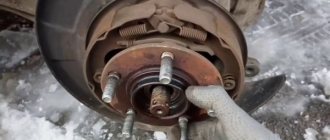
- Remove the brake drum.
To dismantle the drum, you need to carefully strike its inside through a wooden block.
Installing a new part
After removing the bearing, you can immediately begin reassembly:
- Clean the axle shaft from dirt and wipe it with a rag.
- Press the new bearing onto the axle shaft, and then install the retaining ring. To install the latter, it is advisable to heat it up with a blowtorch, which will ensure easier installation and reliable retention after cooling.
Video: replacing the axle bearing on a “classic”
Replacing a wheel bearing on a VAZ Seven is not a complicated procedure. To carry it out, you will need to prepare the necessary tools and materials, as well as read the step-by-step instructions. If you choose a quality product and carry out repair work correctly, the bearing will work for a long time without any problems.
Adjusting the wheel bearing on a VAZ 2107.
The hub nut must be tightened so that the wheel does not dangle and rotates freely. Those. We rotate the wheel and, by tightening or loosening the nut, look for a position in which the wheel will not dangle and will rotate freely.
It’s worth saying right away that the suspension on domestically produced cars initially took into account all the road conditions in which the driver would have to operate his car. Therefore, all suspension elements on a VAZ are considered reliable and durable, but one of the most “long-lasting” suspension components is the steering knuckle. This unit in the VAZ 2107 design rarely fails.
How to remove
When the hub is replaced on a VAZ-2107, the removal procedure consists of the following steps:
- First you need to hang the wheel in the air by lifting the car with a jack.
- Remove the wheel. To do this, you need to unscrew the mounting bolts.
- Remove the cap protecting the hub nut. This is done using a chisel.
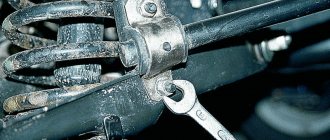
- Disconnect the caliper. To do this, you need to unscrew the mounting bolts. To do this, use a chisel to bend their locking plates. The bolts are unscrewed using socket number 17.
- The disconnected caliper is moved to the side along with the pads and brake hose. So that it does not interfere with the further procedure, it is suspended in a niche next to the wheel.
- Now you need to carefully remove the hub. Everything must be done so as not to damage the oil seal.
- Unscrew the guide pins and remove the brake disc together with the spacer ring.
Removing the wheel
Steering knuckle on the VAZ 2107: what is it for?
Even the uninitiated can answer what a steering knuckle is: obviously, it is a mechanism that ensures the wheels turn while driving. The steering knuckle secures the hub elements of the front row of wheels on the VAZ 2107 and is mounted on the upper and lower suspension arms.
As soon as the driver begins to turn the steering wheel in the cabin, the gear lever acts on the steering rods, which, in turn, pull the steering knuckle to the left or right. This ensures that the front wheels turn in one direction or another.
The main purpose of the steering knuckle in the design of the VAZ 2107 is to quickly and without failure ensure that the front pair of wheels turns in the direction desired by the driver.
Steering knuckle device
The mechanism itself is made of high-strength cast iron, and therefore has a long service life. According to the designers, this unit should withstand serious loads and not “wedge” at the most crucial moment. It is worth emphasizing that on the VAZ 2107 the steering knuckle is indeed one of the most reliable elements: most drivers never change it throughout the entire period of operation of the car.
The design of the front suspension of the “seven” uses two steering knuckles at once - left and right. Accordingly, the elements have slight differences in fasteners, but in other respects they are completely identical:
- manufacturer - AvtoVAZ;
- weight - 1578 g;
- length - 200 mm;
- width - 145 mm;
- height - 90 mm.
The main elements of the steering knuckle are:
- The axle is the part of the axle on which the bearing is located. That is, the axle serves as a support for the rotational movement of the wheels.
- The kingpin is the pivot rod of the swivel joint.
- A wheel rotation limiter is a device that prevents the fist from turning to its maximum due to the risk of loss of control.
Replacement
Front hubs wear out over time. Therefore, it is necessary to periodically check their serviceability and replace them.
The diagnostic procedure is performed as follows:
- Place the vehicle on a level surface and apply the handbrake.
- Use special wheel chocks for the rear wheels to prevent the machine from moving on its own during the inspection.
- Place a stop to suspend the front wheel.
- Rock and spin the wheel.
Replacement
If a slight play is felt, then in some cases it can be corrected by tightening the fastening nut.
It happens that you can hear a creaking or knocking sound. In this case, the most likely cause of the problem is faulty wheel hubs that will need to be replaced.
Sometimes the wear is minor. In this case, you can try to fix the problem by performing repairs.
Often such a breakdown results in the car starting to maneuver much worse than before. This is most obvious when there is a maximum load. When turning the steering wheel, the car begins to listen poorly to the driver. For example, when turning sharply, additional noise and vibration occurs. If the indicated “symptom” occurs in the “seven” while turning to the right, then most likely the wheel bearing on the VAZ-2107 front wheel needs to be replaced.
Here are a few more signs of this type of malfunction:
- problems arise during braking. The driver may feel that the brakes are causing the steering wheel to jerk;
- while driving, clearly noticeable additional vibrations appear in the cabin;
- unreasonably rapid tire wear.
If at least one of the listed signs is present, it becomes necessary to carry out inspection and repair.
Steering knuckle repair
Repair of the steering knuckle is possible with minor wear or minor damage. As a rule, if a unit is seriously damaged after an accident, car enthusiasts simply replace it with a new one.
Repair work is only possible after the steering knuckle has been completely removed from the vehicle. The repair schedule looks like this:
- Clean the surfaces of the fist from dirt and dust, wipe it with a clean cloth, and blow with compressed air.
- Clean the grooves for the retaining rings.
- Inspect the steering knuckle after dismantling for signs of deformation and wear.
- Install a new retaining ring and press the new bearing in until it stops.
- If it is necessary to replace the trunnion, replace it. If the axle and kingpin are severely worn, it is recommended to replace the steering knuckle assembly.
Repairing the steering knuckle involves replacing the retaining rings and bearing. In case of extensive damage, only replacement is recommended.
Replacing bearings and hub cuffs of a VAZ 2106 Zhiguli
- Repair manuals
- Repair manual for VAZ 2106 (Zhiguli) 1976-2005.
- Replacing bearings and hub cuffs
Replacing bearings and hub cuffs
↓ Comments ↓
1. General information
1.0 General information 1.1 Safety precautions
2. Diagnosis of faults
2.0 Diagnostics of faults 2.1 diagnostics of faults in the engine and its systems 2.2 Diagnostics of faults in the clutch 2.3 diagnostics of faults in the gearbox 2.4 Diagnostics of faults in the driveline, rear axle, chassis, steering and braking system 2.5 Diagnosis of faults in the body 2.6. Diagnosis of electrical equipment faults
3. Engine
3.0 Engine 3.1 Cylinder head and timing mechanism 3.2 Lubrication system 3.3 Oil change 3.4 Replacing the camshaft drive chain guide 3.5 Replacing the camshaft and valve levers 3.6 Replacing the valve stem seals 3.7 Replacing the intake and exhaust manifold gaskets 3.8 Replacing the cylinder head gasket ov 3.9 Disassembling the head cylinder block, valve grinding
4. Engine power system
4.0 Engine power system 4.1 Replacing the air filter element 4.2 Replacing the fuel pump 4.3 Repairing the fuel pump 4.4 Replacing the fuel tank and its hatch cover
5. Carburetor
5.0 General information about the carburetor 5.1 Cleaning the fuel filter 5.2 Replacing the idle air system solenoid valve 5.3. Adjusting the carburetor 5.4 Replacing the carburetor 5.5. Carburetor repair
6. Engine cooling system
6.0 Engine cooling system 6.1 Replacing the coolant 6.2 Replacing the coolant pump 6.3. Replacing the thermostat 6.4 Replacing the engine radiator
7. Exhaust system
7.0 Exhaust system 7.1 Replacing exhaust system parts
8. Clutch
8.0 Clutch 8.1 Replacing fluid and bleeding the clutch hydraulic drive 8.2 Adjusting the drive 8.3 Replacing the clutch master cylinder 8.4 Repairing the clutch master cylinder 8.5 Replacing the clutch slave cylinder 8.6 Replacing the pressure plate assembly and clutch release bearing
9. Gearbox
9.0 Gearbox 9.1 Checking the level and changing the oil in the gearbox 9.2 Replacing the reverse light switch 9.3 Replacing the secondary shaft cuff 9.4 Replacing the gearbox 9.5 Repairing the gearbox 9.6 Replacing the speedometer drive 9.7 Features of repairing a five-speed gearbox
10. Cardan transmission
10.0 Cardan transmission 10.1. Maintenance 10.2. Replacing the driveshaft
11. Rear axle
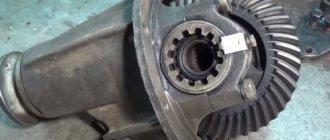
11.0 Rear axle 11.1 Checking the serviceability of the rear axle 11.2 Changing the oil 11.3 Replacing the axle shaft and its cuff 11.4 Removing and installing the rear axle 11.5 Replacing the cuff of the drive gear 11.6 Replacing the gearbox 11.7 Repairing the gearbox
12. Front suspension
12.0 Front suspension 12.1. Maintenance 12.2 Replacing the bearings and hub cuff 12.3 Replacing the cushions and stabilizer bar 12.4 Replacing the ball joints 12.5 Replacing the shock absorbers 12.6 Replacing the springs 12.7 Replacing the upper arms and their rubber-metal hinges 12.8 Replacing the rubber-metal joints of the lower arms on a car 12.9 Replacing the lower arms 12.12 . Adjusting wheel alignment angles
13. Rear suspension
13.0 Rear suspension 13.1 Checking technical condition 13.2. Replacement of rear suspension parts
14. Steering
14.0 Steering 14.1 Adding oil 14.2 Checking the condition of the steering 14.3 Adjusting the gear engagement 14.4 Replacing steering rods 14.5 Replacing and repairing the pendulum arm 14.6 Removing and installing the steering wheel 14.7 Removing and installing the steering shaft 14.8 Removing and installing the steering mechanism 14.9 Removing the bipod
15. Brake system
15.0 Brake system 15.1 Checking the condition of the hydraulic drive 15.2 Checking the vacuum brake booster 15.3 Checking the functionality of the pressure regulator 15.4 Replacing brake fluid and bleeding the brake system 15.5 Replacing the brake pads of the front wheels 15.6 Replacing the brake pads of the rear wheels 15.7 Replacing the brake caliper of the front wheel 15.8 Replacing the brake cylinders of the front wheels 15 .9 Repair of front wheel brake cylinders
16. General information
16.0 General information 16.1. Checking electrical circuits 16.2 Fuse blocks 16.3 Replacing fuses 16.4 Replacing the main and additional fuse blocks 16.5. Replacing the relay 16.6 Replacing the ignition switch 16.7 Replacing the contact part of the ignition switch 16.8 Battery 16.9. Generator 16.10. Starter 16.11. Ignition system 16.12. Lighting, light and sound alarms 16.13. Windshield cleaner and washer 16.14. Repair of the electric heater motor 16.15. Control devices
17. Body
17.0 Body 17.1 Replacing the front bumper 17.2 Replacing the radiator grille 17.3 Replacing the hood latch 17.4 Replacing the hood 17.5 Replacing the windshield 17.6 Replacing the interior rear view mirror 17.7 Replacing the sun visor 17.8 Replacing the headliner 17.9 Replacing the ceiling grab handle
18. Heating and ventilation system
18.0 Heating and ventilation system 18.1 Replacing the electric heater fan 18.2 Replacing the heater radiator 18.3 Replacing the radiator casing 18.4 Replacing the heater valve
19. Car body care
19.0 Car body care 19.1 Car washing 19.2 Preservation and protection of paintwork
20. Applications
20.0 Applications 20.1 Tools used in addition to the standard set 20.2 Electrical diagram of VAZ-2106, VAZ-21061, VAZ-21063 cars produced in 1976–1987. 20.4 Tightening torques for threaded connections 20.5 Basic data for adjustments and monitoring 20.6 Characteristics of spark plugs 20.7 Fuel, lubricants and operating fluids used 20.8 Lamps used on the vehicle 20.9 Lip seals (oil seals)
| EXECUTION ORDER |
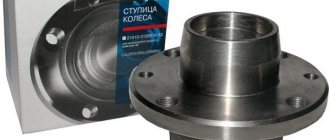
FRONT HUB AND ITS PURPOSE
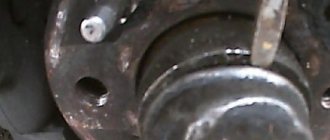
The front hub on the VAZ 2107 is a massive steel disc with a hole in the middle. This hole contains a large bushing in which the wheel bearing is mounted. Along the perimeter of the hub disk there are holes for fastening the wheel. And on the reverse side the hub is connected to the steering knuckle.
The front hub of the “seven” is a massive steel disc with a bushing and bearing in the middle
That is, the hub is an intermediate link between the moving wheel and the stationary part of the suspension. It ensures not only normal rotation of the front wheel, but also its normal turning. Therefore, any malfunction of the hub can have very sad consequences for the driver and his passengers. For example, if the wheel bearing becomes completely unusable, the wheel may jam or simply come off while driving, if the speed is high. It's not hard to guess where this will lead. That is why experienced drivers check the condition of the front hub at least once a month by grasping the top of the wheel and slightly rocking it away from and towards themselves. If even a slight play is felt when rocking, you should not drive such a car.
Reasons for failure of hub parts
The most unreliable part that is subject to wear and breakage is the wheel bearing. This is the only moving part, the wear resistance of which is ensured by high quality material and lubrication. Thanks to this, in normal operation it lasts up to 100 thousand kilometers or more.
Given the state of our roads, this service life may be sharply reduced. This happens for the following reasons:
- Impacts due to the wheel hitting potholes at high speed. The resulting dynamic loads primarily affect the bearings and only then the remaining suspension parts.
- Loss or contamination of lubricant. If the boots are damaged, the lubricant is washed out from the inside of the bearing, and the part becomes clogged with dirt and requires urgent replacement.
- Incorrect tightening when replacing or servicing. An over-tightened bearing will overheat and fail. A weak tightening torque causes play and intense wear of the part.
- Errors when pressing the bearing during replacement. Distortions and damage greatly reduce the service life of the part. Therefore, you should trust the replacement only to experienced locksmiths with a good reputation.
Breakage (deformation) of the hub itself can only occur as a result of strong impacts on the edges of road potholes or an accident.
To extend the life of the unit, you need to monitor the condition of the anthers and drive the car carefully, avoiding potholes and slowing down in front of them.
Replacement methods
First way
So:
- In the first case, it is necessary to use a puller to remove the bearing;
- Simply carefully remove the bearing and replace it with a new one;
- After installation, all the steps above should be carried out in reverse order.
The main advantage of this method is the fact that the technician will not need to touch the camber adjustment bolt, which is very difficult to put in place later.
Bearing puller from the hub
If we talk about the disadvantages, we can note the following: the master will have to take a very uncomfortable position to perform actions. That is why it is necessary to prepare a lift and climb into the inspection hole.
But it is still very inconvenient for a car enthusiast to knock out the hubs in this position and press in the bearing assembly.
Second way
Consists of the following steps:
- To remove the bearing using the second method, you must carefully dismantle the steering knuckle and completely remove the hub;
- After this, the master will need to go to the workbench;
- The VAZ 2110 wheel bearing is replaced directly on the workbench;
- After this, everything is installed back, just as it was removed before.
Remove the retaining ring
Relying on the inner ring of the bearing, use a piece of pipe to knock out the bearing
Or press it out with a puller
Press a new bearing into the cleaned and lubricated hub.
This method is undoubtedly much easier than the first, but since it affects the camber, problems with adjustment cannot be avoided. Before you begin to unscrew the knuckle mounting bolts from the strut, you need to mark their position with chalk or a marker.
The first mark in this case will indicate the location of the adjusting bolt on the rack. The second mark will indicate the previous position of the fists.
After the master begins assembly, he will focus precisely on these marks. Of course, it will be difficult to achieve great accuracy and it will not be possible to return the parts to their place. But with careful work, installation errors can be minimized.
There are some steps to follow:
- The master puts marks;
- Knocks out the knuckle bolts;
- Unscrews the mounting bolts from the lower ball joint;
- The bearing must be knocked out of the hub;
- The retaining rings are dismantled;
- Using a vice, the bearings are pressed out.
Before reassembly, the space in the fists must be thoroughly and thoroughly lubricated.
This method is often used when repairing not only one bearing component, but the entire chassis. As a result of this method, it will also be possible to safely replace ball joints, silent blocks of levers and steering tips.
Third way
It is carried out in the following order:
- In this case, you will need to remove the entire rack completely;
- After all the components have been removed, the technician will need a special vice;
- The wheel bearing will be replaced at the vise and all parts will be reinstalled.
This method is the most complex and difficult because it requires the technician to dismantle the entire rack. In addition, it will be necessary to unpress the steering tip, and you also need to unscrew the fastening nuts, they secure the upper support to the body base.
Direct removal of this VAZ 2110 unit is carried out only after the entire rack has been removed from the car. And this process takes a lot of time.