Many owners of Lada cars are thinking about how to install forward flow on a VAZ 2114. This may be caused either by a desire to increase power or by a desire to give the car a more individual, sporty look. Be that as it may, doing it yourself is quite simple. We will tell you exactly how in today’s article.
Direct flow vaz 2114
A little theory
Tuning the exhaust system is one of the main components of the sporty modification of VAZ cars. With a standard exhaust system, the engine does not realize its full potential. It's a matter of exhaust design. The internal part of the muffler is made in the form of several tubes that disperse the flow of exhaust gases.
Some of the power is lost at the muffler "bank". Converting the muffler to direct flow allows you to slightly reduce losses.
The best result is obtained in combination with other measures: removal of the catalyst and chip tuning, which optimizes the operation of the lambda probe for the new exhaust system. Making changes to the exhaust design changes the amount of oxygen in the exhaust gases. With standard computer settings, injection will not work correctly.
Symptoms of a problem
The car itself will tell you when the muffler needs to be replaced. You just need to listen for the characteristic signs of its malfunction:
- Noise increases when the engine is running;
- There is an exhaust smell inside the cabin or near the car;
- Exhaust gas smoke comes out from under the bottom due to the formation of a hole in the exhaust system.
Direct-flow muffler device
The name itself says that the scattering set of pipes is replaced by one. Exhaust gases escape freely, adding power to the engine. The question arises: why not remove the muffler completely and cut in a pipe of a suitable diameter instead?
The answer is simple. The muffler must perform two functions:
- reduce exhaust noise
- reduce the temperature of the exhaust gases.
Engine roar above 95 dB is prohibited by traffic regulations. The car is guaranteed to attract increased attention from police officers.
In addition, severe overheating of the exhaust pipe leads to its burnout. Along with it, the adjacent parts of the body heat up more strongly. The metal of the rear spar and the bottom of the trunk loses its properties and begins to rot.
To avoid troubles, forward flow should be assembled according to one of the proven schemes.
Assembling a direct flow in the body of an old muffler
If for one reason or another you are not satisfied with the option of purchasing a ready-made direct-flow muffler, there are two options for creating it yourself:
- assembly in the body of an old muffler;
- construction of a new part.
The first option is simpler and cheaper. To carry it out, relatively straight arms and a welding inverter are enough. The advantage of this method is the minimal impact on the computer settings for the oxygen sensor and a slight (if assembled correctly) change in engine noise. The sound will become more bassy at revs, no more.
Ready homemade forward flow
- Remove the old muffler and cut out a full-length window in the body.
- Remove contents and outlet pipe.
- Make and weld into the muffler a “flute” from a perforated pipe or an ordinary pipe, in which cuts are made with a grinder or holes are drilled with a drill. This design disperses the flow of gases, reduces noise and exhaust temperature.
- Weld the exhaust pipe. For aesthetics, you can use a single or double chrome pipe. Perforate the part that is inside the muffler with a drill.
- It is advisable to fill the muffler with mineral wool. You can also use asbestos sheet, glass wool or other heat-resistant material.
- Weld the window in the housing.
To minimize the carryover of filler through the holes in the perforated pipe, it can be pre-wrapped with a metal mesh.
Assembling a new direct-flow muffler
This method is preferable for lovers of an exciting sports exhaust sound. It is advisable to cut off the bent part of the inlet pipe from the old muffler and weld it to the new one. Bending a new one in this way is a labor-intensive and time-consuming process.
- Weld flanges to the perforated pipe on both sides.
- Wrap the pipe with steel mesh or heat-resistant fabric.
- Select a steel pipe with a diameter approximately equal to the flanges, put it on the structure, while simultaneously filling the internal space with mineral wool or a material with similar properties.
- Weld the joints of the pipe with the flanges.
Creating a new direct flow with your own hands has a significant disadvantage. It is impossible for a non-professional to make an aesthetic structure from chrome-plated pipes: it requires skills and special welding equipment (at least a semi-automatic machine, preferably an argon welding machine). In addition, fastenings must be provided for the new muffler - and this is additional work.
Another problem is the choice of pipe for the new housing. Thin-walled ferrous metal can quickly burn out, and a thick-walled pipe (4-5 mm) greatly burdens the structure. Standard rubber hangers won't last long. The optimal choice is the golden mean.
If you decide to make a direct-flow muffler with your own hands, it is better to settle on assembling it in an old housing. It's faster, more practical and requires less skill and equipment.
What to expect from a straight-through muffler:
- slight increase in engine power (with significant modification of the exhaust system)
- improved exhaust sound at rpm.
- acceleration 0-100 in 8-9 seconds.
Tuning the exhaust system of a VAZ 2114 only frees 5-6 horses “stayed in the stalls”. It affects acceleration and, especially, the maximum speed of the car insignificantly.
Source
Diagram for 1.6 l engines
The exhaust system of cars equipped with 1.6 liter engines is distinguished by the fact that it does not contain a neutralizer; this element is replaced by a metal “corrugation”. The exhaust system of the 1.6-liter VAZ 2114 is also equipped with a catalytic manifold, which is mounted after the sealing gasket (3). Let's add a few words about the fastening of the entire structure - it is suspended from the bottom of the car on five suspension cushions, and its component parts are connected to each other using gaskets, O-rings and clamps. And some more information for your information - the exhaust system of VAZ 2115, 14, and 13 has a toxicity standard of R 83.
Why is a straight-through muffler needed?
Some car enthusiasts who want to give their car a “sporty” sound are thinking about the question: is a muffler needed at all? Maybe it can be completely removed and a regular pipe welded instead? The answer to this question is no.
It is impossible to remove the muffler completely, because it solves a number of important problems, namely:
- reduces the toxicity of released gases;
- lowers the temperature of the exhaust stream;
- Reduces sound volume.
By completely dismantling the muffler, you will not only achieve an excessively loud sound, but also burn out the rear spar and trunk metal. In order to avoid this, it is necessary to install forward flow instead of the standard muffler.
It should also be remembered that exhaust sounds louder than 95 dB are prohibited by law. If your car “sounds” louder, you will attract the attention of the traffic police and receive a fine.
Official recommendations
Naturally, the manufacturer recommends installing silencers made by AvtoVAZAgregat of the appropriate modification. The recommendations are justified by the following arguments:
- Compared to competitive products, jammers weigh more. According to factory workers, this means that their walls are thicker and will last longer (3-5 times, according to the manufacturer).
- The insides of the muffler are filled with special cotton wool, which collects condensation and prevents it from causing corrosion.
Results of installing a direct-flow muffler
By converting the muffler to direct flow, you will receive the following advantages:
- increase in power (on average - by 5-10 hp);
- more aggressive exhaust sound (especially at high speeds);
- a slight increase in maximum speed.
At the same time, it is worth understanding that for the most part, installing direct flow gives the car individuality, but does not make colossal changes to its characteristics. It will not be possible to achieve a sharp increase in the maximum possible speed or acceleration to hundreds in 10 seconds by simply modifying the muffler.
Tuning the gas exhaust system
The exhaust system of the VAZ 2114 also allows you to increase the power of the vehicle's power unit thanks to the installation of forward flow. The engine is boosted by accelerating the exhaust gases.
The principle of operation of direct-flow systems involves the creation of a rarefied atmosphere in which flows flow faster from the combustion chamber into the fuel cylinders. Increasing speed proportionally increases power, creating the necessary resistance.
Its value reaches about 10% above what is initially included in the technical characteristics of the exhaust unit without a direct-flow unit.
In a standard muffler, the resistance rate is much higher - 60-70%, which significantly slows down the release of exhaust gases. Equipping with such a unit also increases engine power by 6%. It is important to note that this happens without any structural changes to the gas exhaust system, which often require substantial investment.
Direct flow - how to make it yourself.
The muffler is an element of the engine exhaust system. Its presence does not depend on the type of fuel the engine runs on - gasoline, diesel fuel or methane. The muffler dampens sound vibrations, helps attenuate, subside and resonantly reduce sound waves from engine exhaust. Interlocutors will not be able to communicate around a running engine without a muffler. The noise of the engine will drown out their speech. Nevertheless, many car owners dream of remaking the exhaust system and making it forward-flowing. Some people can create it with their own hands.
Types of mufflers and their differences
There are 4 types of mufflers based on the method of absorbing acoustic waves:
- reflective;
- restrictive;
- absorption;
- resonator.
The reflective circuit is reverse-flow, the rest are direct-flow.
Reflective
If one muffler is installed in a car, then a reflective version is used. It uses the principle of “breaking” the flow of exhaust gases by creating several partitions, expansion chambers and turns. Exhaust volume is reduced to standard levels. For this reason, the vast majority of factory vehicles are equipped with the reflective type.
most popular for factory vehicle configuration
The disadvantage of this type of muffler is the reduction in engine power due to the resistance of the exhaust system to the flow of exhaust gases.
Resonator
A resonator muffler is installed as the first stage in the exhaust system of powerful engines. It consists of a perforated pipe placed in a housing. The body is divided into two or three sections. The energy of the exhaust gases is weakened due to a stepwise reduction in pressure.
installed as the first stage of exhaust energy suppression
The part reduces the force of sound vibrations and maintains engine power with a free flow of exhaust gases.
Restrictive
In restrictive mufflers, the gas flow passes through a diaphragm or cone narrowing, which leads to a decrease in engine power. The acoustic protection of such devices is low, since the diaphragm does not interfere with the rectilinear movement of the sound wave.
Absorption
The damping function for sound vibrations in the absorption muffler is performed by a finely porous non-flammable material located in the space between the perforated pipe and the housing. The design is similar to the resonator type. This type has little effect on power reduction.
Replacing a return flow muffler with a direct flow one with your own hands
When manufacturing a direct flow, it is advisable to use the positive properties of several types of structures.
Reasons for replacing a standard muffler with a direct-flow muffler
Car owners change the factory muffler to a direct flow one for several reasons:
- obtaining an increase in engine power;
- subjective improvement of acoustic parameters of the exhaust;
- increasing the aesthetic parameters of the car;
- complete modernization of the exhaust channel;
- The installed muffler has failed.
Tools and materials for work
A direct-flow muffler is often purchased, but for lovers of tools and an insatiable thirst for creativity, we recommend making it yourself. It is preferable to make parts from stainless steel with a thickness of 0.8–2.0 mm. Select ferrous metal blanks with a thickness of 1.0–1.5 mm for the case, the rest 2.0–4.0 mm to avoid premature burnout of parts, and also use standard blanks. For the body, use a suitable size: a fire extinguisher, a thermos, an empty gas or scuba cylinder.
To fill the muffler chamber, non-flammable porous material or a combination of them is used:
- basalt or other mineral wool;
- fine mesh metal mesh;
- metal mesh for the kitchen;
- metal shavings.
- angle grinder (grinder);
- drill or drilling machine;
- welding machine;
- consumables: metal discs for grinders, drills, electrodes, etc.
Getting ready for replacement
Having selected and purchased the appropriate part, make sure that you have the necessary tools and supplies at hand. To replace the muffler you will need:
- hammer;
- metal brush;
- open-end wrench 13 (preferably 2 pieces);
- rust remover (such as WD-40);
- dry rag.
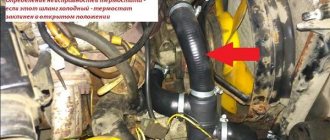
To begin with, we drive the car into a pit or onto an overpass. Having climbed under it, we find the place where the additional and main muffler of the VAZ-2114 are connected. A photo of this connection is presented below.
Their joining is made using a metal crimp coupling consisting of two halves. These halves are attached to each other with bolts and nuts. These are the ones we need to promote. But before this, it is better to clean the threaded connections with a pre-prepared brush, and then treat them with rust removing liquid. If the nuts do not unscrew, which, in principle, often happens, they will have to be cut off with a hacksaw or a grinder.
Having disconnected the crimp coupling, we disconnect the main muffler from the rubber shock absorbers and dismantle it. Be careful not to lose the graphite O-ring installed between the pipes at the joint.
How to install a stinger exhaust on a vaz 2114
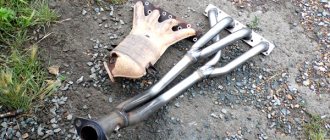
My next story is about the purchase and installation of a “Stinger” exhaust system, a 4-2-1 spider and a “Stinger” barrel resonator.
- Exhaust manifold/Spider 4-2-1 “Stinger” for VAZ 2114.
- Material:
steel 08 PS, used for the manufacture of high-quality exhaust systems. This model can be made of stainless steel. - Dimensions:
primary pipe diameter 38 mm, wall thickness 1.5 mm, secondary pipe diameter 43 mm, outlet 51 mm. - Advantages:
Installing this exhaust manifold on a car gives an increase in power. Can be used as a replacement for a failed standard cat-manifold.
Exhaust Manifold/Spider 4-2-1 Stinger
Direct-flow resonator with a “Stinger” barrel on a VAZ 2110.
steel 08 PS, used for the manufacture of high-quality exhaust systems, powder coating.
pipe diameter 51 mm, barrel diameter 100 mm, wall thickness 1.5 mm.
Installing this direct-flow resonator on a car gives an increase in power. Can be used as a replacement for a failed standard resonator.
Additional information: filling - basalt wool and basalt fabric (heat resistance 1200 degrees C) to prevent the wool from blowing out. During installation, standard clamps are used.
Direct flow resonator with barrel
- Exhaust manifold gasket - 140 rubles
- Neutralizer repair kit (O-ring and 2 bolts with conical springs) - 130 rubles
- Receiver gasket - 40 rubles.
- The installation process is quite difficult and took about 6 hours.
- I will not describe the entire process of removal and installation; anyone interested in what and how to remove can watch here.
I’ll briefly tell you what problems we encountered during installation:
- After removing the factory exhaust manifold, we installed the 4-2-1 “Stinger” spider and it fit like original.
- The first nuance when installing the 4-2-1 spider was that due to its more massive dimensions, the exhaust manifold came into contact with the hose going to the stove.
- A day later, the hose frayed and had to be replaced with another one; I took another hose, which is sold by the meter, to stretch it past the exhaust manifold; installing it at the factory would have also frayed.
- Having removed the factory resonator, I discovered that it was rotten, so it was doubly pleasant that money was not thrown away, the part was replaced with a more advanced one)
- The purchased “Stinger” Resonator for 2114 did not fit into place.
- I had to replace it with another one for model 2110 16V, which had to be shortened a little.
Factory exhaust manifold.
Factory exhaust manifold
Difference between 4-2-1 spider and stock exhaust manifold.
Due to the fact that the 4-2-1 spider is longer than a standard exhaust manifold, a direct-flow resonator under the spider is required for installation.
When installing the 4-2-1 spider, pay attention to the heater hose! Contact of the heater hose with the exhaust manifold is not allowed! The heater hose will leak when exposed to high temperatures.
To install a straight-through exhaust manifold/spider 4-2-1 with a crankcase guard, it is necessary to remove the crankcase guard before installation.
Bottom view of Spider 4-2-1 Stinger
Welding and fitting work when installing a direct-flow resonator. The direct-flow resonator was shortened by several tens of centimeters.
The direct-flow resonator with the “Stinger” barrel on the VAZ 2110 is in place.
Direct-flow resonator with a “Stinger” barrel on a VAZ 2110.
After installing the exhaust system, the first thing I liked was the sound of the exhaust, it became more serious, I didn’t really feel anything in the speakers, since I hadn’t flashed it yet. After the firmware I’ll tell you about the results and post a video with the exhaust sound. I left the muffler stock for now, until I decide, I will select it for a good sound.
How to make a forward flow with your own hands
Of course, the simplest and most convenient option would be to purchase a ready-made direct-flow muffler and install it. But, if you want to save money and have sufficient skills in working with metal, then you can make a direct flow VAZ 2114 yourself. In this case, you can go one of two ways - make a new muffler based on the old one, or assemble it completely from scratch.
The first option is simpler and to implement it you will need:
- Dismantle the “original” muffler and use an angle grinder to cut out a window along the entire length of the body.
- Remove all contents and exhaust pipe.
- Take a steel pipe of a suitable diameter and cut slots in it at equal distances (using a grinder) or drill holes. It will disperse the exhaust flow, reduce its volume and lower the temperature of the gases.
- Weld the resulting pipe inside the muffler body.
- Weld the exhaust pipe (for greater aesthetics, you can install chrome elements on top of it).
- Fill the internal cavity of the muffler with asbestos fiber, glass wool, pieces of mineral board or other heat-resistant material.
- Seal the window cut out in the muffler.
- Mount the finished muffler in place.
Repair or replacement
Having determined that the muffler is faulty, you need to determine the extent of the problem. If its body has minor damage in the form of small pockets of corrosion or local burnout, you can try to correct the situation by repairing it. Often, various adhesive solutions like “cold welding” are used for this, but they will not last long. In this case, it is better to contact a good welder who will fix the problem in a matter of minutes.
If the device body, in your opinion, cannot be repaired, get ready to replace it. By the way, you don’t have to go to a service station for this. Installing a VAZ-2114 muffler can be successfully carried out on your own, of course, if you have the tools and the ability to drive the car onto an inspection pit (overpass). But first, the part must be selected and purchased.
Damper installation
The damper is installed either before or after the muffler. The volume of the forward exhaust will be clearly reduced only when the damper is completely closed. Technological clearances of 3-5% remain for the passage of exhaust gases - so the engine does not stall. In this regard, engine power is significantly reduced due to blockage of the exhaust system.
the damper is made by hand
A damper is also used to switch from a direct-flow to a return-flow muffler and vice versa, if necessary. In this case, a new muffler is installed parallel to the old one, and the damper is mounted in front of them. This scheme is already used on some brands of cars from the factory.
mechanical adjustment of the damper is carried out on the move by the driver from the cab
You can drive a short distance with the throttle closed, but driving constantly is unacceptable for the engine.
the damper is installed in front of the muffler
Where to glue
Before you start work, be sure to familiarize yourself with the purpose of this or that material that will be involved in the soundproofing procedure of your car.
- Vibroplast will serve to cover exposed metal. The main function of a vibroplast is vibration damping.
- Izolon also has properties to dampen vibrations, but it is less effective compared to vibroplast. The structure of the material with closed cells will serve excellently as a second layer after vibroplast.
- Foam rubber is another layer that can be glued after vibroplast and isolon. The last layer will effectively absorb noise.
Dashboard noise
There was foam rubber, now there is bitoplast
It is quite possible to make bitoplast from foam rubber with your own hands. There is nothing complicated in this procedure.
- Protective gloves;
- White Spirit;
- Rubber bitumen mastic.
So, let's get to work.
- Dilute the mastic with white spirit to obtain the consistency of liquid sour cream.
- Carefully treat the foam rubber with the resulting mixture.
- Let the material dry for some time.
- Use homemade bitoplast to soundproof your car.
The material should be dried in the open air, away from people. This is due to the fact that dangerous fumes are released during the drying process.
Modernization of the exhaust system of VAZ 2114
It would seem that it couldn’t be simpler. The stock exhaust system is made of steel and comes from the factory with mediocre paint, more for appearance than for corrosion protection. And there is something to protect, since the entire exhaust system works in hellish conditions. No vehicle component is as loaded with thermal, chemical and mechanical processes as the exhaust system. Salts, water, stones, mechanical shocks threaten the muffler from the outside, and crazy temperatures, enormous vibrations and chemical loads constantly destroy the system from the inside. Therefore, its service life is relatively short. This refers to the stock exhaust circuit, made of standard materials and according to standard architecture.
Upgraded VAZ 2114 exhausts can be made of stainless steel, these are the most expensive kits, or they can be made of improved steel with special treatment that exceeds the resistance of the muffler and the entire system to corrosion. Such systems can operate without replacements or repairs for up to 5 years, provided there are no mechanical damages.
But modification, or tuning, if you will, of the exhaust system is not limited only to the material of manufacture, although it plays a huge role in the efficiency of the system. Design solutions can be completely different. It all depends on what they want to achieve from the exhaust system. If the task is to reduce noise as much as possible, the same measures are taken, but if it is necessary to make the release as easy as possible, to allow gases to escape more freely, the design solutions here are completely different.
Reasons for muffler failure
There can be only two malfunctions of the muffler: burning out of the housing and its damage caused by corrosion processes or mechanical stress. In the first case, the cause is other malfunctions of the exhaust system, for example damage to the catalyst or resonator, as a result of which the gases are not cooled enough. In addition, in the VAZ-2114 the muffler may suffer due to:
- frequent temperature changes (driving on water, snow);
- significant pollution;
- mechanical damage;
- long-term operation without proper maintenance.