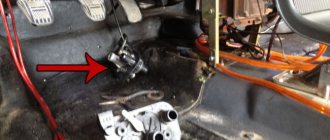
Almost from the very appearance of the VAZ 2110, the same defect was often observed in new and old cars - leakage of brake fluid from the master cylinder (GTC), first into the vacuum chamber, and later to the ground:
This was due to the fact that the elasticity of the working and collar cuffs (and even the BRTI) dropped sharply after -23 C, which caused brake fluid to leak from the reservoir and the GTZ. To do this, a channel hole was made on the GTZ to “drain” excess brake fluid from the cavity between the vacuum booster and the main cylinder:
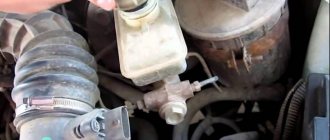
In the photo the cylinder is lying on its side. There was nothing that could be done with rubber bands in the USSR (no such effect was observed on foreign cars), so AvtoVAZ calmed down with this compromise. As the years passed, the GTZ began to fail more often; 90% of them had problems with the collar cuff and the first working chamber. The distant contour was almost always intact. In my practice as a repairman, once on a VAZ 21074 the GTZ suddenly failed completely, upon opening it revealed “cut” cuffs and transparent needle-shaped crystals flowed out of the cylinder with the brake fluid, which cut the cuffs. It turned out that the client mixed brake fluid BSK and Neva. So here is an analysis of the reasons for 90% of the leakage of the “first” cuffs - this is dirt at the end of the gas turbine engine. How did she get there? Very simple - through the drain cut/frost hole.
Problems that arise with the brakes while traveling are considered critical and must be corrected immediately. The culprit of the malfunction is often the main cylinder, installed in the engine compartment and rigidly connected to the pedal. To find out the cause of the breakdown and repair the unit yourself, you need to know the structure of the brake master cylinder (MBC) and its principle of operation. During the diagnostic process, it is necessary to distinguish and filter out problems with other elements of the system.
How does the GTZ function?
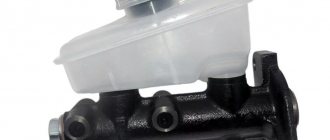
The unit consists of the following parts:
- metal housing with holes for supplying brake fluid, pedal rod and connecting the expansion tank;
- 2 pistons with rubber seals;
- 2 return springs;
- guide bushings;
- end plug with gasket.
An expansion tank is attached to the top of the main distributor body, where excess fluid goes through compensation holes. Inside, the element is divided into 2 cylinders with separate pistons standing on the same axis.
The blind end of the housing is closed with a threaded plug; on the other side there is a flange for attaching to the vacuum booster. The brake pedal rod is attached to the first piston. The brake circuit pipes are connected to the lower holes - separately for the front and rear wheels.
The operating principle of the master brake cylinder looks like this:
- When you press the pedal, both pistons simultaneously move forward and push fluid into the circuit tubes. Under its pressure, the wheel cylinders are activated, compressing the pads on the discs.
- Part of the liquid that does not have time to pass into the tubes flows into the expansion tank through special bypass holes.
- When the driver releases the pedal, the springs push the pistons back, returning them to their original position. Liquid from the tubes and reservoir refills the cylinders.
- To compensate for the expansion of the liquid (for example, from heating), another pair of holes is provided leading to the expansion tank.
How to repair the brake master cylinder?
If the leak has affected the main brake cylinder, it is not necessary to change it, since due to its high cost it can simply be repaired. The weak point of the master cylinder is the seals, which crack and eventually leak some of the brake fluid out.
To get it back into working order, you need to purchase a cylinder repair kit and again drain the brake fluid from the system. After this, remove the tank and release the cylinder from its engagement with it. Now unscrew the brake system fittings from the cylinder and unscrew its fastening.
Disassemble the element, removing the springs, pistons and all rubber seals. Clean the interior using a small brush and gasoline. After this, install a new repair kit and put the cylinder in its place. Next, place the reservoir and fill the brake fluid into the system, pumping all the working cylinders of the car.
The safety of the driver and passengers in the car directly depends on the brake fluid. A sharp drop in brake fluid level is fraught with extremely unpleasant consequences. If the brake fluid level drops below the minimum level, the safety of the driver and passengers is at risk. Although modern cars have a sensor that monitors the brake fluid level, you should not rely entirely on electronics; it is recommended to periodically check its level visually.
Symptoms of problems
The fluid brake system consists of many parts that can become unusable: pipes, wheel cylinders, calipers, drums and pads. Typical signs of a faulty master cylinder:
- After pressing the pedal, the car stops slowly. The reason is that the cuffs of one or two pistons have lost their tightness - they have cracked or “floated”.
- To slow down, you need to press the brake pedal hard. The phenomenon occurs due to swelling of the rubber of the piston seals.
- The brake pedal travel is too short. The fluid inside the cylinder has nowhere to go because the compensation hole is clogged. Another option is that the passage is blocked by a swollen rubber seal.
- A common symptom is pedal failure, the brakes coming on at the end of the stroke. This indicates complete wear of the cuffs; as a result, liquid penetrates behind the piston and rushes into the expansion tank - the cylinder “bypasses.”
- The pads do not release the brake discs and drums and get very hot when driving. Options: one of the pistons is jammed or the bypass hole is clogged.
The listed symptoms of a GTZ malfunction are similar to malfunctions of other elements. Pedal failure also occurs when a large amount of air enters the tubes or loss of fluid in one of the working cylinders. Sluggish deceleration and increased force on the pedal are often caused by a breakdown of the vacuum booster - a cracked membrane or a lack of tightness at the joints of the hose that takes off engine vacuum.
There are signs that clearly indicate the performance of the main hydraulic cylinder and the malfunction of other elements:
- during braking, the car pulls to the side - the problem lies in a certain circuit or wheel;
- jamming of the brake mechanisms of one wheel;
- creaking and squeaking when braking;
- heating the discs and pads on one wheel.
If you eliminate these symptoms, it will become easier to check the brake master cylinder in a garage. This also includes obvious brake fluid leaks and the knocking sound of worn calipers.
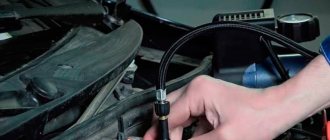
Bleeding the brake system after repair
Upon completion of repair work related to the brake system, it is necessary to bleed it. This can be done either independently or by contacting a specialized car service center. Bleeding the brake system is an extremely simple process that every car owner can do, but for this you will need a partner whose task will be to press the brake pedal at the right moment. Even a child can take on the role of a partner.
To bleed the brake system we will need:
- Small capacity;
- Brake fluid;
- A small hose for a fitting.
And so, having found a partner and prepared everything necessary, we bleed the brake system in the following sequence:
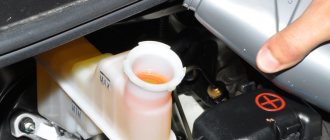
- Fill the brake fluid into the reservoir to the “maximum” mark;
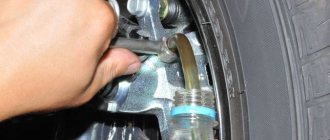
- We clean and wipe the brake fittings of each wheel;
- Pour brake fluid into a small container;
- We hook the prepared hose to the fitting;
- We lower the second end of the hose into a container with brake fluid;
- We give a command to our partner so that he begins to press the brake pedal evenly and intensively. After the 4th press, the partner must lock the pedal in the pressed position;
- Lightly unscrew the fitting and watch the brake fluid come out. The presence of bubbles indicates the presence of air in the brake system;
- After the air has escaped, tighten the fitting and repeat this process on all wheels.
Important! Before bleeding the brake system, it is recommended to read the instructions for the car. You should find out in what order the wheels need to be pumped. If this information is not available, you should start from the far wheel to the near one, where the end point is the brake master cylinder. As a rule, pumping begins with the rear wheels, first the right then the left, then we come to the front in the same sequence.
- Leaking brake fluid should be taken extremely seriously, and under no circumstances should you operate a vehicle without it or with a severe leak.
- You should regularly check the brake fluid level yourself, rather than relying on the car's electronics. It is best to do this in conjunction with checking the engine oil.
- After completing repair work, it is imperative to bleed the brake system. It is not allowed to operate a vehicle with unbleeded brakes.
- If one or more elements of the brake system malfunction, they should be completely replaced. This will allow you to avoid unpleasant, and in some cases even dangerous, consequences while driving.
- We also recommend reading the article on our website.
- Brake fluid is leaking: what to do?
- Checking the brake fluid level
- The most common reasons why brake fluid leaks
- How to Fix a Brake Fluid Leak
Any liquid has the ability to flow from one place to another. Brake fluid is no exception; it can leak. But this property of it, like a similar property of any other liquid for technical purposes, is fraught with the fact that some unit may simply fail, or even an accident may occur - a very dangerous phenomenon, especially when traveling on the road .
Checking the brake fluid level
For this seemingly simple reason, every day you need to look under the hood of your car in order to visually check how much brake fluid, antifreeze and engine oil is left in the car. This way you can constantly monitor the amount of brake fluid in the system and thereby protect yourself from an accident on the road.
Along with visual inspection, you need to check the quality composition of this liquid every 6 to 12 months. To do this, you need to purchase a special tester. The frequency with which the check needs to be carried out directly depends on the mode in which the machine is operated.
When inspecting the brake fluid reservoir, you need to carefully look at its side walls. There should be no deposits on them. If they are, and there may also be drops of water or foreign particles, then you will have to completely replace the brake fluid.
The most common reasons why brake fluid leaks
If you have discovered the fact that brake fluid is still leaking from the reservoir, then you need to begin identifying the cause of the leaks. It should be remembered that traces of leakage may not be obvious, that is, not in the same way as engine oil comes out. So, an unreasonable drop in the brake fluid level may indicate that:
Diagnostics and repair
From the signs listed above, it is easy to understand that in most cases there is only one source of problems - rubber products that have become unusable. The cuffs crack and swell, as a result they leak liquid and close the discharge holes. Hence the recommendation: all “rubber bands” of the brake system should be changed at intervals of approximately 100 thousand km, without waiting for critical wear.
Reference. Many auto mechanics express the opinion that after replacing the cuffs, the main hydraulic cylinder will not last long. The statement is true if the car owner purchased cheap, low-quality spare parts or installed new o-rings in the cylinder, where internal wear has formed in the walls.
Before checking the GTZ for operability, make sure there are no other faults:
- Inspect the wheel assemblies from the inside for leakage of brake fluid from the working cylinders.
- Check the integrity of the expansion tank and the fluid level in it.
- Start the engine and at idle speed, press the vacuum take-off pipe to the amplifier. If the engine speed has increased noticeably, there is an air leak and the master cylinder is most likely working.
What to do if a leak is detected from the tank?
If the brake fluid reservoir is faulty, cracks may appear on it, through which the fluid will certainly flow out under the applied pressure. The tank cannot be repaired
, therefore, if it malfunctions, it is necessary to urgently replace it. Do not forget that operating a vehicle with a faulty brake system is strictly prohibited.
To replace the reservoir, you must first drain the brake fluid from the system. To do this, prepare an empty container and place it under the drain bolt on the master cylinder. Unscrew this bolt and wait until the brake fluid is completely drained from the reservoir. To speed up the process, you can ask your partner to vigorously press the brake pedal to create the desired pressure in the system.
After this, the reservoir is twisted off the brake cylinder, and a new one is installed in its place. Then you need to add brake fluid and, remembering to tighten the bolt on the master cylinder.
Where does the brake fluid go - sources of leakage?
Crack in the brake fluid reservoir
First of all, inspect the tank itself, this may be the reason. Do not rush to immediately disassemble the floor of the car in order to find the cause of the brake fluid leak. In general, it is best to look for the source of the malfunction by following the characteristic traces of leakage; they will show you the location, as well as the cause of the leakage of the fuel fluid.
Violation of the integrity of the brake cylinder
If your brake cylinder is leaking, the fuel fluid level will constantly drop, and under the car after long periods of inactivity, as a rule, there will be stains of fuel fluid on the asphalt. In order to confirm or refute this assumption, it is necessary to perform an inspection. To do this, remove the wheels and carry out a visual inspection of the front discs, check for any leaks on the calipers. If you have drum brakes on the rear wheels, you will also have to remove the drums. A leak in the rear brake cylinder is most often associated with damage to the rubber seals; they may be of poor quality or cracked over time. In winter, this problem is very urgent, the seals “dull” and leakage of fuel fluid occurs.
Damage to the brake hose
To establish this malfunction, a visual inspection will also be sufficient; you can touch the hoses with your hands to make sure they are in good condition. If the hoses feel hard to the touch or crack when bent, replace the hoses with new ones. Check for leaks on the hoses; they must be completely dry. Sometimes it happens that the brake hose simply flies off the fitting, in which case you need to put it in place and secure it using special clamps or replace the hose with a similar one, only of a smaller diameter.
The main brake cylinder (GTC) is faulty
In this case, it is necessary to inspect the gas turbine housing; in most cases, the leak occurs precisely because of the seal. A crack may form in the rubber seal, which causes fuel fluid leakage. Other scenarios are also possible, for example, when the brake fluid goes into the “vacuum reservoir”, while there are no signs of leakage outside; in order to detect this malfunction, it is necessary to remove the brake master cylinder. After removing the brake cylinder, remove it from the “vacuum chamber”, if you find a leak inside the “vacuum chamber” - completely replace the entire brake cylinder.
Start the engine, put it in neutral and apply the brake. If the cause of the brake fluid leak is in the hydraulic drive, the pedal will gradually “fail”. If you press the brake pedal and it reaches almost to the floor, the problem will be associated with a malfunction of the brake circuit.
After completing all repair work, it is MANDATORY to bleed the brake system. Also consider the fact that brake fluid is hygroscopic, so it must be changed after a certain period of time.
How to determine the location of the leak?
First of all, you need to become familiar with some of the signs that indicate a faulty brake system. Firstly, this is an increase in pedal free play, and secondly, a decrease in braking efficiency. All of this may indicate a leak in the brake system. Therefore, if this happens, be sure to check the brake fluid level; most likely, it has been low.
Attention!
A drop in brake fluid level in cold weather in no way indicates compression of the fluid at low temperatures! The fact is that many drivers mistakenly consider a decrease in brake fluid level in the cold to be a completely normal sign. However, it is not.
You need to start checking from the reservoir, then move on to the main brake cylinder, and only then inspect the circuits and working parts of the brake system. Leak locations can always be “marked” by the most common traces of brake fluid, which are difficult to evaporate and are very easily noticeable even by an inexperienced driver.
The weakest points of any braking system are considered to be the joints of the brake circuits or the seals of the braking organs. Therefore, you need to pay attention to them first.
Tools and materials needed for replacement
If you compare how much a VAZ 2107 main brake cylinder costs (from 500 to 2500 rubles), the complexity of the work and the cost of car service, it becomes obvious that it is better to replace it yourself. To do this you will only need a small set of tools and materials:
- screwdriver;
- a set of keys and sockets for 10 mm and 13 mm;
- brake fluid;
- rags;
- clamps;
- new cylinder;
- repair kit for the main brake cylinder VAZ 2107;
- rubber bulb or medical syringe at least 5 mg.
If during disassembly it turns out that the rubber hoses have lost their elasticity, these parts will also have to be replaced.
Separately, it should be noted that the lower the cost of the main brake cylinder on a VAZ 2107, the worse the safety margin of this part. If you are not willing to replace every year, there is no need to choose the cheapest parts.
VAZ 2109 rear brakes stick
- To the beginning of the forum
- Forum Rules
- Old design
- FAQ
- Search
- Users
The piston in the wheel cylinder is pressed in with great force
Piston surface is clean
It seemed that after releasing the brake pedal, 20 seconds passed before the brake pads left the disc
When the wheel rotates, friction between the disc and pads occurs.
The pads are retracted due to small irregularities; there is no mechanism that would retract the front pads. Therefore, slight friction is normal.
and they leave because of the gas turbine engine - the spring in it presses the piston in the return direction
Have you tried to push the front cylinder inside with your hands, even without brakes? No spring can handle this. When replacing the pads, we push the mounts.
unscrew the tube on the GTZ and bleed off the pressure. and in this way you get where you need to go.
I drove like this for almost 200 km. the rod in the VUT was not adjusted.
To begin with, tighten the VUT rod more tightly.
What could be the problem?