Design Features
The bottom of all modifications of the family was made of rolled steel. Additionally, to increase strength, stiffening ribs are made.
Important! Since the frameless design involves accepting the load from all body and transmission elements, it is the condition of the bottom that determines the functional readiness of the car.
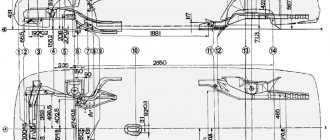
Cars of different body types have different overall dimensions. At the same time, the wheelbase of all modifications is the same - 2,492 mm. The size and shape of the bottom on all machines also has no fundamental differences.
Family service experience indicates that most often - in 9 cases out of 10 - repairing the underbody of a VAZ 2112 begins with checking the condition of the body side members. Corrosion processes require their strengthening.
Preparatory activities
Before installing new frames on the bottom or welding body parts, you need to make preparations and partially disassemble the car:
- remove the seats;
- remove carpet;
- dismantle the old sound insulation;
- put aside electrical wiring in those places where repairs will be carried out.
Before replacing individual elements or installing patches, the entire metal surface is freed from old sound insulation, thoroughly washed and wiped, and cleaned using a grinder, a sanding machine or sandpaper. Then the metal should be degreased and treated with a rust converter; only after this can you begin working directly with the iron.
Preparatory actions involve several sequential operations:
- dismantling seats and interior trim;
- removal of moldings (if installed);
- dismantling of air ducts;
- removal of noise and emissions insulation materials;
- Removing wiring elements.
In the case of the proposed replacement of the bottom of the VAZ 2112, it will be necessary to remove the central tunnel with the dashboard. This will make it easier to access the engine compartment.
To repair the bottom with your own hands, you first need to prepare in a certain way. You will need a set of tools, premises, a lot of time, experience and desire to do such things.
Of the tools, it is especially important to prepare the following components:
- Welding machine. In the case of repairing the underbody of a car, it is better to use a semi-automatic machine with wire and carbon dioxide. It is better, more efficient and more reliable than gas and electrodes;
- Angle grinder. It will be useful, if necessary, to remove rust from the floor, to adjust elements and patches, to clean seams and surfaces;
- Car stands. Here you can use various items. So look for what you have;
- The rest of the kit is standard and includes such components as anti-corrosion solution, mastic for seams, welding wire, sandpaper, primer, soundproofing sheets, paint, etc.
Now you need to drive the car into the garage or other equipment room and put it on stands.
The machine should be positioned in such a way that it is comfortable and safe to work under it.
Disconnect the battery, then remove the doors. In this case, experts advise providing spacers for doorways in order to maintain body rigidity and the necessary geometry.
Dismantling the interior
Since you need to repair the underbody not only under the car, but also from the inside, you will have to completely disassemble the interior. This is a difficult task that will take a lot of time. Be psychologically prepared for this. You will have to dismantle:
- Armchairs;
- Floor tunnel lining;
- Carpeting;
- Air ducts;
- Soundproofing layer.
Carefully collect all the wiring, combine it into bundles if they are not collected, so that later there will be no problems with assembly. Collect all fasteners, distribute them into boxes or bags, and label them. This is extremely important because you may face serious problems later.
If you plan to completely replace the bottom or weld a panel to the floor, then the dashboard and beard will have to be removed to create open access to the engine shield.
Lifting a car
Welding
So, you have disassembled your VAZ 2110, so now you can really assess the condition of the bottom, as well as analyze the required amount of work. The most optimal situation is one that does not require replacement of elements. The rust spots are cleaned until high-quality metal is obtained, after which they are strengthened by patches. But not everyone manages to face such a situation.
If the holes in the bottom turn out to be through, this will lead to a loss of body rigidity, therefore it is strongly recommended to replace the element completely. In the case of the VAZ 2110, the following body elements are distinguished:
- Floor panels;
- Support platforms;
- Threshold extensions;
- Spar extensions;
- Crossbar;
- Connectors.
Now let's discuss a few basic nuances of welding.
- To replace a part that has “slipped” due to corrosion, it must be drilled out at the welded points or simply cut off using a grinder.
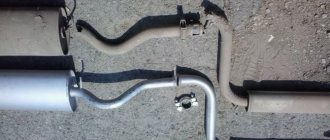
- Do not forget that the brake and fuel system pipelines pass under the bottom. It is extremely difficult to dismantle them, so the easiest way is to cut them off and install new pipeline elements during reassembly.
- If the floor panels are in critical condition, the entire bottom assembly should be replaced. But in this case, be sure to dismantle the exhaust system.
- If it is necessary to change the thresholds, they are dismantled and new ones are installed one by one. It is important to control the geometry.
- If the floor and thresholds are being replaced at the same time, the thresholds are replaced first, and only then the floor panels.
- Carefully mark the elements for welding. The old components must strictly correspond to the new ones being cut out.
- You cannot do without an assistant, so agree in advance with someone who can help you.
- Always start the bottom from the bottom, then grab it.
- Do not make the main weld using a continuous weld. Maintain a step of approximately 4-5 centimeters.
When welding work is completed, be sure to carry out anti-corrosion treatment.
Finishing
Now the condition of the new, or rather updated, body should be brought to perfection, providing the necessary high level of protection against corrosion, destructive rust, gravel and other troubles. To do this, perform several sequential operations:
- Clean the metal, removing scale and achieving shine;
- Lubricate the surfaces with joint compound;
- Treat metal elements with primer;
- Apply a coat of paint to match the body color;
- Treat the outside of the bottom with mastic and anti-gravel compound;
- Measure carefully and then cut out the sheet sound insulation with scissors. It is heated with an industrial hair dryer and placed on the bottom. This is if we are talking about bitumen noise.
Updated body
Now the work on repairing the underbody of your car is approaching its logical conclusion. However, a difficult, important stage of reassembly awaits you ahead. Therefore, we strongly do not recommend relaxing.
If you correctly disassemble the interior and dismantle the underbody elements, there should be no problems with their assembly. We advise you to write down each stage, record it on video, and sign each bag with fasteners.
As you can see, it is quite possible to repair the bottom yourself. Just do not work at random, without prior preparation and appropriate tools. This is a good way to save money, but if you lack experience and skills, it is better to contact specialized service stations with such problems.
Loading …
Dismantling the interior
Lifting a car
Finishing
Updated body
How to find rust on the bottom
A prerequisite for trouble-free operation of the 12th family hatchback is periodic inspection of the car for corrosion from below. Even cars from recent years of production need additional processing.
It is better to carry out a comprehensive inspection of the bottom. Among the main detected defects are:
- peeling of the anti-corrosion composition;
- the appearance of local foci of corrosion (jack attachment points, thresholds);
- presence of fires on the interior side.
You should not delay diagnostics, since if the iron is damaged by 70% of its thickness, restorative repairs are difficult to carry out. It is more convenient to do diagnostics when lifting the car on a lift or driving into an inspection hole. It would be a good idea to look under the upholstery and from the interior.
Causes of rust and preventive measures
Among the reasons for the acceleration of corrosion processes on the bottom of the model with index 2112 are:
- storing the car outside during temperature changes and high humidity;
- operating a vehicle in difficult road conditions;
- water getting under the interior trim.
Almost any car over 7 years old is monitored for corrosion.
Approximate price
On average in Russia, it costs 8,500-29,000 rubles to digest the bottom of a VAZ-2112 car. Price of works included in this amount:
- Purchase of electrodes (about 3 kg per car) - from 550 rubles per 3 kg .
- Two cutting wheels for an angle grinder, two spare ones - about 270 .
- A pair of metal brushes for a drill - from 200 .
- Degreaser and Solvent – 150-160.
- Paint - from 700 rubles .
- Epoxy glue - about 200 rubles .
- Rubber-bitumen mastic – 150.
- Polymer-bitumen mastic – from 350 .
- Rust converter - about 85 .
- Large Movil cylinder – 345.
- Paint brushes – approx. 160.
- Two amplifiers under the seat - 400.
- A pair of corners - 300 rubles .
- Floor panel – 4500.
- Jacks - 160 rubles for two pieces .
- The work of a car mechanic costs about 20,000 rubles .
The procedure for carrying out repair work
All work is conventionally divided into 3 stages: preparation of the bottom, replacement of the entire element or re-welding of individual parts, reassembly of the dismantled parts.
Tools and materials for work
Work is carried out after changing into dry clothes suitable for welding work. Before starting, prepare tools (grinder, welding machine, drill) and consumables. You will need new soundproofing sheets, as well as:
- mastic;
- primer;
- sandpaper;
- protective enamel.
After disassembly, it will become clear whether the repair will include additional metal parts, or whether the entire bottom of the VAZ 2112 will need to be welded.
Safety precautions
Since the work involves welding, fire safety of the work must be ensured. To carry out proper repairs, you should turn off the power to the car and drain all the fuel from the tank. For convenience, the doors in the cabin are dismantled, having previously de-energized the windows. In order to preserve the geometry of the body, after removing the doors, the openings are strengthened by installing spacer elements.
Note! Make sure the vehicle is securely fastened.
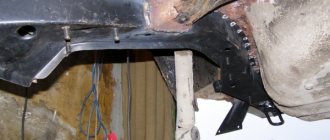
Boil the bottom of the VAZ 2110
I have a typewriter. It’s old, but it’s dear to me—I build on it. It still starts in any frost, drives and doesn’t break down. But it has one problem - it has begun to rust. It’s still too early to cook the body, but the bottom and bottom of the trunk—things have already begun to fall out. The holes are big, in short.
I would like to digest it, cover it with an anti-corrosion coating so that rust does not appear on it until at least another three years.
What can you recommend? How much could it cost?
Best regards, Sergey Tikhomirov.
Bottom repair Hello!
Disassembly/assembly of the interior, welding of the bottom and trunk, anti-corrosion treatment - RUB 30,000. I think it can be done.
The condition of the car largely depends on the body. The suspension can be “rebuilt” by replacing worn and faulty parts. The engine's attachments are also repaired or replaced; in severe cases, major repairs or complete replacement are performed. Body work determines the appearance of the car and, in many ways, its service life.
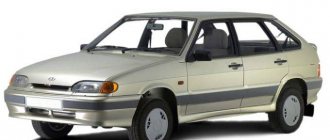
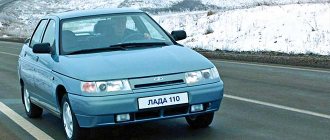
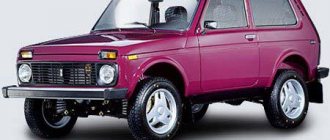
New VAZ 2110 from the showroom with an ideal body
When is repair required?
The first copies of the tenth family had a characteristic feature - the paintwork on the windshield frame peeled off at the top, starting from under the seal. Then this disease was overcome by changing technology, but the weaknesses remained.
Already on five- to seven-year-old cars, corrosion on the sills is very likely, and ten-year-old cars necessarily require monitoring of the bottom, arches, and side members.
They accelerate the appearance of rust and through corrosion, damage in road accidents followed by incomplete or unqualified repairs, difficult operating conditions on bad roads in winter and in bad weather, storage in conditions of high humidity.
Regular anti-corrosion treatment done at a service center or with your own hands will help extend the life of body parts; it is especially necessary for the hidden cavities of the sills and side members, this power “skeleton” of the car.
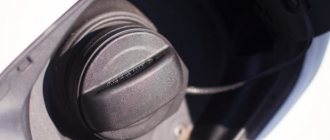
The bottom is corroded on both sides. From below he is attacked by dirt and water from the road. If the anti-gravel coating is damaged, the first spots appear literally within a year; after 2–3 years, with intensive use, corrosion becomes through.
Through corrosion of the bottom
In the cabin there is a carpet on the floor, under which there are layers of vibration-insulating and noise-absorbing materials. If water or snow gets into the bottom trough, for example from shoes, the coating gets wet and does not dry well. Increased constant humidity leads to corrosion of the bottom from the inside of the cabin and the need for repairs. To prevent this, use rubber mats with sides, and make sure that no water gets into the interior during rain or when washing.
Corrosion due to moisture under soundproofing material
A rotten bottom is revealed when viewed from below; under a layer of putty or anti-gravel, the holes may not be visually noticeable, but light blows with a hammer or pricks with an awl will immediately reveal the defect. Corrosion most often appears along the sills and in the driver's and front passenger's feet.
In the cabin, poor condition of the bottom will be indicated by sagging of the floor under your feet under load, in extreme cases, the breakdown or impossibility of fixing the driver's seat. And, of course, there is a frequently encountered situation when, when lifting a car on a jack, the special thrust pads for the jack break due to corrosion.
Preparation for repair
Bottom repair can be done with your own hands, but this requires a good tool, a suitable room, free time, skills and desire.
When working with metal, you cannot do without welding. It is optimal to use a semi-automatic welding machine with wire and carbon dioxide; compared to gas and electrodes, it is much simpler, more convenient and of better quality. An angle grinder will be needed when removing rotten floor fragments, for fitting parts and patches during welding work, and for cleaning seams and surfaces before processing and assembly.
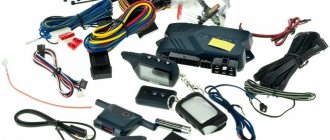
Semiautomatic welding machine with wire for welding with carbon dioxide
You also need stands for the car, for example, four pieces of the “diamond” type. The rest of the tool is standard and more common. The materials you will need are welding wire, joint mastic, anticorrosive, sandpaper, primer, paint, soundproofing sheets.
For repairs, the car is driven indoors and placed on stands. It must be possible to work comfortably and safely from below the bottom. The battery and electronic control unit are turned off to prevent damage during welding. The doors are removed; to maintain the rigidity and geometry of the body, spacers in the doorways are very desirable.
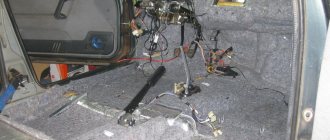
The next stage will be lengthy and responsible - disassembling the interior. Here you need to dismantle the seats, remove the floor tunnel lining, air ducts, remove the carpet, move the wiring harnesses aside, scrape off or beat off the noise. If it becomes necessary to change the entire bottom or weld in a floor panel, then you need to remove the torpedo and the beard - access to the engine shield must be open. It is recommended that all fasteners be carefully assembled, packaged and labeled to facilitate assembly work.
Welding work
When the floor is completely visible, you can decide on the scope of repairs. At best, you can do without replacing parts. All areas of corrosion must be thoroughly cleaned down to “healthy” metal and, if necessary, reinforced with patches. But usually this option is unlikely.
If there are through holes or loss of rigidity, the corresponding body part must be replaced. For VAZ models of the tenth family, the body floor consists of:
- floor panels;
- threshold extensions;
- front spar extensions;
- support platforms;
- connectors;
- cross members.
To replace, the old part is drilled out at the welding points or cut off with a grinder. Remember that there are fuel and brake lines running underneath the underbody on the driver's side. Disassembling them on similar machines is problematic; it is easier to cut them off and replace them with new ones during installation.
If the floor panel of the VAZ 2110 is in very poor condition, then the entire bottom assembly is replaced, in which case additional dismantling of the exhaust system will be required. If it is necessary to replace the thresholds at the same time, then they are changed one at a time with geometry control, and only then the floor is re-welded.
Marking, cutting out the old, fitting the new requires attention and accuracy, and the welding itself also requires an assistant. The bottom is started from below, tacked, the main welding is not done with a continuous seam, but in increments of 4–5 cm.
Final processing
After welding is completed, the seams must be protected from corrosion.
The metal is cleaned from scale to a shine and coated with joint mastic. All surfaces are primed, then painted in the main color, without selecting paint. The selection of quality materials and careful processing will guarantee successful corrosion resistance.
A layer of mastic and anti-gravel coating is applied on the outside. From the inside, after adjusting to size using scissors and heating the bitumen layer with an industrial hair dryer, sheet sound insulation is glued.
Now all that remains is to assemble the interior using the fasteners packaged and signed during disassembly.
Repairing or replacing the underbody with your own hands is within the capabilities of most car enthusiasts. If you want to save money, feel confident, learn new skills, and maybe hang out with friends in the garage and take a break from family worries, then go for it. Do-it-yourself car repair is necessary, useful, and affordable.
VAZ-2110 is a very cheap and easy to maintain car. But one of its main “sores” is the body. Unfortunately, it is poorly protected from corrosion. After only two years of operation, “bugs” form on it. If you continue to ignore the problem, through holes will appear. Rust forms everywhere: on the arches, fenders, and at the bottom of the doors. But the most vulnerable spot of the VAZ-2110 is the bottom. See photos and description of the repair process later in the article.
Replacement of structural parts
When performing work, take into account that the components of the bottom are:
- support platform;
- composite panels;
- threshold extensions;
- amplifiers of side members and cross members;
- connectors.
When carrying out troubleshooting, it becomes clear whether it is possible to repair a particular body element or whether the entire body will need to be replaced. In the case of fragmentary repairs, it is necessary to drill holes in the places where the part is attached using spot welding. The body element itself will need to be cut out with a grinder.
Welding work when repairing the bottom
Readiness for welding is checked according to the following algorithm:
- grounding the device;
- complete serviceability;
- effective room ventilation.
First, the spot welding spots are drilled out and the bottom is cut out along the contour. A new element is inserted into the prepared area and welded around the perimeter in increments of 20-30 mm. The seams are processed. The best results will be achieved when using joint sealant.
Is it possible to work on the bottom and sills at the same time?
People often ask about the simultaneous replacement of the bottom and sills. These operations are performed simultaneously. The factory repair kit for the side parts is installed first.
Final processing
After welding work, it is necessary to clean the seams with a grinder, carry out anti-corrosion treatment, and install new sound insulation panels. The bottom of the VAZ 2110 must be treated with anti-corrosion agent both from the outside and from the inside. Bottom finishing:
- The welds are cleaned until they shine, a grinder is used, and at the final stage, sandpaper R-80 is used.
- The seams are covered with bitumen-based mastic.
- The bottom surface is primed outside and inside the cabin.
- An oil-based anti-corrosion agent is applied to the inner surface. The composition penetrates into all hidden grooves and pockets.
- The outer part of the body is treated with anti-gravel protection.
- Sound insulation panels are cut to the required size, heated with a hair dryer, and placed on the bottom inside the cabin.
- Doors are being installed.
The work on replacing the bottom is completed, all that remains is to mount the interior, install the trim elements, and connect the electrical wiring.