The manufacturing plant does not install fog lights on all VAZ 2114 vehicles, but only on those that have the LUX complex. But a place for their installation in the general electrical system is provided on all cars without exception. The mounting block also has sockets for their fuses. So the car owner can order the installation of PTF at a car service center, at a car dealership during the purchase, or do it himself if he has the skills to work with electrical equipment. It happens that the fog lights already installed on the VAZ 2114 do not light up. In this article, the reader will get acquainted with the PTF connection diagram and find out the reasons for non-working PTF
PTF connection diagram
The power source for the fog lights is the battery (3). The wire from the positive terminal of the battery is connected to a relay (4), from which four wires come out: in the diagram, positive potentials are marked with numbers 85 and 87. Two wires come out of potential 87, which are connected through fuses (2) with a current of 7.5 A in the mounting block to the left and right PTF (1). The wires in the relay (4) are connected through a single contact, and this is the reason why both headlights turn on and off at the same time, and if the relay fails, both headlights also do not work. The wire from the positive potential 85 is connected to button 5. The negative potential 86 in the relay is connected to ground. The button, in turn, is also connected to ground by contact A. The standard factory button has a backlit display, its wiring is closed to the positive contact B.
Fog lights on VAZ 2114 do not light up: looking for reasons
An element of lighting equipment such as fog lights is not mandatory for all vehicles in the series. It can be installed optionally in showrooms that sell new cars.
It is worth saying that in the conditions of the domestic climate, PTF is a very useful addition, especially considering that the main light on VAZ cars leaves much to be desired, and in rainy weather does not always provide adequate visibility on the road. Turning on the fog lights in such a situation is of great help.
PTF VAZ 2114
Installation
The PTF installation process can be divided into three main stages:
- Installation of headlights;
- Network connection;
- Functionality check.
So now we will talk about each stage separately.
Installing headlights
We will consider the option of installing PTF on a standard bumper. Therefore, it does not have holes for new optics. You will have to do them yourself.
To work you will need a certain set of tools and materials:
- File;
- Drill and drill bits;
- Electric jigsaw;
- Roulette;
- Marker.
Connection elements
Now directly about work.
- First of all, remove the bumper. Work is performed only if it is disconnected from the seat.
- Remove all dirt from the bumper.
- Make markings for the installation of future fog optics.
- It is best to mount the headlights slightly to the side of the lower air intake. Try to place the PTF strictly under the main optics of your car.
- For decorative glasses that have outer and inner halves, make markings. The outer half is decorative, and the inner half is designed to fix the outer part and headlights.
- The outer part of the glasses has a protrusion on the inside. With this mounting protrusion, the element should fit into the hole made in the bumper.
- To determine the optimal dimensions, you should measure the landing protrusion. This way you can make the appropriate markings on your bumper.
- Using an electric jigsaw, holes of the required size and location are cut.
- Use a file to file the cut areas.
- The outer part of the glasses should eventually fit tightly into the hole.
- Fog lights are mounted in the resulting holes. For this purpose, the kit includes special mounting bolts.
- Attach decorative glasses to the top of the headlights. The bumper can then be returned to its place.
Connection
Together with the PTF, a diagram for connecting the devices must be attached. It is not complicated, so even a beginner will be able to understand all the nuances of connecting the components to each other.
You will need to embed the wiring from the foglights into the mounting block, which is located in the engine compartment to the right of the windshield. To do this, just unscrew the bolts from the block, lift it and find the pads marked Ш7 and Ш8.
These blocks are used to connect fog lights, although these lighting devices are not installed standard at the factory. Wiring from the headlights and from the fog lamp relay, which is provided in the purchased PTF kit, is connected to these blocks.
Your job is to make the correct connection. This is done according to the following scheme:
- The output wire from pin 87 is ground, so you need to connect it to the car body;
- Pin number 85 goes to the block marked Ш7 and is connected to connector number 17;
- Pins numbered 30 and 86 go to block Ш8. In this case, connect pin 30 to connector 8, and lead 86 to connector number 1;
- Having installed the headlights, stretch the positive wire through the engine compartment, as they are connected to the Ш8 block. But these wires need to be inserted into connectors numbered 2 and 3;
- Now connect the block to the mounting block, and return the block to its place;
- Select an area near the block where the fog light relay will be installed.
Connection result
Button
Now all you have to do is connect the control system for your PTFs. Included with the fog lights is a corresponding button, which will stand on the panel in the seat provided by the manufacturer.
PTF button
The manufacturer, that is, AvtoVAZ, provided for this. Therefore, under the panel you will find a control block. The panel is removed, the corresponding block is located and the button is connected to it. That's it, the controls are ready.
Examination
The last stage is to check the functionality of your PTFs.
To check the efficiency of the lighting devices, turn on the headlights on your VAZ 2114, then press the button to turn on the fog lights. When the lights are turned off, even if the fog lights button is pressed, they should still go out.
The importance of PTF is difficult to overestimate. They help you see the road better during fog, rain, and snow. Moreover, fog lights are designed to improve the visibility of your car to oncoming and behind vehicles. Therefore, we strongly recommend installing PTF not only in front, but also in the rear.
Relay mounting block
The mounting block is located under the hood, near the windshield.
K1 – headlight cleaner relay. If the headlight cleaners do not turn on, check fuses F1 and F7. Inspect the wiper mechanism; dust may have gotten into it or a stone has flown in, damaging or jamming its operation.
K2 – relay-interrupter for direction indicators and hazard warning lights. If your turn signals or hazard lights stop working, check fuses F2 and F16, this is a relay. If the hazard lights work but the turn signals do not, check the power handle, its contacts and connector. If only the emergency lights do not work, check the power button, contacts and wiring. Don't forget to check the turn signal bulbs. There may be a short circuit in one of the headlights. Carefully inspect the connectors and wiring for insulation damage.
If the turn signals work unstably or intermittently, this may be caused by poor contacts in the mounting block, as well as burnout or damage to its tracks. Contact may disappear not only in the block, but also in the headlights themselves, as well as on the way to them. If the wiring has been changed or something has been done to the wires, check them first.
K3 – windshield wiper relay.
If your wipers stop working, first check the relays and contacts. The steering column switch could also stop working or its contacts could oxidize. Inspect the wiper mechanism; due to poor tightening, the nuts securing the mechanism slats may have become loose, or a foreign object may have gotten in, interfering with their normal operation.
The motor could burn out, you can check its performance by applying voltage directly to it from the 12 V battery. Near the motor there is another fuse that protects it from overheating. It is located either on the trapezoid bracket or in the motor itself, depending on its type.
K4 – lamp performance monitoring relay.
K5 – power window relay. If your power window does not go up or down, check fuse F6 and this relay. If the window lifting mechanism is of a cable type, it lowers normally but rises with difficulty, it is necessary to lubricate the cables and glass guides with silicone grease. To do this, you need to remove the door trim and get to the mechanism. The motor may have stopped working, in which case it needs to be replaced.
Sometimes it helps to close the glass by hitting the door to temporarily revive the motor. To disassemble the window lifter mechanism, you need to unscrew the bolts securing the brackets and disconnect the glass itself from the mechanism.
If only one window regulator does not work, the problem may be in the power button and its contacts.
K6 – sound signal relay. If your horn stops working, check fuse F5, relay. The signal may not work due to a lack of contact in the steering wheel. Remove the steering column housing and look at the serviceability of the plates and contacts. Turn the steering wheel left and right; when turning, the mechanism may jam or the contacts may move. One bolt on the casing secures the position of the switch mounting bracket, the second secures the casing.
For the signal to work, you need to securely fix them, setting them in such a way that the contacts close when the switch is pressed. The contacts are located above the steering shaft. The design of the contacts in the steering wheel could also be damaged. Inspect the mechanism; the 3 screws and springs should reliably open and close the circuit.
K7 – rear window heating relay.
If the rear window fogs up and the heating stops working, check fuses F4 and F7, relays, contacts of the heating elements on the glass that may have been burnt or oxidized, as well as the switch button. The heating uses a high current; it would be a good idea to check the tracks on the mounting block board near the specified fuses and relays. The wire going from the switch to the rear window could have frayed and become one of the reasons.
K8 – high beam relay. If only one high beam headlight stops working, check one of the fuses F14 or F15 and the bulb in the problem headlight. Inspect the headlight connector and its contacts. It’s better to call them, then the problem will be easier to find. Check the steering column high beam switch and its contacts. When moving towards you, the headlights should flash with high beams, when switching away from you, switch the low beam to high beam. If the distant one blinks but does not switch, it is most likely the problem.
K9 – low beam relay.
If the low beam in one of your headlights stops working, check one of the fuses F12 or F13, and the lamp in the problem headlight. Check the headlight and low beam switch buttons if both headlights do not light. Contacts in the headlight sockets can also cause the lack of light.
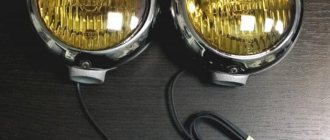
What glass color to choose for the fog light
Experienced drivers remember the time when PTF glass was painted yellow. Since then, there has been a very strange, but erroneous stereotype that yellow headlights are the most effective and optimal color. However, this opinion is completely erroneous, since today the largest car and component manufacturers equip fog lights with transparent glass. And this is not an accident, because transparent glasses are more preferable.
For the VAZ 2110 model, modern models of fog lights are available in only two variations: transparent and corrugated.
It’s paradoxical, but the lion’s share of buyers choose transparent ones, although for a number of objective reasons the corrugated ones are better suited for installation. They not only make the appearance of the car more modern, but also ensure clarity and directionality of the beam itself, and ultimately better visibility in adverse weather conditions, and ultimately safety, as well as checking the VAZ 2110 speed sensor, timely replacement of tires and others precautionary measures.
Setting the fog lights
Adjusting the fog lights involves several steps:
- car preparation,
- drawing up a diagram,
- adjustment.
The preparatory steps are no different from the actions performed before adjusting the main headlights. The fog lights should be clean, the tires should be inflated, and the trunk should be empty.
When setting up fog lights, you should use a special diagram that you create yourself. This requires:
- Place the car at a distance of 5-10 meters from the wall.
- Measure the height of the center of the headlight and mark it with a line on the diagram.
- Transfer the marks of the center of the car and the fog lamps to the wall.
- Draw a line 10-12 centimeters below the height mark of the fog lights.
To adjust the optics, you need to turn the screw until the beam reaches the level marked on the plan. If the headlight cannot be adjusted, you should clean the bolt head and inspect it for souring. You can use WD-40 aerosol to lubricate the parts. If the bolt rotates but the reflector remains in place, you will need to dismantle the fog lamp and check the integrity of the mechanism.
Useful video
If all of the above reasons have been checked, and none of them have been identified, then the problem is in the wiring itself. In this case, you should ring all the wires used in the fog lamp connection circuit, and also check the correctness of the connection itself.
This can be done using the diagram given at the beginning. In this case, special attention should be paid to the correct connection (to the required connectors) of the button and relay.
Published May 04, 2018 Sources used:
- https://vaz-2114-lada.ru/2014/12/ne-rabotayut-protivotumanki-ptf-chto-delat/
- https://autoinfa.com/ne-goryat-protivotumanki-prichiny-i-sposoby-ustraneniya-neispravnosti/
- https://vaz-2114.info/vaz-2114-ne-goryat-protivotumannye-fary/
- https://remontvazov.com/ne-goryat-protivotumanki-na-vaz-2114
Performance diagnostics
After you have found out where the VAZ 2114 reverse sensor is located, you can begin diagnostics. To do this, you may need light bulbs with wires or a tester. However, there are ways to do without their participation.
The verification procedure itself should proceed as follows:
- The hood must be opened and the cover removed from the fuse console.
- Then check 15A, who is directly responsible for its operation. If the white light does not come on after replacing the fuse, the diagnosis continues.
- The ignition must be turned on to record electrical voltage on the console. If it is not there (and its indicator should be 12 V), then it is likely that the contacts have oxidized. If there is, the check is carried out further.
- And then you need to crawl under the car. The protection is removed from the electric motor, the ignition and the corresponding gear are turned on. Now you can see whether voltage has appeared at the sensor connector or not.
- As mentioned above, if there is no tester with an arrow, you can use a test light. Its glow should make it clear about the existing voltage.
- Then comes the key point: it is necessary to short-circuit the conductors of the sensor in question. When the light appears, all that remains is to state the fact that the VAZ 2114 reverse sensor needs to be replaced.
After completing the diagnostics, you can begin the replacement procedure.
Correct installation and connection of fog lights VAZ 2110 and its modifications
Not all models of the tenth row of VAZ are equipped with factory fog lights. If the driver independently tunes additional lighting, he has three options for solving this problem:
- Buy a front bumper with fog lights already installed. They just need to be connected to the car network.
- Buy a front bumper with ready-made stamped sockets for installing PTF. In this case, you need to choose the right set of fog lights and install them yourself.
- Make holes in the plastic for the PTF yourself, attach the fog lights and connect them to the car’s network. This option allows an experienced driver to install fog lights from foreign cars on the VAZ 2110 model range.
The “tens” model range is equipped with PTFs with corrugated (provide a narrowly directed light flux) or transparent (gives spots of light) glass.
The requirements of the Road Traffic Regulations do not contain a mandatory condition for installing PTF on cars, so domestic manufacturers do not always install fog lights on the assembly line. But there are GOST 8769–75 and GOST 41.48–2004, which regulate the number, location and order of switching on all lighting devices, including fog lights.
Requirements for installation of PTF
Fog lights are installed according to certain rules:
- quantity - 2 pieces;
- no closer than 25 cm to the surface of the road surface;
- no more than 40 cm from the outer contour of the headlights;
- sockets for fog lights should be located below the top point of the low beam headlight socket;
- PTF line-of-sight angles should be: in the vertical plane 5o+5o, in the horizontal plane - 45o+10o.
The location of two PTFs in the front lower part of the car must meet the requirements of GOST 41.48–2004 (clause 6.3)
The fog lights turn on only at the same time as the side lights.
Modern brands of vehicles, as a rule, are equipped with PTFs, which are installed by the manufacturers themselves. For this purpose, special sockets are provided on the front bumper. If the fog lights are not installed there, the holes are closed with plugs that can be easily removed.
If the installation of PTF is not provided for by the car, the factory stamped holes for installing fog lights are closed with plugs on two screws
The first editions of the VAZ 2110, 2111 and 2112 were not equipped with holes for installing fog lights, so the sockets must be marked and cut out with your own hands, taking into account the above requirements.
Preparing for installation
Self-connection of PTF on VAZ 2110, 2111 and 2112 involves minimal disassembly of the front part of the car (preferably without removing the front bumper) and the front panel (dashboard). Therefore, before buying a ready-made set of fog lights, you should find out:
- what kind of dashboard is on your car;
- Are there any stamped holes for them in the front bumper, what is their shape, as well as the method of attaching the PTF.
You need to act carefully so as not to create unnecessary difficulties for yourself. If there are no sockets for fog lights in the plastic bumper, then they can be easily made using a drill, a heated metal plate, or cut out with a hand jigsaw. The main thing is to correctly mark the size of the finished PTF kit with fasteners, take into account the curvilinearity of the bumper, the structure of the material (fragile, soft, hard).
You can make your own nest in the bumper using a drill and a thin drill with a diameter of 2–3 mm, often placing the holes along the contour
You need to remember a simple rule. If there are stamped sockets for fog lights, then we select the shape and size of the headlights to match them. If there are no holes, then first we buy PTFs, and then mark them according to their shape and make places for attaching the foglights.