What is this?
Engine overhaul refers to the work of a specialist in restoring the unit to a condition as close as possible to the factory one. The overhaul includes a large list of works. It is carried out if many parts and assemblies have failed.
To understand that the engine of a VAZ-2107 car needs repair, it is necessary to carry out diagnostics. The driver can assume the need to restore the unit’s functionality based on the following signs:
- Presence of knocking noises while the engine is running.
- The oil pressure light is flashing or on.
- Increased oil consumption.
- Blue smoke appears from the exhaust pipe.
- Increased fuel consumption.
The engine overhaul process looks like this:
- The unit is removed and disassembled.
- Clean the parts and check their serviceability.
- Worn components are replaced with new ones.
- The unit is assembled and installed back in place.
Service station mechanics carry out major overhauls of engines. If the engine of a VAZ-2107 car is in a faulty condition, then you need to do a number of the following actions:
- Find a car service that works with VAZ-2107 cars.
- Contact the manager and find out the approximate cost of the service.
- Agree on the date and time of arrival to the master.
- Bring the car to the service station at the agreed time.
- Wait for the diagnostics to complete.
- Find out the cause of the breakdown and the cost of restoring the unit.
- Give consent for repairs.
- Wait until the mechanic finishes the job.
- Check the serviceability of the motor.
- Pay for the service of a specialist.
- Receive a warranty coupon.
Car mechanics at many service stations advise running in the engine for the first 5,000-10,000 km. This will help increase the service life of the motor after overhaul.
Malfunctions of the standard VAZ 2107 engine
It is customary to distinguish between the main malfunctions of the standard 7 engine. All of them require prompt and mandatory permission to avoid major repairs.
Engine overheating
A frequent malfunction caused by various reasons and threatening a breakdown of the cylinder head gasket or complex engine repairs. Usually, when the engine overheats, an indicator appears on the dashboard. Unfortunately, many motorists do not respond in a timely manner to an arrow approaching the red zone.
At the first symptoms of overheating, you need to act while driving:
- open the air damper;
- turn on the heater fan at the highest speed;
- put the gearbox in neutral, try to use inertia to roll the car to the edge of the road (be sure to turn on the emergency lights);
- Leave the engine idling for 2-3 minutes.
This will work if there are no clouds of steam escaping from under the hood, i.e., the overheating level is low. Remember that it is not recommended to immediately turn off the engine with such overheating. This is done only if the hose has burst and there is a threat of depressurization of the cooling system.
After turning the key to the reverse position, the engine does not turn off completely, it works due to pseudo-heat ignition, so it must be turned off forcibly by placing the gearshift lever in any position except neutral, and press the brake - then release the clutch.
After stopping the engine, antifreeze continues to circulate, having the greatest impact on the connections of engine parts. If the outcome is unfavorable, this threatens the formation of vapor locks. The phenomenon is commonly called “heat stroke.”
If overheating of the engine unit is accompanied by steam escaping from under the hood of the car, the elimination instructions look different.
- Open the hood, check the presence of antifreeze in the expansion tank, the integrity of the hoses, radiator and thermostat.
- Grasp the reservoir cap with a rag and carefully unscrew it 1 turn to release the pressure. Work extremely carefully so as not to scald yourself with hot antifreeze!
- Restore the causes of overheating and depressurization of the cooling system: wrap the burst hose with electrical tape or replace it, close the crack in the radiator due to corrosion, fill in the required dose of refrigerant, etc.
In some cases, the culprit for overheating is the sensor that turns on the fan motor. It is easy to check: you need to remove both wires from the sensor terminals and connect them to each other - if the fan starts working when the ignition is on, you need to change the sensor, it does not work.
The thermostat that regulates the flow of antifreeze through and around the radiator may also be malfunctioning. The cooling system unit is checked as follows: with the engine warm, you should feel with your hand the upper and lower pipes connecting the engine to the radiator. A thermostat malfunction can be judged by a cold lower hose.
What does the price depend on?
Different car service centers and private repairmen set different prices for engine overhaul of a VAZ-2107 car. When setting the price, the following factors are taken into account:
- Scope of work.
- Cost of spare parts.
- Prestige of the car service.
- Difficulty in recovery.
- Automotive technician qualifications and experience.
- Urgency of recovery.
- Place of overhaul (at a service station or at the location of the car).
- Region of service provision.
In the capital, a complete restoration of a VAZ-2107 engine will cost more than in the outback. The higher the qualifications and more experience of the specialist, the more prestigious the service station, the higher the price of the overhaul will be. The more parts and assemblies that need to be replaced, the more expensive the work will be.
Types of repairs
Depending on the urgency, auto mechanics can repair the engine:
Depending on the location of the repair, there are:
- At the service station.
- In the garage of a private master.
- At the location of the car.
Depending on the person performing the work, the repair may be:
- Independent.
- Auto service center specialist.
- Private auto mechanic.
Approximate price
In Russia, overhaul of a VAZ-2107 car engine costs from 2,000 to 30,000 rubles. Approximate prices broken down by type of work:
- Replacing the oil pan gasket - about 1,600 rubles .
- Adjusting valve clearances - from 500 rubles .
- Replacing the flywheel - about 3100 .
- Installation of a new cylinder head - from 2,000 to 12,000 rubles .
- Replacement of pillows - from 400 rubles .
- Valve adjustment - about 1200 .
- Installation of a turbocharger – from 5000 .
- Installation of a new fuel consumption sensor – 300 rubles .
- Cylinder head grinding – from 2000 rubles .
- Replacing the valve cover gasket - 1200-2000 rubles .
How much does it cost to overhaul a VAZ and foreign car engine?
If you maintain a domestic engine in a timely manner (change engine oil and coolant on time), then its service life is about 200,000 km. At a certain point, it becomes necessary to overhaul the engine. Experts from the magazine “Behind the Rules” determined the price of such an event.
The main signs of the need for major repairs
:
- high oil consumption;
- smoking;
- loss of power;
- low oil pressure.
What operations does engine overhaul include?
:
- Removing the engine.
- Disassembling the engine and washing all its parts.
- Measurement of basic parts (cylinder block, crankshaft, cylinder head). Check for cracks and tightness of the cooling system jacket. Checking the crankshaft and camshafts for bending. Checking valve mechanisms. Checking the condition of the oil pump.
- Boring of cylinders for repair size or liner. In the latter case - installation of sleeves. Grinding of main and connecting rod journals to repair size. Replacement of valve seats and bushings. Machining the plane of the cylinder head.
- Engine assembly with installation of new rubber elements, seals and gaskets.
Price
Such a major overhaul of a VAZ engine along with spare parts in the Moscow region costs no more than 50,000 rubles.
For comparison, overhaul of a naturally aspirated engine of a foreign car
will cost approximately 180,000 rubles if replacement of basic parts (cylinder block, crankshaft and cylinder head) is not required.
Diesel engine overhaul
will cost 220,000–230,000 rubles
Turbo engine overhaul
- this is a plus of 30,000 - 100,000 rubles to the cost of an aspirated engine, i.e. 210,000 - 280,000 rubles.
Have you ever had to overhaul a VAZ engine? How much money did the repair require?
Let us remind you that during the operation of the engine and gearbox, tiny metal particles enter the oil, which appear due to the rubbing of parts against each other. A crankcase drain plug with a neodymium magnet helps collect metal debris and extends the life of the units by allowing them to operate in clean oil.
Source
Repair of the Zhiguli engine: basic concepts
Many car enthusiasts, especially beginners, do not have a clear idea of what repairing a VAZ 2107 engine, or any internal combustion engine, for example, a VAZ 21213, which is called “overhaul” or overhaul, involves. Let’s explain this using a simple “life situation.”
Your car is not new. You drove it, it “ate” an excess of oil and gasoline, the engine had poor torque, and was noisy. Your car could not climb a long, steep hill in 4th gear. You had to switch to third, all the traffic participants driving behind you first honked at you, then overtook you.
And then somehow you decided to “save” on the purchase of motor oil. The path is not short, but the oil decreases very noticeably. You bought cheap oil on the market, poured it into the engine and forgot. But along the way we had to stall. The engine began to overheat, it was evening, the place was wild. You have a “classic”, not a VAZ 21213. There is no transfer case. You hit the gas pedal and finally pulled out in 1st gear. On the way to the house, the knocking intensified, the oil pressure light began to constantly burn, I had to drive on "choke", and when entering the garage the car completely stalled.
In the workshop it was discovered that:
- the camshafts are worn out and ground down, with rough burrs.
- The splines on the oil pump shaft are cut off almost completely, while the entire crankcase and oil pump filter are clogged with shavings and metal dust.
The following happened: during forced operation of a hot engine, the engine oil lost its lubricating properties, and intensively rubbing parts wore off instead of lubricant, and in the end the engine even “seized.”
Significant funds were spent on repairs. The following was done:
- cylinder head replaced,
- chain tightened
- a new oil pump was installed,
- Complete oil change with engine flush,
- oil filter replaced,
- I had to change a lot of gaskets
- the ignition timing was re-set, at the same time new high-voltage ignition wires were purchased (the wire from the coil was supplied from a VAZ 21213);
- new spark plugs were installed;
- generator relay replaced;
- The timing chain has been tightened, the tensioner and damper have been adjusted.
Should it be considered that a major overhaul was carried out?
Answer: no. Just as the machine previously “ate a lot of bad oil”, so it will also consume good oil, on an increased scale. Just as she drove poorly uphill before the accident, she drives just as poorly after the repair.
A major overhaul of a car engine is a repair that is carried out due to a loss of torque and engine power - namely, a decrease in torque,
What are the ways to detect power loss? Simple ways are:
- Excessive consumption of oil and gasoline;
- Reduced acceleration dynamics with a well-adjusted carburetor, this applies to all “classics” and to the VAZ 21213;
- The appearance of black smoke and soot in the exhaust, traces of greasy soot at the end of the exhaust pipe.
What can simulate the need for major repairs?
- In the event that the gasket slightly does not correspond to the dimensions of the cylinder, for example, a gasket from a VAZ 21213 is supplied. Sometimes it happens that a similar picture develops if the cylinder head gasket is damaged. In this case, there may be a reduction in power output and compression. It may appear that a major overhaul is needed;
- Sometimes the head bolts are not tightened correctly after opening, resulting in a misalignment;
- In the event that the gasket slightly does not correspond to the dimensions of the cylinder, for example, a gasket from VAZ 21213 is supplied.
Loss of power is a consequence of incomplete contact of the pistons with the cylinder walls, or a decrease in compression. It is the reduction in compression, wear of the piston rings and an increase in the diameters of the working volumes of the cylinders that require major repairs.
Good compression is especially important in low gears when the engine develops more power. This allows, for example, the VAZ 21213 to overcome off-road conditions.
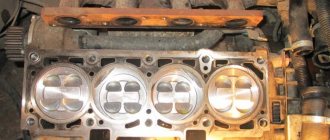
Remember: the main thing in engine overhaul is the repair of the cylinder block.
The stages of cylinder block repair are as follows:
- Troubleshooting - or measuring the compression number in each cylinder;
- Disassembling the block and carefully measuring planes and dimensions;
- Boring the block to new dimensions, and honing surfaces - or changing the geometry of the cylinders;
- Checking dimensions, processing planes, grinding and honing the crankshaft (main and brass journals) - this and the previous points are the essence of a major overhaul;
- Balancing the crankshaft along with the flywheel and clutch basket;
- Selection of new piston rings for new sizes;
- Assembly, performance testing and compression measurement after repair.
For those who have decided to do a major overhaul with their own hands, so that only spare parts are bought (since they will charge tens of thousands of rubles for just one job at a car service station), we will briefly describe only the disassembly and process of removing the cylinder block (the approach is almost the same for the VAZ 2107 and VAZ 21213):
- You need to have a place for repairs, with a pit and a crane-beam, or the possibility of attaching a hoist in order to remove the engine, otherwise the overhaul is doomed to failure before it has even begun;
- First, remove the hood to free access to the engine compartment from the front;
- We remove the battery, having first disconnected the ground;
- We unscrew the bolts on the radiator and cylinder block, having first opened the radiator and expansion tank and drained all the antifreeze;
- Carefully positioning the container, drain the engine oil from the engine crankcase;
- First remove the air filter, then the carburetor and put it aside for a long time;
- Disconnect the dangling fuel supply hose from the fuel pump (insert an M8 bolt into the gap to prevent gasoline from spilling);
- Then the fuel pump, along with the spacer, gaskets and its rod, is removed from the engine;
- We remove all the pipes going to the stove, spark plug wires, coil wire;
- Remove the breaker-distributor with the rod;
- Work begins inside the engine: after removing the cylinder block cover, remove the cam shaft and timing sprocket;
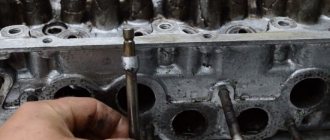
- We unscrew the critical bolts securing the cylinder head; it is advisable to have strong heads or a torque wrench. This is a very responsible procedure, and before you tackle it with your own hands for the first time, you need to carefully read about the direction, force, and procedure for working with screws and a key;
- We disconnect the “pants”, or exhaust manifold, and then completely remove the cylinder head;
- Then we carry out a visual inspection of the cylinders and pistons for embossed marks, check the tightness of the pistons on the pin, and estimate what kind of major repairs are to be made;
- We climb into the pit, remove the protection from the engine crankcase, disconnect all the wires (de-energize the generator), and then remove it along with the belt away;
- We remove and remove the starter from the car;
- All pipes of the cooling system are removed along with the thermostat, the Carlson is removed along with the radiator and the water pump;
Only now, when the garage has become like a spare parts warehouse, can you unscrew the crankshaft pulley mount, clutch housing screws, large nuts (2) from the engine mounts, and, with the help of a partner, hang it on a beam, carefully lift it above the engine compartment and remove the engine.
After this, the clutch, oil filter, flywheel, timing chain are removed, the crankshaft sprocket is also removed, and only after this can you begin to assess the condition of the crankshaft, its journals, bearings, and also begin to work with the cylinder block, assessing future overhauls.
If you are not afraid even of the preparatory amount of work, then we can safely recommend that you carry out a major overhaul of the engine yourself.
In addition, you must find a service station where they will bore your cylinder block, grind the crankshaft, perform pressing and other operations.
Thus, without serious auto repair shops equipped with machines, it is still impossible to carry out major repairs with your own hands alone.
The decision is yours.
VAZ engine overhaul services at low prices
VAZ cars are the best-selling in Russia due to their relatively low cost and adaptability to Russian operating conditions. The presence of a large number of cars of this brand determines the demand for services related to their repair. In particular, a VAZ engine overhaul is often required, which is carried out quickly and efficiently by specialists.
There are various reasons leading to the need for a complete restoration of a car engine. Repairs may be required due to untimely replacement of engine oil, incorrectly selected spark plugs, poor condition of filters, and in other cases. The more serious the degree of damage, the higher the cost of repairing a VAZ engine will be. We set a minimum price for such services, since we have in stock all the spare parts and modern equipment necessary for repairs.
To get an answer to the question of how much it costs to overhaul a VAZ engine, a comprehensive diagnostic of the power unit is carried out. When it is completed, our specialists name the exact cost and stipulate the deadline for completing the work. The final price is influenced by the number of parts that must be replaced during repairs, as well as the complexity of the work. Despite the low prices, the work is performed to the highest quality, which is confirmed by a long-term guarantee.
Overhaul of the engine, or the eyes are afraid, but the hands do.
Overhaul of the engine, or the eyes are afraid, but the hands do.
Background. It all started, as we know, with the purchase of a “not new” car in 2009. Car VAZ 21053 1997 “safari” color code 215 (for those who don’t know - light beige). After the purchase, I drove no more than a couple of thousand kilometers and soon the engine refused to pull normally. I checked the spark plugs - they were relatively clean, adjusted the valves - it didn't help. Having obtained a homemade compression meter and measuring the compression, I was unpleasantly surprised.
The compression was as follows: 1 - 8; 2 - 8; 3 - 4.5; 4 - 8. Here it’s a no brainer that only an autopsy will save the patient. Like many fellow sufferers, I started by calling services, and, having found out the cost of repairs (15-17 thousand rubles for work alone), I made a unanimous decision to do the repairs using my own limbs and gray matter.
And so, the eternal question, to which I did not find a detailed answer on the forums: “Engine capital, what and how to do?”
Let me start, perhaps, with a list of special tools that may be needed for this ritual: • a set of heads; • a mandrel for piston rings (about 260 rubles, but you can make one yourself from a sheet of tin); • mandrel valve stem seals (20 rub.); • valve desiccant (80-100 rub.); • torque wrench (you need to take one so that the size of the tetrahedron is the same as on the heads) (1300 rubles); • micrometer (500-600 rub.); • clutch disc holder (50 rub.);
• ratchet wrench (RUB 80);
• device for adjusting valves with a dial indicator (500-800 rub.); • two- or three-legged puller (400-500 rubles).
For spare parts: • pistons; • piston rings; • main and connecting rod bearings; • crankcase gasket; • block gasket;
Literature: • Repair manual for your car; • catalog of spare parts (of course this is rare these days, but you can find it on the Internet)
Next in order. 1. We put the machine in the place where you will carry out repairs. The ideal option is a garage with an inspection hole. 2. Remove the hood from the car. It's better to do it with two people, but I managed it alone. 3. Disconnect the battery and remove it from the car. 4. Drain the engine oil and coolant. If the condition of the coolant suits you, then you need to drain it more carefully. From the factory, bolts are installed in the radiator and cylinder block, so some of the coolant will spill past. I would advise going to the store to buy taps (the price is 40 rubles per piece). By quickly replacing the plugs on the taps, you can carefully drain the coolant through a hose. 5. Remove the air filter housing (pan), remove the carburetor from the intake manifold and place it where it will not interfere with us. We disconnect the fuel line from the fuel pump and plug it with an M8 bolt. We remove the fuel pump, the fuel pump rod along with the gaskets and spacer. 6. Disconnect the pipes going to the heater and disconnect the wire from the coolant temperature sensor. Disconnect the high-voltage wires from the spark plugs and remove the distributor. Remove the oil separator. 7. Remove the cylinder head cover. We remove the sprocket from the camshaft and then the camshaft itself. 8. We unscrew the M6 studs from the cylinder head so that they do not interfere, using two nuts screwed onto the stud and locked together. 9. Take the wrench, extension and 12mm socket and try to unscrew the cylinder head mounting bolts. This is not as easy as it might initially seem, especially if the cylinder head was tightened “hot” or simply without a torque wrench. I tore 3 heads while removing the cylinder head. When unscrewing, you need to make sure that the head does not warp on the bolt head. If for some reason the bolt does not give in (the edges on the head are torn off), then it must be drilled out. First, we punch a point in the center of the cap and drill with a drill with a diameter of 4-5 mm to a depth of 15 mm. Then we drill with a drill with a diameter of 12 mm to the same depth. It is better to determine the depth approximately with a caliper so as not to drill the head. Next, we take a punch, place it in the center of the drilled hole in the head and apply a couple of sharp blows with a hammer. The cap should bounce off the bolt. 10. Unscrew the four nuts securing the exhaust pipe and, removing it from the studs, move it to the side. We remove the cylinder head along with the manifolds and if we are not going to disassemble it, then we set it aside closer to the removed carburetor. 11. We try to make out the cylinder markings stamped on the bottom of the piston. This is necessary in order to know which pistons to buy and what size to sharpen. Regarding the pistons: I immediately took the “Motordetal” kit (pistons, pins, rings), this frees up the weight distribution of the pistons. The only thing you need to check is the fit of your finger in the piston; it should enter the piston using the force of your thumb and not fall out of the piston in a vertical position. 12. Remove the crankcase protection and engine boot (if any), disconnect the wiring from the generator and remove the generator and belt from the car. 13. Remove the starter casing and hot air intake. Disconnect and remove the starter (attached with 2-3 bolts to the clutch housing). 14. Remove all pipes. Remove the fan shroud and radiator. We remove the pump. 15. Use a mounting tool to secure the flywheel from turning and use a ratchet wrench to unscrew the nut securing the KV pulley. 16. Unscrew the 4 bolts securing the clutch housing and the two nuts on the engine mounts. 17. Remove the engine from the car. Here the method is determined by the location of the repair. I had a beam above the pit so there were no problems securing the winch. Don't forget to invite an assistant for this action. 18. Turn the engine over with the crankcase up, while ensuring the integrity of the two guide bushings in the upper part of the block. It is better to place the engine on wooden blocks. 19. Remove the clutch from the flywheel and the flywheel itself. Remove the clutch housing boot. 20. Remove the oil filter. Unscrew the crankcase mounting bolts and remove the crankcase from the block. We do this carefully so as not to break off the oil intake. 21. Remove the rear block cover together with the oil seal and the front one. 22. Remove the star from the pig. Unscrew the chain stop and remove the tensioner shoe. We remove the chain. We use a puller to remove the HF sprocket (although I removed it by hand). 23. Unscrew the nuts on the connecting rod caps, remove the caps, lower the pistons down and remove the liners. Having assessed the condition of the HF liners and necks, we decide whether to reuse or replace the liners. If you leave the old inserts, you should remember their previous location. If you change it, you should first look at the markings on the non-working side of the liner: if there are no markings, then the liners are nominal, the first repair is +0.25, the second is +0.50. If there is visible and tactile wear on the CV journals, then it is necessary to groove the journals to the next repair size and, accordingly, the obligatory replacement of the liners with the corresponding repair size. 24. We repeat the previous point for the indigenous ones. Naturally, there is no need to move the pistons and connecting rods. We remove the HF from the block and the thrust half-rings. 25. Remove the piglet. Remove the oil pump and remove the oil pump drive gear. We turn the block on its side and remove the pistons and connecting rods from the cylinders. 26. We go to the store and buy a piston of the required size (we don’t pay attention to the class of pistons). At the same time, we are looking for a workshop for boring the block, grinding the piston pins and pressing in the piston pins. The block must be taken to boring with a set of new pistons so that the cylinders are machined for specific pistons. A normal boring machine will mark the pistons after boring the block. 27. We measure the HF necks after processing with a micrometer, use the manual to determine the size of the liners and go to the store to buy the liners. Don’t believe the myth that after the capital investment the car will have to be towed. Those who do this in advance take inserts that are thicker than necessary and clamp the HF. Then, when towing, they try to disrupt this matter. And then there are problems: either the liners will turn, or the stripped metal from the liners will clog the oil channels of the HF. In any case, such an engine will not last long. With the correct selection of inserts, the HF will rotate by hand.
Engine assembly. 1. Inspect the block for the absence of metal shavings. Where possible we remove carbon deposits. And in the future, I recommend cleaning parts from carbon deposits as much as possible so that the new oil works as a lubricant and not as a means of cleaning parts from carbon deposits. 2. We clean the beds of the main liners from dirt, lubricate the beds and liners with engine oil and place them in the bed, guided by the lock. The main bearings are different, read the repair manual, it tells you which ones go where. Use the same oil that you are going to fill in after the repair; it is not known how oils of different brands mixed together will behave. We install the thrust half-rings on the rear wall of the block with the grooves facing the HF planes. We put the HF in the block, install the covers with liners, observing the markings on the covers and the location of the locks on the covers and in the block (they should be on one side), tighten and tighten the bolts with a torque wrench. Checking the rotation of the HF. If the HF does not rotate, it means that the liners were miscalculated and they need to be replaced with thinner ones. 3. It is better to order the piston assembly from a service center, naturally under your own control (not everyone has the opportunity to heat the connecting rod heads to 240 degrees). If there is a hole on the connecting rod for supplying oil to the liners (of a Soviet-assembled engine), then during assembly this hole should be on the side of the letter P (front side) of the piston. If there is no such hole, then, as knowledgeable people said, the connecting rod must be installed so that the lock is on the right side when looking at the piston from the side of the letter P (although the manual said that you can install it as God pleases). 4. Lubricate the piston pins in the pistons through the holes. We put the rings on the pistons. The lower one is an oil scraper (the one with a spring inside), and two compression ones (they are of different thicknesses, so you can’t go wrong), we check the closure of the rings and move the locks at angles of 120 degrees, while making sure that the locks do not fall on the holes and slots in pistons. Lubricate the rings and mandrel with oil and tighten the mandrel on the piston, remembering the location of the front side of the piston. We place the block on its side and insert the piston with connecting rod into the cylinder according to the markings on the piston made during boring. By gently tapping with the handle of a hammer or a wooden block, push the piston into the cylinder. 5. Turn the block upside down. We pull the connecting rods to the journals and secure them in the same way as the main ones. See the manual for tightening torque. Be sure to check the ease of rotation of the HF. If it does not rotate, then change the bearings. 6. We check the tightness of all covers and connecting rods again. 7. Replace the KV rear oil seal in the cover and place the cover on the block, not forgetting to install the boot mounting bolts (they have a square head) and coating the mating surfaces with a sealant gasket. 8. Place the clutch housing boot on the block. We install the flywheel so that the groove on the flywheel is on the side of the 4th elbow of the HF!!! 9. We put back the HF sprocket, having assessed its condition in advance. I changed all the sprockets and chain, because they did not inspire confidence and I had no desire to get into the engine again. We put the chain on the sprocket, install the limit pin, put the piglet in place, fasten it with a bracket and install the sprocket on it (do not forget to counter it after tightening it with a washer, preferably a new one). Install the tensioner shoe. 10. Having replaced the front oil seal of the KV, lubricate the mating planes and install the front cover, centering the position of the oil seal and the front end of the KV and secure it. We put the KV pulley in place and tighten the ratchet nut while holding the KV from turning 11. We put back the oil pump, a new engine crankcase gasket and secure it with bolts. 12. Place the clutch on the flywheel, centering the position of the disc with a mandrel, and evenly tighten the clutch mounting bolts. 13. We install the engine on the car, but the engine mounts should not be fixed to the frame. If the gearbox is not removed from the car, you will have to work hard when combining the gearbox and engine. We bolt the gearbox to the engine and secure the ground wire from the bottom to the gearbox (if you forget, you’ll have a hard time with the starter later!!!). 14. We check the blind holes for the cylinder head bolts for the absence of oil and other liquids, so that the block does not burst when tightened!!! We put the cylinder head on the block (with a new gasket!!!), pull the chain through the cylinder head and secure it (the chain) with wire so as not to fall into the crankcase. Tighten the bolts with a torque wrench (be sure to check all bolts for lack of tension and the condition of the bolt heads). 15. Place the oil pump drive gear in the block and assemble the oil separator. 16. We set the position of the CV according to the long mark of the cover, put the sprocket on the chain so that the mark on the sprocket is at the top, put the sprocket on the camshaft and align the mark on the camshaft bed and the mark on the sprocket. Carefully removing the sprocket, place the camshaft on the cylinder head. We put the sprocket on the camshaft, check that the marks match and tighten the camshaft mounting nuts. We fix the sprocket and counter the bolt with a lock washer. 17. We catch the moment when the first piston is at TDC by pressing the intake valve (it will be pressed before TDC) and set the HF to the +5º position. We put the battery in place and connect the wires. We connect the spark plug to the high-voltage wire of the first spark plug and place its body on ground. On the distributor we place the slider opposite the contact of the 1st cylinder and put the distributor in place, placing the cover latches along the engine. Turn on the ignition and turn the distributor, look for the position at which a spark appears on the spark plug. We fix the distributor in this position, now our ignition is set to advance +5º. 18. Adjust the chain tension and clearances in the valve mechanism. We put the cylinder head cover with a new gasket in place. 19. Put the carburetor in place, install the oil pressure sensor, the coolant plug in the block, the oil filter and fill in the oil. 20. Put the pump in place. We install the generator, connect the wires to the generator. We install the generator belt and set the belt tension. 21. Install the radiator and connect all the hoses of the cooling system and the expansion tank. Fill the system with coolant and check that there are no coolant leaks. 22. Wrap the candles, put high-voltage wires on the candles. 23. Put the starter in place and tighten the bolts. Connect the wiring to the starter. 24. We fix the receiving pipe to the manifold. 25. Install the fuel pump and connect the fuel line. 26. We try to start the engine. After setting the ignition timing according to step 17, my engine started the first time. I advise you to warm up the engine to operating temperature, while checking for oil and coolant leaks. If suddenly a coolant leak starts from under the cylinder head, then tighten the cylinder head only on a cold engine!!! 27. Replace the pan, engine protection and boot, fan casing and hood.
The engine has been overhauled. Now for the first 2500 km you need to drive carefully without sudden acceleration, without overloading the engine. After driving 2500 km, change the engine oil. Look under the hood often to check the unit.
Advice for those who will disassemble the cylinder head. As you know, the standard desiccant is not very convenient and easily flies out of its engagement on the stiletto heel. I advise you to tighten two nuts on a hairpin and clamp the grip of the device between them, then the chance of getting hit on the forehead with the device will be minimal.
PS Maybe I missed something, but I hope I described the main points.
Good luck in this difficult task.
Vehicles serviced
| 1111 Oka | 2101 | 2102 | 2103 | 2104 | 2105 |
| 2106 | 2107 | 2108 | 2109 | 2110 | 2111 |
| 2112 | 2113 | 2114 | 2115 | 21099 | 2120 Nadezhda |
| 2329 Niva Pickup | 4×4 2121 Niva | 4×4 2131 Niva | 4x4 Bronto | 4x4 Urban | Vesta |
| Vesta Cross | Granta | Granta Sport | Kalina | Kalina Cross | Kalina Sedan |
| Kalina Sport | Kalina Universal | Kalina Hatchback | Largus | Largus Cross | Priora |
| Priora Sedan | Priora Station Wagon | Priora Hatchback | X-ray |
VAZ cars remain in demand in the domestic market today, as they have impeccable technical and operational characteristics. Moreover, such vehicles are affordable, economical and have good maintainability.
Every vehicle owner sooner or later encounters problematic engine performance. The power plant of a VAZ car is no exception - quite often malfunctions arise that require immediate elimination. Since failure to resolve the problem in a timely manner will entail more significant financial costs. There can be a large number of reasons that cause breakdowns, but some of them happen more often.
The main signs indicating the need to contact a specialist:
Engine repair or replacement: which is more appropriate?
When an engine fails, every car owner poses this question, since it has several goals: optimal cost and full restoration of the unit’s performance. One of the main disadvantages of replacing a motor is that purchasing a new one (and it is extremely difficult to find one now) will cost a slightly larger amount. That is why most drivers prefer repairs, which also have the following advantages:
• the ability to replace damaged or worn parts with higher quality elements with slightly modified configurations, which can increase previous power figures;
• the restored engine (subject to compliance with all rules and regulations) will not be inferior to the working life of the new unit, since it will correspond to the factory parameters and characteristics;
Typical faults and solutions
There are a number of breakdowns that provoke a complete or partial loss of engine performance. Each of them has its own specifics and causes, but all of them can be eliminated through a professional and careful approach.
Engine runs rough or stalls at idle
. In order to correct this problem, you should adjust the idle speed, replace the drain tube, and correct the gaps that have formed between the cams and camshaft levers.
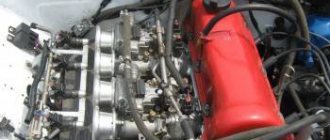
VAZ 2107 engine structure
The 2107 power plant can be called revolutionary for the line of car engines of the Togliatti Automobile Plant. This is the first of the so-called classic cars to receive an advanced injection system.
The “Seven” injection system operates in rather difficult conditions, with constant high loads, especially on our roads. For this reason, the engine requires good and timely maintenance. Even the slightest blockage will negatively affect the fuel supply, resulting in an increase in fuel consumption and a decrease in the efficiency of the internal combustion engine.
Lubrication system
One of the main areas of the VAZ 2107 engine is the lubrication system, which functions by supplying oil to the rubbing surfaces. Thanks to it, friction is reduced and the efficiency of the power plant is increased. Oil is filled through the oil filler neck, which is tightly closed with a lid. Old, no longer needed lubricant is drained from the system through another hole - it is closed with a rubber plug.
Important characteristics of the lubrication system:
- the system holds exactly 3.75 liters of oil, the level of which can be monitored using an indicator gauge;
- the pressure on a heated internal combustion engine at average crankshaft speed is 0.35–0.45 MPa;
- The lubrication system functions in a combined way - under pressure and by splashing.
The main problems of the lubrication system include:
- oil filter clogged;
- problems with crankcase ventilation;
- lubricant leakage through loose connections;
- destruction of crankshaft seals;
- problems with fluid pressure.
The reasons that cause problems to occur are quite varied. You must understand that long-term engine operation is directly related to the lubrication system - it determines the durability of the power plant. After all, even a short-term interruption in the supply of lubricant to the rubbing internal parts of the engine can lead to major repairs and even replacement of an expensive unit.
Cooling system VAZ 2107
It is designed to maintain the desired thermal regime of the motor installation by correlating the heat removal from the hottest components and parts. The “seven” operates a sealed liquid system with forced circulation. Some of its important components are the pump, expansion tank, heater core with electric fan and thermostat.
- The centrifugal pump is driven by the crankshaft. It consists of a cover supported by four studs and a body connected to the cover through a sealing gasket. The pump also has a roller with an impeller, rotating on a bearing.
- The expansion tank is integrated into the cooling system for a reason. The element accepts excess antifreeze, which, when expanded, tends to create high pressure that can rupture all hoses, tubes and radiator honeycombs. The same force is possessed by the vacuum discharge formed when the liquid cools (reduces). The expansion tank is designed to eliminate both phenomena. It is a durable tank element with a filler neck and fittings. A special role is played by the tank lid, equipped with valves to release excess pressure.
- The heater core is a structural part with two reservoirs and an iron core. It is installed on rubber cushions and fixed to the body of the “seven” with two bolts. The element is connected to the expansion tank in a sealed manner. Equipped with an electric fan activated by a sensor. On the “sevens” of the early year of production, an electric fan was not installed; the blades were mechanically rotated by the motor. In injection systems, the electric fan receives a command from the computer through a relay and an antifreeze temperature sensor.
- The thermostat maintains the desired thermal regime of the power unit and helps it start quickly. Equipped with two valves: main and bypass. Thanks to the thermostat, the engine warms up quickly.