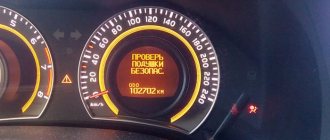
Why does the Airbag indicator light up on the instrument panel?
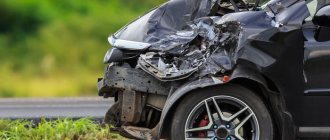
If the airbag light comes on, this means that there is a failure somewhere, and the problem may affect not only the airbags themselves, but also any other element of the on-board safety system.
If there are no breakdowns, when you turn on the ignition, the airbag lamp lights up and flashes six times. If everything is normal with the system and it is working properly, the indicator will go out on its own after that until the next start of the engine. If there are problems, it stays on. The system begins self-diagnosis, detects a fault code and stores it in memory.
After the first testing, after a short period of time the system tests its elements again. If the breakdown was determined incorrectly or the signs of the malfunction disappeared, the diagnostic module erases the previously recorded error code, the lamp goes out and the machine operates in normal mode. The exception is cases where critical breakdowns are detected - the system stores their codes in long-term memory and does not erase them.
Burning “Airbag SRS”, “Airbag”, or “SRS” indicator light: causes and solutions
So, for what reasons may the Airbag or SRS indicator appear on the instrument panel:
The integrity of the security guard is compromised - one of the most unpleasant options for a car owner. Due to a violation of integrity, the control unit may no longer receive the appropriate impulses from controllers, belts and other components of the safety system. There is a possibility that the seat belts themselves are equipped with a sensor that detects whether the seat belts are fastened; accordingly, if the driver or passenger is not fastened, the indicator on the dashboard will light up. This is necessary because the operation of the safety guard is relevant and most justified only in the case when the driver moves in a fastened state. In the event that an accident occurs, the PB will fly out at a speed of about 200 kilometers per hour, respectively, if the driver is not wearing a seat belt, this will correspond to hitting a concrete wall at a speed of 25 km/h. Given this factor, most vehicle manufacturers have programmed the PB so that if an accident occurs, it simply will not operate. And this, as you might guess, suggests that there can be no talk of any security. If you try to deceive the system by pulling straps behind the backs of chairs or using all kinds of emulators that will allow you to deceive it, it will be in vain. After all, this way you are only deceiving yourself; if a serious accident occurs, neither the driver nor the passengers will be able to survive because of this. Another problem is the lack of contact or very poor connection of elements in the power supply circuit of the PB. There is a possibility that the connectors are poorly connected. It is necessary to check the quality of the connection, as well as all contacts. Also, the indicator light on the dashboard may appear due to failure or damage to the shock controllers. They may also be poorly connected. We recommend checking the quality of the connections of the elements, as well as the connectors. But if all contacts are working, and the problem indicates a malfunction of the shock sensors, then these devices must be replaced quickly, otherwise there will simply be no point in the fact that the car is equipped with a power supply. One of the most common reasons is a broken door contact. If any repair work is carried out on the doors or they are changed, and the connectors are disconnected, then the contacts must be checked the next time they are connected. It happens that after reconnection the indicator still continues to light, this indicates the need to reset the control unit memory. Another reason is moisture ingress. If moisture gets on the electrical contacts or on the strap lock, it may cause poor contact or a short circuit. If you encounter such a problem, then the places where moisture gets in need to be dried. Failure or incorrect operation of the control unit. Perhaps the contacts on it also came loose. But if the problem lies in the unit’s board itself, then most likely it will have to be replaced. Safety devices. If these elements fail, the corresponding icon will also light up on the instrument panel.
But as practice shows, car owners pay attention to fuses last. Another reason why this problem may occur is when the seats or control panel are replaced. During replacement, the integrity of the wiring could have been damaged, in particular, we are talking about the connection points. In addition, a malfunction may occur as a result of violations when replacing the steering wheel.
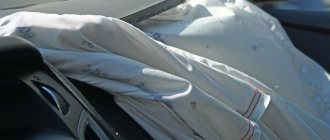
If during replacement you damage the contacts, the indicator will always light up. If the safety guards were triggered during a collision, and the indicator continues to light after they were restored, this indicates that information about this remained in the memory of the control unit. Removing the error will solve the problem. The service life of the PB has been completed. On average, the service life of airbags is about 8-10 years; after this period, car manufacturers usually do not guarantee the performance of the airbag. Low voltage in the vehicle's on-board network. First of all, you also need a generator device.
Loading …
Is it possible to restore it with your own hands?
Many car owners, realizing what expenses they will have to pay when contacting a car service center, decide to do everything themselves. To begin with, it is worth eliminating the option of using a dummy.
Even if you restore everything yourself, you will also have to spend a considerable amount of money on consumables. The restoration kit includes:
- new pillows in the required quantity;
- seat belts and squibs;
- shock sensors.
Such components are purchased in specialized stores, or are found at car dismantling yards. In the latter option, it is important that the donor car is not involved in an accident and the airbags do not deploy on it. But finding such a donor is not so easy.
You can physically replace all the components yourself. Problems arise precisely at the stage of setting up or flashing the control unit. It is strongly recommended to entrust this work to specialized specialists. Moreover, it is better to contact the official dealer of your car brand. There are a number of dubious workshops that do not guarantee the quality of the work performed. They are attracted only by the low cost of services. It is better to refuse them.
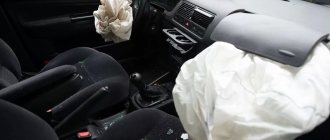
If an accident does happen and the airbag works, but you plan to continue using the car, get ready for a full restoration of the airbags.
Where are the airbags in the car and how do they work?
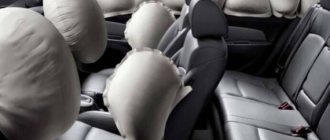
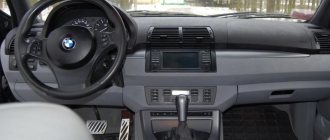
Before checking the presence and condition of protection devices in a particular machine, you need to find out their location. Depending on the make and model of the car, their design and quantity may vary, but in the vast majority of cars the main installation locations can be identified. The most commonly installed safety device is located in the steering wheel - it is intended for the driver. In inexpensive trim levels it may also be the only one. Another common location is at the top of the dashboard, for the front seat passenger. These two devices are combined into the “front-facing” classification.
Next are the location options that are found in more expensive or modern cars. These include side airbags located on the right and left in the cabin - they are called side airbags. Their function is to reduce the risk of injury to the pelvis, abdomen and chest in a collision. This type of protection is usually installed in the backs of the front seats or on the side, on the door side.
The next type of airbag is curtain airbag. They are designed to protect the head during a side impact. They first appeared at the end of the last century. Depending on the manufacturer, the head units (or "curtain airbags") are installed between the pillars at the front and rear of the roof.
Knee airbags are a system that reduces or eliminates injuries to the driver's and front passenger's legs. They are installed in the lower part of the dashboard - under the steering wheel and the glove compartment, respectively.
In the most advanced cars you can also find central airbags. They can be located in one of the armrests of the front row of seats, as well as in the middle part of the rear. The purpose of this system is to reduce the consequences of secondary damage.
In order to find protection systems in a specific car, you need to examine common installation locations. They should be marked Airbag or SRS - these are patented technologies that indicate airbags. This inscription is most clearly visible on the steering wheel. It is this system that is recommended to be inspected first. After unscrewing the cover, you need to check the presence of the system and the integrity of the wiring, as well as the condition of the squib.
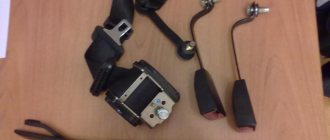
Airbags consist of several elements:
- a control system that transmits a signal during a collision and provokes deployment;
- an elastic sheath (most often nylon) that is filled with gas or air;
- gas generator system, which is a squib and a charge for it, ensuring rapid deployment.
Protection systems are divided into 2 types depending on the gas generator. The former are filled with air, the latter with special gas. Most often this is nitrogen or argon. There are also hybrid systems. The opening occurs due to the reaction of the ignited fuel - potassium nitrate, sodium azide or silicon dioxide.
Airbags are disposable devices. Once triggered, they deflate and rupture, needing replacement. That is why it is necessary to monitor their condition in a used car.
What kind of gearbox cushions are there on Kalina?
These parts are different, and we are not talking about airbags. The first thing that comes to mind is the gearbox support cushion. They are hydraulic and rubber-metal.
Kalina has a large number of such parts installed. These are engine mount cushions that reduce vibration from the power unit. There is a rubber suspension cushion for the muffler resonator. It serves to get rid of extraneous knocks from the exhaust system.
Shock absorber strut cushions also protect the suspension from rapid wear.
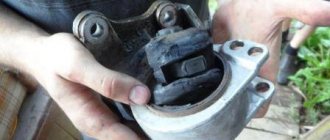
Kalina gearbox cushion
The Kalina is equipped with rubber-metal gearbox support cushions. This is a simple design consisting of two plates (metal), with rubber located between them. Classic rubber is fading into the background, so more wear-resistant polyurethane is actively used. It’s easy to guess why most car enthusiasts install this type of support.
The supports serve to reduce vibration that occurs as a result of the operation of the power unit and suppress extraneous noise, as well as to secure the gearbox to the body.
The rubber gasket is located in the rocker area. It is called the gearshift lever support pad.
Restoring the dashboard after the airbag deployed
Repairing the instrument panel after an accident is one of the most labor-intensive tasks in the SRS passive safety system. To replace the airbag and “sew up” the dashboard, you need to completely remove the dashboard. The most difficult thing to do is restore the appearance of the trim on the passenger side - if the plastic is sealed or sheathed with material carelessly, it will be noticeable.
Restoring the panel after the airbags are deployed is carried out in the following sequence:
- the negative terminal is disconnected from the battery;
- the glove compartment is removed;
- the instrument panel is dismantled;
- the fastenings of the instrument panel frame are unscrewed;
- the panel is dismantled and completely disassembled.
In this case, it is necessary to disconnect all the wires from the dashboard that interfere with removal, remove buttons, deflectors, etc. from the panel. Complete restoration of the dashboard with the installation of new airbags sometimes costs more than tens of thousands of rubles, so car owners are often offered to only restore the casing, without repairs and installation of airbags. But even such work is not cheap; many car owners try, if possible, to find a used instrument panel at car dismantling yards. As a rule, installing second-hand parts is cheaper than a complete repair, and besides, the original panel looks more natural - if the dashboard is restored, it is still noticeable upon careful examination. The restoration of the instrument panel after an accident is carried out by tuning studios; the work is divided into several stages:
- dismantling the dashboard;
- preliminary cleaning and treatment of the dashboard;
- sealing damaged areas using special adhesives;
- making patterns from material chosen by the customer;
- installation of covers on the restored instrument panel;
- Installation of dashboard, electrical connection.
At the request of the car owner, the instrument panel is decorated with decorative chrome elements or natural wood inserts, and an additional acoustic system is installed. The tuned panel looks very impressive, while all the defects that were previously present on the dashboard are hidden.
Recovery procedure
To restore the functionality of this security system, you need to spend a significant amount of money and time. Plus, the procedure requires appropriate qualifications from the master.
The gradual restoration of the airbag includes several procedures:
- replacing the squib;
- installation of new sensors;
- replacement or flashing of the control unit;
- restoration of the casing.
You probably won’t be able to do all this yourself. It is difficult and time-consuming, plus it requires a certain set of knowledge, skills and specialized equipment.
If you restore it yourself, there is a risk that the airbags will not work.
Therefore, the only correct solution in such a situation is to contact a special service center. Get ready for the fact that you will be asked for 4-5 thousand rubles to install the squib, and the torpedo will be restored at best for 8-10 thousand rubles. You will also need to reflash the control unit, which will cost about 3-4 thousand rubles.
The most difficult thing to restore are the cushions that are built into the seats. When triggered, they are torn apart. Therefore, you have to disassemble the chair and perform a complete reupholstery.
Airbag control structure
Modern airbag control systems are structurally simple and consist of the following elements:
- ECU (electronic control unit). Its main element is a three-dimensional accelerometer, which calculates the deceleration of the car when impacted on different axes. It must be borne in mind that the command for airbag squibs is issued only during sharp deceleration in a moving car, so complaints about allegedly faulty airbags that do not work at low speed are actually groundless. The control unit also reads information from a number of additional sensors described below.
- Shock sensors are an element of outdated Airbag systems that did not have an accelerometer built into the ECU. Such sensors were attached either in the bumper area, and responded to critical deformation, or in the front part of the cabin, and gave a signal about a sharp deceleration. They only made it possible to determine the fact of an impact in the direction where they were located, which is why they are not applicable on modern cars with many airbags that are triggered depending on the direction of the impact.
- Airbags. They consist of an elastic shell that is filled with gas when the squib is detonated by an electrical signal. The only airbag malfunction that the ECU can track is a significant change in the resistance of the squib ignition circuit relative to the specified one, that is, a short circuit or break. If the reason for the airbag warning light to come on is a detected open circuit, you can turn it off on a number of vehicles by removing this airbag or another element from the system configuration menu using a diagnostic scanner.
- Auxiliary actuators. The most common are seat belt pretensioners. They are squibs that, before the airbag deploys, press the person to the back of the seat. In this case, the pretensioner will work only in one case - if the seat belt is extended to a sufficient length (determined by the sensor located on the belt reel) and is latched into the buckle. A malfunction of any of these sensors will not only cause the warning light to come on, but also block the corresponding pretensioner.
- Additional sensors. These include seat belt sensors, the front passenger's front airbag switch, and so on. Their malfunction also leads to the registration of a corresponding error and the turning on of a warning lamp on the instrument panel.
- Wiring and connectors. The most common problems associated with them are mechanical damage. The most common malfunction of safety systems lies in a break in the connecting cable of the driver's airbag.
Steering problems
Mostly, problems manifest themselves in the form of looseness of the steering wheel itself, which leads to various inconveniences while driving a vehicle.
This is especially felt when driving on an uneven highway or dirt road, since the car itself in such a situation becomes unstable, and the steering loses its effectiveness. Lada Kalina was no exception.
There is nothing difficult in eliminating this defect. The main thing here is to understand the structure of the steering mechanism and try to understand what is located where. Having done this, you can remove the steering wheel on Kalina yourself, without resorting to the expensive services of service stations.
All parts installed in all series of these cars are characterized by increased resistance to damage, which makes them more reliable. In addition, depending on the year of manufacture of the car, additional devices may be installed in it to improve safety while driving.
Such devices include electric power steering, steering column and airbag. Their main task is to increase vehicle stability on the road and reduce the likelihood of injury in emergency situations.
Removing the airbag
To prevent the airbag from triggering, you must remove the terminals from the battery and then wait until the activator capacitor is completely discharged (at least 1 minute). During work, do not allow the airbag module to fall, get liquids on it, or heat above 95°C.
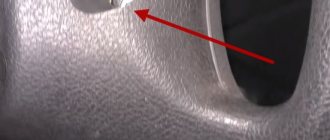
- Insert two rods (nails or screwdrivers with a diameter of 5 mm) into the special holes on the sides of the steering wheel, and then simultaneously compress the spring clamps of the airbag with them (for clarity, the photo shows two rods without the driver’s airbag). When the pillow module rises, the assistant should pull it towards him with his hands.
- Disconnect the two horn wires and the yellow block with the wires in the center by prying them up with a flat-head screwdriver.
- The photo shows the steering wheel and airbag of the Lada Granta.
Search
Lada Kalina
VAZ-1117, 1118, 1119
- 1st memory
- CDS key
- How does CDS work?
- Electronic anti-theft device
- Doors and seats
- Protective bag
- Salon
- control
- Dashboard
- onboard
- Lighting
- Light and wiper switches
- Ignition lock
- Internal heater
- Konyuk
- Circuit breakers
- Tire sizes
- Technical properties
- Passport details
- What's under the hood
- How to drive with air conditioning
- Replacing low beam
- Install racks and gears
- Firmware for viburnum brain
- Reviews after 2.4 years of operation
- What they fixed in 4 years
Steering column
Safety cushion (Airbag) Lada Kalina
Lada Kalina has a front airbag
driver (Airbeg) and in an embodiment. front passenger airbag and front seat belts with drawstring and load limiter.
When the airbag deploys, the front seat belts are tightened for a few milliseconds (to securely secure the driver and front passenger), and the airbags are filled with a special gas that opens and reduces the risk of injury to the upper body and head.
Aviation copes with frontal impacts.
Composition of the airbag accounting system:
- an airbag module, which is installed in the control column;
- airbag module for front passenger safety, located on the instrument panel above the glove compartment;
- seat belts with pre-tensioner and load limiter;
- a rotating device mounted on the steering column switch connector for connecting the horn switch and the airbag module to the on-board vehicle;
- Airbeg control and diagnostic unit, located in the floor tunnel of the housing under the device panel console;
- Airbag warning device on the device panel.
Kalina 2
I saw how a young man in the potassium water group was contacting how to remove
a mat with torpedoes, unfamiliar to the passenger.
Air power is making a big push forward. But you install airbags in some other situations:
- collision with a stationary converted obstacle at low speed (hitting the curb, edge of the sidewalk.);
- collision with a moving deformed obstacle at high speed (head-on collision with another car);
- which is expected to create quite a strong impact on the car in front (in other words, dropping the truck onto the deepest potholes, landing hard on yet another car drop off the ledge).
Airbeg does not work if:
- turning off the ignition;
- there was a minor head-on collision;
- automatic rollover is disabled;
- was the side of the car or the back.
MAIN!
The Airbeg only provides the best protection if the seat, backrest and headrest are positioned correctly, in which case the driver's (passenger's) entire back rests on the backrest and the seatback is pressed down so that the upright driver's seat bends slightly. Hands at elbows. you could hold the steering wheel.
Incorrect seating position when opening the airbag may result in injury due to other death as the airbag requires some space when filling with gas.
Airbeg is a separate, disposable device and does not even require maintenance while the vehicle is in use. After airbag
control module and airbags, belts with tensioners were replaced with special service stations.
Inflatable chamber pillow
The seat belt does not replace the seat belt, but only complements it, working with it in pairs. With seat belts removed during airbag deployment, the risk of serious injury at the other fatal end is high.
Never place any objects on the control wheel on the panel of another device as they may cause serious injury if the airbags deploy.
While driving a car, it is strictly forbidden to attach your forearm (palm) to the place where the airbag is installed. In addition, the front seat passenger should not stand on the panel of the device while driving.
Top of page
Source
Post Views: 22
How to dress correctly
The entire dressing process can be broken down as follows:
You need to start with the front seats. Carry out dismantling. Remove the headrest from the chair and cover it. First, the seat is put on. It is necessary to carefully straighten the eco-leather, only then place the chair on the side and secure the fasteners
It is important to tighten this part of the chair very well, since this is where the bulk of the load falls. If the tension is weak, wrinkles and folds will form on the chair. If the fastening is made from below, the upper part of the chair is put on like a sweater, but it is necessary to apply force, since the cut of the car cover is made exactly to size
Fasteners on the product made on the back of the seat are less preferred by drivers, as they do not look so elegant. The bottom of the car cover is secured under the seat, and it must be pulled tight. After the covers are put on, you need to install the covers on the previous areas and return the chair to its place. Putting on the eco-leather car seat cover for the front and rear seats is identical.
Before installation, be sure to read the included instructions. This will help avoid mistakes and avoid over-tightening the product.
The factory upholstery of the seats inside the car is subject to wear and tear. Eco-leather car covers will help protect the seats externally and significantly transform the car.
A big role here belongs to the correctness of putting on the cover. If you approach this work thoughtfully, it will take a little time, but the result will please you and your loved ones.
Even after a short period of use of a new car, the standard seat upholstery (especially light colors) loses its neat and attractive appearance. Dust, moisture, food and drinks will certainly leave their “traces” on it, which will then be quite difficult to remove even in specialized services that deal with professional dry cleaning of car interiors. Covers, which are best purchased immediately after purchasing a car, will not only reliably protect the seats from all these troubles, but will also give the vehicle interior an elegant look. How to put covers on car seats: videos, photos and recommendations for installing them are presented in this article.
How to check a car before buying
You can check the car's history before purchasing using online services. For example, through the all-Russian Internet service “Autocode”. Here you can get information in 5 minutes about whether the vehicle you are interested in was involved in an accident or not. If the car has been in a serious accident, it means that the safety devices have already been activated. But they replaced them with new ones or installed a dummy - it’s up to the potential buyer to check.
To become the owner of information about road accidents in which the car was involved, enter the VIN or state registration number. vehicle number in the search form on the main page of the Autocode website. Within five minutes you will receive information about the type and date of the traffic accident. In addition, the diagram will indicate the location of the most significant damage to the body.
In addition, a detailed report contains information about the former owners of the car, the history of registration actions, the actual mileage of the car, the dates of technical inspections, information about the presence of traffic police restrictions and other useful information about the vehicle.
To be completely sure of the desired swallow, you should inspect it for any technical problems. However, if you do not have enough experience, or you are in another city, an auto expert will do it for you! To do this, just leave a request for an on-site inspection service on the Autocode website.
Installing and removing airbags on a Lada Granta car
Of course, quite a large number of people are trying to compare two models of domestic vehicles. Firstly, this is a car with the beautiful name “Lada Kalina”. Secondly, this is also a domestic vehicle under an equally beautiful name - “Lada Granta”. It would seem that the models were produced at the same factory, and the elements are similar, but according to experts and the creators of the car, they are the complete opposite of each other. Actually, their internal structure speaks about the same thing.
In addition, it is worth noting that if we touch on the topic of safety on the country’s roads, then the second model is tens of times superior to the first. Perhaps this is why the popularity of the Lada Granta is so great. For example, let's look at the safety level regarding your vehicle's airbags. The model called “Lada Granta” was equipped at the factory with nothing more than airbags that inflate during a collision. In addition, there is a side airbag inside the cabin.
Of course, no one really cares about the airbag; it doesn't need to be cleaned, removed or changed unnecessarily. But you must admit that situations may arise that the driver or owner of the vehicle will have to remove the steering wheel, or simply disassemble it. What to do with the airbag in this situation?
Remember that before you start removing the steering wheel, and therefore disassembling the airbag, which was installed and mounted in it according to technical standards. First, you need to turn off your vehicle's engine ignition.
Secondly, it is completely natural to stop your vehicle. Thirdly, you need to open the hood of your car, and in our case, it is a Lada Granta, and pull out the negative terminal of the car battery. Why, you ask? All for the same thing, that no short circuit occurred. If you do not do this and a short circuit still occurs, then most likely you will need to completely change the on-board computer, which will lead to large financial costs.
Please pay attention to one more important point in this procedure. Look carefully at the position in which the wheels of your vehicle are standing (which means they have already stopped)
Remember that they must be located in a straight position.
Now you can proceed to the next stage of working the steering wheel of your vehicle. It is necessary to unscrew several bolts that are located on the side of the car's steering wheel. Remember that they are the ones that serve as fastenings for the gas generator module, which together with the steering wheel represent a single picture, or, to be more precise, a single structure. In the event that the module does not work, it must be placed on a flat surface, so that its cover is positioned in the upward direction.
After this, you need to unscrew those screws that are responsible for fastening the steering shaft, and using a Phillips screwdriver you can perform this procedure. Remember that you must remove the O-ring along with the switch. And only after this it is necessary to carry out work that is associated with the process of disconnecting the harnesses and wires of the on-board computer network.
The final stage of the disassembly technique will be to remove the steering wheel shaft; this can be done using a flat-head screwdriver. You can then remove the airbag and, if necessary, replace it with a new airbag. Then install it in its “native” place
Now note that the wheels of your vehicle are level and the negative terminal of the car battery has been removed, the first thing you need to do is install the steering shaft and connect it to the “original” device. Then it is fashionable to dismantle the red transport key
After this, you need to install the washer system levers, as well as the alarm system of your vehicle. Once everything is done as described above, all you have to do is thread the two wires through the hub at the front of the steering wheel and carry out the final process of assembling the steering wheel in the reverse order of how we disassembled it.
Front seat backs
Regardless of the design features of the front seats (and the make of the car), covers on the backs of the front row seats can be easily installed without removing the seats. How to wear it correctly:
- First, remove the headrest. Pull the cover over the back of the seat. Don't worry about the so-called "drum" on the front side. The fact is that the material of the cover does not follow the geometry of the seat back. Everything will be fixed later.
- We tighten the lower “tongue” so that the cover sits on the back “like a glove” (that is, the geometry of the seats and the elements of lateral support are fully outlined). Since the back of the backrest covers is made of a thinner, well-stretchable material, this will not be difficult to do.
On a note! Don’t be afraid to apply force when pulling - it’s almost impossible to tear the cover with your hands.
Having achieved complete adherence of the cover to the back of the seat, we drag the “tongue” into the gap between the seat and the back.
We fasten it with rubber bands and hooks to the bottom (again, by the technological holes or metal elements of the chair).
What to do with worn seat belts?
The seat belt squib often deploys along with the airbag. There are two options here - turn to specialists or do the work yourself.
In the second case, the sequence is as follows:
Move the front seat forward as far as possible; Unscrew the blind edge of the belt from the body part; Disassemble the lower edge of the rack trim (the mechanism is located there); Pick out the plug on the adjustment mechanism; Remove the rack trim to check the level of wear; Carefully unscrew the belt and push it away from the adjuster; Remove the device and discard the system connectors; Remove the cover and locking assembly; Under the steel plate there is a mechanism with a return spring. The latter, when the squib operates, is triggered, jumps out of its place and fixes the belt; Compress the springs and put everything back in place.
Bottom of front seats
First we put on the lower part of the front seat cover. How to wear:
Carefully lay out the element on the seat, straighten it into the gap between the seat and the back and forcefully pull it down.
Next, we put fastening hooks on the elastic bands sewn around the perimeter of the lower part (they are included in the delivery kit). We put our hand under the seat (if we decided to install the covers without dismantling the seats). We find the technological elements of the car to securely hook all the hooks around the perimeter of the lower part.
Attention! Be careful and careful! Do not attach hook elements to electrical wires or other electrical wiring elements. After all the elastic bands are secured with hooks, we smooth out the installed part of the cover again, if necessary, tighten it down in the necessary (or bristling) places
If in some places the cover is not secured tightly enough, put your hand under the seat again and rearrange the fastening hooks so as to increase the tension of the included rubber bands
After all the elastic bands are secured with hooks, we smooth out the installed part of the cover again and, if necessary, tighten it down in the necessary (or bristling) places. If in some places the cover is not secured tightly enough, put your hand under the seat again and rearrange the fastening hooks so as to increase the tension of the included rubber bands.
Next, carefully cut a hole for the backrest tilt adjustment knob (if your car is not equipped with an electric drive) and place the edges of the fabric under the plastic plug.
After you put on the lower part, you can start arranging the back.
Remove the steering wheel of a Lada Granta with an airbag
The work is shown on a car equipped with an airbag. On a car without an airbag, the work is easier; you only need to remove the steering wheel pad.
To complete the work, you will need a special puller to remove the airbag and a new steering wheel nut. If you don’t have a puller, you can make one from an old slotted screwdriver with a blade width of 5-6 mm. To do this, you need to make a small groove in the middle of the blade.
1. Prepare the car for work, remove the terminal from the negative terminal of the battery.
On a vehicle equipped with an airbag, to prevent the airbag from deploying, wait at least five minutes after disconnecting the battery before continuing to operate. Place the removed airbag module with the actuator down and away from the workplace.
2. Set the front wheels of the car to the straight-line position.
3. Using a homemade puller through a hole in the steering wheel upholstery. . first on one side and then on the other, squeezing the outer tendrils of the spring clips (for clarity, the airbag has been removed).
. release the two airbag module holders.
4. Moving the airbag module away from the steering wheel, disconnect the ends of the two wires.
5. Use a slotted screwdriver with a thin blade to release the wire block retainer.
6. Disconnect the wire connector from the airbag module.
7. To avoid injury in the event of inadvertent deployment of the airbag, place the removed module away from the workplace with the decorative trim facing up.
8. If necessary, install the steering wheel in the previous position. Using any available method (marker, felt-tip pen, thin chisel) we make installation marks on the shaft and steering wheel.
When removing the steering wheel, the moving part of the slip ring is not automatically locked against rotation. As a result, the central position of the moving part of the ring may be disrupted during assembly. In this case, there is a high probability of damage to the contact ring when turning the steering wheel to one of the extreme positions. To secure the ring, the steering wheel is equipped with a special stopper.
And on the slip ring there is a special hole. By inserting a stopper into this hole, you can fix the moving part of the slip ring in a certain position.
When disassembling, it is necessary to lock the slip ring and not remove the lock until the steering wheel is installed on the steering shaft.
9. Insert the stopper into a special hole to fix the slip ring.
10. Using a 24 mm socket wrench with an extension, unscrew the nut
fasten the steering wheel and leave the nut on several turns of the shaft thread.
11. Using successive palms on the rim of the steering wheel on the right and left sides, we knock it off the shaft splines.
12. Having unscrewed the nut, remove the steering wheel from the shaft, while pulling out the slip ring wires along with the pads from the hole in the steering wheel hub.
We install the steering wheel in the reverse order, aligning the previously made marks and installing a new self-locking nut. Steering wheel fastening nut with a torque of 32-51 N m (3.2-5.2 kgf-m).
If it is necessary to install the steering wheel in a new position (for example, if the spokes are inclined when the car is moving in a straight line), put the wheel on the shaft and secure it with a nut without tightening it completely. After driving straight a few meters, make sure it is in the correct position. If necessary, move the steering wheel to the required number of splines and tighten the nut.
1. Prepare the car for work
2. Use a Phillips screwdriver to unscrew two screws on both sides of the steering column.
Using the same screwdriver, unscrew the two screws securing the linings to each other 2 and the three screws I securing the lower lining to the steering column.
3. Move the steering column locking lever down until it stops and lower the steering column. Remove the ignition switch trim.
4. Remove the bottom trim by pulling the lever through the hole.
5. Remove the upper steering column trim.
Install the covers in reverse order.
The driver's airbag (gas generator module assembly) is dismantled when the steering wheel is removed, or to replace the airbag contact ring or sound signal. If this is the first time this process is performed, it is recommended to invite an assistant. On Lada Granta, Lada Priora and Lada Kalina 2, the driver's airbag has a different shape, but the removal process is no different.