The consequences of a crack in the cylinder block and methods for detecting it depend on its location. Among the main symptoms are the appearance of an emulsion in the coolant reservoir or sump, increased pressure in the cooling system and, as a result, engine overheating. We will talk about the causes and consequences of cracks in the cylinder head/cylinder head walls, which method is better for detecting microcracks and whether this can be done without disassembling the engine. We will separately consider repairing cracks in the cylinder block, in which antifreeze leaks along the outer part of the cylinder block.
Causes of microcracks
Almost all causes of microcracks in the cylinder block (BC) and cylinder head (cylinder head) are the result of abnormal operating conditions or unqualified engine repairs. These include:
- motor overheating. We are talking not only about overheating, during which the coolant boils and the arrow of the engine temperature indicator rises to the red zone, but also about local overheating. The latter occur when the ignition angle is incorrect, a faulty injector, incorrect settings of gas equipment (LPG), as well as in the case of other factors that provoke detonation and increased temperature in the combustion chamber;
- sudden temperature change. Most often, “thermal” shock occurs when large amounts of cold water/antifreeze are added to an overheated engine.
- internal mechanical influence. Occurs when water freezes in the engine cooling jacket or the CPG is destroyed and parts of the connecting rod and piston group (CPG) hit the cylinder block;
- violation of engine repair technology. For example, on some cars, if the cylinder head bolts are tightened too tightly, a microcrack may appear on the cylinder block near the threaded holes of the bolts.
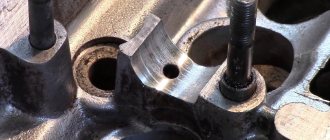
In the cylinder block, microcracks appear in the areas where the cylinder head bolts are screwed in, between the oil circulation channels and the cooling jacket, along the plane of contact of the cylinder head with the cylinder head between the oil and water channels. Cracks in liners are also widespread, through which antifreeze enters the cylinders, and during operation, exhaust gases penetrate into the engine cooling jacket.
A cylinder head crack is most often found between the valve seats, between the seat and the prechamber, as well as along the exhaust valve seat and along the camshaft beds.
seal holes in a cast iron cylinder block with what?
#26 Albertik
Helmsman 1st class
- Main crew
- 948 messages
- From: Tolyatti
- Vessel:
Comfortina 32 - Title:
Antila
- Top
- Answer
- Quote
#27 Sasha240255
- From: Moscow region
- Vessel:
Process in progress. - Title:
“Mikhail Svetlov”
Then I’ll try to cut off the welding seam protruding beyond the plane of the wall with a grinder and put a cover on top with bolts with a gasket made of rubber or paronite with ordinary sealant. Are there any special features for drilling cast iron with an electric drill and cutting threads in cast iron?
- Top
- Answer
- Quote
#28 felt boots
- From: Rechnovsk
Welding on cast iron is a complete mess, it’s the same as welding on clay. In addition, strong stresses appear. They tried to weld in vain, now drilling in these places will be very problematic. Yes, I am repairing cast iron blocks. There are almost no hopeless cases. The best way, but the most painstaking process is drilling along a crack, cutting threads and screwing in screws. First (using the example of a 10 thread) you drill holes through 16 mm (between the drilling centers), cut the thread and screw the pins onto the red thread lock, use a grinder to cut them off at the root. Then between You drill them again, screw them into the ceiling and cut them off. It turns out great. But in your case, after a failed welding, this method is no longer realistic - the cast iron will be as good as the winner - the drill won’t hurt. Bend the plate along the profile, drill around the perimeter and onto the bolts. A good quality one for the plate sealant, just not borscht. Apply it (sealant), wait until it cools, press the plate with bolts so that the sealant is two millimeters thick, and the next day stretch evenly.
Post edited by felt boots: April 12, 2010 - 20:42
- Top
- Answer
- Quote
#29 Albertik
Helmsman 1st class
- From: Tolyatti
- Vessel:
Comfortina 32 - Title:
Antila
- Top
- Answer
- Quote
#30 chainik
- From: Russia
- Vessel:
motorboat 11x3.1 m
There is no need to cook anything. Now there is a sealant for blocks, 2-component, I can name the brand tomorrow, I have it in the trunk. You make a patch from aluminum, adjust it to something not on the block with a hammer, periodically lean it against the block, the cracks also need to be covered, they will split when heated, that is, fit it dry, lean it against the block, drill a hole for M5, no more, suddenly the wall is thin, coat the patch with sealant, put it on the screws, and forget that there was once a hole in the block. I glued a hole in the head in the Saab 2 months ago, no problem . Sincerely.
Post edited by chainik: April 13, 2010 - 06:32
- Top
- Answer
- Quote
#31 chainik
- From: Russia
- Vessel:
motorboat 11x3.1 m
judging by the sketch, the channel is not affected. But I froze the piece that fell out using the same “thin” method, it turned out wonderful
the channel is not affected, just do not tighten the bolts along the lower horizontal part of the patch, they will fall into the channel. Do you recommend installing a gasket, just a layer of sealant?
2All: they welded with special electrodes for cast iron, bought individually, and I went to two construction markets and bought one electrode for cast iron of different brands there, after which I brought them to the welders and they tried to weld a piece of cast iron broken out of a block with each, and then I bought several electrodes of the brand that has proven to perform best. Naturally, the inverter was cooking with direct current and the polarity was set correctly.
Post edited by chainik: April 13, 2010 - 06:36
- Top
- Answer
- Quote
#32 Byi
Helmsman 3rd class
- From: Pongoma village
- Vessel:
Karbas (self-built) - Name:
karbas
- Top
- Answer
- Quote
#33 volatile
- From: N. Novgorod
- Vessel:
Kostromich 1606 - Title:
Selfless
It happened that I missed the moment of draining the water and for a couple of days it was -15 and my cast iron block cracked. in the area of the 1st cylinder liner, a cast iron plate was squeezed out from the inside along a crack in the shape of the letter “P”. I broke the plate because... It was also cracked lengthwise, so I cut out a patch from the old stove lid and tried to weld it. first with a semi-automatic device with a carbon dioxide cylinder, but due to the length of the power cable there was not enough power for the device (it was not possible to drive the boat to the place where there is power near the water and it was not possible to drive the car with the cylinder there due to the lack of such a place), then they welded inverter with electrodes on cast iron. It was welded, but due to local overheating at the welding site, many cracks formed around the seam. I’m planning to seal them with some kind of material such as sealant or glue that is resistant to temperature changes - please suggest such a material. engine 4H 10.5/13.
- Top
- Answer
- Quote
#34 Albertik
Helmsman 1st class
- From: Tolyatti
- Vessel:
Comfortina 32 - Title:
Antila
the channel is not affected, just do not tighten the bolts along the lower horizontal part of the patch, they will fall into the channel. Do you recommend installing a gasket, just a layer of sealant?
- Top
- Answer
- Quote
#35 Ya&R
- From: Our Palestines
- Vessel:
Colander with handle - Title:
Oh, of course!
Post edited by Ya&R: April 13, 2010 - 13:41
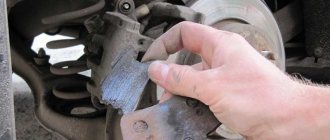
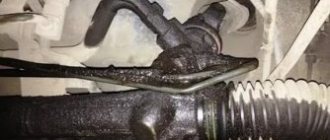
Block crack from outside
In addition to internal microcracks, there are also external splits that lead to antifreeze (less often oil) getting out of the engine block. Most often the reason is a manufacturing defect in the cylinder block. There are cases in which the engine block cracked after the tightening torque of the gearbox bolts was exceeded or it was improperly mated to the BC.
The problem of manufacturing defects is well known to owners of Suzuki cars with a 2.4 liter gasoline engine produced between 2008 and 2010. Already on short runs, antifreeze leaked out of the engine through a crack in the cylinder block. And although the recall company’s practice was not applied, if a malfunction occurred during the warranty period, the owners had the BC replaced free of charge.
Audi 1988, 75 l. With. - just
Biysk
Audi 80, 1988
65 000 ₽
Omsk
Audi 80, 1990
120 000 ₽
Barnaul
Audi 80, 1989
45 000 ₽
Funny
Audi 80, 1989
75 000 ₽
See more cars on Drome
Participate in the discussion can only registered users.
Login Register
Signs and consequences
The consequences and symptoms of a crack in the head or block greatly depend on the area where it occurs. If we talk about the most common cases, cracks between the oil channel and the cooling system jacket lead to mixing of liquids. A brown coating forms in the expansion tank, and the oil on the dipstick has a milky tint. In both cases, we are talking about an emulsion that appears when engine oil and coolant are mixed.
Oil diluted with antifreeze loses its lubricating properties, which increases the coefficient of friction between moving parts and increases the risk of scuffing. It is strictly prohibited to operate the vehicle while doing this.
A crack in the upper part of the liner leads to abundant exhaust gases entering the engine cooling system. An oily film may appear on the surface of the coolant in the expansion tank. The air pockets that appear in this case disrupt the coolant circulation, as a result, the engine overheats. While the car is idle, antifreeze will accumulate in the defective cylinder, making it difficult for the engine to start, and in the first minutes of operation, thick white smoke will come out of the exhaust pipe.
If there is a significant leak, the coolant may not have time to flow through the piston rings into the sump and accumulate in large quantities in the cylinder. The consequence of long attempts to start an engine with such a malfunction can be a bent connecting rod.
If there is a crack in the cylinder block along the bottom of the liner, when the piston lowers, the pressure in the cylinder decreases, which is why exhaust gases practically do not break into the engine’s water jacket. In this case, while the car is parked, coolant enters the pan through a leak in the liner and forms an emulsion on the oil dipstick. In both cases described above, increased antifreeze consumption is observed.
We weld a patch to a crack in the engine head
You can also weld a patch, for this you will need copper electrodes wrapped in tin. Finally, the seams must be coated with epoxy paste.
The epoxy paste that we have already mentioned can be used to repair cracks in the head and engine block in another way. To do this, you need to clean their surface, drill small holes at the ends of the crack, then cut threads into them and screw in copper or aluminum plugs flush. Then you need to degrease the surface (acetone or gasoline are suitable for this). Then, using a spatula, you need to apply layer by layer, as a result you should get a layer 3-4 millimeters thick. After this, the epoxy should harden within 24 hours, and if you create a hundred-degree heat, it will harden in a couple of hours. Finally, sand the surface and you're done!
For the third method of eliminating cracks, we will again need epoxy paste and fiberglass, which we will use as a patch. The preparatory stage for work is similar to that presented above, only each layer of paste must be alternated with fiberglass. Do not regret it, make a patch with a margin of a few millimeters, otherwise the result will be unsatisfactory. The last layer should be epoxy.
And the final option for today, but not the last in the general list, is the option of resuscitating cracks in the block and engine head - using pins. To do this, at the very beginning we drill holes throughout the crack at a distance of 7-8 mm from each other. We cut the thread and screw in the copper rods to a depth corresponding to the wall thickness. Then we cut them with a hacksaw, leaving the ends protruding a few millimeters above the surface of the parts. Afterwards, with gentle blows, we hammer out the ends of the pins, which form a continuous seam. To consolidate the result, you can finally coat it all with epoxy.
We have described the most suitable options for eliminating cracks in the head and engine block on your own, however, the troubles with the car, unfortunately, do not end there; problems may still arise when the camshaft wears out, as well as when working on the shock absorbers. In any case, do not despair, all this can be easily fixed with your own hands, just by following our simple recommendations.
How to detect a crack?
There are several ways to check the cylinder block or cylinder head for a crack.
- Visual inspection. The method is mainly suitable for searching for external cracks and significant leaks in the liner. Ineffective when searching for microcracks and hidden defects.
- Hydraulic crimping method. Most often used for troubleshooting cylinder heads and cylinder blocks, as it is ideal for parts of complex shape with internal cavities and channels. During testing, all external openings of the block head/BC are hermetically sealed. Through a special adapter, compressed air is supplied to one of the water-filled zones at a pressure of 0.6-0.8 MPa. Often, signs of a microcrack begin to appear only when the engine is warm. To increase accuracy, hydraulic tests are carried out in a bath with water heated to 90-95ºС. In the event of a crack, fluid from one channel will penetrate into the adjacent zone. When crimping liners, the piston should be set at bottom dead center (BDC). Through a special mandrel, compressed air is supplied directly to the cylinders. In this case, adjacent channels are filled with water and in case of hidden damage, compressed air will bubble out through the water-filled channels.
- Color flaw detection method. A colored penetrating pigment is applied to the element under study. The part is washed and then treated with a contrast developing solution. The outline of the crack is revealed by the color of the pigment against the general background of the solution. Color flaw detection allows you to detect microcracks up to 0.001 mm wide and is suitable for searching for defects in parts made of any material.
- Magnetic flaw detection (available for cast iron and steel parts). The part is magnetized and then sprinkled with ferromagnetic powder or suspension. In the microcrack zone, the magnetic field is non-uniform, which is why the contour of the defect appears as an accumulation of ferromagnetic material.
How to repair damaged areas
Sealing by electric welding
Drill out the cracks with a drill so that they do not go further and begin to grow during work. Sand.
We heat the block to 600-650 degrees. For embedding, we use a filler rod made of a cast-iron-copper alloy, 5 mm in diameter, and flux. Protect the seam from oxidation using borax.
There should be an even layer on the surface of the engine block with a protrusion of no more than 2 mm. After this, cool the block in a heating cabinet.
Arc welding
In this case, heating the block is not required. Electronic wire is used as a filler material. Argon is used as a welding medium. Do not allow overheating above 60 degrees.
Sealing cylinder head cracks
Heat the head to a temperature of 200 degrees. We use an acetylene torch for this. Sealing is carried out using direct current. The diameter of the electrode is selected depending on the width and thickness of the wall.
Welding the patch
We select a piece of metal the size of a crack. We wrap a tin around copper alloy electrodes and weld the patch. We sand and finally coat with epoxy paste.
Application of epoxy paste
Cut the crack by grinding and drill the ends of the cracks with a drill with a diameter of no more than 85 mm. Place copper plugs into the holes. We make a notch along the outlines of the cracks to create an artificial roughness.
We degrease the surface using acetone and heat it with an infrared lamp to a temperature of 80 degrees. Apply epoxy paste to the fracture in the following sequence:
- 1 layer 1 mm,
- the second 2-3 mm,
- third 3-4 mm.
Maintain for 24 hours at a temperature of 20 degrees, then it is necessary to dry the repair area in a drying chamber at a temperature of 90 degrees for one hour. After drying, clean the glued area and level it by sanding.
Repair methods
Shallow microcracks on the planes of contact between the cylinder head and the cylinder head, as well as almost all defects on the outside can be repaired. External splits can be repaired using cold or electric welding. “Cold” welding means applying a special polymer composition to the defect. Before repairing, it is necessary to thoroughly clean the area around the defect, and it is also advisable to drill the ends of the crack to remove residual stress and prevent further splitting of the part.
Removing cracks in the block and cylinder head using electric welding requires preheating the part. Aluminum parts are heated to at least 250ºС, and cylinder blocks made of heavy metals, which include cast iron, to 350-400ºС. This minimizes the risk of local deformation of the part in the welding area. Before heating and melting the defect, the crack in the cylinder head/cylinder block is cleaned with abrasive, and its ends are drilled to relieve residual stress. Using this method, you can remove not only microcracks, but also restore missing parts of the part and weld broken brackets.
Seal
Advantages over traditional crack repair methods:
- the part being restored is not exposed to high temperatures;
- there is no need for a furnace to gradually cool the part after heating;
- there is no possibility of a new crack arising due to the appearance of residual mechanical stress in the weld area;
- reliability of the seam under thermal and dynamic loads;
- the presence of additional seam sealing;
- significant reduction in repair time;
- the ability to eliminate cracks and breakdowns without dismantling or disassembling the engine.
There are limitations to the use of this type of repair, such as the small thickness of the part being restored and insufficient access to the crack.
We weld a cast iron engine block
Any car has a cast cylinder block. The main malfunction of these motor parts is the appearance of cracks, which can be eliminated by welding. How to weld a cast iron car engine block? This procedure is quite complicated. When performing welding work, it is necessary to achieve both the tightness of the product and the restoration of its physical characteristics.
The engine block is the most important component of any modern car. There are many work processes associated with this element that affect the speed and power of the vehicle. Due to its low melting point, cast iron is used to produce this element. Using cast iron, you can cast parts of varying design complexity, even with the smallest elements.
Repairing a hole in the crankcase
A hole the size of a fist in the crankcase of an eight-cylinder block from a URAL fire department. The cylinder head has no defects - just a hole in the crankcase. The weight is more than 100 kilograms, it will be painful to turn, which means we will repair the unit from the outside.
We install a 1.5 mm closing steel plate and press it firmly against the crankcase wall. Do not forget about surface preparation; before spraying, treat the surface of the block with abrasive K-00-04-16 (aluminum oxide). Then we fill the deep cracks in mode “4” with composition A-20-11, since there was no supply of C-01-11 powder, there is still no difference, the tightness is ensured.
But! Do not skimp on the supply of consumables - such replacement is not always adequate. Then, after filling the deep cracks, in mode “3” they laid an even layer.
The thickness of the coating is about 1.5-2 mm, not very aesthetically pleasing, but firefighters are interested in the guaranteed tightness of the block after repair, and this is fair. So, after using 250 grams of powder and spending 2 hours, the block is ready for installation.
Features of the material used for the manufacture of cylinder blocks
Car engine blocks are usually cast from cast iron. This material is an alloy of iron and carbon, the content of which is 2.14%. This negatively affects the quality of the connection. Main difficulties of the process:
- formation of pores and cracks;
- the appearance of hardened structures during processing, the tool used quickly becomes dull;
- As a result of overheating, the thin material crumbles.
Cast iron may differ in composition:
- gray cast iron is a malleable, high-strength material, easy to process, limited weldability;
- white cast iron is a fairly hard and brittle material that can be ground, but cannot be welded.
Welding technology
Now let's talk in detail about how to weld a crack with your own hands. Parts are pressed out at the site of damage. The defect is discovered after hydrotesting; for convenience, the crack is marked with a thick chalk solution. 5 mm holes are drilled at the ends.
To weld a cast iron block you will need:
- welding machine with current regulator or inverter;
- 2–3 electrodes, it is better to purchase universal Zeller 855;
- chamfering tool;
- brush and hammer for cleaning the seam and removing scale.
The crack must be welded using the following technology:
- The seam area is cleaned to a shine and degreased.
- Flux is applied to both sides of the edges, protecting the cast iron from heating.
- The repair area is heated by a gas burner evenly and gradually, the direction of movement is along the crack.
- The seam is formed in small sections, up to 15 cm long per pass.
- The resulting seam is heated for about five minutes so that the metal cools slowly. When subjected to sudden cooling, it will become brittle and will not withstand the workload.
- The scale is carefully knocked off, and after a visual inspection the joint is well cleaned, especially if the chip is in contact with other parts.
By forging each roller separately, you can immediately eliminate possible defects.
When a defect is found on the engine block, do not rush to replace it. It is better to consult with specialists whether it makes sense to undertake repairs. It is possible to weld a block crack with cold metal in a garage. You need at least basic welding skills to get the job done accurately. Some service stations provide welding services for internal combustion engine blocks; this is much more expedient and cheaper than completely replacing the engine.
Repair of the combustion chamber of the “TOYOTA” cylinder head
The meeting between the piston and the valve did not please the owner at all. The engine started knocking - the combustion chamber of the TOYOTA cylinder head was broken. Buying new?
No, of course, because for DIMET, repairing a cylinder head with this damage should take no more than an hour.
Everything is in the standard sequence: we remove all these ridges and saggings that appear as a result of the “meeting” manually with a milling cutter and expand the nicks, then with abrasive in mode “3”, there are no narrow cracks and cavities, then we apply A-80-13, if there is - better A -20-11, apply with a margin of 1-1.5 mm. Everything took 25-30 minutes. They took it for milling - another 15 minutes. The cylinder head was repaired, as expected, in an hour.
Our email: [email protected]
The problem of repairing cracks in a cast-iron cylinder block in a car service center, and repairing defects in cast-iron parts in general, is very acute.
Cast iron is a treacherous metal, the high carbon content (from 3% to 7.5% in the form of cementite Fe 3 C) makes it low-ductility and difficult to weld, so repairing cast iron products is very delicate. We'll show you the basic principles of coating when repairing heads
cast iron
car cylinder blocks
(cylinder heads) using DYMET® installations.
The photographs below show repaired DYMET® cast iron cylinder blocks and show the stages of the work.
To begin with, we will carry out preliminary preparation of the cylinder head for repair - we will “fix” and then “cut” the defect in the cast iron block
.
This means that, using a milling cutter or other tool, we create
a small groove about 1.5-2.5 mm deep on a crack in a cast iron block
. In order to prevent the crack from spreading, we drill along the edges. Important! – A crack in a cast iron block
should not move when heated, so we fix it with pins or welding at one or more points.
Next, to increase adhesion, it is necessary to give the surface the roughness necessary for the spraying process. Good roughness and adhesion are the basis for reliable adhesion of the coating to cast iron. To treat the surface of the cylinder head, we use the abrasive composition K-00-04-16, that is, we hit the surface with abrasive powder until the roughness suits us - when the cast iron becomes “white” and adhesion increases. If repair work is on stream, it is advisable to use an SD-6 abrasive blasting machine for abrasive processing. You can increase adhesion by applying a thin layer of coating in 3 (third) or 2 (second) mode of operation of the device to the places for future coating on the cast iron block head
cylinders
Let's start filling the crack
composition A-20-11 in 4 (fourth) mode along the entire length of the previously prepared groove. Powder composition A-20-11 perfectly covers cracks and holes. The spraying process first involves the growth of tubercles at the edges of the crack, then the crack is closed.
So, instead of a crack-groove on the surface of a cast-iron block, we have a mound of sprayed metal. It is necessary to carefully cut off the excess coating to the base metal with any proper tool; if we remove a little more, it’s not a big deal, since after that we apply the final sealing coating. To do this, apply to the filled crack in the cast iron block.
in modes 2 and 3, copper composition S-01-01), or copper with zinc (composition S-01-11). But the already familiar A-20-11 composition is also suitable for us.
When repairing a crack in a cast iron cylinder head
the part is slightly heated by hot air, fifteen minutes is enough to cool down.
After 15 minutes, we perform quality control of the repair and sprayed coating. If the preparation of a crack in cast iron
for spraying was not proper (the vast majority of cases are due to poor tack), then we will see a hair-thin crack.
If the crack is quite long (the assessment comes with experience), it is necessary to “cut” and spray again. For short cracks,
we get by with drilling.
Note that the cost of consumables, energy and labor when repairing cylinder head and cracks in cast iron blocks with DIMET® is negligible compared to the cost of new parts.
For your attention, a review of the repair of the cylinder head of Motorservice LLC:
Find out the cost of DYMET devices for cylinder head repair by filling out the form below. Please indicate your region, field of activity, and your email address for a response. Thank you!