Many motorists have encountered the problem that the gearshift lever begins to dangle. What is the reason for this phenomenon? You can immediately determine that the problem lies in the mechanics of the link between the lever and the gearbox. The article will tell you how to fix the problem and tell you about some of the nuances of the process.
Video about how the gearshift lever on a VAZ-2114 can dangle:
The video will tell you how to eliminate a loose gear lever.
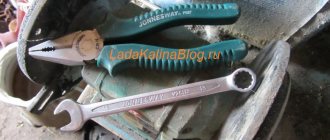
Tool for repairing gear knob fastening
In this article we talk about this lever.
Before starting any repair and restoration operations, the motorist needs to collect tools. So, to eliminate the looseness of the gearbox lever you will need: a 13-size wrench and sandpaper.
The gearshift lever is loose: replacing the bushing on a VAZ-2114
Fearing that repairs will take a lot of time and effort, many car enthusiasts postpone it indefinitely or pay huge sums to a car service center. But, in fact, as practice shows, the procedure itself takes little time and almost every car enthusiast can handle it on his own.
So, let's consider the sequence of the process step by step:
- We lift the gearshift knob casing or dismantle it altogether.
We remove the gearshift knob cover.
Unscrew the nut securing the gearbox linkage
Disconnect the rod from the gearshift knob
Worn parts of the gear lever bushing
Video about getting rid of vibration on the gear knob
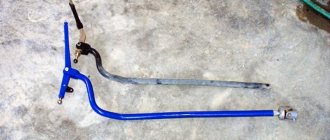
Short-throw rocker for VAZ 2114, do-it-yourself adjustment
Over time, almost everywhere possible, backlash begins to appear on cars produced by AvtoVAZ. The gearbox is no exception. It is not surprising that replacing the rocker on a VAZ 2114 has become a routine procedure familiar to all owners of this model.
Set
Determining the malfunction is quite easy:
- Gear shifts with problems, indistinctly;
- The gearbox is loose.
If such a malfunction occurs, a complete replacement of the element may be required. Moreover, many are switching to a short-throw rocker, which gives the car a more sporty character. This technology was borrowed from motorsports. By the way, a simple adjustment can turn it into a short-stroke one.
Some masters argue that it is not always wise to completely change. It is more profitable from a financial point of view to purchase a repair kit. But in fact, such repairs do not give the desired result, and after a while the link will still have to be changed.
Causes of gearshift lever failure
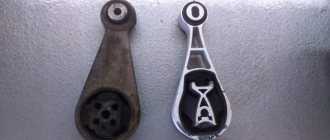
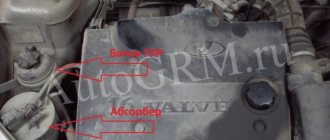
The VAZ 2110 high-speed gearbox is equipped with mechanisms that are designed to withstand heavy loads. The VAZ gear knob copes with its functions perfectly. On the VAZ 2110 – 2112 variants there is a gear shift cushion. This element also has another name: “butterfly”.
It is advisable to understand the reasons why the VAZ 2110 gear shift lever needs to be repaired. As a rule, checking this element is necessary if extraneous noise from the gearbox is noticed.
There are several reasons why a rattling sound began to be noted from the gearbox. In particular, these are:
- defective spare parts;
- spring breakage;
- wear of spare parts related to the engine.
When is it necessary to adjust the gearshift lever?
The need to carry out this procedure arises if the first gear does not engage. Such a manifestation as ringing of the scenes may be the result of a defect in the factory production of this spare part. Also, on a VAZ 2110, adjusting the rocker can help if the speed at the gearbox is difficult to engage.
Thus, each of these reasons leads to the appearance of play in the gearshift knob on the VAZ 2110. Taking this into account, this mechanism is subject to mandatory diagnostics. Timely detection of faults will allow the motorist to avoid problems with the gearbox.
Restoring the functionality of the VAZ 2110 gear shift lever
How to remove rattling gear lever on a VAZ 2110? It seems possible to eliminate this manifestation yourself. If the problem lies in the spring, there is no need to disassemble the box or take other complex actions. In some cases, the problem can be eliminated by purchasing a repair kit for the rocker, including bushings, washers, etc.
The main purpose of the bushing is to hold the lever in a certain position. This element experiences heavy loads. Given this, it may burst over time. The result of this is excessively free movement of the lever. The bushing must be replaced.
When installing the spring, it is recommended to wrap the handle with a tourniquet to ensure a tight fit.
To install new plastic or rubber washers from tools, you need a set of keys, files, and a screwdriver. You also need a plastic cover, from which a washer is cut out using scissors.
- Removing the casing from the gearshift lever.
- The nuts and screw are unscrewed.
- The bushing, washer and bolt are removed.
- The washer is cut to fit the sleeve.
- All dismantled elements are installed back.
What manual transmissions are on the Priora?
VAZ cars of the Lada Priora family are equipped with three types of manual transmissions (2170, 2180 and 2181), which differ in the way the gearbox is controlled - rocker (2170 and 2180) and cable (2181).
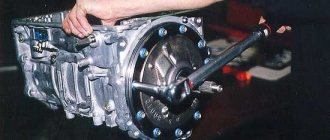
In the first case, the operation of the box is controlled directly through a rigid rod, pivotally connected at one end to the gear selection lever in the cabin, and at the other end to the control rod of the actuator inside the gearbox itself.
In the second case, a pair of flexible cables are used to control pendulum levers located on a separate speed selection and activation device mounted on the top of the box.
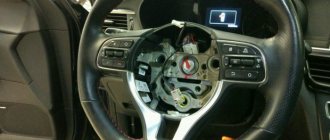
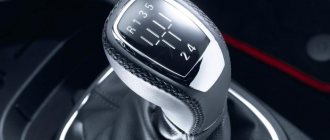
Gear shift knob, or what is the design of the system?
A feature of all manual gearboxes is the need to manually operate the lever. We can assume that it is precisely this that performs the most important function in determining the speed limit of your movement. This means that without it, driving a vehicle becomes simply impossible. The principle of operation of the lever is quite simple: by tilting it in the longitudinal and transverse directions, you set it to a position that corresponds to a certain speed.
The gear shift lever handle is connected to the synchronizer via a fork, the position of which transmits information about the number of the selected speed. The synchronizer sets the gears of the gearbox so that the generated engine power allows the car to move at a given speed. When the position of the lever corresponds to neutral gear, it is held in place by springs. The gear shift pattern is often depicted on the head of the lever.
Features of the device and structure of the transmission mechanism
The fourteenth model is equipped with a five-speed gearbox similar to the unit installed on the G8, with the exception of the main pair.
According to consumer reviews, the lack of quality of the fourteenth gearbox includes the selection of gear ratios: a very short first speed and a long second. This drawback leads to a loss of vehicle dynamics when switching from first to second gear during acceleration.
The gearbox housing, rear cover and clutch housing are the main parts of the gearbox design structure.
Internal device groups:
Main couple
The drive shaft functionality reduces the speed transmitted from the engine to the crankshaft. The transmission coefficient is 3.7. Thus, the main pair of the “fourteenth” is capable of reducing the indicated speed by approximately 4 times. The length of the gears can be changed by controlling the main pair mechanism. What affects acceleration and the maximum possible speed limit of the vehicle.
Differential with gear ratios
The differential gear ratios of the stock VAZ 2114 gearbox include: 3.636 (first speed number); 1.95 (second speed number); 1.357 (third speed number); 0.941 (fourth speed number); 0.784 (fifth speed number) and 3.53 (reverse speed number).
Having an idea of the structural features of the gearbox mechanism, it is necessary to begin preparing tools, materials and tools that will be useful during the removal and disassembly of the box.
How can the gear shift lever be positioned?
The location of the gearbox levers can be either floor-mounted or steering column mounted. And despite the fact that the latter is considered more convenient to use, nevertheless, in most cases, car manufacturers prefer the first option. This is due to some disadvantages of the steering column arrangement, including: low speed and clarity, the likelihood of incomplete gear engagement, the rods wear out much faster, sometimes they can jam, as well as “knocking out” the gear.
But in both cases, the design of the gear shift lever remains the same. The only differences can be in length, and if previously it could reach even 30 cm, today manufacturers strive to make it as small as possible, eliminating too much travel of the gear lever. Therefore, with a floor arrangement, nothing will change significantly in the design, but there will be noticeably fewer breakdowns.
General symptoms
Symptoms are manifested by seven signs, which include:
- When you shift gears, a crunching sound appears;
- the sound of knocking in the box;
- oil leak;
- there is no speed fixation;
- tight lever movement during switching;
- The control room is buzzing;
- noise in the gearbox.
Each of the listed symptoms has its own etymology and an exact picture of its manifestation, which objectively characterizes the root cause of the malfunction.
Crunch in the gearbox
This type of repair requires disassembling the gearbox structure.
The main reasons, a sign of which is a crunching noise during gear shifting:
- faulty gearbox synchronizer (definitely requires replacement of the synchronizer);
- malfunction of the clutch basket (during operation of the vehicle, the “petals” may fly off). The violation is eliminated by replacing the part, and a new clutch disc is also installed;
- Damage to the clutch cable is classified as an indirect cause of gearbox malfunction, but if the cable breaks, the vehicle cannot move;
- factory defect of the gearbox shaft.
Knocking at the checkpoint
The sounds of gearbox tapping are ambiguous due to their multiplicity. Therefore, the picture of the malfunction is accurately established by diagnosing the vehicle.
The box starts knocking if:
- The oil level is not set correctly. An indirect indicator is the amount of oil being poured;
- the distance between the brakes and clutch packs is either too small or, conversely, too large;
- sagging appeared in one of the valves in the box;
- The solenoid has failed.
Oil leakage
If there is an oil leak, the repair task is facilitated by the ability to determine the location of the leak, but most often in practice this is impossible to determine.
Faults that cause oil leakage are the following:
- the seals are worn out;
- the shafts are worn out;
- there was a malfunction in the gearbox input shaft play;
- parts are depressurized: formation of cracks, microholes, etc.;
- The speedometer drive shaft seal is worn out.
Speeds are flying out
This kind of phenomenon occurs during gear shifting. The main reason for the appearance of such a malfunction is wear of the teeth on the gears and coupling. A factor contributing to the development of weakening speed control is a violation of the rules of gear shifting technique, which occurs when the speed limit is not observed. Replacing the gears of the specified parts eliminates the described problem.
The handle is tight
Factors under the influence of which the movement of the handle is difficult are damage to the locking teeth of the lever itself, wear of the jet thrust, and violation of the integrity of the gearbox drive parts.
The box is humming
This sound appears mainly during neutral transmission. The main reason is the low quality of lubricants. Therefore, the first action that must be performed when this type of technical problem occurs is to check and, if necessary, add oil. If the box continues to hum, then it is necessary to perform diagnostics, since the bearing on the input shaft may be worn out.
Noise in the CP
The box begins to make noise when the oil level is insufficient. This situation can be resolved by adding oil. If the noise does not stop, then it is caused by wear of the seals and mechanisms. This can be eliminated by installing new parts to replace worn ones.
Upon completion of the process of identifying the malfunction, its cause and source, as well as the factors influencing the occurrence of malfunction of the gearbox, it is necessary to become familiar with its structure and the structural features of the mechanism.
Shift lever squeak and other problems
From all of the above, it is clear that this part is one of the most important in the entire gearbox, and if it fails, then driving such a vehicle becomes life-threatening. The most common reasons why such an emergency can occur are either mechanical damage or the consequences of incorrect operation. Here are a few breakdowns that you can easily detect on your own.
You should know that the gear shift knob should move freely, without jamming . If difficulties arise in performing this action, most likely the spherical washer or ball joint has failed. They need to be replaced urgently. The creaking of the gear shift lever also indicates a malfunction. If spontaneous shutdown occurs, then you should definitely check the spring; it is quite possible that it simply jumped off.
↑ Disassembly procedure
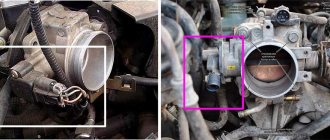
- Loosen the clamp on the gearshift drive rod using 13mm wrenches, and remove the hinge from the rod.
- Then we remove or bend the corner of the boot, and using a 10mm wrench, unscrew the locking bolt on the cardan and knock it off the shaft with gentle blows of a hammer.
This bolt is very reluctant to turn off, since it is mounted on a thread lock to avoid spontaneous unscrewing due to vibration.
At this stage, you can also replace the gear selector shaft oil seal if oil leaks are noticed from under the old one.
How to repair a gear shift lever?
In any case, no matter what happens, repairing the gear shift lever involves replacing failed parts, and without completely removing it it will be impossible to do this. For this purpose, the plastic protective plate is dismantled and the hinge cage is released. After which it is necessary to move the jet rod to the side and remove the entire lever. But in order to free up access to all the plastic bushings and axles, it is necessary to remove the cover for the gear shift lever.
Check how the axle moves. If it is loose, then you need to change all the bushings, and do not forget to lubricate the new spare parts with special lubricant before installing them.
To replace the spring, it must be pulled out, and for this you need to dismantle the retaining ring and the hinge with the lever. If you cannot do without replacing the ball joint, you should carefully push the spherical washer apart with your fingers and remove the worn part. At the same time, when installing a new one, lubricate it.
The thrusts change as follows. There is a clamp at the bottom of the car; you should loosen it. Next you need to disconnect it from the hinges and, by unscrewing the fastening nut, you can freely pull out the rod. Installation of the new one is carried out in the reverse order. Thus, having replaced all damaged elements with new ones, you can drive safely. At the same time, do not forget that periodically it is necessary to adjust the gear shift lever.
Replacing rocker seals
Nothing frustrates a car owner more than traces of oil under the bottom while parked. The cause of this manifestation may be a worn out oil filter or a faulty oil seal.
When installing a new oil seal, you can see and evaluate the condition of the rocker pad, cardan and boot.
Before you begin disassembling all components of the car, you need to find out the reason for the leakage of the oil mixture. If the reason is not the oil filter, you need to make sure that the oil seal is in good condition. To do this, the car is installed on a platform or lift. If the work of replacing and installing a new oil seal is being carried out for the first time, previewing a video on this topic will be very helpful.
- Climb under the car and make a visual assessment of the boot. If oil leaks through the oil seal, the boot will reveal this and there will be traces of oil leaks on it;
- Having bent the boot, you need to get to the cardan. Disconnecting the driveshaft will open the way to the cuff;
- The sequence of removing the cardan is strictly from the lever to the rocker, the reverse order is prohibited;
- After dismantling the cardan shaft, access to the oil seal opens;
- To remove the cuff you will need a hook and spike;
- A seal that has become unusable is replaced with a new one. Garage repair gurus use a plastic bottle cap as an auxiliary tool for this;
- After installing the new oil seal, the unit is reassembled. In this case, the condition of each element is necessarily checked for wear, and if necessary, the part is also replaced.